Advertisement
Quick Links
Aria 7 User Guide
Contents
Your Aria 7 is supplied with the correct power adapter
for your region. Depending on the choices made by
your service provider, your box may also contain the
optional accessories shown below.
The Aria 7 is protected with a clear plastic film. This
should be removed before use.
Optional accessories
HDMI cable
Ethernet cable
9 way mini-DIN to
3 x RCA or 6 x RCA cable
Remote control and batteries
1. Connecting the Aria 7 to a TV
Warning! Before connecting or disconnecting the
Aria 7 to your TV using any kind of cable, first switch
off Aria 7, the TV and all other devices connected to it
(amplifiers etc.) and disconnect them from the mains
electrical supply.
You have a choice of ways to connect the audio and
video produced by the Aria 7 to your TV:
1. HDMI: Recommended for best quality. Connect an
HDMI cable from the HDMI output of the Aria 7 to
the HDMI input of your TV.
2. Analog A/V: Provides good quality. SD only,
composite or component with analogue audio left/
right (depending on supplied A/V lead).
Connecting your television directly to the audio/video
output of your Set Top Box will assure a more vivid
picture and enhance your viewing enjoyment.
Connecting via Wi-Fi
Internal single or dual band Wi-Fi is an optional feature
for the Aria 7. If your Aria 7 has Wi-Fi, please contact
your service provider for detailed instructions about
the wireless network configuration.
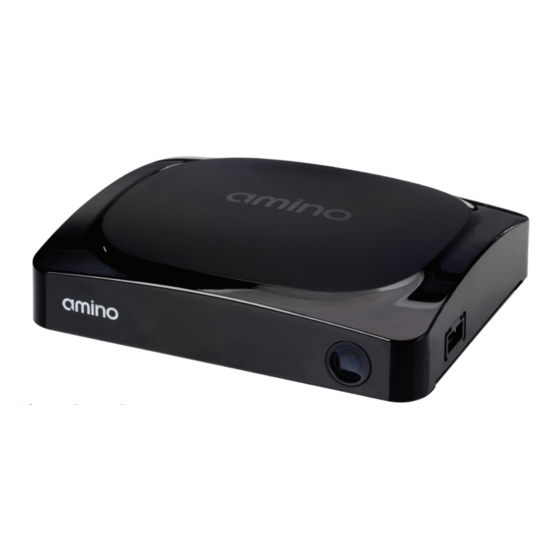
Overview of the Aria 7
Power/Activity LED:
Blue = on.
Blue flashing = infra-red (IR) command received.
Red = standby.
1
2
3
4
1.
USB port.
2. RF antenna or cable
input (optional).
3. S/PDIF optical output.
4. Analogue A/V output.
5. IR extender jack
socket.
6. HDMI output.
2. Connecting the Aria 7 to an A/V receiver
Connect one end of an optical S/PDIF cable to the S/
PDIF optical output of the Aria 7 and connect the other
end to the S/PDIF optical input of your A/V amplifier or
home cinema system.
3. Connecting the Aria 7 to the power
supply
Warning! The Aria 7 must only be used with the power
adapter provided with the product. Ensure the power
adapter supplied is the correct one for your region. If
you are unsure, contact your service provider.
Connect the power adapter to the DC power input of
the Aria 7, then insert the power adapter plug into the
mains supply.
5
6 7
8 9
10
7. Optional smart card
port for users with SIM
format smart cards.
8. Reset button. Only for
use under guidance
from your service
provider.
9. Ethernet port.
10. DC power input
12 V 1 A.
Advertisement

Related Manuals for Amino 7


Summary of Contents for Amino 7
- Page 1 2. Connecting the Aria 7 to an A/V receiver Warning! Before connecting or disconnecting the Aria 7 to your TV using any kind of cable, first switch off Aria 7, the TV and all other devices connected to it Connect one end of an optical S/PDIF cable to the S/ (amplifiers etc.) and disconnect them from the mains...
- Page 2 Product disposal information - EU only Operating temperature: 5 °C to 40 °C (40 °F to 104 °F) Amino products are labelled in accordance with the WEEE Frequency bands and maximum powers: Directive and therefore should not be disposed of with other household or commercial waste.
Need help?
Do you have a question about the 7 and is the answer not in the manual?
Questions and answers