Table of Contents
Advertisement
Quick Links
Advertisement
Table of Contents

Related Manuals for Cirris CR


Summary of Contents for Cirris CR
- Page 1 User Manual...
-
Page 2: Table Of Contents
9.1.2 Smart-Adapters Programming Process ..45 6.3 Cirris Server Software ......15 9.2 Creating a New Program ..... 46 6.4 Database Backup . - Page 3 9.4 Attach Connectors ......49 11. Guided Assembly ......74 11.1 Overview .
- Page 4 This page intentionally left blank. CR User Manual - 2022.2.0...
-
Page 5: Introduction
21). ● CR Getting Started Guide - Provided with a new tester, it includes a subset of the material found in this manual focusing on safety and the essential information needed to set up the tester and install the Easy-Wire software. -
Page 6: Help/Support
Cirris YouTube Channel to find instructive videos. ● In the United States, contact our technical support team by email at techsupport@cirris.com, by telephone at 801 973 4600, ext. 666 (or ask for Tech Support). ● Outside the United States, visit the... -
Page 7: Safety
Alerts users to a risk of personal injury or damage to the equipment. Intended Use CR testers are designed for electrical testing and are intended to be used indoors, in a dry environment, at a tem- perature of 50-104 degrees Fahrenheit (10-40 degrees Celsius). Best performance can be achieved at a relative humidity of less than 70%. -
Page 8: System Components
3. System Components The components supplied with a CR test system depend on its size (the number of test points) and the accessories ordered. The PC controller is typically supplied by the user, but some systems may include a PC with the Easy-Wire software pre-installed. -
Page 9: Optional Accessories
The PC controller on which the Easy-Wire Station Software is installed must meet the following requirements: If using the optional Cirris Server Software to share a network database with multiple Easy-Wire stations, the PC on which the server software is installed must meet the same requirements, except: ●... -
Page 10: Calibration
New CR systems ship with a Certificate of Calibration valid for one year. Cirris recommends that the calibration be verified annually at a minimum thereafter by either, (a) sending the system to the Cirris factory for the service or (b) using a CR Performance Verification Kit and running the verification process described in its included documentation. -
Page 11: Hardware Setup
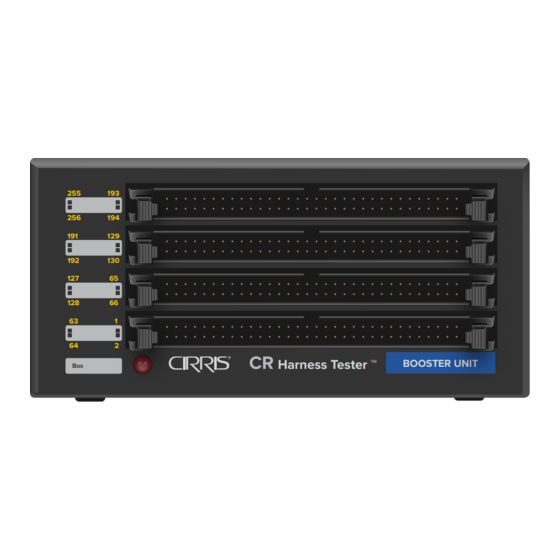
5. Hardware Setup Configurations The most basic CR system includes only a Base Unit with 256 test points. One Base Unit is required per system, regardless its size. The Base Unit can support up to seven (7) Expansion Scanners. Larger systems re- quire Booster Units with each supporting up Harness Tester ™... -
Page 12: Assembling The System
16-pos. Female Connects to Expansion Scanner / Booster Unit 16-pos. Female Connects to Base/ Booster or to Expansion 16-pos. Male Connector on another Expansion Connector Connects to another Expansion/Booster Cable Expansion/Booster Cable or to Terminator CR User Manual - 2022.2.0... - Page 13 6. Place a terminator on the Base Unit Add On Out and /or Booster Out if the either or both is unused - for example if the system consists of only a Base Unit. Terminator Terminator Terminator Side View of 80-23126.wir CR SCANNER BOOSTER Expansion Cables 02/19/2021 Hardware Setup...
- Page 14 Plug the power cord(s) into a surge-protected power strip and plug the poser strip into a ground power outlet. The CR Power supply will accept AC power input from 100-240 volts AC, 50-60 Hz. The power outlet must provide a properly wired, low impedance earth ground. The ground for the test system is integral to the power cord(s).
-
Page 15: Easy-Wire Software
6. Easy-Wire Software The Easy-Wire software controls the CR test system, provides the user interface for testing operations, and includes the test program editor in which test programs are created and revised. The contents of the Connector Registry, test programs and test results are all stored in the Easy-Wire database. The database can be located on the hard drive of the test station PC-controller, the typical configuration for stand-alone stations, or the database can be located on a network drive and shared with other Easy-Wire test stations using the Cirris Server Software. - Page 16 Cirris sales representative to update the license before continuing with the installation. Click OK to close the message window.
-
Page 17: Starting Easy-Wire
Double-click the Easy-Wire shortcut to open the software. Note: If the Easy-Wire shortcut isn’t visible on the desktop, from the Windows task bar, click Start > Cirris Systems Corporation > Easy-Wire. 2. The Select Default Tester and Frequency window is... - Page 18 These tests ensure that the hardware and software are working properly. If the self-test passes, the Main Menu will open with a Ready status indicator. page 94 for troubleshooting tips if a red Error indicator appears instead. CR User Manual - 2022.2.0...
-
Page 19: Cirris Server Software
Database Backup Regardless of whether the test station shares a network database using the Cirris Server Software, or is a stand-alone test station, the database should be backed up regularly. This can be managed externally, but the Easy-Wire software provides the capability for users to automatically back up the database on a defined schedule. -
Page 20: Security
2. Under the Software Settings tab, select Change. 3. Select an alternate language from the list of options and click OK. 4. Click OK on the Setup System Options window to return to the Main Menu. CR User Manual - 2022.2.0... -
Page 21: Software License
The process of activating an Easy-Wire software license includes, (a) creating a license request file, (b) sending the license request file to your Cirris sales representative, and (c) importing the license activation file provided by Cirris in response. The license is associated with the PC on which the software is installed. - Page 22 2. On test stations that share a network database, all the stations and the Cirris Server must be running the same software version. Install the Easy-Wire software on all the networked test stations. If necessary, contact your Cirris salesperson for software upgrade pricing. Stand-alone testers (testers not sharing a network database) can run different Easy-Wire versions, but in this case, it may not be possible to use test programs created under newer versions on stations running older versions.
- Page 23 6. Email the License Request File(s) to your Cirris sales representative. Regardless of the number of test stations included in the request, Cirris will provide a single license file in response that will provides the current license information for the facility.
-
Page 24: Viewing The Software License
After the license has been activated, the Main Menu will display the status as Active License. Click/tap View License or select Software License Manage- ment under the Utilities Menu to open the Cirris Software License Information window and view the current license status. -
Page 25: The Easy-Wire Help
The Easy-Wire Help The Easy-Wire Help provides readily accessible contextual assistance from any Easy-Wire window. In the Easy-Wire software, click the Help button at the bottom of any window to display context-sensitive Help in a browser. 2. In the Help system, to view the contents, click the Table of Contents icon. - Page 26 4. To search the Help, click the Search icon. CR User Manual - 2022.2.0...
- Page 27 This page intentionally left blank. Easy-Wire Software...
-
Page 28: Test Fixtures
7. Test Fixtures The CR tester is connected to the Device-Under-Test (DUT) using test fixtures, sometimes also referred to as test cables, interface cables, or test hardware. The concept is straightforward as the purpose of test fixturing is simply to connect an individual test point to each termination in the DUT. However, the requirements of the application can complicate the execution. -
Page 29: Optional Interface Hardware
Tester mating connectors are available for ribbon cable and for discrete wires. Mating Cables 7.2.2 Ribbon and discrete wire cables that mate with the CR tester are available in various lengths. Versions with the same connector on both ends are often used to connect the tester to fixtures such as Transitions Boards. -
Page 30: Fixture Overview
Fixture Overview Due to the flexible testing capabilities of the CR, the system is used for guided assembly and test on a wide array of products in many different production scenarios. Therefore, there’s also extreme variety in the form of test fixtures used. - Page 31 ● Transition Boards for Fixed Setups - Screw Terminal (ETB-ST) and Spring Terminal (ETB-SLT) Transition Boards are often used for fixed applications, such as harness boards, where they can be permanently mounted. The transition boards can be connected to the tester using 64-conductor ribbon cable and break out to up to 64 discrete wires connected separately to the terminals.
-
Page 32: Test Fixture Assembly
● 4-wire (Kelvin) testing - requires two test points for each position in the mating connector. 4-wire adapters must be wired in a specific order. See page 34 for more information. CR User Manual - 2022.2.0... -
Page 33: Traditional Fixtures
Traditional Fixtures 7.4.1 A schematic for a traditional, standard 2-wire fixture may look something like the example below. The example test cable is wired in test point sequence, which is not required, but as noted above it may simplify the Attach process during programming. - Page 34 Fast Attach can only be used with traditional, 2-wire fixtures and each DUT mating connector of a Fast Attach type must be wired in the same sequence to the CR test points. The pattern doesn’t necessarily have to be sequential, as shown in the example below, and it doesn’t have to be to wired to the same tester mating connector.
- Page 35 Creating a Fast Attach connector: 1. Build a fixture using the desired connector. Fast Attach connectors can only be traditional, 2-wire test cables/ fixtures. Connect the test cable/fixture to the tester. 2. From the Easy-Wire Main Menu > Connector Registry. Find the connector type that matches the one to be configured for Fast Attach or create a new one if necessary.
-
Page 36: Smart-Lights
Smart-Lights® 7.4.2 Cirris Smart-Lights® are compatible with CR and CH2 testers. A Smart-Adapter utilizes a Cirris Smart-Lights device, which is typically mounted on or near the Smart-Adapter’s DUT mating connector. Once registered on a tester’s station or on a network database, the Smart-Adapter is automatically recognized by the tester. This capability provides several key benefits. - Page 37 Mounting the mating connector and Smart-Lights device on an Easy-Wire harness table block allows the mating connector to be easily placed and removed from a grid tile surface, such as the Cirris Grid Tile System or the Panduit Quick-Build grid tiles.
-
Page 38: 4-Wire Fixtures
4-Wire (Kelvin) Fixtures 7.4.3 The 4-wire (Kelvin) measurement method allows the CR system to measure resistances as low as .005 ohm and if the test fixture is properly configured, it can eliminate the resistance of test cables/fixtures from the measurement. - Page 39 4-wire pair. The pattern on Tester Connector (Front View) the CR is a 32-point off- set. In each connector, the 32-Point O set in 4-Wire Pairs (Points 1 & 33 and Points 2 & 34...
-
Page 40: Connector Registry
See the Easy-Wire Help for more information. Smart-Lights are registered using an existing connector type. Double-clicking on a connector or a splice opens the graphic for that item, if one was created. CR User Manual - 2022.2.0... -
Page 41: Creating A New Connector
Creating a New Connector 1. From the Main Menu > Connector Registry. 2. Under the Connectors tab, select Create Connector to start the process and follow the instructions on the screen during each step. 3. Step 1 - Enter a part number for the new connector. The connector type can be used multiple times in a test program and in multiple programs, so use a part number that’s recogniz- able. - Page 42 Limiting the storage size for each image to less than 100KB is recommended. Select Change Image Resolution to reduce the image resolution while previewing the change. CR User Manual - 2022.2.0...
-
Page 43: Registering Smart-Lights
Registering Smart-Lights Before using a smart adapter, it must be registered in the Cirris Easy-Wire database accessed by the tester. If using multiple CR/CH2 testers, consider using a shared network database so that the smart adapters registered on one tester will automatically work on another. If each tester accesses its own, local database, Smart-Lights registered on one database can be exported and imported in other databases. - Page 44 8. In the window that opens probe the positions in the connector as directed. 9. When the probing is complete, the Smart- Lights LED should be illuminated green and the registration will be complete. CR User Manual - 2022.2.0...
-
Page 45: 4-Wire Smart-Adapters
4-Wire Smart-Adapters Smart-Adapters and Traditional Adapters can both be wired for 4-wire testing. However, because the wiring pattern for Smart-Adapters is stored in the Connector Registry, the 4-wire status of connector pins must be established in the Connector Registry. When using Traditional Fixturing, the 4-wire points are designated under the Define Connectors tab in the Test Program Editor (page 47). - Page 46 In the example shown, pins 1 and 2 are wired for 4-wire, pin 3 is wired for 2-wire, and pin 4 is highlighted and waiting to be probed. 9. When finished, the probing window will close and the new Smart-Adapter will be registered. CR User Manual - 2022.2.0...
-
Page 47: Programming
9. Programming Overview New test programs are developed in the Easy-Wire Test Program Editor. The editor consists of six tabs, each signifying a separate section of the test program. The first four tabs designate sections that must be completed - Define Connectors, Attach Connectors, Set Test Defaults, and Define Instructions. -
Page 48: Traditional Fixturing Programming Process
View nets, nets joined by components, and single points in the DUT. Assigning point Labels is not typically required as connector references Labels are assigned under the Define Connectors tab and the names of connector positions (pins) are assigned in the Connector Registry. CR User Manual - 2022.2.0... -
Page 49: Smart-Adapters Programming Process
Smart-Adapters Programming Process 9.1.2 The Connector Registry includes both Traditional connectors and Connector Registry Smart-Adapters. The Smart-Lights associated with Smart-Adapters must be registered in the Connector Registry before they’re available for use. Connect Connect the Smart-Adapters before starting the program creation Smart-Adapters process. -
Page 50: Creating A New Program
Note that Use Smart Adapters is checked. It’s not necessary, and has no effect on the program, but the order of the program’s connectors can be changed by dragging connectors up or down in the list. CR User Manual - 2022.2.0... -
Page 51: Traditional Fixturing
Traditional Fixturing 9.3.2 If using Traditional Fixturing, the programming process starts by adding connectors from the Connector Registry to the test program under the Define Connectors Tab. 1. Connectors in the Registry can be organized by categories. To view/ search connectors by category, select the desired category from the drop-down list. - Page 52 Pin Attributes window. Check Four Wire Pin then click OK to return to the edit window. The 4-Wire column will be added and the specified pin will be marked Yes for 4-wire. Repeat the process as needed. CR User Manual - 2022.2.0...
-
Page 53: Attach Connectors
Attach Connectors The Attach process maps positions in the product’s connectors to specified test points. This step is necessary for the tester to display messages using terminology that matches the product nomenclature. Smart-Adapters 9.4.1 If Smart-Adapters are used, Easy-Wire will scan the attached fixtures and automatically complete the Define Connectors and the Attach Connectors Tabs. - Page 54 Done to close the window. Note: See the Easy-Wire Help for assistance with Auxiliary (Aux) LEDs which can be used to guide operators to locations other than connectors, such as parts bins, cable tie locations, etc. CR User Manual - 2022.2.0...
-
Page 55: Set Test Defaults
Set Test Defaults The Set Test Defaults Tab includes a variety of test program options separated into four sections - Test Parameters, Test Process, Test Window, and Report Options. Options in the Set Defaults Tab can be selected before or after the Define Instructions Tab has been completed and as always, changes can be made at any time by opening the program in the Test Program Editor. -
Page 56: Start Condition
Assembly is Attached option to speed throughput. However, for tests of complex assemblies, like those often tested on the CR, the Start Button is Pressed or Barcode is Scanned is normally used. Tests can also be started using a digital I/O input or Windows messaging. - Page 57 ● Single Test Repeat performs a complete Single Test, including hipot if programmed, the number of times specified in the Select test criteria portion of the dialog box. ● Continuous Test behaves like a Sequential Build Test in that assembly instructions and graphics are displayed until all test instructions have been completed.
-
Page 58: Test Window
The tester displays a #37 error number if it can provide a which-end estimate for opens errors and a #38 error number for short errors. CR User Manual - 2022.2.0... -
Page 59: Report Options
Report Options 9.5.5 Also see our Editing Test Reports YouTube video. Under the Configure Report / Auto Print menu: ● Test Reports provide the results for a unit test and can be programmed to automatically print or to export as a .pdf or .csv file. The trigger for print- ing/exporting occurs when the DUT is disconnected from the tester or the test session is ended. -
Page 60: Define Instructions
When using Smart-Adapters, Tabs 1 and 2, Define Connectors and Attach Connectors, are completed automatically. The default process then guides the user directly to the Learn process, but if preferred, the Learn an Attached Device window can be closed and one of the other methods used. CR User Manual - 2022.2.0... -
Page 61: Learning Instructions
Learning Instructions 9.6.1 Learning a sample product can be the fastest way to creating test instructions. The resulting instructions should always be checked against the product documentation to ensure the learned instructions accurately represent the product design. 1. Select Learn Attached Wiring Pattern on the Define Instructions tab to open the Learn an Attached Device window. -
Page 62: Importing Instructions
There are a several alternate methods that can be used to import data. ● The Cirris Format Conversion utility is installed with the Easy-Wire software. It allows the user to import a table of data into an instruction list by specifying the column location for each required field and to substitute default test parameters if the associated variable is missing. -
Page 63: Adding Instructions
Adding Instructions 9.6.3 Instructions can be entered and edited using the tools provided in the user interface: To add a new instruction, first select the instruction type from the drop-down list. See the Easy-Wire Help for complete descriptions of the instruction types. 2. -
Page 64: Editing Instructions
Swap Instruction Pin Order. This can be helpful when using the tester’s guided assembly capability with one of the Build Test Methods. ● The order of existing instructions can be revised by selecting Reorder Instruction List. CR User Manual - 2022.2.0... -
Page 65: View Nets
View Nets Under the View Nets Tab, the user can view Nets compiled by the software based on the instructions entered in the Define Instructions tab. Points are grouped into three categories - Nets, Nets Joined by Components, and Single Points. -
Page 66: Label Points
Labels will not be lost). To verify that the labels are being applied, view the instructions under the Define Instructions Tab. The new Point Labels should be used instead of the original designations in the instructions list when Use Labels is checked. CR User Manual - 2022.2.0... -
Page 67: Test Program Editor Options
Test Program Editor Options Several universal options are accessible by selecting buttons at the bottom of the Test Program Editor window. Text View 9.9.1 The Text View removes the graphical interface to reveal the underlying program code. The program can be edited in the Text View but the interface does not include a syntax check. -
Page 68: Program Reports
● The Net List ● Summary of Test Results for the program The Assembly Wiring Report includes a list of connections. Drilling down by double-clicking on any line of the Connector Wiring Section opens the Connector Wiring Detail. CR User Manual - 2022.2.0... -
Page 69: Probe Points
Probe Points 9.9.3 Selecting the Probe Points button opens the Probed Point List which displays the test points that are being contacted by the probe. Save the Test Program 9.10 To save the new test program Click Save in the Test Program Editor. -
Page 70: Testing
Select Category drop-down list. All test programs will be displayed when the All category is selected. To create new categories, from the Main Menu > Utilities > Category Maintenance and see the Help for assistance. CR User Manual - 2022.2.0... -
Page 71: Testing With Traditional Test Fixtures
Testing with Traditional Test Fixtures 10.1.1 If Traditional Test Fixtures are being used, they must be attached to the tester in specific positions matching the set- up for which the test program was created. The name or part number of the fixtures and their respective positions must be documented to allow this requirement to be met. -
Page 72: Test Window
● Start Button is Pressed is the most common start condition used on the CR. It produces a Ready to Test header and an active Start button. Attach the product then click Start to begin the test. -
Page 73: Test Process
Test Process 10.2.2 There are a few key points that help make the testing process easier to understand. ● The Easy-Wire software gives the test programmer a variety of Test Method options (see page 52). These methods control the testing process and present the user with slightly different ways of interacting with the tester. -
Page 74: Test Results
This is displayed as Wire missing error with the intended From and To points. Short indicates that an unintended connection exists between two or more nets and/or single points. CR User Manual - 2022.2.0... - Page 75 Miswire is a combination of an open error and a short error and indicates that an intended connection is missing and an unintended connection exists instead. In the error message, the intended connection is displayed with the miswire shown on the line below. High Resistance indicates that the resistance of an intended connection measures greater than the pass/fail threshold of the WIRE test, but less than...
-
Page 76: Probe
If the Test Report or Test Label was programmed to print or export automatically, it will do so when the DUT is removed from the tester. All test results data will be saved to the Easy-Wire database at the same time. CR User Manual - 2022.2.0... - Page 77 The In-Process Report can be printed until the DUT is disconnected by clicking the Reports button in the Test Window and selecting In Process Report on the menu that opens. Selecting another report will prompt the user to save the In Process report before access is granted.
-
Page 78: Guided Assembly
One of the unique and powerful features of the Easy-Wire software is its guided assembly capability. When used with the CR tester, the process provides both testing and zero-defect assembly into one affordable package. Portions of the material covered in this section have been mentioned previously, but here the focus is on how these key topics interact with the test-while-building process. -
Page 79: Build Test Methods
For example, wires can be different colors, be different lengths, or have unique labels. In such applications, the CR Install Pin instruction can be used to assist assemblers by providing directions and verifying the proper placement of each wire with capacitance measurements. -
Page 80: First-End Programming
D. As noted in the instruction window, ensure the wire is not installed in the connector and select Try It to prompt the tester to perform a capacitance measurement to establish a tare value for the test fixture and product connector. CR User Manual - 2022.2.0... - Page 81 3. The tester reports the Tare Measurement. Install the wire and press Try It again. 4. Enter a value about half the measured value. (The software rounds entries up to the full pF values.) During the assembly process the tester will validate proper placement if the measured capacitance is greater than the value entered.
-
Page 82: First-End Assembly Process
● The status of the active instruction is displayed - #110 Wire Missing J5-M in the example shown. ● The connector graphic highlights the position associated with the instruction in green. Pins as- sociated with completed instructions are shown in blue. CR User Manual - 2022.2.0... - Page 83 In the Random Build Test Method, the Test Window will prompt the assembler to enter a Wire Label to advance to the corresponding instruction. Selecting Continue advances to the next instruction. In a Sequential Build the skipped instruction is moved to the end of the instruction list.
- Page 84 Selecting Abort terminates the test in a failure and displays the errors. Completing all the instructions successfully produces a Pass (Good) result. CR User Manual - 2022.2.0...
-
Page 85: Second-End Pinning
Second-End Pinning 11.4 Second-end pinning is build-while-testing, guided assembly that results in a completely assembled and electrically tested product. Although the description includes the term “second-end” the product can include any number of connectors and terminations. It can be performed in combination with first-end pinning or it can be performed separately after first-end connectors have been wired. - Page 86 As an option, grid tile harness boards and associated fixtures can be used for setting up product-specific routing guides and termination points. Grid tile boards allow for regular tear down and set up. See the Cirris Web Site for more information on harness board fixturing using grid tiles. CR User Manual - 2022.2.0...
-
Page 87: Programming
Programming 11.4.2 Programming a Guided Assembly test follows the same process described earlier in this manual. However, a few key items, reiterated and expanded here, can help optimize the build and test process. Probe or Wrist Strap When performing guided assembly using a Random Build Test Method, the assembler determines the order of the instructions by touching a wire’s conductor using a probe,... - Page 88 Order pane and move them to the New Instruction Order list by selecting Move to New List. Continue until all the instructions have been moved. Instructions can also be moved under the Define Instructions tab using drag-and- drop. CR User Manual - 2022.2.0...
- Page 89 Swapping the Pin Order It’s helpful for operators to be presented with a consistent instruction format. For that reason it’s beneficial for the FROM point to be the first pinned end of an instruction and the TO point to be the second end. Electrically, it makes no difference to the tester, it only affects the guided assembly presentation.
- Page 90 4. Rate controls the speed of the speech. 5. Volume controls the volume of the speech. 6. To try the settings, type a phrase in the text box and click Test. 7. Select OK to accept the settings. CR User Manual - 2022.2.0...
-
Page 91: Build / Test Process
Build / Test Process 11.4.3 The fixturing and product connectors should be connected to the tester as described under the Testing Section, page 66. The Sequential Build Test Methods and the Random Build Test Methods have slightly different processes as shown in the following flowcharts. - Page 92 Test to Pass Assembler Options Complete Abort Continue Instruction Assembler Informed & Good Good Last Given Opportunity to Instructions Instruction Correct Error Complete Testing... Assembler Options Rework Continue Abort Instruction Shorts Fail Test Good Pass CR User Manual - 2022.2.0...
- Page 93 The test is started by selecting the Start Button. When performing a test that uses a Build Test Method, the test advances to the first incomplete instruction. If all the instructions are already accurately completed, the tester will perform a full test and report a Pass condition.
- Page 94 Abort is selected. Abort In Sequential Build or Random Build, Abort will end the test in a Failed condition. CR User Manual - 2022.2.0...
- Page 95 Active Instruction Performed Incorrectly If an instruction is performed incorrectly: ● The Test Window header turns red. ● The tester emits a “Bad” tone. ● If the error is a miswire, the most com- mon error condition, the TO pin associ- ated with the error is highlighted in red.
- Page 96 Abort is select- Abort with Active Error Pressing Abort while testing with incomplete instructions, or with error condition, will end the test in a failed state. CR User Manual - 2022.2.0...
- Page 97 If/when all the instructions are completed successfully, the tester will perform a complete shorts test. If the shorts test passes, the test will end in a Pass (Good) condition. Guided Assembly...
-
Page 98: Maintenance & Troubleshooting
2. Verify that the USB cable is connected between the PC and the Base Unit. 3. Restart the Easy-Wire software. If the problem persists, note the contents of the error message and contact Cirris for support. CR User Manual - 2022.2.0... -
Page 99: Checking The Sound
Checking the Sound 12.2 The Easy-Wire software provides sound prompts to provide feedback to the operator. If the sound isn’t working, try the following. In the Main Menu, click Test Sound. If two trumpet sounds are heard the sound is working. If not, continue with the steps below. - Page 100 4. Open the Computer tab and click Change Volume. 5. Adjust the volume slider and click Test to try the revised setting. 6. When the volume is at the desired level, click Done. The Setup System Options window will be open. Click OK. CR User Manual - 2022.2.0...
- Page 101 ● Verify that the volume on your PC is turned up (the PC volume control can be found on your Windows task bar). ● Verify that sound can be heard when using other applications. If the sound problem persists, contact Cirris for assistance. Maintenance & Troubleshooting...
-
Page 102: Routine Maintenance
If the tester requires service, as directed by Cirris support personnel, it may be necessary to send a malfunctioning unit back to Cirris for repair. If needed during the repair period, a loaner tester can often be provided for an additional charge. - Page 103 This page intentionally left blank. Maintenance & Troubleshooting...
-
Page 104: Glossary
With a mating connector wired back to the tester, the Install Pin instruction can be used on the CR tester to confirm that a wire is placed in the specified connector position. - Page 105 Smart-Adapters: Smart-Adapters use Smart-Lights to store the fixture identification (ID). The ID is associated with configuration information stored in the Connector Registry. The ID is scanned by a CR or CH2 tester when opening the editor or a test session and the characteristics of the connector and its wiring pattern are applied automatically in...
- Page 106 When performing high voltage Dielectric Withstand (DW) and Insulation Resistance (IR) testing, very little current flow is excepted between isolated nets/points. WIRE Test: See Continuity Test above. CR User Manual - 2022.2.0...
-
Page 107: Appendix - Testing Basics
Either method is acceptable. In Cirris programming the Source point is the FROM point and the Ground point is TO point. -
Page 108: Low Voltage Isolation Testing
To ensure that no shorts exist, all nets must be tested against all others. Cirris testers apply the current source to one point in each net while it floats others in the net (connects them neither to the current source or ground) and holds all other points in the DUT at ground. -
Page 109: High Voltage Testing
In both cases the measurement is made between nets that are expected to be electrically isolated. Like low voltage isolation testing, each net must be tested against all others. Cirris testers use one of two possible high voltage test processes depending on the program setting - the typical, conventional process or a high speed process. - Page 110 CR User Manual Version 2022.2.0 © 2022 Cirris, Inc. 401 North 5600 West Salt Lake City, Utah 84116 USA. www.cirris.com...
Need help?
Do you have a question about the CR and is the answer not in the manual?
Questions and answers