Hach DR300 Service Manual
Hide thumbs
Also See for DR300:
- User manual (196 pages) ,
- User manual (196 pages) ,
- User manual (192 pages)
Table of Contents
Advertisement
Advertisement
Table of Contents

Subscribe to Our Youtube Channel
Related Manuals for Hach DR300


Summary of Contents for Hach DR300
- Page 1 DOC222.53.90639 DR300 Service Manual 02/2019, Edition 2...
-
Page 3: Table Of Contents
Table of Contents Section 1 Specifications ........................3 Section 2 General information ......................5 2.1 Safety information........................5 2.1.1 Use of hazard information....................5 2.1.2 Precautionary labels......................5 2.1.3 Certification......................... 5 2.2 Product overview.......................... 6 2.3 Product components........................6 2.4 Keypad description........................7 2.5 Display description........................ - Page 4 Table of Contents...
-
Page 5: Section 1 Specifications
Data storage Last 50 measurements ® ® Bluetooth Bluetooth is on when the optional Hach Communication Dongle is installed. Certifications Warranty 1 year (EU: 2 years) ® The Bluetooth word mark and logos are registered trademarks owned by the Bluetooth SIG, Inc. and any... - Page 6 Specifications...
-
Page 7: Section 2 General Information
Section 2 General information In no event will the manufacturer be liable for direct, indirect, special, incidental or consequential damages resulting from any defect or omission in this manual. The manufacturer reserves the right to make changes in this manual and the products it describes at any time, without notice or obligation. -
Page 8: Product Overview
General information Supporting test records reside with the manufacturer. This Class B digital apparatus meets all requirements of the Canadian Interference- Causing Equipment Regulations. Cet appareil numérique de classe B répond à toutes les exigences de la réglementation canadienne sur les équipements provoquant des interférences. FCC Part 15, Class "B"... -
Page 9: Keypad Description
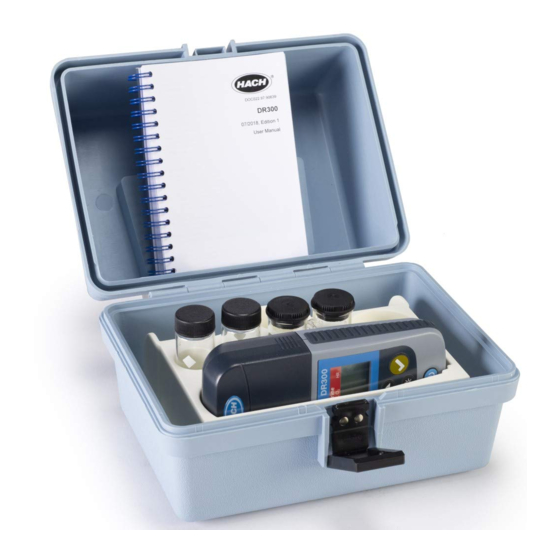
1 DR300 5 Storage case 2 AAA alkaline batteries 6 Reagents 3 Sample cells, 25 mm (10 mL), glass 7 Hach Communication Dongle (optional, supplied separately) 4 Sample cells, 1 cm (10 mL), plastic 2.4 Keypad description Figure 2 shows the keypad and gives the key functions. -
Page 10: Display Description
6 Parameter and measurement ranges 3 Measurement ranges or parameters 7 Calibration adjusted icon: The factory default calibration was adjusted or a user-entered calibration curve was ® ® 4 Bluetooth icon: Bluetooth is on entered. Shows when the Hach Communication Dongle is installed. -
Page 11: Section 3 Startup
Only remove the plastic insert to install the Hach Communication Dongle. Refer to the installation instructions supplied with the dongle. - Page 12 Startup D A N G E R Chemical exposure hazard. Obey laboratory safety procedures and wear all of the personal protective equipment appropriate to the chemicals that are handled. Refer to the current safety data sheets (MSDS/SDS) for safety protocols. C A U T I O N Chemical exposure hazard.
-
Page 13: Download A Test Procedure
Figure 6 Install the instrument cap over the cell holder 3.3.1 Download a test procedure 1. Go to http://www.hach.com. 2. Enter "DR300" in the Search box. 3. Select the applicable instrument from the list. 4. Click the Downloads tab. 5. Scroll down to "Methods/Procedures". -
Page 14: Install The Bluetooth Dongle
3 seconds to go back to measurement mode. ® 3.5 Install the Bluetooth Dongle To install the Hach Communication Dongle do the illustrated steps that follows. After ® correct installation the display shows the Bluetooth icon. Refer to Figure 3... - Page 15 Startup...
- Page 16 Startup...
-
Page 17: Section 4 Inspection
This inspection task is also available as a service video on HSO. HSO full access requires login credentials. First log into HSO and afterwards click on https://support.hach.com/app/answers/answer_view/a_id/1024331. Select the desired service video. Note: Following hyperlink without being logged will end in a permission denied information screen. -
Page 18: Replace The Batteries
The software tool VAP235 is a .NET client program for factory or service inspection of a DR300 instrument. The software uses the RS232 serial port to communicate with an instrument. The software will guide the user step by step through the inspection process. - Page 19 C:\ProgramData\VAP235\Files (hidden folder). This directory also contains templates for labels and certificates. The newest NominalValue.csv file is stored https://danaher.sharepoint.com/:f:/r/sites/hch/team/rd/Shared%20Documents/Released %20Software/Service%20Tools/DR300?csf=1. Note: Update NominalValues.csv when you received a new or recalibrated test kit. Firmware After Installation DR300_BLx.xx_CRCxxxx.bin and DR300_UIx.xx_CRCxxxx.bin have been installed in the application directory in the folder Update (for example: C:\Program Files (x86)\VAP235\Update).
- Page 20 Inspection Figure 7 General settings Preparation for inspection 1. Install the service cable VAA10036.99.G00 in the DR300. Refer to Insert the service cable on page 19. 2. Connect the VAA10036.99.G00 to an USB port. 3. Select the correct com port in the drop-down menu near by the Connect button. Refer Figure 8.
-
Page 21: Insert The Service Cable
This task is also available as a service video on HSO. HSO full access requires login credentials. First log into HSO and afterwards click on https://support.hach.com/app/answers/answer_view/a_id/1024331. Select the desired service video. Note: Following hyperlink without being logged will end in a permission denied information screen. - Page 22 Inspection • VAP235: Service tool software Step Description Picture Open the battery cover. Remove the batteries. Remove the plastic insert for dongle or the Hach Communication Dongle.
-
Page 23: Do An Inspection With The Test Filter Set, Service Cable, Pc And Vap235 Software
4.5.3 Do an inspection with the test filter set, service cable, PC and VAP235 software Items to collect: • PC and Software VAP235 • Service cable VAA10036.99.G00 • Test filter set service DR300 VAA10038.99.V00 • Printer (if a printout of the Certificate of Service Inspection is necessary) - Page 24 Picture First install the software VAP235. Refer to Install VAP235 software on page 16. Install the service cable VAA10036.99.G00 in the DR300. Refer to Insert the service cable on page 19. Connect the service cable VAA10036.99.G00 to an USB port.
- Page 25 Inspection Step Description Picture Push Start inspection. The application version and boot version are automatically checked. If VAP235 is configured to perform the update automatically (Enable updates, refer to Install VAP235) the update starts. Follow the commands. Install the instrument cap over the cell holder and press ZERO button.
- Page 26 Inspection Step Description Picture Check if all segments are displayed and press SELECT button.
- Page 27 Inspection Step Description Picture Check if backlight is on and press BACKLIGHT button. For the following commands use the test filter set service DR300 VAA10038.99.V00. The used set No.# is shown.
- Page 28 Inspection Step Description Picture Insert set No.# vial 1 and press READ button. Note: Make sure to install the filter in the correct orientation. Note: The filter is light-tight. Therefore, it is not necessary to install the instrument cap. The measured value of vial 1 (in absorbance) is shown. Insert set No.# vial 2 and press READ button.
- Page 29 Inspection Step Description Picture The measured value of vial 2 (in absorbance) is shown. Insert set No.# vial 3 and press READ button. Note: The filter is light-tight. Therefore, it is not necessary to install the instrument cap. The measured value of vial 3 (in absorbance) is shown. Insert set No.# vial 8 and press READ button.
-
Page 30: Do A Service Inspection With The Test Filter Set And Service Mode
Certificate of Service Inspection (manually) on page 81 Step Description Picture Note the part number and serial number from the DR300 on the Certificate of Service Inspection. Note the set number and expiration date from VAA10038.99.V00 on the Certificate of Service Inspection. - Page 31 • Minimum value • Maximum value Make sure to note the correct wavelength of the DR300 type. Refer to Set the part number on page 43. To start the service mode push and hold , then push at the same time.
- Page 32 Inspection Step Description Picture Push and do a backlight test. • Install the instrument cap on the cell holder. • Push to set the instrument zero. 0.000 is shown.
- Page 33 Inspection Step Description Picture • Insert the NG11 filter into the cell holder. Make sure to install the filter in the correct orientation. • Install the instrument cup. Note: The filter is light-tight. Therefore, it is not necessary to install the instrument cap. •...
- Page 34 Certificate of Service Inspection (manually) on page 81. This inspection task is also available as a service video on HSO. HSO full access requires login credentials. First log into HSO and afterwards click on https://support.hach.com/app/answers/answer_view/a_id/1024331. Select the desired service video.
-
Page 35: Update The Software
Inspection Note: Following hyperlink without being logged will end in a permission denied information screen. 4.7 Update the software 1. Install the service cable VAA10036.99.G00 in the DR300. Refer to Insert the service cable on page 19. 2. Start the VAP235 software. - Page 36 Inspection...
-
Page 37: Section 5 Repairs
Section 5 Repairs D A N G E R Electrocution hazard. Remove power from the instrument before this procedure is started. W A R N I N G Chemical exposure hazard. Obey laboratory safety procedures and wear all of the personal protective equipment appropriate to the chemicals that are handled. - Page 38 Repairs Step Description Picture Remove the plastic insert for dongle or the Hach Communication Dongle. To remove the screws (4x), use a TORX T10 torque screw driver. Open the instrument. Top housing including keypad Display Mainboard including optical unit Seal...
-
Page 39: Replace The Optical Unit
Repairs 5.2 Replace the optical unit Items to collect: • Optical cup • Retaining springs (2x) • Lens • Retainer detector • Detector clip • Detector (IC converter light to frequency) • Aperture • Interference filter • Housing for LED •... - Page 40 Repairs • Krytox oil (item no. 16004801) Step Description Picture Open the instrument, refer to Open the instrument on page 35. Remove the optical unit from the mainboard. Insert retainer springs (2x) in the optical cup. Push the springs in the correct position.
- Page 41 Repairs Step Description Picture Insert the lens. Note: Make sure that the larger curvature of the lens points downwards. To mount the detector assembly, slide the retainer (A) in the detector clip (B). Do not lock it yet. Insert the detector (C), the lens points downwards. Snap the retainer on the detector clip.
- Page 42 Repairs Step Description Picture Turn the optical unit and insert an aperture. Insert the interference filter. Note: Make sure that the wavelength is correct. Note: Make sure that the wavelength label is readable. Push the LED head in the housing. Bend the pins 90°. Note the polarity and direction.
- Page 43 Repairs Step Description Picture Snap the LED retainer in the optical unit. Assemble the optical unit with the mainboard. Carefully insert the pins of LED and detector into the plugs and press the optical unit against the mainboard. Make sure that the optical unit overlaps the mainboard for 2 mm.
-
Page 44: Replace The Mainboard
This repair task is also available as a service video on HSO. HSO full access requires login credentials. First log into HSO and afterwards click on https://support.hach.com/app/answers/answer_view/a_id/1024331. Select the desired service video. Note: Following hyperlink without being logged will end in a permission denied information screen. -
Page 45: Set The Part Number
Note: Following hyperlink without being logged will end in a permission denied information screen. 5.3.1 Set the part number Note: It's not allowed to reconfigure an instrument to another parameter! 1. Install the service cable VAA10036.99.G00 in the DR300. Refer to Insert the service cable on page 19. -
Page 46: Set The Serial Number
HDB215 LPG445.99.65000 655 nm HDB237 5.3.2 Set the serial number 1. Install the service cable VAA10036.99.G00 in the DR300. Refer to Insert the service cable on page 19. 2. Start the VAP235. 3. Connect the VAA10036.99.G00 to an USB port. -
Page 47: Replace The Display
Repairs Figure 10 Set serial number 5.4 Replace the display Items to collect: • Display • Display frame • Backlight reflector label • Connector, LCD zebra (2x) • Krytox oil (item no. 16004801) Step Description Picture Open the instrument, refer to Open the instrument on page 35. - Page 48 This repair task is also available as a service video on HSO. HSO full access requires login credentials. First log into HSO and afterwards click on https://support.hach.com/app/answers/answer_view/a_id/1024331. Select the desired service video. Note: Following hyperlink without being logged will end in a permission denied information...
-
Page 49: Replace The Keypad
This repair task is also available as a service video on HSO. HSO full access requires login credentials. First log into HSO and afterwards click on https://support.hach.com/app/answers/answer_view/a_id/1024331. Select the desired service video. Note: Following hyperlink without being logged will end in a permission denied information screen. - Page 50 Repairs • Krytox oil (item no. 16004801) Step Description Picture Open the instrument, refer to Open the instrument on page 35. Install in a new bottom housing new battery contacts. Note: Push down the battery contact springs with blade of a screw driver.
-
Page 51: Replace The Battery Contacts
Repairs Step Description Picture Stick at a new top housing the correct parameter label (self- adhesive). Stick the window (self-adhesive) bubble-free on the housing. Note: Proper bonding is important for IP67 waterproof. To reassemble the instrument, install display, keypad, optical unit and mainboard. - Page 52 Repairs • Krytox oil (item no. 16004801) Step Description Picture Open the instrument, refer to Open the instrument on page 35. Remove the defective battery contacts from the bottom housing. If the battery contact LPZ445.99.00011 is defective, replace the bottom housing. Refer to Replace the housing on page 47.
- Page 53 This repair task is also available as a service video on HSO. HSO full access requires login credentials. First log into HSO and afterwards click on https://support.hach.com/app/answers/answer_view/a_id/1024331. Select the desired service video. Note: Following hyperlink without being logged will end in a permission denied information...
- Page 54 Repairs...
-
Page 55: Section 6 Troubleshooting
Section 6 Troubleshooting Error Description User action recommendations Technical information including troubleshooting action items (only for Service Operator) Note: The following information lists the most likely error causes and actions to be taken. "+" means additional information shall be checked ">"... - Page 56 Troubleshooting Error Description User action recommendations Technical information including troubleshooting action items (only for Service Operator) E-04 The reading is If the reading is less than the + Check/read the service log for possible other error messages. more or less instrument range, make sure that Option A) than the...
- Page 57 Replace the mainboard on page 42 E-13 Parameter load The memory of the instrument is The DR300 chemical parameters could not be loaded (neither failure defective. Contact technical from filesystem nor from backup). The device is not capable to support.
-
Page 58: Get The Instrument Logger
Contact technical support. > Replace the mainboard on page 42 6.1 Get the instrument logger 1. Install the service cable VAA10036.99.G00 in the DR300. Refer to Insert the service cable on page 19. 2. Start the VAP235 software. 3. Connect the service cable VAA10036.99.G00 to an USB port. - Page 59 Error during software update [DR300]SUBKEY_UPDATE_FAILED_MISC = 0U SUBKEY_UPDATE_FAILED_SIGN_ERR =1U SUBKEY_UPDATE_FAILED_CRC_ERROR = 2U SUBKEY_UPDATE_FAILED_CANCELED = 3U [none] Error type error Warning: battery capacity is low [DR300]Warning: battery capacity is < 2% Battery Voltage Battery Capacity [°C] Temperature Hardware ID Volt Module ID Volt standard Status: serial number was changed [Default]No further information for this event.
- Page 60 Measurement error [DR300]Type 1 - Zero Invalid (E-14) 2 - Signal too high (E-21) 3 - Invalid freq quotient (E-22) 4 - LED error (E-2) 5 - LED error slfchk (E-2) 6 - Absorbtion too high (E-15)
- Page 61 Troubleshooting Category Code Value Short description Detailed description error Filesystem error [DR300]FS_HACH_ERR_OPEN = 24 FS_HACH_ERR_WRITE = 25 FS_HACH_ERR_READ = ... FS_HACH_ERR_FILESIZ FS_HACH_ERR_ARG FS_HACH_ERR_MALLOC FS_HACH_ERR_CONTENT FS_HACH_ERR_CRC FS_HACH_ERR_FLASH FS_HACH_ERR_VERIFY [none] error index standard Battery replaced message standard Module detected [DR300]Module type 1=factory...
- Page 62 Battery capacity [none] Hardware version Hardware version voltage [none] Module ID Module ID voltage standard HWC LED adjust [DR300]Maximum LED power for high frequency as message percent. Calibrated during HWC. max PWM threshold error Error: stack overflow [Default]One or more stack overflow events occurred.
-
Page 63: Get The Data Logger
[none] BLE module MAC address (if equipped) error Parameter load error 6.2 Get the data logger 1. Install the service cable VAA10036.99.G00 in the DR300. Refer to Insert the service cable on page 19. 2. Start the VAP235 software. 3. Connect the service cable VAA10036.99.G00 to an USB port. -
Page 64: Set Back The Instrument To Factory Settings
Troubleshooting Figure 13 Get data log Figure 14 Data logger 6.3 Set back the instrument to factory settings 1. Install the service cable VAA10036.99.G00 in the DR300. Refer to Insert the service cable on page 19. 2. Start the VAP235 software. - Page 65 Troubleshooting Figure 15 Set delivery state...
- Page 66 Troubleshooting...
-
Page 67: Section 7 Replacement Parts And Accessories
Section 7 Replacement parts and accessories W A R N I N G Personal injury hazard. Use of non-approved parts may cause personal injury, damage to the instrument or equipment malfunction. The replacement parts in this section are approved by the manufacturer. Note: Product and Article numbers may vary for some selling regions. - Page 68 Replacement parts and accessories Figure 17 Bottom part and battery contacts HVR022 HAG264 BOTTOM VIEW HVR021 10 (2x) OVQ291 XMF883 14 (4x) HZD215 HFK045 LPG445.99.00000 04.06.2018 BPav 019Z18 18.07.2018 Berk Sht. Größe Ers. für Ausgabe Zust./Rev. Änderung / Rev.No. Datum/Date Name Size...
- Page 69 Replacement parts and accessories Replacement parts Position no. Item no. Description Picture LPZ445.99.00010 Housing, top LPZ445.99.00013 Keypad LPZ445.99.00014 Window LPZ445.99.00019 Label, Parameter, Chlorine LR LPZ445.99.00020 Label, Parameter, Chlorine LPZ445.99.00021 Label, Parameter, Chlorine/pH LPZ445.99.00022 Label, Parameter, Chlorine Dioxide LPZ445.99.00023 Label, Parameter, Molybdenum LPZ445.99.00024 Label, Parameter, Mono/Free NH...
- Page 70 Replacement parts and accessories Position no. Item no. Description Picture LPZ445.99.00025 Label, Parameter, Ammonia LPZ445.99.00026 Label, Parameter, Zinc ® LPZ445.99.00027 Label, Parameter, Iron-Ferro Ver LPZ445.99.00028 Label, Parameter, Iron-TPTZ LPZ445.99.00029 Label, Parameter, Phosphate LPZ445.99.00030 Label, Parameter, Ozone LPZ445.99.00031 Label, Parameter, Nitrate LPZ445.99.00032 Label, Parameter, Bromine LPZ445.99.00033...
- Page 71 Replacement parts and accessories Position no. Item no. Description Picture YAB210 Mainboard DR300 ASSY LPZ445.99.00015 Seal/Grip LPZ445.99.00009 Housing, Bottom LPZ445.99.00053 Load disk, foam LPZ445.99.00049 Battery contact, fixed, DUAL AAA...
- Page 72 Replacement parts and accessories Position no. Item no. Description Picture LPZ445.99.00050 Battery contact, spring, DUAL AAA 6, 2x LPZ445.99.00011 Battery Contact, spring, 2x LPZ445.99.00008 Housing, HCD Dongle 14 LPZ445.99.00018 Typelabel - DR300 (HACH LANGE)
- Page 73 Replacement parts and accessories Position no. Item no. Description Picture LPZ445.99.00046 Screw, 4x24 500 PAN SST TORX, 4x LPZ445.99.00007 Battery cover, assembly LPZ445.99.00006 Instrument cap, assembly Optical unit LPZ445.99.00044 Retainer, LED, Densichek, PKT II...
- Page 74 Replacement parts and accessories Position no. Item no. Description Picture LPZ445.99.00045 LED (3,1 mm, white) LPZ445.99.00043 Housing, LED, white, PKT II LPZ445.99.00001 Filter, Interference 500 nm LPZ445.99.00002 Filter, Interference 528 nm...
- Page 75 Replacement parts and accessories Position no. Item no. Description Picture LPZ445.99.00003 Filter, Interference 600 nm LPZ445.99.00004 Filter, Interference 655 nm LPZ445.99.00040 Aperture, 063, Densichek, PKT II LPZ445.99.00051 O-ring for cell compartment, 1.301ID X .070W LPZ445.99.00048 Spring, cell compartment, 2x...
- Page 76 Replacement parts and accessories Position no. Item no. Description Picture LPZ445.99.00005 Cup, optical, Densichek, PKT II LPZ445.99.00041 Biconvex lens PMMA LPZ445.99.00042 Retainer, detector, Densichek LPZ445.99.00047 IC conv light to frequency 235...
- Page 77 Replacement parts and accessories Position no. Item no. Description Picture LPZ445.99.00052 Clip, detector, Pocket Colorimeter Display unit YAB211 Display DR300 LPZ445.99.00012 Frame, display LPZ445.99.00016 Label, backlight reflector LPZ445.99.00017 Connector, LCD, ZEBRA, 2x...
- Page 78 Replacement parts and accessories Accessories Item no. Description Picture LPV446.99.00001 Hach Communication Dongle 5953100 Soft-sided case/holster 4674300 AAA batteries, alkaline...
- Page 79 Sample cell, 25 mm (10 mL), glass 4864302 Sample cell, 1 cm (10 mL), plastic Service tools Item no. Description Picture VAA10038.99.V00 Test filter set Service DR300 VAA10036.99.G00 Service cable VAP235 Software for factory and service inspection Note: Not available to order.
- Page 80 Replacement parts and accessories Item no. Description Picture 2525400 Dielectric grease 16004801 Krytox GPL103 oil, colorless...
-
Page 81: Appendix A Certificate Of Service Inspection
Appendix A Certificate of Service Inspection ISO 9001 Certified DR300 Certificate of Service Inspection Part No. Gerätenummer, n°d'appareil LPG440.99.00002 Serial No. Seriennummer, numéro de série 1234567 General Function Allgemeine Funktion, fonction générale Display Anzeigeelement, écran: Function Keys Funktionstasten, touch de cuves: Photometric Data Photometrische Werte, data photométrique... - Page 82 Certificate of Service Inspection...
-
Page 83: Appendix B Certificate Of Service Inspection (Manually)
We have fixed within our quality management system that our test resources can be traced back by national standards, there where it is possible. Therefore your Hach Lange calibration certificate, supported by this protocol, provides the necessary documentation and audit trail for the control of your measuring and testing equipment. - Page 84 Certificate of Service Inspection (manually)
- Page 86 Tel. +49 (0) 2 11 52 88-320 SWITZERLAND Fax (970) 669-2932 Fax +49 (0) 2 11 52 88-210 Tel. +41 22 594 6400 orders@hach.com info-de@hach.com Fax +41 22 594 6499 www.hach.com www.de.hach.com © Hach Company/Hach Lange GmbH, 2018-2019. All rights reserved. *DOC222.53.90639*...
Need help?
Do you have a question about the DR300 and is the answer not in the manual?
Questions and answers