Table of Contents
Advertisement
Quick Links
Advertisement
Table of Contents

Related Manuals for Biobase BK-DH2000


Summary of Contents for Biobase BK-DH2000
- Page 1 Hybridization System BK-DH2000 User Manual BIOBASE GROUP Version 2019.10...
-
Page 2: Foreword
Foreword Thank you for purchasing our Products: Hybridization Instrument. This Manual for users contains function and operation of the Instrument. In order to use the instrument properly, please read this manual carefully before using the Instrument. Opening Check Please check the Instrument and Appendix with the packing list when you first open the instrument packing case. -
Page 3: Table Of Contents
Content Foreword..............................1 Content..............................2 Safety Warnings and Guidelines......................3 1. Important operation information of the security................. 3 2. Safety............................3 3. The maintenance of Instrument....................4 Chapter 1 Introduction.........................5 1. Introduction..........................5 2. Normal Operation Condition.......................5 3. Parameters and performance....................... 5 Chapter 2 Preparations........................ -
Page 4: Safety Warnings And Guidelines
Safety Warnings and Guidelines 1. Important operation information of the security Before using the instrument, user need have a complete understanding how to operate it safety. Before running the instrument, please read this manual carefully. Forbid anyone to operate the instrument before reading the manual. If operate not in accordance with the tips on the manual ,the heat generated by the instrument at runtime may cause severe burns, and electric shock accident. -
Page 5: The Maintenance Of Instrument
wet or dusty places. In order to avoid temperature overheating ,do not block or cover the holes on the instrument. when several equipment be used at the same time, the more the distance between each instrument shall be not less than 30 cm. Shutting off the power when stop working. -
Page 6: Chapter 1 Introduction
Chapter 1 Introduction 1. Introduction BK-DH2000 can be setting constant temperature, time and etc. Instead of manual operation experiment, the accuracy of experiment is higher and result is more reliable than traditional manual experiment. Hybridization and degeneration can be operated at same time, which reduces experimental procedure and improves efficiency and accuracy of operation. - Page 7 Fuse 250V 3A Ф5×20 Dimension(mm) 440x220x120 Weight(kg)
-
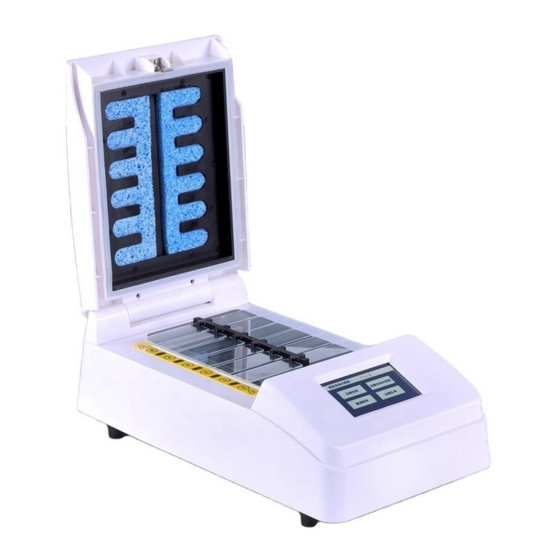
Page 8: Chapter 2 Preparations
Chapter 2 Preparations 1. Structure Description Humidity sponge mounting groove Slide heating plate Touch screen Power connector Fuse Cooling fan Power switch... -
Page 9: Humidity Sponge Installation
2. Humidity sponge installation a) Before each experiment, need to add 30ml of purified water to each sponge. b) Then install sponges into sponge mounting groove. Please make sure the humidity sponges place flat. -
Page 10: Chapter 3 Operation Guide
Chapter 3 Operation Guide 1. Starting up and system load Plug the instrument into a properly grounded outlet, and turn on the power switch on the rear of the instrument. The touch screen shows system self-testing and loading menu. During the process, please be patient, the system will automatically enter the operating menu. -
Page 11: Program List Menu
3. Program list menu A: Return button: Return to the upper menu B: Edit/Load button: Selected program is loaded, run or edit the program C: Delete button: Clear the selected program, and restore to default value. D/E: Select program F: Program list 4. -
Page 12: Parameter Setting Menu
A: Return button: Return to the upper menu. No save the revised parameters. B: Parameters display/edit button: Press this button to edit parameters (temperature and timing value). C: Start --Press this button to start program run. D: Stop--Press this button to Stop running program(This button only valid in the status of programs running) E. -
Page 13: Program Name Edit Menu
6. Program name edit menu In this menu, user can edit the program name. Alphabetic keyboard numeric keyboard A: Return button--Return to the upper menu. No save the revised parameters. B: A/a—Upper/lower case letter switch key. C: numeric keypad--Click it to switch to numeric keypad. D: alphanumeric keyboard--Click it to switch to alphabetic keyboard. -
Page 14: System Configuration Menu
7. System configuration menu A: Return button--Return to the upper menu. B: Menu Language--Switching system menu language (Chinese/English). C: Auto 37℃*-- Enable/Disable preheating function. D: UPFR*--Enable/Disable UPFR(Auto resume to run after power failure). E: Temperature calibration*--Click it to start temperature calibration. F: Button sound—Enable/Disable the button sound. - Page 15 6. Go to System Option menu, click temperature calibration button to start temperature calibration. Calibration warming A: Return button--Exit temperature calibration, all data of this calibration is invalid. B: Temperature calibration point: It is calibrated temperature point (4 default calibration points: 40/60/80/100℃).
-
Page 16: Chapter 4 Considerations
Chapter 4 Considerations During running, do not move the instrument. During use, stay away from an external heat source to ensure the accuracy of temperature control,. After use, turn the power off. After cooling for 30 minutes, erase the legacy of water vapor around the heating platform with a dry clean soft cloth. -
Page 17: Chapter 5 Fault Analysis And Processing
Chapter 5 Fault Analysis and Processing Phenomenon Processing Procedure No response after power-on No connection of power(a) No response after power-on Broken fuse(b) No response after power-on Broken switch(c) The actual and displayed temperatures are quite different Broken sensor(c) No heating/Cooling Broken temp control system(c) Press invalid Touch screen failure(c) - Page 18 BIOBASE GROUP 2# building, No.9 Gangxing Road, High-tech Zone, Jinan City, Shandong Province, China Tel: +86-531-81219803/01 Fax: +86-531-81219804 Inquiry: export@biobase.com Complaints: customer_support@biobase.cc After-sales service: service_sd@biobase.cc; service_ivd@biobase.cc Web: www.biobase.cc/www.meihuatrade.com / www.biobase.com...
Need help?
Do you have a question about the BK-DH2000 and is the answer not in the manual?
Questions and answers