
Subscribe to Our Youtube Channel
Related Manuals for Felton TATE SMARTFLOW


Summary of Contents for Felton TATE SMARTFLOW
- Page 1 INSTALLATION GUIDE TAT E Smartflow® Digital Shower Mixer TATE SMARTFLOW® DIGITAL SHOWER MIXER INSTALLATION GUIDE...
- Page 2 FELTON...
-
Page 3: Table Of Contents
CONTENTS Notice Tools Required Measurements Scope of Application Control Unit Installation Digital Mixer Installation Connecting the Flow Controller Operational Test Troubleshooting Warranty TATE SMARTFLOW® DIGITAL SHOWER MIXER INSTALLATION GUIDE... -
Page 4: Notice
MAINTENANCE Felton products are made of high quality materials and require only minimal maintenance. The following maintenance tips help to preserve the surface and prevent damage through incorrect cleaning. Fittings and control parts should be wiped dry after used. Only use mild cleaning products that contain soap. The following must not be used: Scourers, abrasive sponges, hydrochloric acid, lime, plaster or cement removers,... -
Page 5: Measurements
6. 2x Inlet hoses (supplied) BOX 2 CONTROL UNIT 5. Control Sleeve 6. Control Wheel 1. Control Mounting Tube 2. Screw 3. Control Data Cable 10m 7. Control Housing 8. Foam Seal 4. Cable Tie MEASUREMENTS 55mm 155mm 115mm TATE SMARTFLOW® DIGITAL SHOWER MIXER INSTALLATION GUIDE... -
Page 6: Scope Of Application
Power supply be within 1m from the digital mixer Hot in Cold in Hot in Cold in ONLY APPLIES WHEN TATE SMARTFLOW DIGITAL SHOWER MIXER IS PAIRED WITH A SPOUT: Under Sink (Recommended) Under Basin (Recommended) Cable length Spout Outlet 10m max. Control Unit... -
Page 7: Control Unit Installation
Unit need to be positioned accordingly within this distance. It is recommended that the Data Cable is installed in conduit for ease of maintenance. The Control Tube can be reduced in length if required by cutting along the cutting slot (see Fig. 2). TATE SMARTFLOW® DIGITAL SHOWER MIXER INSTALLATION GUIDE... - Page 8 Data Cable Control Mounting Tube Using the Data Cable, thread the end with the small connector through the hole and Control Mounting Tube. This end of the cable is protected with a plastic sleeve, leave this on until later in the installation. Foam Seal Control Housing CLICK Push the Control Mounting Apply a silicone bead on the Tube into the hole until the back of the Control Housing, front flange sits against the then push the Control Housing wall. into the Plastic Tube until it is firmly fitted on the unit. FELTON...
- Page 9 This tightens the lugs on the inside of the wall. Tighten until there is no rotation of the Control Housing. Pull the red strip to release the connector from the plastic sleeve. Control Wheel Push the four pin connector into the socket on the back of the Control Wheel. Data Cable TATE SMARTFLOW® DIGITAL SHOWER MIXER INSTALLATION GUIDE...
- Page 10 Thread in the cable and fit the Control Wheel onto the Housing. Fit the Control Sleeve onto the Control Wheel. SIDE VIEW Ensure that you fit the Control Sleeve in the correct orientation. FELTON...
-
Page 11: Digital Mixer Installation
DIGITAL MIXER INSTALLATION Remove the cover Inside the Temperature Control Unit Control unit Fixing holes Transformer 12V / wall plug Cover retaining holes Fixing hole Cold Outlet Inlets TATE SMARTFLOW® DIGITAL SHOWER MIXER INSTALLATION GUIDE... - Page 12 99 m m If installed vertically, use orientation Install the Digital Mixer Mark fixing holes shown MOUNTING FOR CONCRETE 56 m m 56 m m 99 m m ø 5 m m 99 m m If installed vertically, use orientation shown Install the Mark fixing holes Drill fixing holes Digital Mixer FELTON...
- Page 13 11. Connect the two Inlet hoses with the MF adaptors and filters to the water supply feed Large retaining bolt Hot inlet Cold inlet A - Connect the brass adaptors into the flexi hoses. B - Fit both flexi hoses (with the brass adaptor on) firmly into the unit box. C - Fit the large retaining bolt with a torx screw driver supplied. TATE SMARTFLOW® DIGITAL SHOWER MIXER INSTALLATION GUIDE...
-
Page 14: Connecting The Flow Controller
Flow control unit B. Push a Flow control unit with outlet fitting back into the Digital Mixer and fit ADVICE: the short retaining bolt with torx screw Push in firmly! driver supplied. Connect the Data Cable coming from the Control Unit. Use the large 6 pin connector and push firmly into the socket. Feed the cable through the one of the guide slots in the front of the Digital Mixer. Data Cable connection FELTON... - Page 15 Connect the power cable coming from the transformer. Use the connector and push firmly into the socket. Feed the cable through the guide slot in the front of the Digital Mixer. Power cable connection TATE SMARTFLOW® DIGITAL SHOWER MIXER INSTALLATION GUIDE...
- Page 16 Digital Mixer with Flow Control Unit installed: Power cable connection IMPORTANT: Fit cables into slots to allow cover to properly close at end of installation IMPORTANT: Electrical supply must be installed by a qualified electrician (if required). Please Note: Leave the torx taped to the box for future use FELTON...
-
Page 17: Operational Test
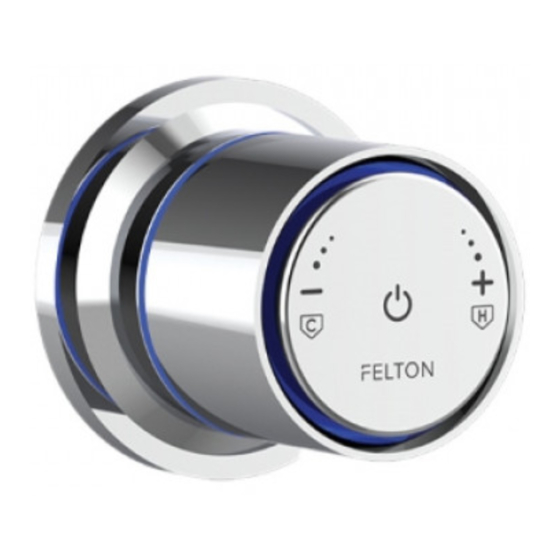
1 Ensure that the Digital Mixer is installed correctly installed according to the instructions above. Turn on the water supply and check the unit and plumbing for leaks. Once the plumbing is confirmed to be water-tight, connect the power supply and conduct the operational test below. Digital Mixer with Flow Control Unit installed OPERATING THE CONTROL SYSTEM 1 Open Close Push the interface once. The interface turns on and the Push the interface again. The interface turns off and the LED illuminates. LED goes off. TATE SMARTFLOW® DIGITAL SHOWER MIXER INSTALLATION GUIDE... -
Page 18: Troubleshooting
The Control Unit does not respond to Carry out function «Diagnostic Test» temperature and flow adjustment* The interface is defective in User Guide The knob is not running smoothly Remove and clean knob If issue persists or is not covered in the above, please contact our Felton Technical Team on 0800 743 358 or sales@felton.co.nz FELTON... -
Page 19: Warranty
WARRANTY 5 year warranty applies to all Felton branded products including the electronic hardware and its components. Where products are promoted as having a “5 year warranty”, Felton Industries Limited guarantees the electronic components of these products (excluding batteries) to be free from defects in materials and workmanship under normal installation, use and service for a period of five (5) years from the date of purchase. Fair wear and tear is expressly excluded. This warranty is effective for five (5) years from the date of purchase and covers electronic replacement parts only (excluding batteries) and 2 years from the date of purchase for plumber’s labour relating solely to repairing or replacing the Hardware, provided the product is installed by a registered plumber. You must retain proof of... - Page 20 . c o . n z | F i n d u s o n S o c i a l M e d i a @feltontapware /feltonltd /FeltonIndustriesLimited @feltonltd /felton-industries-limited 150322EI...
Need help?
Do you have a question about the TATE SMARTFLOW and is the answer not in the manual?
Questions and answers