Advertisement
Quick Links
Fix Kit F
Instructions: Triad
(Version June 2022)
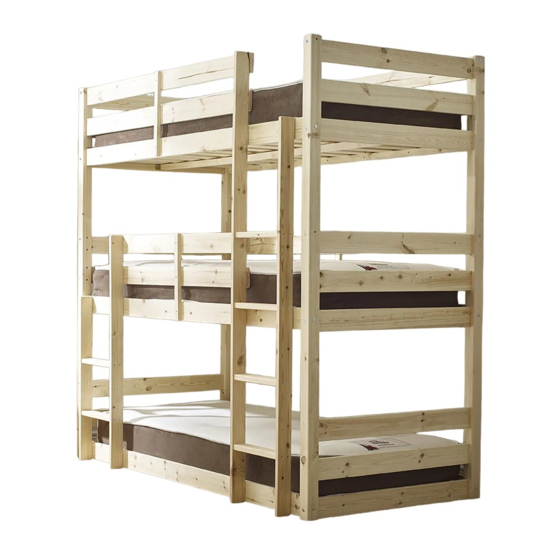
Triad (All Sizes)
Assembly Instructions
Assembly Instructions
IMPORTANT – READ CAREFULLY –
RETAIN FOR FUTURE REFERENCE
Safety First !
The top surface of the mattress must not be above the line ,marked on the frame
(Maximum height: 20cm).
The size of the mattress required is detailed below:
Standard 3ft Single, Standard Length - Mattress size 90cm by 190cm
Small 3ft Single, Standard Length - Mattress size 75cm by 190cm
Standard 2ft 6 Single, Short Length - Mattress size 90cm by 160cm
Small 2ft 6 Single, Short Length - Mattress size 75cm by 160cm
Small 4ft Double, Standard length - Mattress size 120cm by 190cm
Standard 4ft 6 Double, Standard Length - Mattress size 137cm by 190cm
High beds and the upper bed of a bunk bed are not suitable for children under six years due to risk of injury
from falls.
Be aware of the danger of young children (under 6) falling from upper bunk.
Beds should not be used if any structural part is broken or missing.
Bunk beds and high beds can present a serious risk of injury from strangulation if not used correctly. Never
attach or hang items to any part of the bunk bed that are not designed to be used with the bed, for example,
but not limited to ropes, strings, cords, hooks, belts and bags.
Children can become trapped between the bed and the wall, a roof pitch, the ceiling, adjoining pieces of
furniture (eg cupboards) and the like. To avoid risk of serious injury the distance between the top safety
barrier and the adjoining structure shall not exceed 75mm or shall be more than 230mm.
Always ensure that guardrails, ladder and other components are maintained in the proper position and free
from damage, and all the screw fixings tight.
Always use the ladder for entering and leaving the upper bunk.
Do not allow horseplay on or under the bed and prohibit jumping on the bed.
Use a nightlight as an added safety precaution for persons under the upper bunk.
Use guardrails on both sides of the upper bunk.
Every bedroom must have at least one opening window. Ventilation of the room is necessary in order to keep
the humidity low and to prevent mould in and around the bed.
The bed complies with BS EN 747-1: 2012+A1 :2015 safety standards
IMPORTANT:
DO NOT DISPOSE
of
the packaging until you are satisfied
with your purchase.. Please keep all
cardboard until fully satisfied.
Advertisement

Related Manuals for Strictly Beds & Bunks Triad


Summary of Contents for Strictly Beds & Bunks Triad
- Page 1 Fix Kit F Instructions: Triad (Version June 2022) Triad (All Sizes) Assembly Instructions Assembly Instructions IMPORTANT – READ CAREFULLY – RETAIN FOR FUTURE REFERENCE Safety First ! The top surface of the mattress must not be above the line ,marked on the frame (Maximum height: 20cm).
- Page 2 TOP TIPS - TOP TIPS Read before you start assembly Locating the Dowel Rods To keep the bed from rattling all the dowel holes have been slightly mis-drilled by a couple of mm. When you push parts together the dowels will straighten and pull together to ensure a tight fit.
- Page 3 How to identify your parts and fixings All our products have four attachment methods. These are colour coded, at the end of each part you will find a marker pen marking either RED, WHITE BLUE and BLACK RED MARKING/FIXINGS The part will have a red marker pen marking on the end. Top back and front guard rails, top headboard facias.
-
Page 4: Customer Care
CUSTOMER CARE We have checked all parts to ensure they are free of damage. However timber is a natural, living product. Occasionally timber can still be adjusting to humidity, for this reason a crack or stretch mark may appear after the product has been packaged. - Page 5 Part 6-Front Top Long Guard Rail(RED) Part 18- Guard rail Support (11) Part 23-Long Triad Ladder Strut Part 4-Ladder Steps Part 22 - short Triad Ladder Strut Part 13- BLUE Headboard Part 21-Mid PDA Ladder Strut INSTRUCTIONS & FIXING KIT...
- Page 6 Headboards WHITE CHALK MARK White Blue White Blue White Blue First we need to create headboards. The corner posts have a white chalk marking. VERY IMPORTANT - these indicate the top of the post, at the base they will have PNL - (left side) and PNR - (right side).
- Page 7 Now two people are required for this. We are now attaching the back guard rails and side rails. Ensure the white chalk markings are facing inside the bed. From the top of the picture you need to find and attach the following: Top Guard Rail - RED - Part 2 x 1 Bottom Guard Rail - WHITE - Part 3 x 1 Siderail - Universal - Part 1 x 1...
- Page 8 We now again need to attach the front side rails, again using fixings B and C attach as per the above picture. Once fixed you can now tighten all fixings ready for the next phase. Now we build the ladders We now need to build both the ladders, these consist of a short and long ladder strut When installed the ladder rungs need to be tight.
- Page 9 Ladders - Left or Right side of the bed ? Depending on your preference you may want to change which side the ladder are located, this makes a difference on where you attach the ladder hooks. The IMPORTANT RULE is the long ladder strut on both ladders should always be facing the furthest away from each corner post.
- Page 10 Now we need to attach the two bottom front guard rails. First select the bottom front guard rail (part 2N) marked white. Rest the spacer bar (fixing A2) as shown in the picture, This will ensure the correct gap is allowed. Now using the long black fixing Q screw through from the inside of the guard rail into each long ladder strut.
- Page 11 Now we fix the centre Rails The two top bunks have a centre rail. From the inside of the bed we need to attach two metal brackets, two either end. These are fixed using the small screws (L), these are fixed to part 13 (blue) - third insert down from the top.
Need help?
Do you have a question about the Triad and is the answer not in the manual?
Questions and answers