Table of Contents
Advertisement
Quick Links
Advertisement
Table of Contents
Troubleshooting

Related Manuals for BIO-MED DEVICES Crossvent-2i+


Summary of Contents for BIO-MED DEVICES Crossvent-2i+
- Page 1 Crossvent-2i+ INTENSIVE CARE/TRANSPORT VENTILATOR OPERATION & SERVICE MANUAL CATALOG #2204iC Revision: 102621 Bio-Med Devices, Inc. 61 Soundview Road, Guilford, CT 06437 800-224-6633 FAX 203-458-0440 Web Site: www.biomeddevices.com COPYRIGHT 2006 BIO-MED DEVICES INC.
-
Page 2: Table Of Contents
TABLE OF CONTENTS I. PATIENT SAFETY, WARNINGS, AND CAUTIONS ............1 WARNINGS ......................................1 CAUTIONS ......................................4 NOTES ........................................5 SYMBOLS ........................................ 7 II. UNPACKING AND ACCESSORIES ..................9 A- UNPACKING ....................................9 B- ACCESSORIES....................................9 III. SPECIFICATIONS, CONNECTIONS AND USER INTERFACE ........10 A- GENERAL DESCRIPTION................................ - Page 3 ALARM KEY ..............................19 NOTES REGARDING ALARMS ......................... 20 5- KEYS COMMON TO ALL MENUS ..........................21 LOCK ................................21 ALARM QUIET ............................. 21 ARROW KEYS .............................. 21 AUTO SET ..............................21 POWER SOURCE KEY ..........................22 INSPIRATORY SOURCE KEY ........................22 SETUP KEY ..............................
- Page 4 BATTERY ..............................43 PRESSURE TRANSDUCER ......................... 43 FLOW CALIBRATION ..........................43 TOUCHSCREEN (CALIBRATION)......................43 KEYS (Touchscreen Test) ..........................43 DISPLAY (LCD) TEST ..........................43 VALVES ................................ 44 HOURS................................44 FACTORY SERVICED ..........................44 B- PERFORMANCE CHECKS ................................ 45 1- SETUP MENU ..................................45 OXYGEN SENSOR CALIBRATION ......................
- Page 5 H- TECHNICAL TROUBLESHOOTING............................ 63 IX. PARTS LIST AND SCHEMATIC DIAGRAMS ..............65 A- REPLACEMENT PARTS LIST ..............................65 B- SCHEMATICS ....................................66 1- PNEUMATIC SCHEMATICS ............................. 66 3- CIRCUIT SCHEMATICS ..............................69 WARRANTY ..........................80 APPENDIX A ..........................81 ABBREVIATIONS ....................................81 APPENDIX B ..........................
-
Page 6: I. Patient Safety , Warnings, And Cautions
I. PATIENT SAFETY , WARNINGS, AND CAUTIONS The Crossvent-2i+ ventilator is intended for use only by a qualified practitioner, under the direction of a qualified physician. All personnel operating the ventilator must be completely familiar with the warnings and operating procedures in this manual prior to using the Crossvent-2i+ with patients. - Page 7 • All safety measures must be observed when servicing this device. In particular, the ventilator must be turned off and the power supply disconnected. • Bio-Med Devices cannot be held responsible for any failure to adhere to the recommendations set forth in this manual.
- Page 8 P A T I E N T S A F E T Y - C O N T . • Do not re-use disposable breathing circuits. Re-use of disposable (single-use) breathing circuits can result in contamination (patient infection) or circuit degradation (circuit can fall apart, develop holes, or exhibit polymer decay).
-
Page 9: Cautions
• It is recommended that the Crossvent-2i+ never be left with its battery discharged as this will reduce battery life. After discharge of the battery, recharge fully before disconnecting the plug-in power supply. • Only replace the battery pack with Bio-Med Devices part #PRT2268. Do not substitute. The cells are non- standard high capacity •... -
Page 10: Notes
When the alarm is set to off, the sensor may be disconnected while the ventilator is in use without causing an alarm. • For blended gas, the Bio-Med Devices blender should be used. • It is recommended that an external filter/water trap be used at all times in order to provide greater protection to the internal components of the Crossvent-2i+. - Page 11 • With Constant Flow on, inspiratory time is used exclusively. • 20 minutes of operation after low battery alarm assumes a properly maintained battery in good condition. • The battery should be replaced at least every two years. Only use batteries supplied by Bio-Med Devices, part #PRT2268.
-
Page 12: Symbols
P A T I E N T S A F E T Y - C O N T . SYMBOLS Follow Instructions for Use Product should be kept dry MR Unsafe Type BF Equipment Manufacturer Date of Manufacture Country of Origin & Manufacture Direct Current (DC) It is essential that these instructions be read and complied with prior to operating this product. - Page 13 P A T I E N T S A F E T Y - C O N T . Rx Only Caution: Federal law restricts this device to sale by or on the order of a licensed healthcare practitioner Medical Device Unique Device Identifier...
-
Page 14: Ii. Unpacking And Accessories
II. UNPACKING AND ACCESSORIES A- UNPACKING CAUTION: Prior to turning the unit on for the first time, the battery must be charged fully using the included power supply. Examine the shipping carton for signs of damage. Examine the Crossvent-2i+ carton to ascertain whether it has sustained any damage during shipment. -
Page 15: Specifications, Connections And User Interface
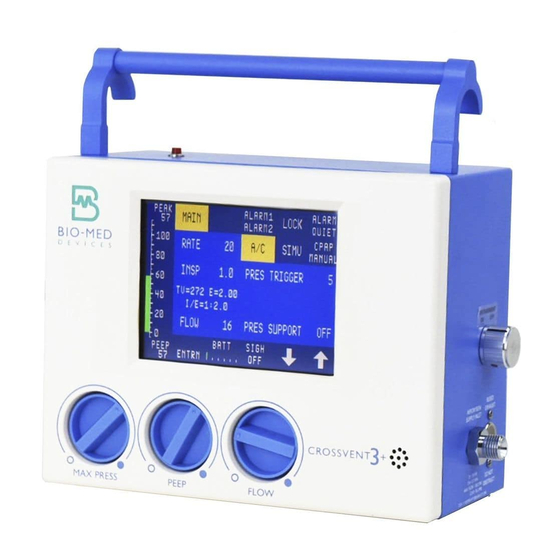
SPECIFICATIONS, CONNECTIONS AND USER INTERFACE A- GENERAL DESCRIPTION The Crossvent-2i+ Intensive Care/Transport Ventilator is an ultra compact, electronically controlled, time cycled, volume or pressure limited ventilator with intensive care capabilities designed specifically to fit into isolettes. It provides a wide range of operating parameters to allow ventilatory support of patients from pediatric to neonate. -
Page 16: B- Specifications
III. S P E C I F I C A T I O N S , C O N N E C T I O N S A N D U S E R I N T E R F A C E - C O N T . -
Page 17: D- Manual Controls And Connections
III. S P E C I F I C A T I O N S , C O N N E C T I O N S A N D U S E R I N T E R F A C E - C O N T . -
Page 18: 2- Rear Of Ventilator
Part D of this section). To charge the battery, only the power supply provided by Bio-Med Devices should be used. With the dot on the supply’s connector aligned with the dot on the panel, plug the external power supply into the Crossvent and into an AC outlet and charge the battery until the battery gauge at the bottom of the display indicates a full charge. -
Page 19: Patient Outlet
CAUTION: The battery should be placed at least every two years. Only use batteries supplied by Bio-Med Devices, part #PRT2268. Do not substitute. CAUTION: Do not allow the temperature of the battery to go above 131° F (55° C) whether the unit is on or off as this may cause damage resulting in a shorter life expectancy of the battery. -
Page 20: Maximum Pressure Relief Valve
III. S P E C I F I C A T I O N S , C O N N E C T I O N S A N D U S E R I N T E R F A C E - C O N T . -
Page 21: E- Display Interface & Menus
Primary Alarms Secondary Alarms NOTE: When first turned on, the unit displays “Bio-Med Devices, Inc.” until the initialization process is complete. If this does not clear, submit the unit for service. Procedure for selecting a function and adjusting its setting: A menu or parameter is selected by simply pressing the corresponding key on the display. -
Page 22: Assist Control (A/C)
III. S P E C I F I C A T I O N S , C O N N E C T I O N S A N D U S E R I N T E R F A C E - C O N T . -
Page 23: Pressure Support
III. S P E C I F I C A T I O N S , C O N N E C T I O N S A N D U S E R I N T E R F A C E - C O N T . -
Page 24: 4- Alarm Menus
III. S P E C I F I C A T I O N S , C O N N E C T I O N S A N D U S E R I N T E R F A C E - C O N T . -
Page 25: Notes Regarding Alarms
III. S P E C I F I C A T I O N S , C O N N E C T I O N S A N D U S E R I N T E R F A C E - C O N T . -
Page 26: 5- Keys Common To All Menus
I N T E R F A C E - C O N T . Only the infant pneumotach, Bio-Med Devices Catalog #4409, can be used. Any other pneumotach will give faulty readings. Under certain circumstances, such as incompliant or large patients, the Peak Expiratory Flow may be too great for the pneumotach to read. -
Page 27: Power Source Key
III. S P E C I F I C A T I O N S , C O N N E C T I O N S A N D U S E R I N T E R F A C E - C O N T . - Page 28 III. S P E C I F I C A T I O N S , C O N N E C T I O N S A N D U S E R I N T E R F A C E - C O N T .
-
Page 29: Iv . Setup And Operating Instructions
IV . SETUP AND OPERATING INSTRUCTIONS A- PATIENT CIRCUIT WARNING: A patient filter should always be used in the patient breathing circuit to prevent cross contamination WARNING: Do not re-use disposable breathing circuits. 1. PATIENT CIRCUIT CONNECTIONS The breathing circuit for the CV2i is BMD catalog #2030. If the isolette does not have an Oxygen Sensor tee built in, then #2030-O may be used which has a tee in the circuit. -
Page 30: B- Operating Instructions
S E T U P A N D O P E R A T I N G I N S T R U C T I O N S - C O N T . B- OPERATING INSTRUCTIONS The following describes the procedure for setting up and operating the Crossvent-2i+ Ventilator. It is assumed that the operator is thoroughly familiar with the Specifications, Theory of Operation, Tests and Calibration procedures as outlined in this manual. -
Page 31: 2- Detailed Operating Instructions
S E T U P A N D O P E R A T I N G I N S T R U C T I O N S - C O N T . 2- DETAILED OPERATING INSTRUCTIONS Turn the ON/OFF switch to the ON position. The unit comes on in the Main menu in the same mode it was in when last turned off. -
Page 32: 3- Summary Of Operating Instructions
S E T U P A N D O P E R A T I N G I N S T R U C T I O N S - C O N T . NOTE: If it is desired to deactivate the oxygen sensor, select it in the Alarm 2 menu. Scroll the lower limit down to off. -
Page 33: Setup Menu And Troubleshooting
V . SETUP MENU AND TROUBLESHOOTING A- SETUP MENU The SETUP key is only available immediately after powering on the unit and is disabled as soon as any other key except ALARM QUIET or BATTERY is pressed or if no key is pressed within 30 seconds of powering on the unit. This menu allows the user to set preferences and perform test and calibration procedures relative to patient use. -
Page 34: 4- Tv/Insp Preference
16. Set PEEP = 0. 17. With test lung and pneumotach removed, occlude patient circuit. 18. Observe several breaths, then pick the displayed Peak Press that best represents the average (this number may vary). 19. Divide the set TV (20) by the Peak Press (Example: 20 ml/46 cmH2O = 0.43 ml/cmH2O). This number is the compliance factor. -
Page 35: B- Calibration Menu (Cal)
S E T U P M E N U A N D T R O U B L E S H O O T I N G - C O N T . B- CALIBRATION MENU (CAL) This menu is to be used only by someone skilled in the service and repair of the CROSSVENT Ventilator. Refer to the MAINTENANCE &... -
Page 36: C- Operational Troubleshooting
S E T U P M E N U A N D T R O U B L E S H O O T I N G - C O N T . C- OPERATIONAL TROUBLESHOOTING PROBLEM POSSIBLE CAUSE CORRECTIVE ACTION Fails to respond to touch 1. - Page 37 S E T U P M E N U A N D T R O U B L E S H O O T I N G - C O N T . PROBLEM POSSIBLE CAUSE CORRECTIVE ACTION Battery fails to charge properly 1.
-
Page 38: Vi. Cleaning, Sterilization And Packing
The complete patient circuit supplied with the Crossvent-2i+ is disposable and intended for single use. 4- Re-usable Circuit- The optional Bio-Med Devices re-usable patient circuit may be gas or chemically sterilized as follows: • Pasteurization at 150° to 170°F (65.6° to 76.6°C) for a minimum of 30 minutes. -
Page 39: B- Packing For Shipment
Fill the carton on all sides with packing material to prevent the unit from shifting during transit. Close the carton with tape, noting serial number on the outside of the carton. Ship to: BIO-MED DEVICES, INC. 61 Soundview Road Guilford, CT 06437 USA... - Page 40 MAINTENANCE AND SERVICE SECTION...
-
Page 41: Vii. Theory Of Operations
The Crossvent-2i+ is a time cycled, volume or pressure limited ventilator. Its basic principle of operation is extremely simple. Supply gas, either air, oxygen, or a blended mixture, is connected to the Crossvent-2i+ inlet fitting. NOTE: For blended gas, the Bio-Med Devices blender should be used. For pneumatic schematics, refer to the Schematic section of this manual. -
Page 42: A- System Components
VII. T H E O R Y O P E R A T I O N - C O N T . A- SYSTEM COMPONENTS S U P P L Y I N L E T F I L T E R The supply gas passes through an inlet filter. -
Page 43: B- Assist Control Mode
VII. T H E O R Y O P E R A T I O N - C O N T . B- ASSIST CONTROL MODE In this mode the Crossvent-2i+ will function either as an assist or controller. If the patient is inspiring, the ventilator will sense flow past the pneumotach with Flow Trigger being used and this will initiate an assisted inspiration. -
Page 44: C- Simv (Synchronized Intermittent Mandatory Ventilation) Mode
VII. T H E O R Y O P E R A T I O N - C O N T . C- SIMV (Synchronized Intermittent Mandatory Ventilation) MODE In the SIMV mode, the Crossvent-2i+ delivers two main types of breaths: ASSISTED and SPONTANEOUS. Both are initiated by the patient’s inspiratory effort, which is sensed by the ventilator. -
Page 45: D- Cpap (Continuous Positive Airway Pressure)
VII. T H E O R Y O P E R A T I O N - C O N T . D- CPAP (Continuous Positive Airway Pressure) In the CPAP mode, the breaths are delivered in exactly the same manner as a spontaneous breath in the SIMV mode. Each breath is triggered by the patient’s inspiratory effort. -
Page 46: E- Backup Modality
VII. T H E O R Y O P E R A T I O N - C O N T . E- BACKUP MODALITY When in SIMV mode, the SIMV Rate is also the backup rate. When in CPAP mode, the backup rate is set with the Backup Rate key. -
Page 47: Maintenance And Service
MAINTENANCE AND SERVICE WARNINGS: TECHNICAL REPAIRS SHOULD BE PERFORMED BY QUALIFIED PERSONNEL, TRAINED EITHER BY BIO-MED DEVICES, INC OR THEIR AUTHORIZED TRAINERS. BIO-MED DEVICES, INC. IS NOT RESPONSIBLE FOR UNAUTHORIZED REPAIRS, OR REPAIRS MADE BY UNAUTHORIZED PROCEDURES. THE CV-2i+ SHOULD PASS A FULL TECHNICAL PERFORMANCE CHECK AFTER ANY REPAIR PROCEDURE THAT REQUIRES THE CASE TO BE OPENED. -
Page 48: 2- Calibration Menu Overview
VIII. M A I N T E N A N C E A N D S E R V I C E - C O N T . 2- CALIBRATION MENU OVERVIEW WARNING: Improper changes made in the Calibration menu can be detrimental to the performance of the ventilator. -
Page 49: Valves
VIII. M A I N T E N A N C E A N D S E R V I C E - C O N T . V A L V E S May be used to activate the internal solenoid valves independently for calibration and troubleshooting purposes. The key adjacent to the designated valve indicates its current state. -
Page 50: B- Performance Checks
VIII. M A I N T E N A N C E A N D S E R V I C E - C O N T . B- PERFORMANCE CHECKS WARNING: If the CROSSVENT fails any of the following performance checks, remove the unit from patient service and submit for maintenance. -
Page 51: Flush
VIII. M A I N T E N A N C E A N D S E R V I C E - C O N T . F L U S H (Valve D1, D3- if equipped with Exhaled Tidal Volume monitoring) Using a length of tubing, connect the blue pneumotach fitting on the back of the unit to a low flow test standard and turn on the Crossvent. -
Page 52: External Power Failure Alarm
E X T E R N A L P O W E R F A I L U R E A L A R M Connect the Bio-Med Devices Crossvent Power Supply to the power input on the rear of the Crossvent. (This connector is keyed, align dot to dot.). -
Page 53: Alarm Menus
VIII. M A I N T E N A N C E A N D S E R V I C E - C O N T . NOTE: If TV is not displayed under the RATE key, then go into SETUP, press TV/INSP and select Tidal Volume as the preferred parameter. -
Page 54: C- Recommended Tools And Test Equipment
VIII. M A I N T E N A N C E A N D S E R V I C E - C O N T . C- RECOMMENDED TOOLS AND TEST EQUIPMENT 1 - S P E C I A L T O O L S A N D T E S T E Q U I P M E N T Items available from BMD Part Number Description... -
Page 55: D- Preventative Maintenance
Battery replacement* Recommend return to factory for this service *Replace only with batteries supplied by Bio-Med Devices, part # PRT2268. Do not substitute. G A S I N L E T F I L T E R The filter element in the supply inlet fitting (DISS O Input) should be replaced during major overhauls or whenever it becomes clogged. -
Page 56: E-Software Upgrades
On occasion, software upgrades may be released with further enhancements to the Crossvent. These are available through Bio-Med Devices or your dealer. It is a rather simple task to install new software into the Crossvent, but this should be done by qualified personnel as the rear panel of the ventilator must be removed to access the RS232 jack used to download the software. -
Page 57: F- Pneumatic Calibration
VIII. M A I N T E N A N C E A N D S E R V I C E - C O N T . F- PNEUMATIC CALIBRATION 131-PEEP 130-PIP 130-DARV 132-PROXIMAL FLUSH 132-DISTAL FLUSH 153-BASE FLOW BLEED MANIFOLD 36-FILTER CIRCUITS DEPICTED ARE... - Page 58 VIII. M A I N T E N A N C E A N D S E R V I C E - C O N T . The steps in these procedures are divided into two parts. The first part is “TO TEST”. This describes the procedure used to test each specific component of the unit to determine its condition.
- Page 59 VIII. M A I N T E N A N C E A N D S E R V I C E - C O N T . Remove hemostats. 5. FLOW VALVE/POTENTIOMETER ZERO - [ 500 ML/M WARNING: Any time the flow valve(s) are disturbed, the flow calibration in the CAL menu must be performed as explained in Step 14.
- Page 60 VIII. M A I N T E N A N C E A N D S E R V I C E - C O N T . orange tube from the Main Regulator with a tee on the end of it. Remove the orange plug on either side of this tee and connect the pressure gauge here.) Connect the Patient Connector on the back of the CV-2i+ to a high flow test instrument using a single length of tubing.
- Page 61 VIII. M A I N T E N A N C E A N D S E R V I C E - C O N T . Using a length of tubing, connect the blue fitting on the back of the Crossvent to a low flow test standard and turn on the Crossvent.
- Page 62 VIII. M A I N T E N A N C E A N D S E R V I C E - C O N T . Connect the patient circuit to an external test instrument capable of measuring flow. After turning ON the CV-2i+, press the SETUP Button, then CAL MENU and then VALVES.
-
Page 63: G- Disassembly & Reassembly Instructions
2. BATTERY REMOVAL & REPLACEMENT CAUTION: Only replace the battery pack with Bio-Med Devices part #PRT2268. Do not substitute. NOTE: After installing a new battery, it must be discharged, the battery gauge must be reset in the calibration menu and the battery then fully charged and discharged as outlined in this procedure. -
Page 64: Front Bezel
10. Leave the unit like this until the battery is expended and the unit shuts down. 11. Set the ON/OFF switch to OFF if it is ON. Plug the Bio-Med Devices external power supply into the back of the unit. This plug and jack are keyed so the red dot on the plug and jack must be aligned in order for them to engage. -
Page 65: Complete Pneumatics As An Assembly
VIII. M A I N T E N A N C E A N D S E R V I C E - C O N T . From the rear of the unit, unplug the tubes from the transducers. Unplug the cable from the solenoid board to the PCB. -
Page 66: Solenoids
VIII. M A I N T E N A N C E A N D S E R V I C E - C O N T . From the front, rotate the gear on the Flow Valve until the setscrews can be accessed. There will be two setscrews per hole, one on top of the other, for a total of four. -
Page 67: 10. Gas Input Filter
VIII. M A I N T E N A N C E A N D S E R V I C E - C O N T . Unscrew the two screws holding the solenoid to be replaced to the manifold and remove the solenoid. Making sure the gasket is properly fitted around the new solenoid’s ports, secure it to the manifold with the screws. -
Page 68: H- Technical Troubleshooting
VIII. M A I N T E N A N C E A N D S E R V I C E - C O N T . H- TECHNICAL TROUBLESHOOTING NOTE: A performance test should always be completed before proceeding with repairs. CAUTION: Always follow proper static grounding procedures when removing or replacing electronic parts, LCD assembly, etc. - Page 69 Check all circuit connections Pneumotach reading greatly Bad transducer (TD-PNEUMO) Replace transducer and/or check inaccurate associated circuitry Microprocessor failure Return to factory Unit hangs with Bio-Med Devices on the display Devices controlling the alarm beeper Return to factory have failed. Continuous Audible Tone...
-
Page 70: Ix. Parts List And Schematic Diagrams
IX. PARTS LIST AND SCHEMATIC DIAGRAMS A- REPLACEMENT PARTS LIST NOTE: SERIAL NUMBER OF VENTILATOR MUST ACCOMPANY ALL PARTS ORDERS ITEM PART # DESCRIPTION PRT2233 KIT, PREVENTIVE MAINTENANCE (CV2i+ WITH SINGLE SUPPLY INLET) PRT2268 ASSY, BATTERY 7.2V 6 C-CELL NiMH (Do not substitute) PRT3316 ASSY, LCD DISPLAY WITH TOUCHSCREEN PRT4410... -
Page 71: B- Schematics
P A R T S L I S T A N D S C H E M A T I C D I A G R A M S - C O N T . B- SCHEMATICS 1- PNEUMATIC SCHEMATICS SINGLE REGULATOR... - Page 72 P A R T S L I S T A N D S C H E M A T I C D I A G R A M S - C O N T . DUAL REGULATOR...
- Page 73 P A R T S L I S T A N D S C H E M A T I C D I A G R A M S - C O N T . ALARM LED JACK JLED MAIN PC BOARD BATTERY JCON JCON...
-
Page 74: 3- Circuit Schematics
P A R T S L I S T A N D S C H E M A T I C D I A G R A M S - C O N T . 3- CIRCUIT SCHEMATICS... - Page 75 P A R T S L I S T A N D S C H E M A T I C D I A G R A M S - C O N T .
- Page 76 P A R T S L I S T A N D S C H E M A T I C D I A G R A M S - C O N T .
- Page 77 P A R T S L I S T A N D S C H E M A T I C D I A G R A M S - C O N T .
- Page 78 P A R T S L I S T A N D S C H E M A T I C D I A G R A M S - C O N T .
- Page 79 P A R T S L I S T A N D S C H E M A T I C D I A G R A M S - C O N T .
- Page 80 P A R T S L I S T A N D S C H E M A T I C D I A G R A M S - C O N T .
- Page 81 P A R T S L I S T A N D S C H E M A T I C D I A G R A M S - C O N T .
- Page 82 P A R T S L I S T A N D S C H E M A T I C D I A G R A M S - C O N T .
- Page 83 P A R T S L I S T A N D S C H E M A T I C D I A G R A M S - C O N T .
- Page 84 P A R T S L I S T A N D S C H E M A T I C D I A G R A M S - C O N T .
-
Page 85: Warranty
BIO-MED DEVICES, INC. will pay any shipping charges required in repairing or replacing any part or all of this Ventilator within three (3) months from the date of purchase. Thereafter, shipping charges will be paid by the PURCHASER. -
Page 86: Abbreviations
APPENDIX A ABBREVIATIONS Breaths Per Minute Breaths Per Hour Liters Per Minute Milliseconds Milliliters Degrees Centigrade Degrees Fahrenheit Centimeters of Water Pressure ml/cmH Milliliters Per Centimeter Water Liters Volts of Alternating Current Volts of Direct Current Hertz (Cycles Per Second) Light Emitting Diode Liquid Crystal Display Pounds Per Square Inch... -
Page 87: Default Settings
APPENDIX B DEFAULT SETTINGS These are the settings that will be made by the software if all power to memory is lost or if a complete test routine is performed. Mode: Assist Control Rate: 12 bpm Tidal Volume: 100ml Flow Trigger: 3 SIMV rate: 4 bpm Pressure support: off Alarm limits:... -
Page 88: Summary Of Disabled Functions
APPENDIX C SUMMARY OF DISABLED FUNCTIONS DISABLING MENU MESSAGE PARAMETER DISABLED FUNCTION DISABLED IN FLOW TRIGGER MAIN CONSTANT FLOW PRESSURE SUPPORT DISABL BY CF* MODE RATE ALARM DISABL BY CF* ALARM 1 EXHTV/EXHMV DISABL BY CF* RATE DISABL CF CPAP* NONE- REMOVED FROM EXP. -
Page 89: Audible Alarm Codes
CHARGERS AND INVERTERS This explains some of the requirements for connecting a Bio-Med Devices Crossvent ventilator to a charger or AC adapter. It is important that the correct charger be used and if a Crossvent is to be used in a vehicle with an AC generating device (inverter), it must comply with certain requirements. - Page 90 The inverter receptacles must be of the standard three-prong configuration to utilize the hospital-grade cord of the Bio-Med supplied charger. This will keep voltage surges, spurious noise and leakages to a minimum. Any other type of AC/DC power supply or charger, such as open frame devices, medically approved or not, is not recommended by Bio-Med Devices.
-
Page 91: Emc Compatibility
APPENDIX F EMC Compatibility Additional Guidance and manufacture’s declaration – electromagnetic emissions/immunity The Crossvent is compliant with relevant EMC requirements only when used with these cables and transducers: BMD pn ESEN007 internal pressure trandsducer BMD pn ESEN008 internal pressure trandsducer BMD pn ESEN009 internal pressure trandsducer BMD pn ESEN010 internal pressure trandsducer BMD pn 4434 external oxygen cell with intrinsic cable <... - Page 92 Guidance and manufacturer’s declaration – electromagnetic emissions The Crossvent is intended for use in the electromagnetic environment specified below. The customer or the user of the Crossvent should assure that it is used in such an environment. Emissions test Compliance Electromagnetic environment - guidance RF emissions The Crossvent uses RF energy only for its internal function.
- Page 93 IEC 61000-4-8 Note: U is the a.c. mains voltage prior to application of the test level. Electromagnetic Immunity The Crossvent is intended for use in the electromagnetic environment specified below. The customer or the user of the Crossvent should assure that it is used in such an environment. Immunity Test Compliance Level Electromagnetic Environment –...
-
Page 94: Training Recommendations
Upon receipt of the Crossvent ventilator, the qualified medical professional should at a minimum read this manual in its entirety and follow their own facility’s training guidelines for new equipment. Bio-Med Devices also recommends the use of the further training resources (including in-service videos) available at www.biomeddevices.com. Training should be... -
Page 95: Device End-Of-Life Disposal
DEVICE END-OF-LIFE DISPOSAL To decommission the Crossvent ventilator, the user may send it back to Bio-Med Devices for proper disposal and recycling of all applicable components. If this is not practical, the user may disassemble the device and recycle components using local recycling resources. -
Page 96: Index
INDEX Abbreviations, 78 Gas Supply, 4, 12 AC Power, 9, 10, 12 Alarm Beeper, Alarm Menus, 17 Hours, 41 Alarm Quiet, 5, 20 Alarm Rest Switch, 11 Alarms, 2, 11 I/E Ratio, 15, 17 Arrow Keys, 20 Inspiratory, 17, 21, 26 Assist Control, 15, 35 Assisted Breath (ASIST), 21 Auto Set, 2, 20, 24... - Page 97 Spontaneous Breaths, 16 Quick Setup, 25 Temperature, 10 Theory of Operation, 33 Rate, 19 Tidal Volume, 17, 26 Relief Valve, 13 Touch Screen, 30 RS-232, 48 Touchscreen Calibration, 40 Troubleshooting, 28, 60 TV. See Tidal Volume Setup, 21 Setup Menu, 26, 39 SIMV, 16, 17, 36 Valves, 41 SIMV Rate, 17, 36...
Need help?
Do you have a question about the Crossvent-2i+ and is the answer not in the manual?
Questions and answers