Table of Contents
Advertisement
Quick Links
Advertisement
Table of Contents
Troubleshooting

Related Manuals for BIO-MED DEVICES CROSSVENT-3+


Summary of Contents for BIO-MED DEVICES CROSSVENT-3+
- Page 1 CROSSVENT-3+ INTENSIVE CARE/TRANSPORT VENTILATOR OPERATION & SERVICE MANUAL CATALOG #3304C revision: 122606 Bio-Med Devices, Inc. 61 Soundview Road, Guilford, CT 06437 800-224-6633 FAX 203-458-0440 Web Site: www.biomeddevices.com COPYRIGHT 2005 BIO-MED DEVICES INC.
-
Page 2: Table Of Contents
TABLE OF CONTENTS I. PATIENT SAFETY, WARNINGS, CAUTIONS AND NOTES ....1 WARNINGS ......................1 CAUTIONS........................ 4 NOTES........................5 SYMBOLS ......................... 7 II- UNPACKING AND ACCESSORIES ............8 A- UNPACKING ....................... 8 B- ACCESSORIES ....................8 SPECIFICATIONS, CONNECTIONS AND USER INTERFACE ..9 A- GENERAL DESCRIPTION ................. - Page 3 CPAP............................17 MANUAL ..........................17 PRESSURE TRIGGER ......................17 PRESSURE SUPPORT ......................17 RATE ............................18 SIMV RATE ..........................18 BACKUP RATE........................18 TIDAL VOLUME (TV) ......................18 INSP............................18 I, E, I/E KEY ........................... 18 FLOW KEY ..........................18 4- ALARM MENUS ........................
- Page 4 SUPPLY GAS INLET FILTER ....................36 SUPPLY PRESSURE SENSING SWITCH ................36 AIRWAY PRESSURE TRANSDUCER ..................36 DIFFERENTIAL PRESSURE TRANSDUCER ................36 MAXIMUM PRESSURE RELIEF VALVE ................36 DIAPHRAGM ACTUATED RELIEF VALVE (D.A.R.V.) ............36 NEGATIVE PRESSURE RELIEF VALVE ................36 B- ASSIST CONTROL MODE ................
- Page 5 MANUAL ..........................47 C- RECOMMENDED TOOLS AND TEST EQUIPMENT ........48 1- Special Tools and Test Equipment ................... 48 D- PREVENTATIVE MAINTENANCE ..............49 1- RECOMMENDED MAINTENANCE SCHEDULE ..............49 TIMELINE ..........................49 GAS INLET FILTER........................ 49 BATTERY CHECK ........................49 2-PREVENTIVE MAINTENANCE PARTS KITS .................
- Page 6 APPENDIX F ..................... 89 CHARGERS AND INVERTERS ................89 APPENDIX G ..................... 90 EUROPEAN AGENT ....................90 INDEX......................91...
-
Page 7: Patient Safety, Warnings, Cautions And Notes
I. PATIENT SAFETY , WARNINGS, CAUTIONS AND NOTES The CROSSVENT-3+ ventilator is intended for use only by a qualified practitioner, under the direction of a qualified physician. All personnel operating the ventilator must be completely familiar with the warnings and operating procedures in this manual prior to using the CROSSVENT-3+ with patients. As with any life support device, the patients on the CROSSVENT-3+ should be visually monitored by competent personnel at all times since life threatening conditions may arise that may not be detected by the alarms. - Page 8 • All safety measures must be observed when servicing this device. In particular, the ventilator must be turned off and the power supply disconnected. • Bio-Med Devices cannot be held responsible for any failure to adhere to the recommendations set forth in this manual.
- Page 9 O N T . • Because this is a CE marked device, it must never be modified without prior expressed written consent from Bio-Med Devices. • When setting Pressure Trigger, auto-triggering or missed breaths may occur due to various conditions including, but not limited to, compliance, resistance, rate, flow, PEEP, I:E ratio, and circuit characteristics.
-
Page 10: Cautions
After discharge of the battery, recharge fully before disconnecting the plug-in power supply. • Only replace the battery pack with Bio-Med Devices part #PRT4467. Do not substitute. The cells are non-standard high capacity. • When using an AC power source, only the power supply provided with the Crossvent is approved for use with this ventilator. -
Page 11: Notes
When this sensor is off, it may be disconnected while the ventilator is in use, without causing an alarm. • For blended gas, the Bio-Med Devices blender should be used. • It is recommended that an external filter/water trap be used at all times in order to provide greater protection to the internal components of the CROSSVENT. - Page 12 • Prior to disposal of any component, with particular attention to the battery and PCB, check with your local controlling authority for disposal regulations. • When first turned on, the unit displays “Bio-Med Devices, Inc.” until the initialization process is complete. If this does not clear, submit unit for service.
-
Page 13: Symbols
P A T I E N T P A T I E N T S A F E T Y S A F E T Y - - - - C C C C O N T . O N T . P A T I E N T P A T I E N T S A F E T Y... -
Page 14: Ii- Unpacking And Accessories
II- UNPACKING AND ACCESSORIES A A A A - - - - UNPACKING UNPACKING UNPACKING UNPACKING CAUTION: Prior to turning the unit on for the first time, the battery must be charged fully using the included power supply. Examine the CROSSVENT carton to ascertain whether it has sustained any damage during shipment. Inspect the contents of the shipping carton. -
Page 15: Specifications, Connections And User Interface
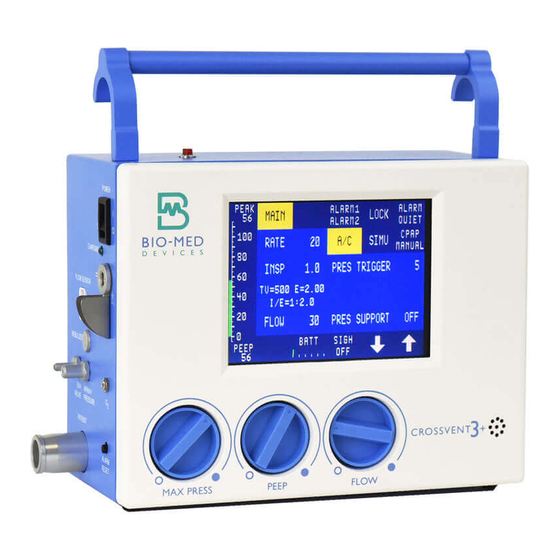
SPECIFICATIONS, CONNECTIONS AND USER INTERFACE A A A A - - - - GENERAL DESCRIPTION GENERAL DESCRIPTION GENERAL DESCRIPTION GENERAL DESCRIPTION The CROSSVENT-3+ Intensive Care/Transport Ventilator is an ultra compact, electronically controlled, time cycled, volume or pressure limited ventilator with intensive care capabilities. It provides a wide range of operating parameters to allow ventilatory support of patients from pediatric through adult. -
Page 16: B- Specifications
III. SPECIFICATIONS, CONNECTIONS & USER INTERFACE cont’d. B B B B - - - - SPECIFICATIONS SPECIFICATIONS SPECIFICATIONS SPECIFICATIONS Rate 5 – 150 bpm Inspiratory Time 0.1 – 3 seconds Tidal Volume 5 – 2500 ml Flow Rate 1 – 120 Inspiratory Time 0.10 –... -
Page 17: C- Manual Controls And Connections
III. SPECIFICATIONS, CONNECTIONS & USER INTERFACE cont’d. C C C C - - - - MANUAL CONTROLS AND CONNECTIONS MANUAL CONTROLS AND CONNECTIONS MANUAL CONTROLS AND CONNECTIONS MANUAL CONTROLS AND CONNECTIONS 1 1 1 1 - - - - FRONT OF VENTILATOR FRONT OF VENTILATOR FRONT OF VENTILATOR FRONT OF VENTILATOR... -
Page 18: 2- Right Side Of Ventilator
III. SPECIFICATIONS, CONNECTIONS & USER INTERFACE cont’d. 2 2 2 2 - - - - RIGHT SIDE OF VENTILATOR RIGHT SIDE OF VENTILATOR RIGHT SIDE OF VENTILATOR RIGHT SIDE OF VENTILATOR FIG. 2- RIGHT SIDE VIEWS CAUTION: Antistatic or electrically conductive hoses or tubing should not be used. G A S S U P P L Y I N L E T G A S S U P P L Y I N L E T G A S S U P P L Y I N L E T... -
Page 19: External Electrical Supply Connector
(refer to Backlight in Part D of this section). To charge the battery, only the power supply provided by Bio-Med Devices should be used. With the red dot on the supply’s connector facing the front of the Crossvent, plug the external power supply into the side of the unit and into an AC outlet. -
Page 20: Flow Sensor (Pneumotach)
CAUTION: The battery should be replaced at least every two years. Only use batteries supplied by Bio-Med Devices, part #PRT4467. Do not substitute. F L O W S E N S O R ( P N E U M O T... -
Page 21: 4- Rear Of Ventilator
The CE mark displayed on this product signifies that this device is in compliance with the European Medical Devices Directive (Council Directive 93/42/EEC). As a prerequisite for the CE mark, Bio-Med Devices operates under an ISO 13485 compliant quality system (covering the design and manufacture of medical devices). -
Page 22: D- Display Interface And Menus
LCD. These include: Main functions, Primary Alarms, Secondary Alarms and a Setup menu. displays “Bio-Med Devices, NOTE: When first turned on, the unit .” until the initialization process is complete. If this does not clear, submit the unit for service. -
Page 23: Assist Control
III. SPECIFICATIONS, CONNECTIONS & USER INTERFACE cont’d. Ventilation modes: A S S I S T C O N T R O L ( A / C ) A S S I S T C O N T R O L ( A / C ) A S S I S T C O N T R O L ( A / C ) A S S I S T C O N T R O L ( A / C ) Provides controlled or assist/control ventilation depending... -
Page 24: Rate
III. SPECIFICATIONS, CONNECTIONS & USER INTERFACE cont’d. R A T E R A T E R A T E R A T E Sets the normal respiration rate. It is adjustable from 5 to 150 bpm, which is changed using the arrow keys. When in SIMV, this changes to SIMV RATE and when in CPAP, to BACKUP RATE. -
Page 25: 4- Alarm Menus
III. SPECIFICATIONS, CONNECTIONS & USER INTERFACE cont’d. 4 4 4 4 - - - - ALARM MENUS ALARM MENUS ALARM MENUS ALARM MENUS A L A R M M E N U K E Y A L A R M M E N U K E Y A L A R M M E N U K E Y A L A R M M E N U K E Y Although there are three Alarm screens, only Alarm 1 and Alarm 2 are accessible by pressing a... -
Page 26: Additional Alarms Outside Of The Alarm Menus
III. SPECIFICATIONS, CONNECTIONS & USER INTERFACE cont’d. A L A R M P A R A M E T E R R A N G A L A R M P A R A M E T E R R A N G E S A N D A L A R M L I M I T S A L A R M P A R A M E T E R R A N G A L A R M P A R A M E T E R R A N G E S A N D A L A R M L I M I T S... -
Page 27: Notes Regarding Alarms
III. SPECIFICATIONS, CONNECTIONS & USER INTERFACE cont’d. N O T E S R E G A R D I N G A L A R N O T E S R E G A R D I N G A L A R M S N O T E S R E G A R D I N G A L A R N O T E S R E G A R D I N G A L A R RATE- The monitored rate is calculated and displayed as a rolling average over 5 breaths. -
Page 28: Arrow Keys
III. SPECIFICATIONS, CONNECTIONS & USER INTERFACE cont’d. ALARM QUIET will automatically be canceled and the audible alarm will return. If Alarm Quiet is pressed with no alarm conditions existing at the time, then any new alarm will be silenced while it is active. A R R O W K E Y S A R R O W K E Y S A R R O W K E Y S... -
Page 29: Setup Key
III. SPECIFICATIONS, CONNECTIONS & USER INTERFACE cont’d. S E T U P K E Y S E T U P K E Y S E T U P K E Y S E T U P K E Y This key is only accessible immediately after powering on the unit. Pressing it will display the SETUP menu which allows the user to make changes to the unit’s setup as well as calibrate the oxygen sensor (see setup procedures in Section V). -
Page 30: Setup And Operating Instructions
Plug the power supply into an A.C. outlet. With the red dot on the connector facing the front of the unit, insert the Bio-Med Devices’ plug-in power supply output connector into the mating connector on the left side of the ventilator. -
Page 31: B- Patient Circuit Connections
SETUP AND OPERATING INSTRUCTIONS- cont. B B B B - - - - PATIENT CIRCUIT CONNECTIONS PATIENT CIRCUIT CONNECTIONS PATIENT CIRCUIT CONNECTIONS PATIENT CIRCUIT CONNECTIONS WARNING: A patient filter should always be used in the patient breathing circuit to prevent cross contamination WARNING: Do not re-use disposable breathing circuits. -
Page 32: C- Operating Instructions
DETAILED OPERATING INSTRUCTIONS DETAILED OPERATING INSTRUCTIONS Turn the ON/OFF switch to the ON position. Following the “Bio-Med Devices” splash screen, the unit comes on in the Main menu in the same mode it was in when last turned off. Press the ALARM QUIET key to increase the temporary audible alarm silence period from 60 sec. to 120 sec. -
Page 33: 3- Summary Of Operating Instructions
SETUP AND OPERATING INSTRUCTIONS- cont. The CROSSVENT-3+ primary function keys and control knobs should be set to the desired initial values, for example: CONTROL METHOD SETTING RATE ARROWS 20 BPM TIDAL VOLUME or ARROWS 700 ml ARROWS 1 sec. INSP, if displayed FLOW KNOB 30 LPM... -
Page 34: Setup Menu And Troubleshooting
V . SETUP MENU AND TROUBLESHOOTING A A A A - - - - SETUP MENU SETUP MENU SETUP MENU SETUP MENU This menu allows the user to set preferences and perform test and calibration procedures relative to patient use. To access this menu, turn the ON/OFF switch to ON and press the SETUP key in the lower right corner of the display. -
Page 35: B- Calibration Menu (Cal)
V. SETTINGS MENU AND TROUBLESHOOTING, cont’d. B B B B - - - - CALIBRATION MENU (CAL) CALIBRATION MENU (CAL) CALIBRATION MENU (CAL) CALIBRATION MENU (CAL) This menu is to be used only by someone skilled in the service and repair of the CROSSVENT Ventilator. Refer to the MAINTENANCE &... -
Page 36: C- Operational Troubleshooting
V. SETTINGS MENU AND TROUBLESHOOTING, cont’d. C C C C - - - - OPERATIONAL TROUBLESHOOTING OPERATIONAL TROUBLESHOOTING OPERATIONAL TROUBLESHOOTING OPERATIONAL TROUBLESHOOTING PROBLEM POSSIBLE CAUSE CORRECTIVE ACTION Fails to respond to touch 1. Keys locked 1. Press LOCK key twice to unlock selection of a key 2. - Page 37 V. SETTINGS MENU AND TROUBLESHOOTING, cont’d. PROBLEM POSSIBLE CAUSE CORRECTIVE ACTION Ventilator does not start 1. Power cable not connected 1. Connect power cable; charge or and battery discharged replace battery 2. Low battery and no power in 2. Change outlet; charge or replace electrical outlet battery 3.
-
Page 38: Cleaning, Sterilization And Packing
4 4 4 4 - - - - REUSABLE CIRCUIT REUSABLE CIRCUIT REUSABLE CIRCUIT REUSABLE CIRCUIT The optional Bio-Med Devices re-usable patient circuit may be gas or chemically sterilized as follows: • Pasteurization at 150° to 170°F (65.6° to 76.6°C) for a minimum of 30 minutes. -
Page 39: B- Packing For Shipment
7. Fill the carton on all sides with packing material to prevent the unit from shifting during transit. 8. Close the carton with tape, noting serial number on the outside of the carton. 9. Ship to: BIO-MED DEVICES, INC. 61 Soundview Road Guilford, CT 06437 USA... - Page 40 MAINTENANCE & SERVICE SECTION...
-
Page 41: Theory Of Operations
Supply gas, either air, oxygen, or a blended mixture, is connected to the CROSSVENT-3+ inlet fitting. NOTE: For blended gas, the Bio-Med Devices blender should be used. WARNING: In rare instances, when using the Crossvent with an air/oxygen blender, there may be a reduction in the delivered flow at the higher flow settings. -
Page 42: A- System Components
VIII THEORY OF OPERATION- cont’d. A A A A - - - - SYSTEM COMPONENTS SYSTEM COMPONENTS SYSTEM COMPONENTS SYSTEM COMPONENTS S U P P L Y G A S I N L E T F I L S U P P L Y G A S I N L E T F I L S U P P L Y G A S I N L E T F I L S U P P L Y G A S I N L E T F I L T E R T E R... -
Page 43: B- Assist Control Mode
VIII THEORY OF OPERATION- cont’d. B B B B - - - - ASSIST CONTROL MODE ASSIST CONTROL MODE ASSIST CONTROL MODE ASSIST CONTROL MODE In this mode the CROSSVENT-3+ will function either as an assist or controller. If the patient is inspiring, the ventilator will sense the negative pressure created by the inspiratory effort and this will initiate an assisted inspiration. -
Page 44: C- Simv (Synchronized Intermittent Mandatory Ventilation) Mode
VIII THEORY OF OPERATION- cont’d. C C C C - - - - SIMV (Synchronized Intermittent Mandatory Ventilation) MODE SIMV (Synchronized Intermittent Mandatory Ventilation) MODE SIMV (Synchronized Intermittent Mandatory Ventilation) MODE SIMV (Synchronized Intermittent Mandatory Ventilation) MODE In the SIMV mode, the CROSSVENT-3+ delivers two main types of breaths: ASSISTED and SPONTANEOUS. -
Page 45: D- Cpap (Continuous Positive Airway Pressure)
VIII THEORY OF OPERATION- cont’d. D D D D - - - - CPAP (Continuous Positive Airway Pressure) CPAP (Continuous Positive Airway Pressure) CPAP (Continuous Positive Airway Pressure) CPAP (Continuous Positive Airway Pressure) In the CPAP mode, the breaths are delivered in exactly the same manner as a spontaneous breath in the SIMV mode. -
Page 46: E- Backup Modality
VIII THEORY OF OPERATION- cont’d. E E E E - - - - BACKUP MODALITY BACKUP MODALITY BACKUP MODALITY BACKUP MODALITY When in SIMV mode, the SIMV Rate is also the backup rate. When in CPAP mode, the backup rate is set with the Backup Rate key. -
Page 47: Maintenance And Service
WARNINGS: Technical repairs should be performed by qualified personnel, trained either by BIO-MED DEVICES, INC or their authorized trainers. Bio-Med Devices, Inc. is not responsible for unauthorized repairs, or repairs made by unauthorized procedures. The CROSSVENT should pass a full technical performance check after any repair procedure that requires the case to be opened. -
Page 48: Battery
IX. MAINTENANCE AND SERVICE- cont. calibration procedures to prevent unauthorized or untrained personnel from gaining access to these procedures as changes made can affect the operation of the ventilator. It is possible to exit the CAL menu and return to normal operation at any time by pressing the MAIN MENU key. When returning to the MAIN menu from the SETUP or CAL menus, the ventilator may not cycle due to invalid settings caused by changes to those settings made during test or calibration procedures. -
Page 49: Valves
IX. MAINTENANCE AND SERVICE- cont. V A L V E S V A L V E S V A L V E S V A L V E S May be used to activate the internal solenoid valves independently for calibration and troubleshooting purposes. -
Page 50: B- Performance Checks
IX. MAINTENANCE AND SERVICE- cont. B B B B - - - - PERFORMANCE CHECKS PERFORMANCE CHECKS PERFORMANCE CHECKS PERFORMANCE CHECKS WARNING: If the CROSSVENT fails any of the following performance checks, remove the unit from patient service and submit for maintenance. 1 1 1 1 - - - - SETUP MENU SETUP MENU SETUP MENU... -
Page 51: Flush
R E A L A R M R E A L A R M Connect the Bio-Med Devices Crossvent Power Supply to the power input on the side of the Crossvent. (This connector is keyed. Red dot to front of unit.). -
Page 52: Power Failure Alarm
IX. MAINTENANCE AND SERVICE- cont. P O W E R F A I L U R E A L A R M P O W E R F A I L U R E A L A R M P O W E R F A I L U R E A L P O W E R F A I L U R E A L A R M A R M... -
Page 53: Pressure Support
IX. MAINTENANCE AND SERVICE- cont. P R E S S U R E S U P P O R T P R E S S U R E S U P P O R T P R E S S U R E S U P P O R T P R E S S U R E S U P P O R T (MAIN MENU) Set PRESSURE SUPPORT to 10 cmH... -
Page 54: C- Recommended Tools And Test Equipment
IX. MAINTENANCE AND SERVICE- cont. C C C C - - - - RECOMMENDED TOOLS AND TEST EQUIPMENT RECOMMENDED TOOLS AND TEST EQUIPMENT RECOMMENDED TOOLS AND TEST EQUIPMENT RECOMMENDED TOOLS AND TEST EQUIPMENT 1 1 1 1 - - - - Special Special Special Special Tools and Test Equipment... -
Page 55: D- Preventative Maintenance
Every 6 years Replace PC Board *Replace only with batteries supplied by Bio-Med Devices, part # PRT4467. Do not substitute. Note: Prior to disposal of any component, with particular attention to the battery and PCB, check with your local controlling authority for disposal regulations. - Page 56 IX. MAINTENANCE AND SERVICE- cont. Included in the kits are the following parts: Filter(s), MAX/DARV Pressure Line, PEEP Pressure Line and Flush Line if it has the flow sensor. Additionally, it is recommended that the Battery be replaced every two years.
-
Page 57: E-Software Upgrades
On occasion, software upgrades may be released with further enhancements to the Crossvent. These are available through Bio-Med Devices or your dealer. It is a rather simple task to install new software into the Crossvent, but this should be done by qualified personnel as the rear panel of the ventilator must be removed to access the RS232 jack used to download the software. -
Page 58: F- Pneumatic Calibration
IX. MAINTENANCE AND SERVICE- cont. F F F F - - - - PNEUMATIC CALIBRATION PNEUMATIC CALIBRATION PNEUMATIC CALIBRATION PNEUMATIC CALIBRATION SOLENOID CONFIGURATION A1 B D1D2D3 PROX. DIST. PEEP RS232 DARV 10/10A FIG. 10- PNEUMATIC CALIBRATION DARV (Diaphragm Actuated Relief Valve) 130. - Page 59 IX. MAINTENANCE AND SERVICE- cont. The steps in these procedures are divided into two parts. The first part is “TO TEST”. This describes the procedure used to test each specific component of the unit to determine its condition. The second part is “TO CALIBRATE”.
- Page 60 IX. MAINTENANCE AND SERVICE- cont. Remove the shaft extender from the valve shaft by loosening the two setscrews. Turn the valve shaft until the specification stated above (4e) is met. Position the shaft extender on the MAX Valve shaft with its stop pin against the left side of the stop. Tighten the setscrews in this position.
- Page 61 IX. MAINTENANCE AND SERVICE- cont. When the preceding steps have been completed, the gear(s) should appear as above. The potentiometer gear should be positioned on the shaft so that its front face is forward of the flow gear(s) by half its thickness. This enables proper engagement throughout the full travel of the flow shaft(s).
- Page 62 IX. MAINTENANCE AND SERVICE- cont. 9. DARV SIGNAL - 65 cmH (perform first - 5, 6) TO TEST: Remove the orange test plug from the cross next to the DARV Variable Resistor (130). Connect this barb to a low pressure test instrument. b.
- Page 63 IX. MAINTENANCE AND SERVICE- cont. Reinstall and test. 13. FLOW (entrainment off) (perform first - 5, 6, 7, 8, 9) NOTE: For greatest accuracy, verify flow using a 60% O2 gas supply making certain that the pressure to the CROSSVENT inlet remains within specified pressure limits (31-75 psi; 303.6 – 517.4 kPa) at all flows. This may require a supply pressure to the blender to be 70 PSI or greater when checking the higher flows.
- Page 64 IX. MAINTENANCE AND SERVICE- cont. Adjust the PEEP Knob until 15 cmH O is observed on the analog gauge. All flow readings should be taken with this backpressure. Readjust as necessary as each flow value is set. At the higher flows, this pressure may go above 15 cmH O and you may not be able to adjust it down.
-
Page 65: G- Disassembly & Reassembly Instructions
2. BATTERY REMOVAL & REPLACEMENT 2. BATTERY REMOVAL & REPLACEMENT CAUTION: Only replace the battery pack with Bio-Med Devices part #PRT4467. Do not substitute. NOTE: After installing a new battery, it must be discharged, the battery gauge must be reset in the calibration menu and the battery then fully charged as outlined in this procedure. -
Page 66: Front Bezel
10. Leave the unit like this until the battery is expended and the unit turns itself off. 11. Plug the Bio-Med Devices external power supply into the side of the unit. This plug and jack are keyed so the red dot on the plug must be facing the front of the unit in order for them to engage. -
Page 67: Complete Pneumatics As An Assembly
IX. MAINTENANCE AND SERVICE- cont. Unplug the O jack. From the front, unplug the potentiometer cable (JPOT), alarm LED cable (JLED) and Entrainment switch cable (JETRAIN), if present. 10. Loosen the inside nut on the power connector on the left side of the case and then remove the external round nut. -
Page 68: Pneumatic Valve Bracket Assembly
IX. MAINTENANCE AND SERVICE- cont. nick the barb (refer to Fig. 16 in Preventive Maintenance Kits later in this section). This is easiest to do after the pneumatics have been completely removed. Tubing from the MAX Pressure valve is routed between the case and the rear panel screw guide on the side of the case. -
Page 69: Flow, Max Pressure & Peep Valves
IX. MAINTENANCE AND SERVICE- cont. 8. FLOW, MAX PRESSURE & PEEP VALVES 8. FLOW, MAX PRESSURE & PEEP VALVES 8. FLOW, MAX PRESSURE & PEEP VALVES 8. FLOW, MAX PRESSURE & PEEP VALVES Remove the rear panel, battery, front bezel and PCB. In lieu of removing the PCB, the Pneumatic Valve Bracket assembly can be removed to access the valves. -
Page 70: Solenoids
IX. MAINTENANCE AND SERVICE- cont. Making sure the valve is properly centered in the bracket slot, place the washer and nut on the valve and secure the valve so it is held in place, but still can be moved back and forth within the slot. -
Page 71: Gas Input Filter
IX. MAINTENANCE AND SERVICE- cont. Remove the rear panel and battery. Turn the knob on the outside of the case to the ON position. Unplug the Entrainment Switch cable (JENTRAIN) from the front of the PCB, remove the two screws retaining the micro-switch and remove it. Mount the new switch so that the plunger is directly under the cam on the shaft of the ON/OFF switch. -
Page 72: H- Technical Troubleshooting Chart
IX. MAINTENANCE AND SERVICE- cont. H H H H - - - - TECHNICAL TROUBLESHOOTING CHART TECHNICAL TROUBLESHOOTING CHART TECHNICAL TROUBLESHOOTING CHART TECHNICAL TROUBLESHOOTING CHART NOTE: A performance test should always be completed before proceeding with repairs. CAUTION: Always follow proper static grounding procedures when removing or replacing electronic parts, LCD assembly, etc. - Page 73 IX. MAINTENANCE AND SERVICE- cont. SYMPTOM POSSIBLE CAUSE CORRECTIVE ACTION Aged sensor. Replace sensor. Bad IC602, L301 (no +5V analog) Replace IC602, L301. Oxygen will not calibrate. Bad cable. Replace cable. Tubing leak. Replace tubing. Pressure will not calibrate. TD-AIRWAY bad. Replace TD-AIRWAY.
-
Page 74: Parts List And Schematic Diagrams
X. PARTS LIST AND SCHEMATIC DIAGRAMS A A A A - - - - REPLACEMENT PARTS LIST REPLACEMENT PARTS LIST REPLACEMENT PARTS LIST REPLACEMENT PARTS LIST NOTE: SERIAL NUMBER OF VENTILATOR MUST ACCOMPANY ALL PARTS ORDERS ITEM PART # DESCRIPTION KIT, PREVENTIVE MAINTENANCE (UNITS WITHOUT FLOW SENSOR PRT3348 AND WITHOUT ENTRAINMENT) -
Page 75: B- Schematics
X. PARTS LIST AND SCHEMATIC DIAGRAMS- cont. B B B B - - - - S S S SCHEMATICS CHEMATICS CHEMATICS CHEMATICS 1 1 1 1 - - - - PNEUMATIC SCHEMATICS PNEUMATIC SCHEMATICS PNEUMATIC SCHEMATICS PNEUMATIC SCHEMATICS... - Page 76 X. PARTS LIST AND SCHEMATIC DIAGRAMS- cont.
-
Page 77: 2- Pcb Block Diagram
X. PARTS LIST AND SCHEMATIC DIAGRAMS- cont. 2 2 2 2 - - - - PCB BLOCK DIAGRAM PCB BLOCK DIAGRAM PCB BLOCK DIAGRAM PCB BLOCK DIAGRAM... -
Page 78: 3- Circuit Schematics
X. PARTS LIST AND SCHEMATIC DIAGRAMS- cont. 3 3 3 3 - - - - CIRCUIT SCHEMATICS CIRCUIT SCHEMATICS CIRCUIT SCHEMATICS CIRCUIT SCHEMATICS... - Page 79 X. PARTS LIST AND SCHEMATIC DIAGRAMS- cont.
- Page 80 X. PARTS LIST AND SCHEMATIC DIAGRAMS- cont.
- Page 81 X. PARTS LIST AND SCHEMATIC DIAGRAMS- cont.
- Page 82 X. PARTS LIST AND SCHEMATIC DIAGRAMS- cont.
- Page 83 X. PARTS LIST AND SCHEMATIC DIAGRAMS- cont.
- Page 84 X. PARTS LIST AND SCHEMATIC DIAGRAMS- cont.
- Page 85 X. PARTS LIST AND SCHEMATIC DIAGRAMS- cont.
- Page 86 X. PARTS LIST AND SCHEMATIC DIAGRAMS- cont.
- Page 87 X. PARTS LIST AND SCHEMATIC DIAGRAMS- cont.
- Page 88 X. PARTS LIST AND SCHEMATIC DIAGRAMS- cont.
-
Page 89: Warranty
BIO-MED DEVICES, INC. will pay any shipping charges required in repairing or replacing any part or all of this ventilator within three (3) months from the date of purchase. Thereafter, shipping charges will be paid by the PURCHASER. -
Page 90: Abbreviations
APPENDIX A ABBREVIATIONS ABBREVIATIONS ABBREVIATIONS ABBREVIATIONS Breaths Per Minute Breaths Per Hour Liters Per Minute Milliseconds Milliliters Degrees Centigrade Degrees Fahrenheit Centimeters of Water Pressure ml/ cmH Milliliters Per Centimeter Water Liters Volts of Alternating Current Volts of Direct Current Hertz (Cycles Per Second) Light Emitting Diode Liquid Crystal Display... -
Page 91: Default Settings
APPENDIX B DEFAULT SETTINGS DEFAULT SETTINGS DEFAULT SETTINGS DEFAULT SETTINGS These are the settings that will be made by the software if all power to memory is lost . Mode: Assist Control Rate: 12 bpm Tidal Volume: 500ml Pressure Trigger: 1 cmH SIMV rate: 4 bpm Sigh: off Pressure support: off... -
Page 92: Summary Of Parameter Ranges / Accuracies
APPENDIX C SUMMARY OF PARAMETER RANGES / ACCURACIES SUMMARY OF PARAMETER RANGES / ACCURACIES SUMMARY OF PARAMETER RANGES / ACCURACIES SUMMARY OF PARAMETER RANGES / ACCURACIES PARAMETER RANGE RESOLUTION OF DISPLAY ACCURACY ___________ __________ _________________________ ________________ Rate 5- 150bpm .1 bpm below 10; 1 bpm above 10 ±10% Tidal Volume 5- 2500ml... -
Page 93: Summary Of Disabled Functions
APPENDIX D SUMMARY OF DISABLED FUNCTIONS SUMMARY OF DISABLED FUNCTIONS SUMMARY OF DISABLED FUNCTIONS SUMMARY OF DISABLED FUNCTIONS DISABLING FUNCTION PARAMETER DISABLED CPAP..........… SIGH... -
Page 94: Audible Alarm Codes
APPENDIX E AUDIBLE ALARM CODES AUDIBLE ALARM CODES AUDIBLE ALARM CODES AUDIBLE ALARM CODES CAUSE AUDIBLE SEQUENCE COMMON ALARM DUE TO VIOLATION OF 1 LONG LIMITS LOSS OF POWER (INCLUDES TURNING OFF) 1 LONG INTERFACE PROCESSOR FAILURE 2 LONG ___ ___ SOLENIOD PROCESSOR FAILURE 3 LONG ___ ___ ___... - Page 95 CHARGERS AND INVERTERS This explains some of the requirements for connecting a Bio-Med Devices Crossvent ventilator to a charger or AC adapter. It is important that the correct charger be used and if a Crossvent is to be used in a vehicle with an AC generating device (inverter), it must comply with certain requirements.
- Page 96 APPENDIX G EUROPEAN AGENT EUROPEAN AGENT EUROPEAN AGENT EUROPEAN AGENT Bio-Med Devices’ Official Agent in Europe is: HORST HÖRNLA H + H Intermed Schwedenstraße 32 87463 Dietmannsried-Reicholzried United Germany Telefon: 08374-240620 Fax: 08374-2406262...
- Page 97 INDEX Abbreviations, 83 Flush, 34 AC Power, 9, 10, 13 Gas Supply, 4, 23 Accessories, 8 Hours, 42 Accuracies, 85 I/E Ratio, 16 Addendums, 12 Inspiratory, 18, 22, 27 Air Entrainment, 12 Inspiratory Effort, 17 Airway Pressure, 14 Intensity, 16 Alarm Beeper, 11 Keys, 16, 41 Alarm Menus, 19...
- Page 98 Tidal Volume, 18, 27 TV. See Tidal Volume Tools, 47 Valves, 42 Touchscreen Calibration, 41 Warnings, 1 Transducer, 35 Warranty, 82 Troubleshooting, Operational, 29 Weight, 10 Troubleshooting, Technical, 65...
Need help?
Do you have a question about the CROSSVENT-3+ and is the answer not in the manual?
Questions and answers