VIA Technologies AMOS-820 User Manual
Fanless ultra-compact quad-core arm system ruggedized for extreme environments
Hide thumbs
Also See for AMOS-820:
- Manual (49 pages) ,
- User manual (40 pages) ,
- Quick start manual (27 pages)

Related Manuals for VIA Technologies AMOS-820


Summary of Contents for VIA Technologies AMOS-820
- Page 1 USER MANUAL AMOS-820 Fanless ultra-compact quad-core ARM system ruggedized for extreme environments 1.08-07132016-170200...
- Page 2 VIA Technologies, Inc. reserves the right the make changes to the products described in this manual at any time without prior notice. Regulatory Compliance...
- Page 3 Battery Recycling and Disposal Only use the appropriate battery specified for this product. Do not re-use, recharge, or reheat an old battery. Do not attempt to force open the battery. Do not discard used batteries with regular trash. Discard used batteries according to local regulations. Safety Precautions Always read the safety instructions carefully.
- Page 4 AMOS- - - - 8 8 8 8 20 AMOS AMOS AMOS 20 20 1 x AMOS-820 system 1 x Phoenix plug to DC-jack (P/N: 99G33-250043) 1 x COM/CAN conversion cable (P/N: 99G33-080527) 1 x COM port cable (P/N: 99G33-080527) 4 x Mounting screws (P/N: 99G44-030381)
-
Page 5: Table Of Contents
Installing the 3G/Wi-Fi Kit ......................14 3.3. Installing the Rubber Feet......................18 3.4. Mounting the AMOS-820 on Wall/Table ................19 4. 4. 4. 4. Software and Technical Supports Software and Technical Supports Software and Technical Supports ........ Software and Technical Supports ........ - Page 6 Figure 25: Installing 3G and Wi-Fi antenna ......................... 16 Figure 26: Connecting antenna cable to the micro-RF connector ................. 16 Figure 27: Reinstalling bottom access cover ......................17 Figure 28: Installing the rubber feet ..........................18 Figure 29: Mounting the AMOS-820 system ....................... 19...
- Page 7 AMOS AMOS- - - - 820 User Manual AMOS AMOS 820 User Manual 820 User Manual 820 User Manual List of Tables Table 1: DC-in jack pinout ..............................7 Table 2: CAN/COM2 port pinout ............................8 Table 3: COM1 port pinout ...............................8 Table 4: USB 2.0 port pinout .............................9 Table 5: Micro USB 2.0 port pinout ..........................9 Table 6: Audio jack receptacle pinout ........................
-
Page 8: Product Overview Product Overview
1.1.3. Stylish and fully sealed design The chassis of the AMOS-820 is composed of four main parts. The stylish ridged aluminum top cover does double duty and acts as the heatsink of the AMOS-820. -
Page 9: Power Over Ethernet (Optional)
820 can be operated using either PoE or external adaptors (12V). 1.1.10. Multiple Mounting Option The AMOS-820 supports multiple methods for mounting the chassis securely. The rugged industrial PC can be mounted to a table, wall, or any flat surface 1.1.11. -
Page 10: Product Specifications
AMOS AMOS- - - - 820 User Manual AMOS AMOS 820 User Manual 820 User Manual 820 User Manual 1.2. Product Specifications Processor Processor Processor Processor 1.0GHz NXP i.MX 6Quad Cortex-A9 SoC System Memory System Memory System Memory System Memory 1GB DDR3 SDRAM onboard Storage Storage... - Page 11 Environmental Specification Specification Specification Specification Operating Temperature Operating Temperature Operating Temperature Operating Temperature • -20°C ~ 65°C (3G and Wi-Fi not included) (AMOS-820-1Q10A1) • -20°C ~ 60°C (3G and Wi-Fi not included) (AMOS-820-2Q10A1) Operating Humidity Operating Humidity Operating Operating Humidity Humidity •...
-
Page 12: Panel Layout
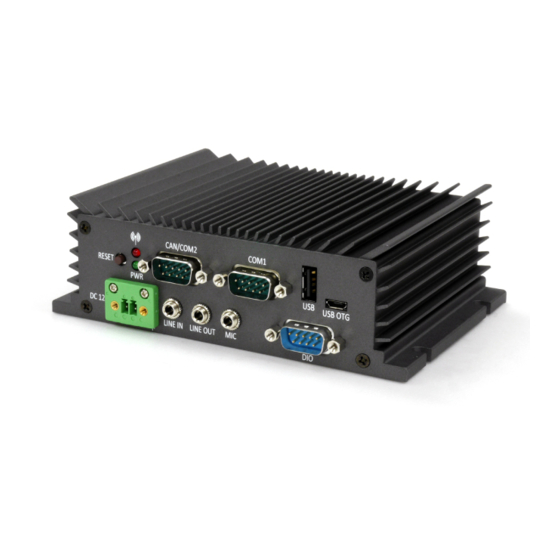
AMOS AMOS- - - - 820 User Manual AMOS AMOS 820 User Manual 820 User Manual 820 User Manual 1.3. Panel Layout Figure 1 1 1 1 : Front panel I/O layout Figure : Front panel I/O layout Figure Figure : Front panel I/O layout : Front panel I/O layout Figure... -
Page 13: Dimensions
AMOS AMOS- - - - 820 User Manual AMOS AMOS 820 User Manual 820 User Manual 820 User Manual 1.4. Dimensions Figure 3 3 3 3 : Front side view dimension Figure : Front side view dimension Figure Figure : Front side view dimension : Front side view dimension Figure Figure 4 4 4 4 : : : : Top... -
Page 14: External I/O Pin Descriptions And Functionality
Reset button diagram 2.3. LED Indicator There are two LEDs on the front panel of the AMOS-820 that indicate the status of the system: • Power LED is green and indicates the status of the system’s power. • WPAN/WWAN/Wi-Fi LED is red and indicates network status of the system. -
Page 15: Can/Com2 Port
AMOS AMOS- - - - 820 User Manual AMOS AMOS 820 User Manual 820 User Manual 820 User Manual 2.4. CAN/COM2 Port The integrated 9-pin CAN/COM2 port uses a male DE-9 connector. The CAN bus port supports CAN protocol specification Version 2.0 B while the COM2 port supports TX/RX. The purpose of the CAN/COM2 port is to debug only. -
Page 16: Usb 2.0 Port
.0 port pinout 2.7. Micro USB 2.0 Port The AMOS-820 comes with a Micro USB 2.0 type B port located on the front panel. The Micro USB 2.0 type B port supports OTG and it offers expandable storage. Figure 12... -
Page 17: Audio Jacks
AMOS AMOS- - - - 820 User Manual AMOS AMOS 820 User Manual 820 User Manual 820 User Manual 2.8. Audio Jacks There are three audio jack receptacles on the front panel. Each receptacle can fit a 3.5 mm Tip Ring Sleeve (TRS) connector enables connection to Line-in, Line-out and Mic-in. -
Page 18: Micro Sd/Spi Boot Select Switch
820 User Manual 820 User Manual 820 User Manual 2.10. Micro SD/SPI Boot Select Switch The AMOS-820 comes with a boot select switch which allows users to select boot device from Micro SD and SPI. Figure 15 Figure 15: : : : Micro SD/SPI boot... -
Page 19: Hdmi Port
HDMI HDMI port pinout port pinout 2.13. RCA Jack The AMOS-820 is equipped with a RCA jack labeled as “AV IN” on the back panel. The RCA jack connects to external composite video input device. Figure Figure 18 Figure Figure... -
Page 20: Hardware Installation Hardware Installation
AMOS AMOS- - - - 820 User Manual AMOS AMOS 820 User Manual 820 User Manual 820 User Manual 3. 3. 3. 3. Hardware Installation Hardware Installation Hardware Installation Hardware Installation This chapter provides information about hardware installation procedures. It is recommended to use a grounded wrist strap before handling computer components. -
Page 21: Installing The 3G/Wi-Fi Kit
AMOS AMOS- - - - 820 User Manual AMOS AMOS 820 User Manual 820 User Manual 820 User Manual 3.2. Installing the 3G/Wi-Fi Kit Step 1 Step 1 Step 1 Step 1 Align the notch on the 3G/Wi-Fi module with the protruding wedge on the miniPCIe slot then insert the module at 30°... - Page 22 AMOS AMOS- - - - 820 User Manual AMOS AMOS 820 User Manual 820 User Manual 820 User Manual Step 3 Step 3 Step 3 Step 3 Loosen the thirteen screws of the front, back and bottom plates. Figure 23 Figure 23: : : : Removin Removing front,...
- Page 23 AMOS AMOS- - - - 820 User Manual AMOS AMOS 820 User Manual 820 User Manual 820 User Manual Step 5 Step 5 Step 5 Step 5 Insert the 3G/Wi-Fi antenna cable into the antenna hole from the inside of the back panel plate. Insert the washer, fasten it with the nut, and install the antenna.
- Page 24 AMOS AMOS- - - - 820 User Manual AMOS AMOS 820 User Manual 820 User Manual 820 User Manual Step 8 Step 8 Step 8 Step 8 Reinstall the bottom access cover. Figur Figure e e e 27 Figur Figur 27 27 27: : : : Reinstalling bottom access cover Reinstalling bottom access cover...
-
Page 25: Installing The Rubber Feet
AMOS AMOS- - - - 820 User Manual AMOS AMOS 820 User Manual 820 User Manual 820 User Manual 3.3. Installing the Rubber Feet Step 1 Step 1 Step 1 Step 1 Locate the area to install the rubber feet. Step 2 Step 2 Step 2... -
Page 26: Mounting The Amos-820 On Wall/Table
Make sure to remove the rubber feet before mounting the AMOS-820 system. The rubber feet are not required when mounting the system on walls or tables. Do not use other types of screws on mounting the AMOS-820 system aside from the provided screws to avoid any damages. -
Page 27: Android And Linux Support
Software and Technical Supports Software and Technical Supports 4.1. Android and Linux Support The VIA AMOS-820 system is highly compatible with Android 4.4.2 and Linux Kernel Linux 3.10.17 4.1.1. Driver Installation Support and drivers are provided through various methods including:...
Need help?
Do you have a question about the AMOS-820 and is the answer not in the manual?
Questions and answers