Advertisement
Quick Links
Advertisement

Related Manuals for NCR 7772-K475


Summary of Contents for NCR 7772-K475
- Page 1 Kit Instructions High Mount XL10 Customer Display Bracket, CX 7772-K475 Issue A...
-
Page 2: Revision Record
NCR, therefore, reserves the right to change specifications without prior notice. All features, functions, and operations described herein may not be marketed by NCR in all parts of the world. In some instances, photographs are of equipment prototypes. Therefore, before using this document, consult with your NCR representative or NCR office for information that is applicable and current. -
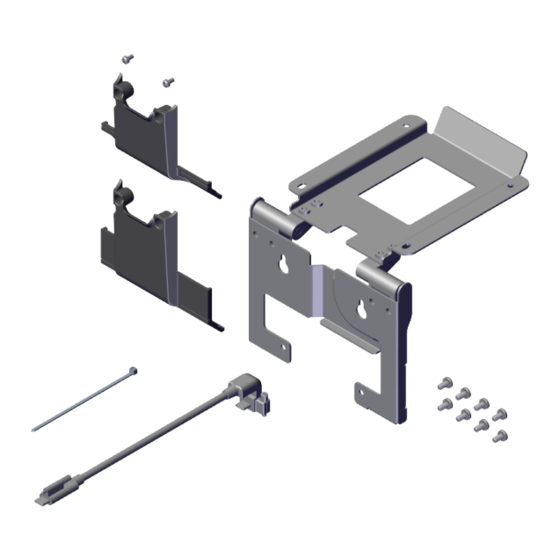
Page 3: Kit Contents
High Mount XL10 Customer Display Bracket, CX This kit provides a Bracket to Mount the XL10 Customer Display on the CX head. Kit Contents Item Part Number Description 497-0531229 Bracket Assembly, XL10 Display, High Mount, CX 006-8627600 Screw, M4x8, Phillips, Cross Recessed Pan Head Machine Screw with External Tooth Lock Washer, Black, Zinc 497-0529413... -
Page 4: Installation Procedure
High Mount XL10 Customer Display Bracket, CX Installation Procedure Warning: Disconnect the AC power cord from the AC outlet and wait 30 seconds before servicing the terminal. 1. Lay the Display face down on a flat surface. Note: Always use a soft material (cloth, foam) to protect the display screen when placing the terminal face down. - Page 5 High Mount XL10 Customer Display Bracket, CX 3. Connect the USB-C Cable to the CX7 Display and tighten the thumbscrew. Note: For clarity, the Neck is not shown in the illustration below and in the succeeding illustrations. 4. Install the new Cable Cover. The new Cable Cover has a hole on the side to allow cable routing.
- Page 6 High Mount XL10 Customer Display Bracket, CX 5. Partially install two (2) screws on the back of the CX7 Display in the location shown. 6. Hook the Bracket on the partially installed screws. Ensure the Cable is routed as shown.
- Page 7 High Mount XL10 Customer Display Bracket, CX 7. Tighten the two (2) partially installed screws and install two (2) screws on the bottom of the Bracket. 8. Connect the other end of the Cable to the back of the XL10 Customer Display and tighten the thumbscrew.
- Page 8 High Mount XL10 Customer Display Bracket, CX 9. Secure the Cable on the side of the bridge lance using a cable tie as shown. 10. Install the XL10 Customer Display on the Bracket (4 screws). Ensure the Cable is routed through the gap in the Bracket as shown.
- Page 9 High Mount XL10 Customer Display Bracket, CX 11. Pivot the XL10 Customer Display into position.
Need help?
Do you have a question about the 7772-K475 and is the answer not in the manual?
Questions and answers