
Related Manuals for Raven Scanner Compact WiFi


Summary of Contents for Raven Scanner Compact WiFi
- Page 1 Raven Scanner Compact WiFi User Manual support@raven.com | 1-800-713-9009 | raven.com/support...
-
Page 2: Copyrights And Trademarks
Machine: The Raven Scanner (“Machine” or “Hardware”); Duration: 1 Year (“Warranty Period”); Warranty for Machines: Starfish Technologies, LLC dba Raven (“Manufacturer” or “Raven”) warrants that each Machine is free from defects in materials and workmanship and conforms to the manufacturer’s published specifications. The warranty period for each Machine is a specified, fixed period commencing on its date of... - Page 3 LIMITATIONS ON APPLICABLE STATUTORY RIGHTS OF A CONSUMER, SO THE ABOVE EXCLUSION AND LIMITATIONS MAY NOT APPLY TO YOU. RAVEN’S LIMITED WARRANTY DOES NOT APPLY TO A RAVEN PRODUCT THAT HAS BEEN SUBJECTED TO PHYSICAL DAMAGE AFTER PURCHASE, CAUSED, FOR EXAMPLE,...
- Page 4 1-800-713-9009 In order to properly service you, please be prepared to describe your issue and provide the Raven account email address, scanner model, serial number and proof of purchase. For more Raven Scanner information, visit our website at: https://www.raven.com/...
-
Page 5: Safety Information
● Do not install the hardware in a humid or dusty place. ● Place the hardware securely on an even, flat surface. Tilted or uneven surfaces may cause mechanical or paper-feeding problems. ● Retain the box and packing materials for shipping purposes. support@raven.com | 1-800-713-9009 | raven.com/support... -
Page 6: Federal Communications Commission (Fcc) Compliance Information Statement
This hardware should be installed and operated with minimum distance 20cm between the radiator & your body. To maintain compliance with FCC RF exposure compliance requirements, please avoid direct contact to the transmitting antenna during transmitting. “Contains FCC ID: YAI2213” support@raven.com | 1-800-713-9009 | raven.com/support... -
Page 7: Product Safety Guide
This could cause fire, electrical shock, or injury. ● Do not insert objects into any opening, as they may touch dangerous voltage points or short-out components. Beware of electrical shock hazards. support@raven.com | 1-800-713-9009 | raven.com/support... - Page 8 For more information about where you can drop off your waste equipment for recycling, please contact your local city office, your household waste disposal service or the shop where you purchased the product. support@raven.com | 1-800-713-9009 | raven.com/support...
-
Page 9: Getting Started
Scanner, you can instantly scan single-sided or double-sided document(s) and deliver the electronic images to various destinations including your desktop, e-mail addresses, fax, and cloud services such as Raven Cloud, Dropbox, Google Drive or Evernote. Package Items Raven Compact Scanner... -
Page 10: Front View
LCD Display Displays the workflow number from Raven Desktop software application. Right / Left Arrow Use to scroll left and right to choose your Raven Desktop workflow. WiFi Button Press 2 seconds to turn Wi-Fi on or off. A blue flash indicates Wi-Fi connection is ready. -
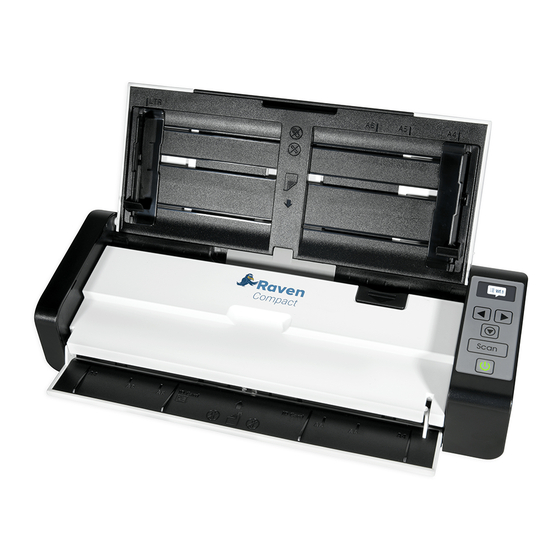
Page 11: Open View
Raise the guides when loading a document, and then align them to the edges of the document to be scanned. Front Feed Tray This tray is used for feeding documents. Open it when scanning documents. support@raven.com | 1-800-713-9009 | raven.com/support... -
Page 12: Rear View
Side View Item Name Description Power Jack Connect the AC power adapter to the scanner. Micro USB Port Used to plug the micro end of the USB cable to the USB port on a computer. support@raven.com | 1-800-713-9009 | raven.com/support... -
Page 13: Setting Up Your Scanner
If you plan to feed documents through the rear of the scanner, attach the rear feed tray to the back slot of the scanner as indicated. Be careful not to break the tabs when inserting or removing the tray. support@raven.com | 1-800-713-9009 | raven.com/support... - Page 14 Raven Desktop. 4.2 Complete the download and installation of Raven Desktop on your computer. 4.3 Sign up for a free Raven account, or log in with existing Raven account credentials. Connecting to Computer 4.1 Connect the micro end of the USB cable to the micro USB port of your scanner.
- Page 15 4.3 Open Raven Desktop and click to Connect a new scanner, then choose Raven Compact and the USB connection method to proceed through the steps to finishing installing drivers and connecting the scanner to your computer. Be sure the scanner is powered on and connected to the computer by USB cable.
- Page 16 Using the Scanner Buttons to Scan The following picture shows the 4 buttons and workflow screen on the scanner. The workflow selection and scan buttons work with Raven Desktop on Windows or Mac. Visit Raven.com/desktop to download and configure your workflows.
- Page 17 Destinations Choose one or more destinations where your scanned documents should be sent. Raven Cloud: Scan to your Raven Cloud document management account for searchable filing & organization. Google Drive: Scan to your Google Drive account (login required).
-
Page 18: Operation
● Document(s) should be free of curl, wrinkle, tears, wet ink, or punch holes. ● Document(s) should be free of staples, paper clips, paper sticky notes. Loading Document(s) in the Automatic Document Feeder (ADF) Tray 1. Unfold the document feeder and its extension. support@raven.com | 1-800-713-9009 | raven.com/support... - Page 19 4. Verify that the paper guides are aligned with the edges of the stack by sliding the paper feed guides in the automatic feeder tray. IMPORTANT: To load paper through the automatic document feeder, be sure to close the cover of the front input tray. support@raven.com | 1-800-713-9009 | raven.com/support...
-
Page 20: Loading A Single-Page Document Into The Front Input Tray
Load one-sided document with the text facing down. 3. Center your document with the paper size marks. IMPORTANT: Only one sheet of paper is allowed to load in the front paper tray. support@raven.com | 1-800-713-9009 | raven.com/support... - Page 21 1. Hold both ends of the documents and fan them a few times. 2. Rotate the documents by 90 degrees and fan them in the same manner. 3. Align the edges of the documents in a step-like pattern (see picture). support@raven.com | 1-800-713-9009 | raven.com/support...
-
Page 22: Scanning A Stack Of Documents With Various Sizes And Weights
3. Align the edges of the documents by tapping the bottom of the stack against the table top. 4. Center these pages in the document feeder and make sure that the edges of page of the largest size slightly touch the Paper Guide. support@raven.com | 1-800-713-9009 | raven.com/support... - Page 23 2. Verify that the paper guides are aligned with the edges of the stack by sliding the paper feed guides in the automatic feeder tray. 3. Select “Raven Cloud” as a Destination in your desired Raven Desktop workflow. 4. Click “SCAN”.
- Page 24 3. Verify that the paper guides are aligned with the edges of the stack by sliding the paper feed guides in the automatic feeder tray. 4. Select “SharePoint” as a Destination in your desired Raven Desktop workflow. 5. Click “SCAN”.
- Page 25 3. Verify that the paper guides are aligned with the edges of the stack by sliding the paper feed guides in the automatic feeder tray. 4. Select “Box” as a Destination in your desired Raven Desktop workflow. 5. Click “SCAN”.
-
Page 26: Saving Contacts
Raven Desktop onto your computer and complete the driver installation. After installation of Raven Desktop is completed and you have connected to your scanner, you can close Raven Desktop and the Raven Standard should be available for use with other applications that are TWAIN compatible. -
Page 27: Troubleshooting
In the event of a paper jam, follow the procedures below to remove the paper: 1. Press the ADF Release button to open the feeder cover. 2. Carefully pull the paper out of the feed tray. 3. Close the feeder cover. Your Scanner is now ready to use. support@raven.com | 1-800-713-9009 | raven.com/support... -
Page 28: Error Conditions
1. Document has become Open the feeder cover and stuck in the feeder. pull the original out of the 2. Original exceeds max. feeder. length. Cover Open Feeder cover is open. Close the feeder cover. support@raven.com | 1-800-713-9009 | raven.com/support... -
Page 29: Questions And Answers
Questions and Answers Question: The Scanner is often disconnected or not found on Raven Desktop Answer: After a period of no use, the scanner goes into a low power sleep state. Simply press the power button to wake the scanner before attempting to scan or use Raven Desktop. -
Page 30: Maintenance
Clean them periodically. Use only the recommended or supplied tool to clean the scanner and feeder dock. Cleaning Procedures 1. Open the feed tray. 2. Press the ADF Release button to open the feeder cover. support@raven.com | 1-800-713-9009 | raven.com/support... - Page 31 NOTE: ● Adding some isopropyl alcohol (95%) on the cleaning cloth is more efficient when cleaning the rollers. Raven Scanner Cleaning Wipes are available on Raven.com for pre-moistened disposable cleaning wipes. ● Do not use any solvents or corrosive liquid (i.e., alcohol, kerosene, etc.) to clean...
- Page 32 ● Feed Roller: 100,000 sheets ● Separation Pad: 30,000 sheets For ordering the ADF roller, please visit https://www.raven.com/accessories, email Raven support at support@raven.com or call 1-800-713-9009 to order a replacement. Feed Roller Replacement Steps 1. Open the feed tray. 2. Press the ADF Release button to open the feeder cover.
- Page 33 3. Open the roller cover. 4. Slide the feed rollers to the left. support@raven.com | 1-800-713-9009 | raven.com/support...
- Page 34 5. Remove the feed rollers. 6. Attach the new feed rollers. Insert the left end of the shaft to the notch and slide the feed roller to the right. A snap-in sound could be heard. support@raven.com | 1-800-713-9009 | raven.com/support...
- Page 35 Separation Pad Replacement Steps 1. Open the feed tray. 2. Open the feeder cover. 3. Press two arms of the separation pad inwardly with two fingers (1) and lift it up (2) to remove the separation pad. support@raven.com | 1-800-713-9009 | raven.com/support...
- Page 36 The actual cycle varies according to the type of used paper and how frequently the scanner is used and cleaned. ● Use only the specified consumables. ● Visit https://www.raven.com/accessories, email Raven support at support@raven.com or call 1-800-713-9009 to order any consumables. support@raven.com | 1-800-713-9009 | raven.com/support...
-
Page 37: Specifications
TWAIN for Win XP / Vista / Win 7 / Win 8 / Win 10 / Mac OS Included Items: Raven Compact Scanner, AC Cable, AC Adaptor, Quick Guide, USB Cable For more Raven Scanner information, visit our website at: https://www.raven.com/... -
Page 38: Technical Support
Technical Support Raven 11150 S Wilcrest Drive Suite 200 Houston, Texas 77099 1-800-713-9009 support@raven.com www.Raven.com support@raven.com | 1-800-713-9009 | raven.com/support...
Need help?
Do you have a question about the Scanner Compact WiFi and is the answer not in the manual?
Questions and answers