Table of Contents
Advertisement
Advertisement
Table of Contents

Related Manuals for Raven Scanner Original


Summary of Contents for Raven Scanner Original
- Page 1 Raven S canner O riginal User Manual ...
- Page 2 1 ...
-
Page 3: Copyrights And Trademarks
Machine: The Raven Scanner (“Machine” or “Hardware”); Duration: 1 Year (“Warranty Period”); Warranty for Machines: Starfish Technologies, LLC dba Raven (“Manufacturer” or “Raven”) warrants that each Machine is free from defects in materials and workmanship and conforms to the manufacturer’s published specifications. The ... - Page 4 EXCEPT FOR THE LIMITED WARRANTY ON MEDIA AND HARDWARE SET FORTH ABOVE AND TO THE MAXIMUM EXTENT PERMITTED BY APPLICABLE LAW, THE RAVEN SOFTWARE AND HARDWARE ARE PROVIDED “AS IS”, WITH ALL FAULTS AND WITHOUT WARRANTY OF ANY KIND, AND RAVEN AND RAVEN’S LICENSORS HEREBY ...
- Page 5 In order to properly service you, please be prepared to describe your issue and provide the Raven account email address, scanner model, serial number and proof of purchase. For more Raven Scanner information, visit our website at: ...
-
Page 6: Safety Information
Safety Information When using this machine, the following safety precautions should always be followed. Safety During Operation In this manual, the following important symbols are used: ● WARNING: Indicates potentially hazardous situations, which if instructions are not followed, could result in death or serious injury. ... - Page 7 Precautions ● Do not install the hardware near heating or air conditioning units. ● Do not install the hardware in a humid or dusty place. ● Place the hardware securely on an even, flat surface. Tilted or uneven surfaces may cause mechanical or paper-feeding problems. ...
-
Page 8: Federal Communications Commission (Fcc) Compliance Information Statement
Federal Communications Commission (FCC) compliance information statement Part 15 This equipment has been tested and found to comply with the limits for a Class B digital device, pursuant to part 15 of the FCC rules. These limits are designed to provide reasonable protection against harmful interference in a residential installation. ... -
Page 9: Product Safety Guide
Product Safety Guide Please clearly read all these instructions and follow all instructions and warnings before installing and using the device. The following indications are used in this document to obviate any chance of accident or damage to you and/or the device. ... - Page 10 o Liquid has entered the device or the AC power adapter. o Object has entered the device or the AC power adapter. o The device or the AC power adapter has been dropped, or the case has been damaged. o The device or the AC power adapter does not operate normally (i.e. ...
-
Page 11: Getting Started
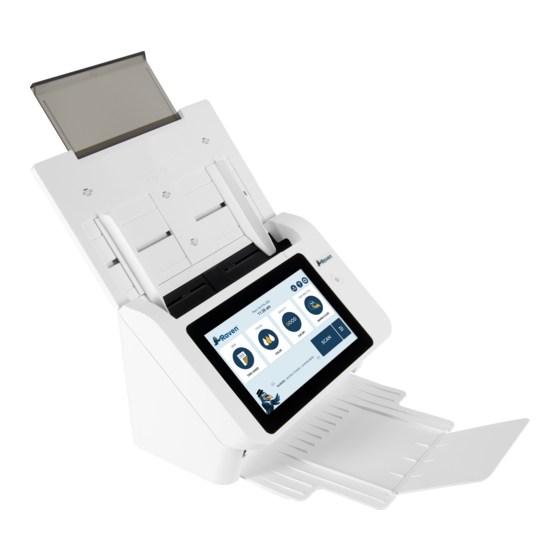
Raven Cloud, Dropbox, Google Drive or Evernote. In addition, the product also allows you to save the scanned image to an inserted USB flash drive. ... - Page 12 Front View # Part Name Function 1 Stacker Keeps the paper in place. Extend it in case of longer paper. 2 Panel Unit ADF cover with the touch panel. 3 Touch Panel Use this touch panel to operate the scanner. 4 ...
- Page 13 Rear View # Part Name Function 13 Power Switch Use this to turn the scanner ON or OFF. 14 Power Receptor Connects the scanner to a standard AC power outlet by the included AC adapter. 15 Ethernet Port Connects the scanner to a port on the ...
-
Page 14: Setting Up Your Scanner
Setting Up Your Scanner Install the Scanner 1.1 Open the panel unit by pulling the 1.2 Install the paper chute by aligning lever, and get the paper chute ready. and inserting the tabs of the paper chute into their slots on the scanner. ... - Page 15 Connect The Scanner 2.1 Connect one end of the power cable to the power receptacle of the scanner. Connect the other end to an appropriate power outlet. ● ATTENTION: Please make sure the scanner is turned OFF before you plug or unplug the scanner power adapter. ...
- Page 16 3.1 Connect to available wireless network 3.2 Or connect to other hidden network. Sign in to your Raven account. Sign up if you don’t already have an account. 4.1 Sign in to your Raven account or sign 4.2 Welcome screen shows scan ...
-
Page 17: Adjusting Scan Settings
Updating Your Scanner Software To take advantage of the latest features and enhancements of your Raven Scanner, periodic updates are required. When connected to the internet, your Raven Scanner will automatically detect when new updates are available and prompt for installation. Simply ... -
Page 18: Operation
Operation Document Loading Tips Make sure the size and ream weight of your documents are acceptable by the scanner. Refer to “Specifications” of this guide for more information. To scan multiple documents in a batch from the ADF can increase your work efficiency and make large scanning tasks easier. - Page 19 Loading Document(s) in the ADF Document Feeding 1. Load the stack of documents f ace down with the top of the pages pointing into the feeder. 2. Verify that the paper guides are aligned with the edges of the stack by sliding the paper feed guides in the automatic ...
- Page 20 Scanning a Stack of Document with Various Sizes and Weights When scanning a batch of documents with different sizes and weights, be sure to follow the following guidelines to avoid a skewed image or a paper jam: ...
-
Page 21: Scanning Plastic Cards
Scanning Plastic Cards The plastic card can be an embossed credit card, driver license, ID card, insurance card, medic-care card or any membership card. Make sure to load the embossed face of the embossed card face up into the scanner. When scanning multiple embossed cards, the pad module can be removed to ease the scanning process. - Page 22 Scanning and Sending Your Document to Raven Cloud 1. Load the stack of documents with the top of the pages pointing into the feeder. 2. Verify that the paper guides are aligned with the edges of the stack by sliding the ...
- Page 23 1. Connect your Dropbox account within your account settings by visiting https://app.raven.com /connect 2. Load the stack of documents with the top of the pages pointing into the feeder. 3. Verify that the paper guides are aligned with the edges of the stack by sliding the ...
- Page 24 1. Connect your Evernote account within your account settings by visiting https://app.raven.com/connect 2. Load the stack of documents with the top of the pages pointing into the feeder. 3. Verify that the paper guides are aligned with the edges of the stack by sliding the ...
-
Page 25: Troubleshooting
Troubleshooting Clearing Paper Jams In the event of a paper jam, follow the procedures below to remove the paper: 1. Remove any unjammed documents still loaded into the ADF. 2. Open the panel unit by pulling the panel unit open lever. ... - Page 26 4. Close the panel unit by pushing it back down until it snaps back into place. 25 ...
-
Page 27: Questions And Answers
Questions and Answers Question : Paper becomes jammed during scanning. Answer: 1. Open the front door. 2. Pull out the jammed paper carefully. 3. Close the front door Question : More than one sheet of paper are fed into the scanner. Answer: ... -
Page 28: Maintenance
Maintenance Your scanner is designed to be maintenance-free. However, constant care and maintenance can keep your scanner working smoothly. Cleaning The Scanner Paper powder, dust, ink and toner from paper being scanned may make the inner ADF dirty, which leads to poor image quality or document-feeding errors. - Page 29 Cleaning the ADF After using the scanner for a long period of time, the rollers and glass inside the scanner may become contaminated with ink, toner particles or paper dust. It is necessary to perform routine cleaning to ensure the optimum image quality and performance. ...
- Page 30 Cleaning The Glass 4. Wet a clean cloth with some isopropyl alcohol. (95%) 5. Wipe the glass and the white area as illustrated below to rid the dust or dirt. Attention: D o not spray cleaner directly onto the scanner glass. Excess liquid residue may fog or damage the scanner. ...
-
Page 31: Replacing The Pad Module
Replacing the Pad Module As a guideline, it is recommended to replace the pad module every 50000 sheets of scans (A4, 70 g/m2 or 18 lb.), and it is recommended to replace the feed roller every 300000 sheets of scans (A4, 70 g/m2 or 18 lb.). ... -
Page 32: Replacing The Feed Roller
4. Close the panel unit by pushing it back down until it snaps back into place. Replacing The Feed Roller 1. Open the panel unit by pulling the panel unit open lever. 2. - Page 33 3. Remove the feed roller by pinching both sides of the feed roller and pull it out. 4. Install the new feed roller by aligning and inserting the feed roller onto the roller pitman on the scanner. ...
- Page 34 5. Install the paper chute by aligning and inserting the tabs of the paper chute into their slots on the scanner. 6. Close the panel unit by pushing it back down until it snaps back into place. ...
-
Page 35: Specifications
Operation < 30 W, Ready < 9 W, Sleep < 5.2 W, Off < 0.3 W Operating Environment Temperature (41°F~95°F) Included Items: R aven Scanner Original, AC Cable, AC Adaptor For more Raven Scanner information, visit our website at: h ttps://www.raven.com/ ... -
Page 36: Technical Support
Technical Support Raven 5821 Southwest Freeway Suite 600 Houston, Texas 77057 1-800-713-9009 support@raven.com www.Raven.com 35 ...
Need help?
Do you have a question about the Scanner Original and is the answer not in the manual?
Questions and answers