Table of Contents
Advertisement
Available languages
Available languages
Advertisement
Chapters
Table of Contents
Troubleshooting

Subscribe to Our Youtube Channel
Related Manuals for Yaber Pro U9


Summary of Contents for Yaber Pro U9
- Page 1 Pro U9 V.22.3.11...
- Page 3 LANGUAGE English ......................Français ......................Italian ........................Espanol ......................Deutsche ......................日本語 ......................... aftersales@yabertech.com...
-
Page 4: Table Of Contents
Support@yabertech.com aftersales@yabertech.com aftersales@yabertech.com CONTENTS ..............YABER LIFETIME PROFESSIONAL SUPPORT TIPS ................................. PACKAGE LIST ............................. PROJECTOR SPECIFICATIONS ....................PROJECTOR OVERVIEW ........................ REMOTE CONTROL ..................................................... INSTALLATION ........................1. Installation Method ........................2. Install on the Ceiling ........................ STARTING PROJECTOR ........................IMAGE ADJUSTMENT ........................ -
Page 5: Yaber Lifetime Professional Support
Support@yabertech.com aftersales@yabertech.com YABER LIFETIME PROFESSIONAL SUPPORT Dear customer, Thank you very much for supporting YABER! Please read this manual thoroughly before using the projector. If you have any issues, email your order number and the problem to aftersales@yabertech.com . We will provide a fast solution in 24 hours. -
Page 6: Package List
Support@yabertech.com aftersales@yabertech.com PACKAGE LIST YABER Pro U9 Projector*1 Remote Control*1 Power Cord*1 HDMI Cable*1 3-in-1 AV Cable Lens Cover*1 Cleaning Kit*1 Cleaning Cloth*1 User Manual*1 Projector Screen*1 PROJECTOR SPECIFICATIONS Model No. Pro U9 Native Keystone 1920*1080P Manual Vertical/Horizontal Resolution Correction... -
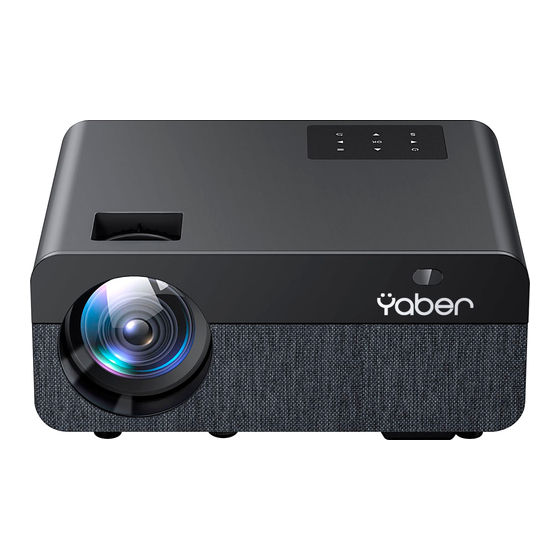
Page 7: Projector Overview
Support@yabertech.com aftersales@yabertech.com PROJECTOR OVERVIEW... - Page 8 2. Menu 3. OK Key 4. Arrow Key 5. Source 6. Back Tips: Pro U9 fuselage buttons are touch-screen buttons, which can be operated with a light touch. Power Turn on/off the power Menu Key Operate in av or hdmi mode...
-
Page 9: Remote Control
Support@yabertech.com aftersales@yabertech.com REMOTE CONTROL Turn on/off the power Make system settings Can make some basic adjustments of the screen after clicking during the video playback Operate in av or hdmi mode Volume down Confirm selection or select video to play Close the sound Select the input signal soucre Used to adjust the parameter of the projector in the menu mode... -
Page 10: Installation
Support@yabertech.com aftersales@yabertech.com Note: 1).Install 2 pieces of AAA batteries into the remote before using it. Do not combine new batteries with old ones in remote controller, which can cause operation failure due to insufficient power supply. 2).When using the remote controller, please make sure that the signal transmitter of the remote controller aims at infrared signal receiver of the projector. -
Page 11: Install On The Ceiling
Support@yabertech.com aftersales@yabertech.com Aspect Ratio: 16:9 Distance (ft.) Screen Size 5.50 50" 7.80 70" 10.80 100" 13.00 120" 16.40 150" The recommended projection distance is about 10.8ft,the shortest projection distance is 5.5ft. The image size depends on the distance between projector and screen, there may be 3% deviation among above listed data. -
Page 12: Starting Projector
Support@yabertech.com aftersales@yabertech.com STARTING PROJECTOR 1)Press the power key on the remote or projector, the indicator light will turn blue; 2)Adjust the focus ring on the left side of the projector to get the best image performance; (If it is still blurry, please try to adjust the projection distance.) 3)Use the 4D keystone function of the projector to get a rectangle projection screen;... -
Page 13: Image Adjustment
Support@yabertech.com aftersales@yabertech.com 2. Image adjustment Please follow the below steps to correct: Adjust the image size to get the best image size by moving the projector back and forth, then rotate the lens to get the best focus. Use the 4D&4P keystone function (4 Corner keystone&... -
Page 14: Usb Disk Input Mode
[ OK ] button to play it. TIPS: A.Pro U9 upgraded projector supports U disk to directly play PPT, Word, Excel files; B.If you enter from the [Video] menu, you can only play the video, The same as other 3 option. -
Page 15: Music Play Interface
Support@yabertech.com aftersales@yabertech.com Player Menu Include Function Subtitle On-Off,Subtitle Switching, set multiple modes of video Subtitle options Subtitle advanced subtitles Track Switch You can set the audio mode Audio options You can set the video to fast Forward revind Advanced options forward or rewind Speed 0.25-2... -
Page 16: Wifi Setting
Support@yabertech.com aftersales@yabertech.com aftersales@yabertech.com 3.1. iOS Cast (for iOS Devices) 1.Go to home page -- Select the [ ] menu -- Select the [ WiFi Setting ] menu -- Open the WiFi function -- Select your home WiFi from the list -- Connect the Y9 projector to your home WiFi. -
Page 17: Miracast(For Android Devices)
Support@yabertech.com aftersales@yabertech.com 2.Back to home page -- Select [ iOS Cast ] menu -- Press the OK button to enter the [ iOS Cast ] menu. Video Music Picture Office Signal Source IOS Cast Miracast 3.Select the [ Settings ] menu on your iOS device -- Turn on the [ Wi-Fi ] function -- Connect your iOS device to the same home network as the projector. -
Page 18: Blueteeth Setting
2.Select the [ Settings ] menu on your Android device -- Select the [ Screen mirroring ] function -- Select your Miracast receiver named [ Pro U9-An- Cast-XXXX ] -- your Android device screen will be displayed on the projec- tion screen after 3 seconds. - Page 19 Blueteeth device, make sure the speaker is waiting for pairing, Otherwise the projector cannot search for Blueteeth or cannot connect to Blueteeth speakers. 3. If you have any question, please feel free to email YABER via aftersales@yabertech.com Select “...
-
Page 20: Image Setting
Support@yabertech.com aftersales@yabertech.com Image setting Include Function Picture Mode Standard, Warm, User, Cool Switch among the image mode Brightness 0~100 Adjust the brightness parameter to 100 Contrast 0~100 Adjust the contrast parameter 0-100 Saturation 0~100 Adjust saturation parameters 0-100 Sharpness 0~100 Adjust sharpness parameters 0-100 Color Temperature Standard, Warm, User, Cool... -
Page 21: 4-Side Keystone
Support@yabertech.com aftersales@yabertech.com 6.2 4-side Keystone:-40~40 Keystone Setting 4-corner keystone 4-style keystone Reset Step 1: Press the button to select the [4-side Keystone] menu, then press the [ OK ] bottom to enter the submenu. Step 2: If the projection image shows as (1), press the button on the remote or projector to increase the vertical parameter (-40~0), until to achieve the projection image (2). -
Page 22: Projector Position
Support@yabertech.com aftersales@yabertech.com You can set 4 projection modes here: 1. Front 2. Rear 3. Front -Celling 4. Rear-Celling 1.Desktop front projection 2.Desktop rear projection 3.Celling front projection 4.Celling rear projection... -
Page 23: Customer Zoom
Support@yabertech.com aftersales@yabertech.com Custom zoom Custom zoom Scaling Horizontal Zoom Vertical Zoom Step 1: Press the button to select the [Customer zoom] menu, then press the [OK] bottom to enter the submenu. Step 2: Click the "Scaling", TURN the Scaling function,you can reduce the height and width of projection size up to 50% in the same proportion. -
Page 24: Signal Lines Connection
Support@yabertech.com aftersales@yabertech.com SIGNAL LINES CONNECTION YABER Pro U9 projector has 6 interfaces, HDMI ports*2/USB ports*2/AV output/AUDIO output. Please select the correct connecting port to connect your device (PC, Phone, DVD Player, Sound bar, USB, PS4 etc.) 1. Connect USB Disk 1). -
Page 25: Connect To The Soundbar/Speaker
Support@yabertech.com aftersales@yabertech.com Audio out (L/R) Audio-out Or connect to the DVD Player with the HDMI cable in the package. HDMI HDMI 4. Connect to the Sound bar/Speaker If your speaker has AUX port, please use your 3.5mm audio cable connect the projector and your speaker as the picture shows, enter the home page to select [ AV ] as the signal source. -
Page 26: Warranty
Support@yabertech.com aftersales@yabertech.com WARRANTY Thank you so much for your purchase and support! We provide 3-year warranty for Pro U9 projector. If you have any questions, please feel free to contact us via aftersales@yabertech.com TROUBLESHOOTING Problems listed below might occur during the operation of your projector. - Page 27 CONTENU ............. ASSISTANCE PROFESSIONNELLE YABER À VIE ............................. CONSEILS ........................LISTE DES PAQUETS ..................SPÉCIFICATIONS DU PROJECTEUR ......................APERCU DU PROJECTEYR ..........................TELECOMMANDE ........................... INSTALLATION ......................... 1. Méthode d'installation 2. Distance et taille de projection ..........................................3. Installer sur le plafond ....................
-
Page 28: Assistance Professionnelle Yaber À Vie
ASSISTANCE PROFESSIONNELLE YABER À VIE Cher client, Merci beaucoup de soutenir YABER! Veuillez lire attentivement ce manuel avant d'utiliser le projecteur. Si vous rencontrez des problèmes, envoyez votre numéro de commande et le problème à aftersales@yabertech.com . Nous fournirons une solution rapide en 24 heures. -
Page 29: Liste Des Paquets
La lentille sale doit être essuyée avec un chiffon en coton doux pour la surface de la lentille en verre. Aucun chiffon dur ou abrasif ne doit être utilisé. LISTE DES PAQUETS Yaber Pro U9 Projecteur *1 Télécommande*1 Cordon d'alimentation*1 Câble HDMI*1 3-in-1 Câble AV... -
Page 30: Apercu Du Projecteyr
aftersales@yabertech.com... - Page 31 1. Power Key 2. Menu 3. OK Key Arrow 5. Source 6. Back Conseils: les boutons de fuselage Pro U9 sont des boutons d'écran tactile, qui peuvent être actionnés avec une légère pression. D'alimentation Allumer / éteindre l'alimentation Bouton Revenir Retourner au menu précédent...
- Page 32 aftersales@yabertech.com Allumer / éteindre l'alimentation Définir les paramètres système faire quelques ajustements de base de l'écran après avoir cliqué pendant la lecture vidéo Fonctionne en mode av ou hdmi Baisser le volume Confirmer la sélection ou sélectionner la vidéo à lire Fermer le son Sélectionnez la source du signal d'entrée Utilisé...
-
Page 33: Installation
aftersales@yabertech.com Remarque: 1). Installez 2 piles AAA dans la télécommande avant de l'utiliser. Ne combinez pas de nouvelles piles avec d'anciennes dans la télécommande, car cela pourrait entraîner une panne de fonctionnement en raison d'une alimentation électrique insuffisante. 2). Lorsque vous utilisez la télécommande, assurez-vous que l'émetteur de signal de la télécommande vise le récepteur de signal infrarouge du project- eur. -
Page 34: Distance Et Taille De Projection
aftersales@yabertech.com Maintenez le projecteur à une hauteur où sa lentille est en symétrie axiale par rapport à l'écran. Si cela n'est pas possible, utilisez la fonction de correc- tion trapézoïdale pour régler l'image de projection. Si vous souhaitez obtenir un écran de projection gratuit, veuillez nous contacter via aftersales@yabertech.com 2. -
Page 35: Projecteur De Démarrage
aftersales@yabertech.com 1) Appuyez sur la touche d'alimentation de la télécommande ou du project eur, le voyant deviendra bleu; 2) Ajustez la bague de mise au point sur le côté gauche du projecteur pour obtenir les meilleures performances d'image; (S'il est toujours flou, essayez d'ajuster la distance de projection.) 3) Utilisez la fonction trapézoïdale 4D du projecteur pour obtenir un écran de projection rectangle;... -
Page 36: Réglage De L'image
aftersales@yabertech.com 2. Réglage de l'image Veuillez suivre les étapes ci-dessous pour corriger : Ajustez la taille de l'image pour obtenir la meilleure taille d'image en déplaçant le projecteur d'avant en arrière, puis faites pivoter l'objectif pour obtenir la meilleure mise au point. Utilisez la fonction trapèze 4D et 4P (4 trapèze d'angle et 4 trapèze latéral) du projecteur pour obtenir un écran de projection rectangulaire. -
Page 37: Mode D'entrée Du Disque Usb
USB, puis appuyez sur le bouton [ OK ] pour le lire. CONSEILS: A.Le projecteur mis à niveau A.Pro U9 prend en charge le disque U pour lire directement les fichiers PPT, Word, Excel; B.Si vous entrez dans le menu [Vidéo], vous ne pouvez lire que la vidéo, la même chose que les 3 autres option. -
Page 38: Interface De Lecture De Musique
aftersales@yabertech.com Menu du joueur Mode Une fonction Sous-titre activé/désactivé, Changement définir plusieurs modes de sous- Options de sous-titres de sous-titres, Sous-titre avancé titres vidéo Options audio Commutateur de piste Vous pouvez régler le mode audio Vous pouvez régler la vidéo pour Options avancées Rembobinage avant une avance rapide ou un retour rapide... -
Page 39: Réglage Wi-Fi
1. Accédez à la page d'accueil - Sélectionnez le menu [ ] Sélectionnez le menu [ Paramètres WiFi ] - Ouvrez la fonction WiFi - Sélectionnez votre WiFi domestique dans la liste - Connectez le projecteur Pro U9 à votre WiFi domestique. Einstellung Connexion Wifi Réglage de... -
Page 40: Miracast (Pour Les Appareils Android)
4. Ouvrez le [Centre de contrôle] sur votre appareil iOS - Sélectionnez la fonction [Screen Mirroring] - Sélectionnez et connectez le récepteur iOS Cast nommé [Pro U9-iOSCast-xxxx] - l'écran de votre appareil iOS sera affiché sur la projection l'écran après 3 secondes. -
Page 41: Réglage Blueteeth
2. Sélectionnez le menu [Paramètres] sur votre appareil Android - Sélection nez la fonction [Mise en miroir de l'écran] - Sélectionnez votre récepteur Miracast nommé [Pro U9-AnCast-XXXX] - l'écran de votre appareil Android s'affichera sur l'écran de projection après 3 secondes. -
Page 42: Réglage De L'image Du Projecteur
Diffusion iOS Miracast Noter: 1. Le projecteur Pro U9 est compatible avec les casques Blueteeth, les haut-parleurs Blueteeth et les Airpods, mais pas les claviers Blueteeth ou les téléphones Blueteeth. 2. Lors de la connexion d'un haut-parleur Blueteeth, vous devez vous déconnecter de l'appareil précédemment connecté... -
Page 43: Réglage De La Distorsion Trapézoïdale
aftersales@yabertech.com Paramétrage de Inclure Fonction l'image Mode image Standard, Chaud, Utilisateur, Froid Basculer entre les modes d'image Luminosité 0~100 Ajustez le paramètre de luminosité à 100 Contraste 0~100 Ajustez le paramètre de contraste 0-100 Saturation 0~100 Ajuster les paramètres de saturation0~100 Ajuster les paramètres de netteté... -
Page 44: Clé De Voûte À 4 Côtés
aftersales@yabertech.com 6.2 Clé de voûte à 4 côtés:-40~40 Correction trapézoïdale Trapèze à quatre coins Trapèze à quatre cotés Réinitialiser Ajuster l’écran a l’aide des touches flechees jusqu’à ce que la ligne auxiliaire soit ajustée a un rectangle. Étape 1: Appuyez sur le bouton pour sélectionner le menu [Trapèze 4 côtés], puis appuyez sur le bouton [ OK ] en bas pour accéder au sous-menu. -
Page 45: Emplacement Du Projecteur
aftersales@yabertech.com Méthode de projection Preview Installation normale et projection Suspension de l’installation et projection Installation normale et projection Suspension de l’installation et de Vous pouvez définir 4 modes de projection ici: 1. De face 2. Arrière 3. Façade -Plafond 4. Près du plafond 1.Front projection Ceiling mount 2.Rear projection Ceiling mount 3.Front projection Table mount... -
Page 46: Zoom Client
aftersales@yabertech.com Zoom personnalisé Zoom personnalisé Zoom proportionnel Valeur de zoom Étape 1 : Appuyez sur le bouton pour sélectionner le menu [Zoom client], puis appuyez sur [OK] en bas pour accéder au sous-menu. Étape 2: cliquez sur "Mise à l'échelle", TOURNEZ la fonction de mise à l'échelle, vous pouvez réduire la hauteur et la largeur de la taille de projection jusqu'à... -
Page 47: Retour Aux Paramètres D'usine
Português(Portugal)(PT) Slobencina(Slovensko) CONNEXION DES LIGNES DE SIGNALISATION Le projecteur YABER Pro U9 dispose de 6 interfaces, ports HDMI*2/ports USB*2/sortie AV/sortie AUDIO. Veuillez sélectionner le bon port de connexion pour connecter votre appareil (PC, téléphone, lecteur DVD, barre de son, USB, PS4, etc.) -
Page 48: Connectez Le Disque Usb
aftersales@yabertech.com 1. Connectez le disque USB 1).Entrez le disque USB, sélectionnez [ USB ] sur la page d'accueil et entrez; 2).Sélectionnez l'option [ Vidéo/Musique/Image/Bureau ]; 3).Sélectionnez le fichier souhaité (ou dossier pour entrer dans le sous-dos- sier) sur le disque USB, puis appuyez sur le bouton [ OK ] pour le lire. 2. -
Page 49: Arrêt Sécurisé
3. Couvrez l'objectif et rangez le projecteur dans un endroit frais et sec. GARANTIE Merci beaucoup pour votre achat et votre soutien! Nous offrons 3 ans garantie pour projecteur Pro U9. Si vous avez des questions, n'hésitez pas à nous contacter via aftersales@yabertech.com DÉPANNAGE... - Page 50 aftersales@yabertech.com 2. La télécommande ne communique pas avec le projecteur. 1) L'interrupteur d'alimentation à l'arrière du projecteur est-il allumé ou éteint? 2) Les piles de la télécommande sont épuisées? 3) Quelque chose obstruant le signal entre la télécommande et l'IR. 4) Lumière forte sur IR directement.
- Page 51 Support@yabertech.com SOMMARIO ................SUPPORTO PROFESSIONALE A VITA YABER ............................SUGGERIMENTI ........................ELENCO DEI PACCHETTI ....................... SPECIFICHE DEL PROIETTORE ....................PANORAMICA DEL PROIETTORE ............................TELECOMANDO ............................INSTALLAZIONE ........................1. Metodo di installazione .......................... 2. Installare sul soffitto ..........................AVVIO PROIETTORE .......................
-
Page 52: Supporto Professionale A Vita Yaber
Support@yabertech.com SUPPORTO PROFESSIONALE A VITA YABER Caro cliente, Woohoo! Il tuo proiettore è già nelle tue mani! Iniziamo! Hai domande su come funziona? Leggere attentamente questo manuale prima di utilizzare il proiettore. Sei soddisfatto del tuo proiettore? In caso di problemi, inviare per e-mail il numero dell'ordine e la descrizione del problema a: aftersales@yabertech.com... -
Page 53: Elenco Dei Pacchetti
La lente sporca deve essere pulita con un panno di cotone morbido per la lente di vetro superficie. Non utilizzare panni duri o abrasivi. ELENCO DEI PACCHETTI YABER Pro Y9 Proiettore * 1 Power Cavo * 1 Telecomando * 1 Manuale di istruzioni * 1... -
Page 54: Panoramica Del Proiettore
aftersales@yabertech.com Support@yabertech.com PANORAMICA DEL PROIETTORE... - Page 55 2. Menu 3. Tasto OK 4. Tasto freccia 5. Fonte 6. Indietro Suggerimenti: i pulsanti della fusoliera Pro U9 sono pulsanti touch-screen, che possono essere azionati con un tocco leggero. Potenza Accendere/spegnere l'alimentazione Tasto Menu Funziona in modalità av o hdmi...
-
Page 56: Telecomando
aftersales@yabertech.com Support@yabertech.com TELECOMANDO Accendi / spegni l'alimentazione Effettua le impostazioni di sistema Può apportare alcune regolazioni di base dello schermo dopo aver fatto clic durante la riproduzione del video Funziona in modalità av o hdmi Volume basso Conferma la selezione o seleziona il video da riprodurre Chiudi il suono Seleziona la sorgente del segnale in ingresso Utilizzato per regolare il parametro del proiettore nella modalità... -
Page 57: Metodo Di Installazione
aftersales@yabertech.com Support@yabertech.com Nota: 1) .Installare 2 batterie AAA nel telecomando prima di utilizzarlo. Non combin- are le nuove batterie con quelle vecchie nel telecomando, che possono causare problemi di funzionamento a causa di un'alimentazione insufficiente. 2) .Quando si utilizza il telecomando, assicurarsi che il segnale il trasmettitore del telecomando punta al ricevitore del segnale a infrarossi del proiettore. -
Page 58: Installare Sul Soffitto
aftersales@yabertech.com Support@yabertech.com Proporzioni:16:9 Distance (m.) Dimensione dello schermo 1.68 50" 2.38 70" 3.29 100" 4.00 120" 5.00 150" La distanza di proiezione consigliata è di circa 100 pollici, la distanza di proiezione più breve è di 3.3m. La dimensione dell'immagine dipende dalla distanza tra il proiettore e lo schermo, potrebbe esserci una deviazione del 3% tra i dati sopra elencati. -
Page 59: Avvio Proiettore
aftersales@yabertech.com Support@yabertech.com AVVIO PROIETTORE 1) Premere il tasto di accensione sul telecomando o sul proiettore, la spia diventa blu; 2)Regolare l'anello di messa a fuoco sul lato sinistro del proiettore per ottene- re la migliore resa dell'immagine; (Se è ancora sfocato, prova a regolare la distanza di proiezione.) 3)Utilizzare la funzione keystone 4D del proiettore per ottenere uno schermo di proiezione rettangolare;... -
Page 60: Regolazione Dell'immagine
aftersales@yabertech.com Support@yabertech.com 2. Regolazione dell'immagine Si prega di seguire i passaggi seguenti per correggere: Regolare la dimensione dell'immagine per ottenere la migliore dimensione dell'immagine spostando il proiettore avanti e indietro, quindi ruotare l'obietti- vo per ottenere la migliore messa a fuoco. Utilizzare la funzione keystone 4D&4P (4 keystone angolare e 4 keystone laterale) del proiettore per ottenere uno schermo di proiezione rettangolare. -
Page 61: Modalità Di Input Disco Usb
USB, quindi premere il pulsante [ OK ] per riprodurlo. CONSIGLI: A.Il proiettore aggiornato Pro U9 supporta il disco U per riprodurre diretta- mente file PPT, Word, Excel B.Se si accede dal menu [Video], è possibile riprodurre solo il video, come le altre 3 opzioni. -
Page 62: Interfaccia Riproduzione Musicale
aftersales@yabertech.com Support@yabertech.com Menu Giocatore Modalità Funzione Sottotitoli On-Off,Cambio Sottotitoli, imposta più modalità di sottotitoli Opzioni Sottotitoli Sottotitoli Avanzati video Cambio Traccia Puoi impostare la modalità audio Opzioni Audio Puoi impostare il video perl'avanz- Riavvolgimento in avanti Opzioni Avanzate amento veloce o il riavvolgimento Velocità... -
Page 63: Impostazione Wi-Fi
1.Vai alla home page -- Seleziona il menu [ ] -- Seleziona il menu [ Impostazioni WiFi ] -- Apri la funzione WiFi -- Seleziona il tuo WiFi domestico dall'elenco -- Collega il proiettore Pro U9 al WiFi domestico. Blueteeth WIFI... -
Page 64: Miracast (Per Dispositivi Android)
aftersales@yabertech.com Support@yabertech.com 2.Torna alla home page -- Seleziona il menu [ iOS Cast ] -- Premi il pulsante OK per accedere al menu [ iOS Cast ]. Video Audio Immagine Office Ingresso segnale iOS Cast Mircast 3.Selezionare il menu [ Impostazioni ] sul dispositivo iOS -- Attivare la funzione [ Wi-Fi ] -- Connettere il dispositivo iOS alla stessa rete domestica del proiettore. -
Page 65: Impostazione Blueteeth
2.Seleziona il menu [Impostazioni] sul tuo dispositivo Android - Seleziona la funzione [Mirroring schermo] - Seleziona il tuo ricevitore Miracast chiamato [Pro U9-An Cast-XXXX] - lo schermo del tuo dispositivo Android verrà visualiz- zato sullo schermo di proiezione dopo 3 secondi. -
Page 66: Impostazione Immagine
Cast Mircast Nota: 1.Il proiettore PRO U9 è compatibile con le cuffie Blueteeth, gli altoparlanti Blueteeth e gli Airpod, ma non le tastiere Blueteeth o i telefoni Blueteeth. 2. Quando si collega un altoparlante Blueteeth, è necessario disconnettersi dal dispositivo precedentemente connesso o spegnere il dispositivo Bluet- eeth precedente, assicurarsi che l'altoparlante sia in attesa di associazi- one, altrimenti il proiettore non può... -
Page 67: Impostazione Keystone
aftersales@yabertech.com Support@yabertech.com Impostazione Includere Funzione dell'immagine Modalità immagine Standard, Caldo, Utente, Freddo Passa dalla modalità immagine Luminosità 0~100 Regola il parametro di luminosità su 100 Contrasto 0~100 Regola il parametro di contrasto 0-100 Saturazione 0~100 Regola i parametri di saturazione 0-100 Nitidezza 0~100 Regola i parametri di nitidezza 0-100... -
Page 68: Chiave Di Volta A 4 Lati
aftersales@yabertech.com Support@yabertech.com 6.2 Chiave di volta a 4 lati:-40~40 Correzione trapezio Trapezio a quattro angoli trapezio a quattro lati reimposta Regola lo schermo tramite i tasti freccia fino a quando la linea ausiliaria non diventa un rettangolo Passaggio 1: premere il pulsante per selezionare il menu [Trapezio a 4 lati], quindi premere il pulsante [ OK ] in basso per accedere al sottomenu. -
Page 69: Posizione Del Proiettore
aftersales@yabertech.com Support@yabertech.com 7. Posizione del proiettore Modalità proiezione Preview installazione normale e pr... installazione sospesa e proiezion installazione normale e proiezion installazione normale e proiezion Puoi impostare 4 modalità di proiezione qui: 1.Front 2.Posteriore 3.Front-Clling 4.Alloggio posteriore 1.Attacco a soffitto a proiezione 2.Montaggio a soffitto a retroproiezione frontale 3.Supporto da tavolo per 4.Supporto da tavolo per proiezioni frontail proiezioni posteriori... -
Page 70: Zoom Del Cliente
aftersales@yabertech.com Support@yabertech.com 8. Zoom del cliente Zoon personalizzato Zoom personalizzato Zoom proporzionale Zoom sinistra e desrta Zoon su e giù Passaggio 1: premere il pulsante per selezionare il menu [Zoom cliente], quindi premere il tasto [OK] in basso per entrare nel sottomenu. Passaggio 2: fare clic su "Ridimensionamento", RUOTARE la funzione Ridimensionamento, è... -
Page 71: Avvio E Impostazione Del Proiettore
Support@yabertech.com AVVIO E IMPOSTAZIONE DEL PROIETTORE Il proiettore YABER Pro U9 ha 6 interfacce, porte HDMI*1/porte USB*2/us- cita AV/uscita AUDIO. Seleziona la porta di connessione corretta per connettere il tuo dispositivo (PC, telefono, lettore DVD, soundbar, USB, PS4 ecc.) 1.Collegare il disco USB... -
Page 72: Connettiti Alla Soundbar/Altoparlante
aftersales@yabertech.com Support@yabertech.com Audio out (L/R) Audio-out Oppure collegalo al lettore DVD con il cavo HDMI nella confezione. HDMI HDMI 4. Connettiti alla soundbar/altoparlante Se l'altoparlante dispone di una porta AUX, utilizzare il cavo audio da 3,5 mm per collegare il proiettore e l'altoparlante come mostrato nell'immagine, accedere alla home page per selezionare [ AV ] come sorgente del segnale. -
Page 73: Garanzia
Support@yabertech.com GARANZIA Grazie mille per l'acquisto e il supporto! Forniamo 3 anni garanzia per il proiettore Pro U9. In caso di domande, non esitate a contattarci tramite aftersales@yabertech.com RISOLUZIONE DEI PROBLEMI I problemi elencati di seguito potrebbero verificarsi durante il funzionamento del proiettore. - Page 74 aftersales@yabertech.com Support@yabertech.com 9. Spegnimento automatico dopo aver lavorato per un po . 1) La ventilazione del proiettore è bloccata. 2) La tensione non è stabile. 3) Il sistema di protezione dal surriscaldamento. aftersales@yabertech.com...
- Page 75 Support@yabertech.com aftersales@yabertech.com CATÁLOGO ............. YABER Upgrade Pro U9 Manual del usuario - Español ..............................CONSEJOS ..........................LISTA DE EMPAQUE ..................... ESPECIFICACIÓN DEL PROYECTOR ......................RESUMEN DEL PROYECTOR ..................... RESUMEN DEL REMOTO CONTROL ............................INSTALACIÓN ........................1. Méthode d'installation ..........................2. Instalar en el techo ......................
-
Page 76: Yaber Upgrade Pro U9 Manual Del Usuario - Español
Support@yabertech.com YABER Upgrade Pro U9 Manual del usuario - Español Soporte profesional de por vida de YABER Estimado cliente, ¡Muchas gracias por apoyar a YABER! Lea este manual detenidamente antes de utilizar el proyector. Si tiene algún problema, envíe su número de pedido y el problema se vende al por menor a aftersales@yabertech.com... -
Page 77: Lista De Empaque
Support@yabertech.com LISTA DE EMPAQUE YABER Pro U9 Control remoto*1 Cable de alimentación*1 Proyector *1 Cable HDMI*1 3-en-1 Cable AV Cubierta de la lente*1 Tela de limpieza*1 Manual de usuario*1 Kit de limpieza * 1 Pantalla del proyector*1 ESPECIFICACIÓN DEL PROYECTOR Modelo: Pro U9 Resolución... -
Page 78: Resumen Del Proyector
aftersales@yabertech.com Support@yabertech.com RESUMEN DEL PROYECTOR... - Page 79 3. Tecla OK 4. Tecla de flecha 5. Fuente 6. Volver Sugerencias: Los botones del fuselaje del Pro U9 son botones de pantalla táctil que se pueden operar con un toque ligero. Poder Enciende / apaga la energía Tecla de menu Funciona en modo av o hdmi Confirma la opción...
-
Page 80: Resumen Del Remoto Control
aftersales@yabertech.com Support@yabertech.com RESUMEN DEL REMOTO CONTROL Encender/apagar el proyector Ajustes del sistema Puede hacer algunos ajustes básicos de la pantalla después de hacer clic durante la reproducción del video Operar en modo AV o HDMI Volumen - Tocar Mudo Seleccione la fuente de la señal de entrada Ajustar el parámetro en el modo de menú... -
Page 81: Instalación
aftersales@yabertech.com Support@yabertech.com Nota: 1.Instale 2 baterías AAA en el control remoto antes de usar. No combine baterías nuevas y viejas en el control remoto, ya que esto puede causar un mal funcionamiento debido a una fuente de alimentación insuficiente. 2.Cuando use el control remoto, asegúrese de que el transmisor de señal del control remoto apunte al receptor IR. -
Page 82: Instalar En El Techo
aftersales@yabertech.com Support@yabertech.com Ratio d'aspec defecto: 16:9 Distancia de proyección (m) Tamaño de proyección 1.70 50" 2.38 70" 3.30 100" 3.97 120" 5.00 150" La distancia de proyección recomendada es 3.3 m, la distancia de proyec- ción más corta es 1.68 m. El tamaño de la imagen depende de la distancia entre el proyector y la pantalla, puede haber una desviación del 3% entre los datos enumerados anteriormente. -
Page 83: Encender Dl Proyector
Support@yabertech.com aftersales@yabertech.com ENCENDER DL PROYECTOR 1. Presione “ ” en el control remoto o el proyector para encenderlo, (La luz indicadora se vuelve azul) 2. Ajuste el anillo de enfoque para obtener el efecto de proyección más claro (si siempre está borroso, ajuste la distancia de proyección dentro del rango de 1,5 m-5 m) 3. -
Page 84: Ajuste De Imagen
Support@yabertech.com aftersales@yabertech.com 2. Ajuste de imagen Siga los pasos a continuación para corregir: Ajuste el tamaño de la imagen para obtener el mejor tamaño de imagen moviendo el proyector hacia adelante y hacia atrás, luego gire la lente para obtener el mejor enfoque. Utilice la función de corrección trapezoidal 4D y 4P (corrección trapezoidal de 4 esquinas y corrección trapezoidal de 4 lados) del proyector para obtener una pantalla de proyección rectangular . -
Page 85: Interfaz De Reproducción Usb
Support@yabertech.com aftersales@yabertech.com 2. Interfaz de reproducción USB 2.1 Reproducir video / música / imagen / oficina en el modo de entrada de disco USB 1). Ingrese el disco USB, seleccione la opción [Video / Música / Imagen / Oficina] 2). Seleccione el archivo deseado (o carpeta para ingresar a la subcarpeta) en el disco USB, luego presione el botón [OK] para reproducirlo. -
Page 86: Interfaz De Reproducción De Música
Support@yabertech.com aftersales@yabertech.com Menú del jugador Modo Función Encendido-apagado de subtítulos,Cambio establecer múltiples modos de Opciones de subtítulos de subtítulos, Subtítulo Avanzado subtítulos de video Interruptor de pista Opciones de audio Puede configurar el modo de audio Puede configurar el video para Rebobinar hacia adelante Opciones avanzadas avanzar o rebobinar... -
Page 87: Conexión Inalámbrica
③Algunos dispositivos móviles pueden no admitir la duplicación de pantalla debido a la compatibilidad. ④Cualquier pregunta, no dude en ponerse en contacto con YABER a través 3.1 IOS de Cast (por Dispositivos iOS) 1.Vaya a la página de inicio - Seleccione el menú [ ] - Seleccione el menú... -
Page 88: Miracast (Por Dispositivos Android)
Support@yabertech.com aftersales@yabertech.com 2.Volver a la página de inicio - Seleccione el menú [iOS Cast] - Presione el botón OK para ingresar al menú [iOS Cast]. Vedio Audio Imagen Oficina Fuente de seña Cast de IOS Miracast 3. Seleccione el menú [Configuración] en su dispositivo iOS - Encienda la función [Wi-Fi] - Conecte su dispositivo iOS a la misma red doméstica que el proyector. -
Page 89: Configuración De Blueteeth
2.Seleccione el menú [Configuración] en su dispositivo Android - Seleccione la función [Duplicar pantalla] - Seleccione y conecte el nombre del dispositivo [Pro U9-AnCast-XXXX] - La pantalla de su dispositivo Android se mostrará en la pantalla de proyección después de 3 segundos. -
Page 90: Configuración De Imagen
Cast de IOS Miracast Note: 1.El proyector PRO U9 es compatible con los auriculares Blueteeth, los altavoces Blueteeth y los Airpods, pero no los teclados Blueteeth ni los teléfonos Blueteeth. 2. Cuando conecte un altavoz Blueteeth, debe desconectarse del dispositivo previamente conectado o apagar el dispositivo Blueteeth anterior, asegúrese... -
Page 91: Configuración De Keystone
Support@yabertech.com aftersales@yabertech.com Imagen Incluir Función Imagen Standard, Warm, User, Cool Switch among the image mode Brillo 0~100 Adjust the brightness parameter to 100 Contraste 0~100 Adjust the contrast parameter 0-100 Saturación 0~100 Adjust saturation parameters 0-100 Agudo 0~100 Adjust sharpness parameters 0-100 Color Standard, Warm, User, Cool Adjust color temperature... -
Page 92: Keystone De 4 Lados
Support@yabertech.com aftersales@yabertech.com 6.2 Keystone de 4 lados: -40 ~ 40 Corrección trapezoidal trapezoide de cuatro esquinas trapezoide de cuatro lados restablecer ajusta la pantalla a través de las flecha hasta que la linea auxiliar se ajuste a un rectáangulo Paso 1: Presione el botón para seleccionar el menú [Corrección trapezoi- dal de 4 lados], luego presione la parte inferior [OK] para ingresar al submenú. -
Page 93: Dirección De Proyección
Support@yabertech.com aftersales@yabertech.com Método de proyección Preview Instalación normal y proye... Instalación pospuesta y proyec... Instalación normal y proyeccion... Instalación suspendida y proyec... Puede configurar 4 modos de proyección aquí: 1.Frente 2.Trasero 3.Techo frontal 4.Techo trasero Pantalla Proyector Pantalla Proyector 1. Proyección frontal suspendida 2. -
Page 94: Zoom Personalizado
Support@yabertech.com aftersales@yabertech.com Zoom personalizado Zoom personalizado Escalada Zoom horizontal Zoom vertical Paso 1: presione el botón para seleccionar el menú [Zoom del cliente], luego Presione la parte inferior [OK] para ingresar al submenú. Paso 2: Haga clic en "Escala", GIRE la función Escala, puede reducir la altura y el ancho del tamaño de proyección hasta un 50% en la misma proporción. -
Page 95: Conectarse Con Otros Dospositivos
CONECTARSE CON OTROS DOSPOSITIVOS El proyector YABER Pro U9 tiene 6 interfaces, puertos HDMI * 2 / puertos USB * 2 / salida AV / salida AUDIO. Seleccione el puerto de conexión correcto para conectar su dispositivo (PC, teléfono, reproductor de DVD, barra de sonido, USB, PS4, etc.) -
Page 96: Conecte A La Barra De Sonido / Altavoz
Support@yabertech.com aftersales@yabertech.com Audio out (L/R) Audio-out O conéctelo al Reproductor de DVD con el cable HDMI incluido en el paquete. HDMI HDMI Conecte a la barra de sonido / altavoz Si su altavoz tiene un puerto AUX, utilice su cable de audio de 3,5 mm para conectar el proyector y su altavoz como muestra la imagen, ingrese a la página de inicio para seleccionar [AV] como fuente de señal. -
Page 97: Garantía
Support@yabertech.com aftersales@yabertech.com GARANTÍA ¡Muchas gracias por su compra y apoyo! Ofrecemos 3 años garantía para el proyector Pro U9. Si tiene alguna pregunta, no dude en contactarnos a través de aftersales@yabertech.com PREGUNTAS FRECUENTES Los problemas enumerados a continuación pueden ocurrir durante el funcionamiento de su proyector. - Page 98 Support@yabertech.com aftersales@yabertech.com KATALOG ..............YABER lebenslange professionelle Unterstützung ................................. TIPPS ........................... LISTE DER PAKETE ......................BEAMER SPEZIFIKATIONEN ...................... ÜBERSICHT DER BEAMEREN ..........................FERNBEDIENUNG ............................INSTALLATION ......................1. Installation Method ....................2. Projektionsabstand und größe ........................ 3. Montage an der Decke ......................
-
Page 99: Yaber Lebenslange Professionelle Unterstützung
Support@yabertech.com aftersales@yabertech.com YABER lebenslange professionelle Unterstützung Sehr geehrter Kunde, Vielen Dank für Ihre Unterstützung! Bitte lesen Sie dieses Handbuch sorgfältig durch, bevor Sie den Beamer verwenden. Wenn Sie Fragen haben, senden Sie bitte eine E-Mail an Ihre Bestellnummer und Frage aftersales@yabertech.com... -
Page 100: Liste Der Pakete
Bildqualität beeinträchtigen. Schmutzige Linsen Wischen Sie die Oberfläche der Glaslinse mit einem weichen Baumwolltuch ab. Verwenden Sie keine harten Tücher oder Schleifmittel. Liste der Pakete YABER Pro U9 Beamer* 1 Fernbedienung * 1 Netzkabel * 1 HDMI Cablte*1 Drei-in-Eins-AV-Kabel * 1... -
Page 101: Übersicht Der Beameren
Support@yabertech.com aftersales@yabertech.com Übersicht der Beameren... - Page 102 aftersales@yabertech.com Support@yabertech.com 1/18 Fußpolster Erhöhen Sie die Höhe des Projektors Infrarot-Fenster Infrarot-Signalempfänger Beamer Objektiv Optische beschichtete Glaslinse Anschlüsse für Stromkabel Anschlüsse für Stromkabel Kopfhörerbuchse 3,5 mm Kopfhörerausgang 7/10 HDMI Port HDMI1 Eingang, HDMI2 Eingang USB-Anschluss USB Interface USB-Anschluss unten: USB-T-Anschluss Der Hafen von AV Audio in Lautsprecher Stereo 5w...
-
Page 103: Fernbedienung
aftersales@yabertech.com Support@yabertech.com Fernbedienung Ein-/Ausschalten der Stromversorgung System einstellungen vornehmen einige grundlegende Anpassungen des Bildschirms vornehmen nachdem Sie während der Videowiedergabe geklickt haben Betrieb im HDMI Modus Lautstärke runter Auswahl bestätigen oder Video zum Abspielen auswählen Schalten Sie den Sound Wählen Sie die Eingangssignalquelle Wird verwendet, um die Parameter des Projektors im Menümodus einzustellen Zurück zum Home menü... -
Page 104: Installation
Support@yabertech.com aftersales@yabertech.com Anmerkungen: 1). Vor Gebrauch 2 AAA-Batterien an die Fernbedienung anbringen. Kombinieren Sie keine neue Batterie mit einer alten Batterie an der Fernbe- dienung, da eine unzureichende Stromversorgung zu einem Betriebsausfall führen kann. 2). Achten Sie bei Verwendung der Fernbedienung darauf, dass der Signal- geber der Fernbedienung auf den Infrarot-Signalempfänger des Beamers zielt. -
Page 105: Projektionsabstand Und Größe
Support@yabertech.com aftersales@yabertech.com Halten Sie den Beamer in einer Höhe, in der seine Linse axialsymmetrisch zur Leinwand ist. Wenn dies nicht möglich ist, verwenden Sie die Keystone-Korrekturfunktion, um das projizierte Bild anzupassen. 2.Projektionsabstand und -größe Wenn Sie eine kostenlose Projektionswand wünschen, kontaktieren Sie uns bitte unter aftersales@yabertech.com. -
Page 106: Starten Sie Den Beamer
Support@yabertech.com aftersales@yabertech.com A. Bitte kaufen Sie einen UniversalBeamer für die Deckenmontage; B. Entfernen Sie die vier Gummimatten an der Unterseite des Beamers und Sie werden die Schraubenlöcher sehen, montieren Sie die Decke mit M4*10mm Schrauben und montieren Sie sie. Starten Sie den Beamer 1)Drücken Sie die Power-Taste auf der Fernbedienung oder dem Beamer und die Anzeigeleuchte wird blau. -
Page 107: Image Adjustment
Support@yabertech.com aftersales@yabertech.com Drehen Sie den Fokusring langsam. Überprüfen Sie gleichzeitig den Fokuspunkt sorgfältig. Der beste Fokuspunkt für das Objektiv wäre dort, wo das Bild am klarsten ist. Hinweis: Wenn es immer noch verschwommen ist, versuchen Sie bitte, den Projektionsabstand anzupassen. 2. -
Page 108: Projektor Einrichten
Unterordners) auf dem USB-Datenträger aus und drücken Sie dann die [ OK ] Taste, um sie abzuspielen. TIPPS: Der aufgerüstete A.Pro U9-Projektor unterstützt U-Disk zum direkten Abspielen von PPT, Word und Excel Dateien B.Wenn Sie über das [Video] Menü zugreifen, können Sie nur das Video... - Page 109 Support@yabertech.com aftersales@yabertech.com 2.2 Video Schnittselle Player Menu Subtitle options Audio options Advanced options Screen Scale Speed Menu Funktionsweise Stehend Zum vorherigen Video wechseln Schneller Rückzug, schneller Rückzug während der Wiedergabe des Videos. Die Umwickelgeschwindigkeit von 2x bis 32x Schärfe Das aktuelle Video abspielen oder anhalten Schnell vorwärts Schieben Sie das Video schnell vorwärts, während Sie es abspielen.
- Page 110 Support@yabertech.com aftersales@yabertech.com 2.3 Audio wiedergabe Schnittstelle 1. Drücken Sie auf der Fernbedienung die Taste " ". Sie können die Musikliste direkt öffnen und direkt abspielen 2. Drücken Sie die Taste " " auf der Fernbedienung. Sie können den Musikwiedergabemodus, Einzelschleife / Zufallswiedergabe usw einstellen. 2.4 Office Play Schnittstelle Öffnen Sie die Datei, die Sie wiedergeben möchten, drücken Sie die Taste "M"...
-
Page 111: Wi-Fi Einstellungen
Verbindung in der Nähe des Beamers befindet. Es wird eine Entfernung von weniger als 1 m empfohlen. ③ Aufgrund der Kompatibilität unterstützen einige mobile Geräte die Bildschirmspiegelung möglicherweise nicht. ④ Bei Fragen wenden Sie sich bitte an Yaber per E-Mail an aftersales@ yabertech.com 3.1 IOS Cast (für iOS Geräte) 1. -
Page 112: Miracast (Für Android-Geräte)
IOS Besetzung Miracast 2. Wählen Sie das Menü [ Settings ] auf Ihrem Android-Gerät-wählen Sie die Funktion [ Screen mirroring ]-wählen Sie Ihren Miracast-Empfänger mit dem Namen [ Pro U9 -AnCast-XXXX]-Ihr Android-Gerät Bildschirm wird auf der Projektionswand nach 3 Sekunden angezeigt. -
Page 113: Blueteeth Einstellungen
Support@yabertech.com aftersales@yabertech.com Pro U9-AnCast-6688 Pro U9-AnCast-6688 3. Tippen Sie auf Ihrem Android-Gerät auf [ Einstellungen ] – [ WLAN anzeigen ] – [WLAN] öffnen und verbinden Sie Ihr Heim-WLAN. Anmerkungen: 1.Verschiedene Marken von Android-Handys haben verschiedene Opera tionsoptionen Bildschirmspiegelungsanzeige, siehe... - Page 114 Blueteeth Gerät ausschalten, stellen Sie sicher, dass der Lautsprecher auf das Pairing wartet. Andernfalls kann der Beamer nicht nach Blueteeth suchen oder keine Verbindung zu Blueteeth Lautsprechern herstellen. 3.Wenn Sie Fragen haben, wenden Sie sich bitte per E-Mail an YABER über: aftersales@yabertech.com...
-
Page 115: Bild Einstellung
Support@yabertech.com aftersales@yabertech.com 5. Bild einstellung Wählen Sie das Menü “ ” auf der Startseite des Beamer Einstellung WiFi-Anschluss Blueteeth Bildeinstellung Video Audio Bild Office Benutzerd Trapez Projektionsver- efinierter korrektur fahren Zoom Signalquelle IOS Besetzung Miracast Werkseinstellu System-Upgrade Sprache ng wiederherst ellen Bildeinstellung Bildmodus User... -
Page 116: Keystone Einstellung
Support@yabertech.com aftersales@yabertech.com 6. Keystone Einstellung 6.1 4-Eck-Keystone: 0~50 Wenn die Projektionsfläche nicht rechteckig ist, kann sie durch die 4-Punkt Trapezkorrektur angepasst werden. Schritt 1: Drücken Sie die Taste , um das Menü [4-Corner-Trapez] auszuwählen, und drücken Sie dann die Taste [ OK ] unten, um das Untermenü... -
Page 117: 4-Seitiger Keystone: -40~40
Support@yabertech.com aftersales@yabertech.com 6.2 4-seitiger Keystone: -40~40 Trapez korrektur Trapez mit vier Ecken Vierseitiges Trapez zurücksetzen Passen Sie den Bildschirm mit den Pfeiltasten an, bis die Hilfslinie auf ein Rechteck Schritt 1: Drücken Sie die Taste , um das Menü [4-seitige Trapezkorrektur] auszuwählen, und drücken Sie dann die Taste [ OK ] unten, um das Untermenü... -
Page 118: Projektionsverfahren
Support@yabertech.com aftersales@yabertech.com 7. Projektionsverfahren Projektionsverfahren Preview Vorderseite Rückseite Front -Decke Deckennähe Sie können hier 4 Projektionsmodi einstellen: 1.Vorderseite 2.Rückseite 3.Front -Decke 4.Deckennähe 1.Bestückung der vorderen 2 . H a l t e r u n g d e r h i n t e r e n Projektions fläche Projektions fläche 3. -
Page 119: Benutzerdefinierter Zoom
Support@yabertech.com aftersales@yabertech.com Benutzerdefinierter Zoom Benutzerdefinierter Zoom proportionaler Zoom Zoomwert Schritt 1: Drücken Sie die Taste , um das Menü [Benutzerdefinierter Zoom] auszuwählen, dann Drücken Sie unten auf [OK], um das Untermenü aufzurufen. Schritt 2: Klicken Sie auf "proportionaler Zoom", DREHEN Sie die Skalierungsfunktion, Sie können die Höhe und Breite der Projektionsgröße im gleichen Verhältnis um bis zu 50% reduzieren. -
Page 120: Werkseinstellung Wiederherstellen
Support@yabertech.com aftersales@yabertech.com Werkseinstellung wiederherstellen Werkseinstellung wiederherstellen Löschen Sie alle Daten, stellen Sie alle Systemeinstellungen und benutzerdefinierten Projekte wieder her Werkseinstellung wiederherstellen Einstellung Blueteeth WiFi-Anschluss Bildeinstellung Benutzerd Trapez Projektionsver- efinierter korrektur fahren Zoom Werkseinstellu System-Upgrade Sprache ng wiederherst ellen Sprache Deutsch(Deutschiand) Español(España)(ES) Français(France)(FR) Italiano(Italia) Polski(Polska) -
Page 121: Anschluss Der Signalleitungen
Support@yabertech.com aftersales@yabertech.com ANSCHLUSS DER SIGNALLEITUNGEN YABER Pro U9 Bemaer verfügt über 5 Schnittstellen, HDMI-An- schlüsse*1/USB-Anschlüsse*2/AV Ausgang/AUDIO Ausgang. Bitte wählen Sie den richtigen Anschluss, um Ihr Gerät anzuschließen (PC, Telefon, DVD-Player, Soundbar, USB, PS4 usw.) 1.USB Festplatte anschließen 1). Geben Sie den USB Datenträger ein, wählen Sie [ USB ] auf der Homep- age und geben Sie ein;... -
Page 122: Verbinden Sie Sich Mit Der Soundbar/Dem Lautsprecher
Support@yabertech.com aftersales@yabertech.com Audio out (L/R) Audio-out Oder schließen Sie den DVD-Player mit dem im Lieferumfang enthaltenen HDMI-Kabel an. HDMI HDMI 4.Verbinden Sie sich mit der Soundbar/dem Lautsprecher Wenn Ihr Lautsprecher über einen AUX-Anschluss verfügt, verwenden Sie bitte Ihr 3,5-mm-Audiokabel, verbinden Sie den Beamer und Ihren Lautspre- cher wie im Bild gezeigt, rufen Sie die Homepage auf, um [ AV ] als Signalquelle auszuwählen. -
Page 123: Garantie
Support@yabertech.com aftersales@yabertech.com GARANTIE Vielen Dank für den Kauf und die Unterstützung! Wir gewähren drei Jahre Garantie auf PRO U9 Beameren. Wenn Sie Fragen haben, zögern Sie nicht, uns unter aftersales@yabertech.com zu kontaktieren. TROUBLESHOOTING Die unten aufgeführten Probleme können während des Betriebs Ihres Beamers auftreten. - Page 124 Support@yabertech.com aftersales@yabertech.com 8. Das Gerät kann nicht gefunden werden, wenn es mit einer Festplatte oder einem Flash-Laufwerk verbunden ist. < unk1 > Überprüft, ob das Gerät kaputt ist. 9. Automatische Abschaltung nach einer Arbeitszeit. 1) Die Beamerlüftung ist blockiert. 2) Die Spannung ist instabil. 3) Überhitzungsschutzsystem.
- Page 125 Support@yabertech.com aftersales@yabertech.com 目次 前言 付属品 仕様書 プロジェクター各部の説明 リモコン各部の説明 プロジェクターの設置 1. 投影方式 2. 投影距離と投影サイズ 3. 天井取り付け プロジェクターを起動方法 投写イメージの調整 1. ピント合わせ 2. 画面調整 3. 信号源の選択 プロジェクターを起動 1. 入力信号源を選択 2. USB入力モード 2.1 USBディスク入力モードでビデオ/音楽/画像/オフィスを再生する 2.2 ビデオの再生インターフェース 2.3 音楽再生のインタフェース 2.4 オフィス再生のインターフェース 3. WIFi設定 3.1 iOS キャスト(iOSデバイスの場合) 3.2 Miracast (Androidデバイスの場合) 4. ブルートゥース設定 5. メニューの設定方法 6. スクリーンミラーリングシステムアップデート 6.1. 4ポイント台形補正 : 0~50 6.2. 4サイド台形補正 : -40~40 6.3. リセッ ト 7. 投影モード...
- Page 126 aftersales@yabertech.com Support@yabertech.com 前言 平素より格別のご愛顧を賜わり厚くお礼申し上げます。 この度は、 弊社のプロジ ェ ク ターをお買い上げいただき誠にありがと う ございます。 弊社のプロジェクターはご満足いただけましたでしょ うか? 全て検査済みですが、 万が一故障や問題等が起きました場合は弊社にて即時 対応させて頂きます。 何か不明点等ございましたら、是非遠慮なくaftersales@yabertech.com までご連絡ください。誠心誠意に対応させていただきます。 接続無信号 ・ 音が出ない ・ ピントが合わないなどの問題は設定の仕方で解決 できますので、 お困りの際はご連絡下さいませ。 また、 お買い上げいただいた商品について何かご不満な点や使用方法につ いてわからないことがございましたらご遠慮なくお問い合わせください。必ずご 満足いくまで対応させていただきますのでぜひ改善チャンスをくださるようにお 願いします。 お客様に満足して頂ける製品開発に精励してまいりたいと存じますので今後 ともより一層のご愛顧を賜りますようお願い申し上げます。 敬具 使用注意事項: 1. WiFiとブルートゥースの接続するについてですが、 使用ガイドを参照してくだ さい。 著作権保護の協議のためNe ix、PrimeVideo 、Hulu はサポートし ておりませんが、...
- Page 127 Support@yabertech.com aftersales@yabertech.com 5. 三年間保証がついていますので、何か不明点等ございましたら、是非遠 慮なくaftersales@yabertech.comまでご連絡ください。誠心誠意に対応さ せていただきます。 安全にお使いいただく ためのご注意 (必ず守り く ださい) 警告 お子様が本製品や付属品を口に入れないようにご注意く ださい。 本製品のカバーを開けたり、 分解したり しないでく ださい。 濡れた手で本製品やケーブルに触らないでく ださい。 本製品内部に液体、 金属などの異物が入らないようにしてく ださい。 本製品は水分湿気の多い場所、 直射日光の当たる場所、 ホコリや油煙などの多 い場所、 車中 や暖房器具の傍などの高温となる場所に設置したり、 保管したり し ないでく ださい。 本製品に強い振動や衝撃を与えないでく ださい。 本製品を重ねて設置したり、 本製品の上に重いものを置いたり しないでくださ い。 本製品は不安定な場所に設置したり、 保管したり しないでく ださい。 本製品のケーブルを抜き差し時は、...
- Page 128 Support@yabertech.com 仕様書 モデル番号 : Pro U9 ネイティブ 1920*1080P 台形調整 台形補正/手動 解像度 イメージング 光源 システム 16.7M Full 4:3/16:9 カラー コントラスト 50-200インチ 2.6-4.2M 推奨投影サイズ 投影距離 AC100-240V 1.19Kg 電源 本体重量 JPG/JPEG/BMP HDMI*2/USB*2/3.5mm 写真ファイル 接続端子 /PNG Headphone jack/AV 投影方式 フロント/リアプロ/ ラック/マウント 3GP/AVI/MP4/MPG/VOB/TS/M2TS/DAT/MKV ビデオファイル...
- Page 129 aftersales@yabertech.com Support@yabertech.com プロジェクター各部の説明...
- Page 130 Support@yabertech.com aftersales@yabertech.com 高さネジ調整用穴 プロジェクターの投影高さを調整 プロジェクターレンズ プロジェクターレンズ 3/11 リモコン信号受け 内蔵スピーカー 5w スピーカー 上のUSBポート USB ポート 下のUSB-Tポート HDMIポート HDMI 1 input / HDMI 2 input 電源ポート 電源コードを接続します AVポート Audio input 3.5mm イヤホン Output イヤホンポート 通気口 プロジェクターの過熱を防ぐ フォーカスリング ピント合わせ 防塵カバーのスイッチ スイッチを押して、 防塵カバーを取り外し 取り外して埃を掃除できます (画面に黒い点がある 防塵カバー...
- Page 131 aftersales@yabertech.com Support@yabertech.com リモコン各部の説明 電源オン/オン システム設定 ビデオ再生中にクリックしすると、 画面の基本的な調整を行うことができます AVまたはHDMIモードで操作する 音量— 確認する/ビデオを再生または一時停止 ミュート 入力信号源を選択 メニューモードでプロジェクターのパラメーターを調整する ホーム画面に戻る 前のメニューに戻る 音量+...
- Page 132 Support@yabertech.com ご注意 : 1) . バッテリーは同梱されていません。 2 AAAバッテリーが必要です (別途購入) 2) . リモコンを使用しながら、 IR信号受信部に向けます。 3) . 液もれの原因にもなりますので長期間使用しない場合は電池を取り出して おいてください。 プロジェクターの設置 1. 投影方式 Pro U9 プロジェクターは、 天吊り金具で天井に吊ることができ、 安定した机の上 に置いても投影できます。 ご使用環境によって下記の4つの投影方式がありま す。 1.固定位置での投影 2.マウント搭載 3.リアプロ 4.ラック搭載リアプロ 必要に応じて、 プロジェクターは安定した面に設置したり、 本製品のマウント を使用して天井から吊るしたりすることができます。 また、 外部ディスプレイ と接続したり、 背面投影 (リアプロ) を楽しむことが可能です。 2. 投影距離と投影サイズ...
- Page 133 aftersales@yabertech.com Support@yabertech.com コントラスト: 16:9 投影距離 (m) 投影サイズ 1.65 50" 2.37 70" 3.20 100" 3.90 120" 150" 4.90 投影効果を保証するために、 1.5m~3.2mの範囲に設置してください。 画面サイズは、 プロジェクターのレンズからスクリーンまでの距離によって決 まります。 設定方式により3%の誤差があります。 3.天井取り付け 1.天井取り付け用の汎用の天吊り金具は別途購入してください。 2 .プロジェクターの底には天井取り付け用のネジ穴があります。 (規格は M4*10mm ) 。 四隅のゴム足のゴムを取り外すと、 天井取り付け用ネジ穴が出 てきます。 以下を参照してください。 プロジェクターを起動方法 1) .リモコン用単四電池2本は別売りので、 ご使用前に電池を入れください。 2) .リモコンまたはプロジェクターの電源キーを押すと、 インジケーターライトが ブルーになります。...
- Page 134 aftersales@yabertech.com Support@yabertech.com 3) . 4D台形補正メニューでデーターを調整して台形投影画面を補正します。 4) . プロジェクターのレンズを回して、 ピントを調整してください。 5) . 設備と接続している場合は、 必ず対応の信号源を選択してください。 選択し ないと無信号になります。 6) . メニューの言語設置画面で、 プロジェクターの表示言語を日本語まで設置し てください。 ( 詳しく設置方法は説明書のメニュー設定ページを参照ください。 ) 投写イメージの調整 1. ヒント合わせ 初めてプロジェクターを使用する時は、 ぼやけな画像が表示されます。 ご使用 前には、 まずピントを合わせてください。 プロジェクター側面のフォーカスリングを回して投影画面がクリアまでピントを 合わせしてください。 その同時に投影画面のピント変化をご確認でください。 注 : ピント調整しても投影画面はぼやけている場合は、 投影距離を調整してみ てください。 ご注意 : もし台形をうまく調整できない場合は正面平面でプロジェクターを放置して再 調整してください。 ピント合わせ リング...
- Page 135 aftersales@yabertech.com Support@yabertech.com 2. 画面調整 画面修正するには、 以下の手順に従ってください。 プロジェクターを前後に動かして画像サイズを調整し、 最適な画像サイズを取 得してから、 レンズを回転させて最適なフォーカスを取得します。 プロジェクタ ーの4点&4サイドキーストーン機能 (4点キーストーン&4サイドキーストーン) を使用して、 投影画面は台形まで調整できます。 3. 信号源の選択 リモコンまたはプロジェクターの 「S」 ボタンを押して、 「 AV」 、 「 VGA」 、 「 HDMI」 から選択します。外部デバイス(スマートフォン、iPad、Fire tv stick、TVボッ クス、 DVDプレーヤー、 コンピューター、 など) プロジェクターの対応するイン ターフェースで、 必ず対応するソースを選択してください。 正しいソースを選 択しないと、 プロジェクターは信号を検出できません。 そして、 ホームページに 「ビデオ」...
- Page 136 ホームページに 「ビデオ」 「 音楽」 「 写真」 「 信号源」 「 IOSキャスト」 「 ミラキャスト」 のメニューがあります。 2. USB入力モード 2.1 USBディスク入力モードでビデオ/音楽/画像/オフ ィスを再生する 1) USBディスクを挿入して、 [ビデオ/音楽/画像/オフィス]オプションを選択し ます 2) USBディスク内のファイル (またはサブフォルダーに保存される文件) を選 択し、 [OK]ボタンを押して再生します。 ご注意 : A.アップグレードされた Pro U9 は、 PPT、 Word、 Excelファイルを直接再生する のをサポートしています B. [ビデオ]メニューから入ったら、 ビデオのみを再生できます。 他の3つのメニ ューも同じです。 2.2 ビデオの再生インターフ ェース 設定メニュー 字幕設定 オーディオ設定...
- Page 137 aftersales@yabertech.com Support@yabertech.com メニュー 機能説明 前の動画に切り替え 再生/一時停止 次の動画に切り替え 字幕設定 字幕起動/停止 字幕ファイル切り替え 進階設定 メニュー セレクシ ョン 機能説明 字幕起動/停止 起動/停止 字幕機能を作動/一時停止 他の字幕ファイルへ切り 字幕切り替え 他の字幕ファイル 替える機能 字幕に付き詳しい設定 タイムライン調整/字幕 進階設定 エンコード/フォントカ ーラー/フォントサイズ/ フォントエフェク ト/行間 隔/文字間隔...
- Page 138 aftersales@yabertech.com Support@yabertech.com オーディオ設定 トラック切り替え メニュー 機能説明 トラック切り替え オーディオ トラックを切り替える機能 設定メニュー 字幕設定 オーディオ設定 早送りと巻き戻し機能 早送りと巻き戻し機能 横縦比調整 早送りと巻き戻し 再生スピード 00 : 00 : 10 00 : 03 : 10 メニュー 機能説明 早送りと巻き戻し機能 早送りと巻き戻し機能を解禁します...
- Page 139 aftersales@yabertech.com Support@yabertech.com 設定メニュー 字幕設定 オーディオ設定 早送りと巻き戻し機能 横縦比調整 横縦比調整 再生スピード 初期 フールスクリーン 16:9 メニュー セレクシ ョン 機能説明 横縦比調整 初期/フールスクリーン 画面の横縦比例を調整す /16 : 9/4 : 3 る機能 設定メニュー 字幕設定 オーディオ設定 早送りと巻き戻し機能 再生スピード 横縦比調整 再生スピード 0.25 0.75 メニュー セレクシ ョン 機能説明 再生スピード 0.25/0.5/0.75/0.8/1 動画の再生スピードを調...
- Page 140 aftersales@yabertech.com Support@yabertech.com 2.3 音楽再生のインタフェース 1) リモコンの " " ボタンを押すと、 音楽リストを直接開いて直接再生できます 2) リモコンの " "ボタンを押すと、 音楽再生モード : シングルループ/ランダム 再生などを設定できます。 2.4 オフ ィス再生のインターフ ェース 再生モード 再生 自動再生 切り替え時間 キャンセル 再生したいファイルを開き、リモコンまたはプロジェクターの「M」ボタ ンを押すと、 「再生」、 「自動再生」の 2 つの再生モードを選択できます。 「自動再生」の場合は内容の切り替え時間も設定できます。...
- Page 141 aftersales@yabertech.com Support@yabertech.com 3.WIFi設定 ワイヤレス接続 注意事項 : ①ホームページに [ スクリーンミラーリング ] メニューに入って、 システム設定で ミラーリングの指導言語を日本語に変更できます。 ②ワイヤレスでスクリンミラーリングの流暢性は、 ネットワーク環境に係わります。 安定性がよくの環境でワイヤレズでスクリンミラーリングことをお勧めします。 画面ミラーリングを使用する場合は、 100Mbit以上の帯域幅をお勧めします。 ③流暢性と安定性のためにワイヤレスで接続する時スマホなどの設備はプロジ ェクターに1m以内の距離でご使用お勧めします。天井吊りの場合では、 スマ ホとプロジェクターの間隔が遠すぎないようにお勧めします。 ④すべてのスマートフォンがこの機能をサポートしているわけではありません。 使用する前にサポートされているか確認してく ださい。 ⑤ご家庭WIFIの2.4 Gを接続してく ださい。 5GWIFIを接続お勧めません。 aftersales@yabertech.com ⑥ご不明な点がございましたら、 までお気軽に連 絡お願いします。 3.1 iOS キャスト(iOSデバイスの場合) 1.ホームページの " " メニューを選択します 「WiFi設定」 メニューを選 WiFi機能を開きます WiFiリストからターゲッ トネッ トワーク 択します...
- Page 142 信号源 3.3. iOSデバイスの 「設定」 に入って 「Wi-Fi」 機能をオンにしま す デバイスをプロジェクターと同じWiFに接続します。 4. iOSデバイスで 「コントロールセンター」 を開きます。 「スクリーンミラー リング」 機能を選択します。 「Pro U9 -iOSCast-xxxx」 を ク リ ッ ク し て 、 画 面 ミ ラ ーリングに入ります。 接続が成功すると、 スマホの画面がプロジェ クターに表示されます。 3.2 Miracast (Androidデバイスの場合) STEP1: ホームページの 「Miracast」 メニューを選択します...
- Page 143 Support@yabertech.com Pro U9-AnCast-6688 Pro U9-AnCast-6688 STEP3: ご自宅のネッ トでストリーミング希望な場合、 STEP2を完成した後、 Androidデバイスで、 「 設定」 「WLANディスプレイ」 をタップします。 「 Wi-Fi」 をオンにして家庭のWiFiを接続します。 ご注意 : ①スマホの [画面ミラーリング」 機能のボタンですが、 スマホにより 「マルチス ク リ ー ン 」 / 「 ワ イ ヤ レ ス デ ィ ス プ レ イ 」 / 「 W L A N デ ィ ス プ レ イ 」 / 「 ス...
- Page 144 Support@yabertech.com aftersales@yabertech.com ペアリングされたデバイス ブルー ト ゥースのステータス (接続可能なデバイスを... 名前 ブルートゥースデバイスを検索する 近くのデバイス ご注意 : 1. ブルートゥーススピーカーと接続する時に、 ブルートゥーススピーカーがペア リング待ちの状態であることを確認してください。 ブルートゥーススピーカーが ペアリング待ちの状態ではないと、 ブルートゥーススピーカーが検索できない、 プロジェクターと接続できかねます。 aftersales@yabertech.com 2. 何かご不明な点がございましたら、 までお気 軽にお問い合わせください。 Airpordsの場合 : Airpordsを開き、 後ろのボタンを3〜4秒間長押し続けると、 Airpordsを検索して接続できます。 注 : ①ブルート ゥースヘッ ドセッ ト、 ブルート ゥーススピーカーにのみ接続でき、 ブルー ト...
- Page 145 Support@yabertech.com aftersales@yabertech.com 5. 画面調整 5.1 ホームページにある“ ”メニューを選択して、 設定 WiFi接続 ブルート ゥース 画像設定 ビデオ 音楽 画像 オフィス 投影方法 カスタムズーム 台形補正 iOS キャスト Miracast 信号源 システムのアップ 工場出荷時の設定 グレード を復元るす 言語 画像設定 Standard 画像モード 明るさ コントラスト 飽和度 シャープネス Standard 色温度 High 画像ノイズリダ... 最選率...
- Page 146 aftersales@yabertech.com Support@yabertech.com 6. 台形補正の設定 6.1. 4ポイント台形補正 : 0~50 投影画面が台形でない場合は、 4ポイント台形補正で調整できます。 ステップ1 : [4ポイント台形補正]を選択し、 [OK]ボタンを押してサブメニューに 入ります。 ステップ2 : リモコンまたはプロジェクターの[OK]ボタンを押して、 ポイントを選 択します ステップ3: 投影画面が希望の台形になるまで、 リモコンまたはプロジェクター の矢印キーを押して、 水平または垂直パラメーターを調整します。 6.2. 4サイド台形補正 : -40~40 台形補正設定 4ポイント台形補正 4サイド台形補正 リセッ ト 補助線が長方形に調整されるまで、矢印キーを使用して画面を調整します 中央の円が完全な円の場合、画面の比率はシステム設定に準拠します ʻOKʼキーでコーナー、上、下、左、右のキーを選択して調整します...
- Page 147 Support@yabertech.com aftersales@yabertech.com ステップ1:[4サイド台形補正]を選択し、 [OK]ボタンを押してサブメニューに入 ります。 ステップ2:投影画像が (1) と表示されている場合は、 リモコンまたはプロジェ クターのボタンを押して、 投影画像 (2) が得られるまで、 垂直パラメーター (-40 〜0) を増やします。 ステップ3:投影画像が (3) と表示されている場合は、 リモコンまたはプロジェ クターのボタンを押し、 投影画像 (4) が得られるまで垂直パラメーター (0〜40) を減らします。 6.3. リセッ ト 「リセッ ト」 をクリックすると、 パラメータがデフォルト値に復元されます 台形補正設定 4ポイント台形補正 4サイド台形補正 リセッ ト 7. 投影モード 投影方法...
- Page 148 aftersales@yabertech.com Support@yabertech.com 1.天吊り設置 2.逆面-天吊り設置 3.机上設置 4.逆面-机上設置 8. カスタマーズーム機能 カスタムズーム カスタムズーム 連携比例ズーム 水平方向ズーム 垂直方向ズーム ステップ1:ボタンを押して[カスタマーズーム]メニューを選択し-[OK]ボタンを 押してサブメニューに入ります。 ステップ2:[連携比例ズーム]をクリックし、 [連携比例ズーム]機能をオンにする と、 投影サイズの高さと幅を同じ比率で最大50%縮小できます。 ステップ3:[連携比例ズーム]をクリックし、 [連携比例ズーム]をオフにすると、 投影サイズの水平ズームと垂直ズームを最大50%まで別々に縮小できます。 9. システムアップデート オンラインアップグレード オンラインアップデート 現在のバージョン:V 0.0.3 オンラインアップデート ネッ トワークは接続済み状態をご確認ください ローカルアップデート...
- Page 149 す す す す す す す す す す す す 言語 Deutsch(Deutschiand) Español(España)(ES) Français(France)(FR) Italiano(Italia) Polski(Polska) 中文(中国) (CN) 中文(台湾) (TW) 中文(香港) (HK) 日本語(日本) ビデオ機器の接続 YABER Pro U9プロジェクターには、 HDMIポート* 2 / USBポート* 2 / AV出力/オ ーディオ出力の6つの接続ポートがあります。 デバイス (PC、 スマホ、 DVDプレー ヤー、 サウンドバー、 USB、 PS4など) を接続するため、 必ず正しい接続ポートを 選択してください...
- Page 150 Support@yabertech.com aftersales@yabertech.com 1. USBとの接続 1) USBディスクを挿入します。 2) オプションの[ビデオ/音楽/画像/オフィス]を選択します 3)USBディスク内のご希望のファイル (またはサブフォルダーに入るフォルダ ー) を選択し、 [OK]ボタンを押して再生します。 2. HDMIポートを介してデバイスとの接続します 1) TVスティックまたはラップトップをプロジェクターのHDMIポートに接続しま す。 2) ホームページに入り、 対応するHDMIを信号源を選択します。 3. DVDプレーヤーに接続します 付属品に含まれる3-in-1AVケーブルをご利用します。 1) DVDプレーヤーとプロジェクターの電源を入れます。 2) パッケージに含まれる3-in-1 AVケーブルを使用して、 カラフルなメスコネク タをDVDプレーヤーのRCAケーブルに接続します。 3)黒のコネクタをプロジェクターのAVポートに接続し、 ホームページに入り、 信号源として[AV]を選択します ご注意 : テレビレコーダーと接続して音声がでない場合は一部のビデオが著作権保護 のため外部に信号を転送することはできません。 ビデオのドルビーモードを PCMに変更してください。...
- Page 151 aftersales@yabertech.com Support@yabertech.com Audio out (L/R) Audio-out または、 パッケージ内のHDMIケーブルでDVDプレーヤーに接続します HDMI HDMI 4. サウンドバー/スピーカーに接続します スピーカーにAUXポートがある場合は、 3.5mmオーディオケーブルを使用し て、 写真のようにプロジェクターとスピーカーを接続し、 ホームページに入り、 信 号源として[AV]を選択してください。 Audio out AUX port ご注意 : 外部設備に音声が出ない場合 原因 : Netflixアプリやprime videoのアプリでは一部のビデオが著作権保護の ため外部に信号を伝送することはできません。 解決方法 : 本製品はドルビーに対応しかねますので、 ビデオのドルビーモード をオフにして他のモードに変更してください。 安全なシャッ トダウン 1. プロジェクターまたはリモコンのボタン 「 」 を押します。 再起動、 シャッ トダウ 「 ...
- Page 152 aftersales@yabertech.com Support@yabertech.com 設定 設 設 定 WiFi-Anschluss i- - sc sc Bild einstellung B B ild einstellung g WiFi接続 W W iFi 必要な操作を選択してください 接続 接続 接続 続 続 続 続 続 ブルート ゥース ブル ト ゥ ス ス 画像設定 画像設定 Trapez korrektur Trapez korrektur r Projektionsverf...
- Page 153 aftersales@yabertech.com Support@yabertech.com 3) プロジ ェ ク ターの換気口が遮断されているか。 4) 電圧が安定していません。 5) 長い時間稼働して、 過熱保護システムを引き起こ したか。 3. 映像が出ない 1) 接続している入力源を選んでいますか。 本体またはリモコンの入力信号選択ボ タンを再度押してく ださい。 2) 入力端子のケーブルが正しく 接続されていますか。 そ れ で も 解 決 し な い 場 合 は [ 、 リ セ ッ ト ]...
- Page 154 FCC STATEMENT : This device complies with Part 15 of the FCC Rules. Operation is subject to the following two conditions: 1) This device may not cause harmful interference, and 2) This device must accept any interference received, including interference that may cause undesired operation.
- Page 155 Should this unit be operated under conditions other than those recommend- ed or at voltages other than the voltage indicated on the unit, or any attempts made to service or modify the unit, this will render WARRANTY VOID. The product you buy may sometimes differ slightly from illustration. DISPOSAL: This marking indicates that this product should not be disposed with other household wastes throughout the EU.
- Page 156 Trade name: Yaber Equipment: Entertainment Projector Model No. : Pro U9 to which this declaration relates is in conformity with the essential require- ment set out in the Council Directive on the Approximation of the laws of the Member States relating to LVD Directive(2014/35/EU) &...
Need help?
Do you have a question about the Pro U9 and is the answer not in the manual?
Questions and answers