Table of Contents
Advertisement
Quick Links
Advertisement
Table of Contents

Related Manuals for Yaber Pro U6


Summary of Contents for Yaber Pro U6
- Page 1 Pro U6 PROJECTOR...
-
Page 2: Table Of Contents
YABER Lifetime Professional Support - - - - - - - - - - - - - - - - - -... - Page 3 6. System Update - - - - - - - - - - - - - - - - - - - - - - - - - - - - - - - - - - - - - - - - - - - - - 21 7.
-
Page 4: Yaber Lifetime Professional Support
YABER Lifetime Professional Support Dear customer, Thank you very much for supporting YABER! Please read this manual thoroughly before using the projector. If you have any issues, email your order number and the problem to aftersales@yabertch.com We will provide a fast solution in 24 hours. -
Page 5: Package List
Package List Pro U6 Projector HDMI Cable 3 -in -1 AV Cable Remote Control Power Cord Cleaning Cloth Lens Cover Quick Start Guide Carry Bag EN 3... -
Page 6: Projector Specifications
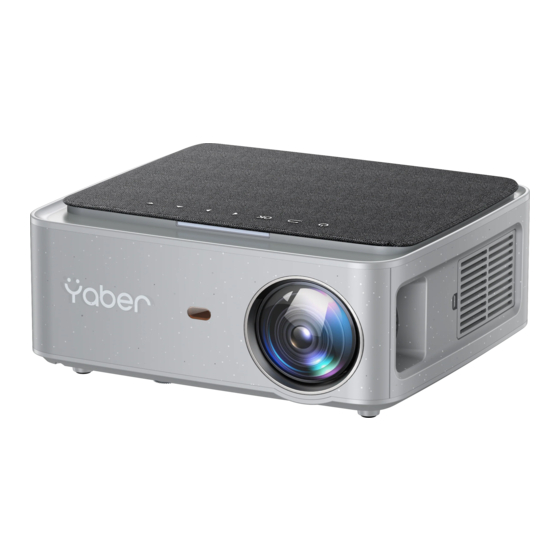
Projector Specifications Model No. Pro U6 Manual Vertical& Native Resolution 1920*1080P Keystone Correction Horizontal Display Technology Light Source Color Game 16.7M Full Aspect Ratio 4:3/16:9 Recommended Minimum Projection 4.5 -16.0ft 4.5ft Projection Distance Distance Power Voltage AC100 -240V Projector Weight 8.6lb... - Page 7 Height Adjustment Screw Rubber Pads Focus Ring Detachable Detachable Dust Filter Dust Filter Switch Dust Cleaning Port Height Adjustment Screw Adjust the height of the projector IR Window Infrared signal receiver Projector lens Optical coated glass lens Power Cord Port Power Cord Port Headphone Jack 3.5mm Headphone Output...
- Page 8 Source Back Up Key Down Key Left Key Right Key Power Turn on/off the power Back Return to the previous menu Confirm the option Up Key Down Key Used to adjust the parameter of the projector in the menu mode Left Key Right Key EN 6...
-
Page 9: Remote Contol
Remote Contol Power Source Picture flip Confirmation key Arrow keys (Play and Pause) Back Menu Home Page Volume + Previous Next Volume - Mute Power Turn on/off the power Source Select the input signal source Used to adjust the parameter of the projector in the menu Arrow keys mode Press once: Operate picture and sound settings in AV or HDMI... -
Page 10: Installation
Note: 1. Install 2 pieces of AAA batteries into the remote controller before using it. Do not combine new batteries with old ones in remote controller, which can cause operation failure due to insufficient power supply. 2. When using the remote controller, please make sure that the signal transmitter of the remote controller aims at infrared signal receiver of the projector. -
Page 11: Install On The Ceiling
Aspect Ratio: 16:9 Distance (ft.) Screen Size 40" 60" 80" 11.2 100" 13.4 120" 16.8 150" The recommended projection distance is about 11.2ft, the shortest projection distance is 4.5ft. The image size depends on the distance between projector and screen, there may be 3% deviation among above listed data. -
Page 12: Starting Projector
Starting Projector 1. Press the power key on the remote controller or projector, the indicator light will turn blue. 2. Use the focus function of the projector to get the best image performance.(If it is still blurry, please try to adjust the projection distance.) 3. -
Page 13: Digital 4D Keystone Correction
2. Digital 4D Keystone Correction Use the digital 4D keystone correction of the projector to change the image to be rectangle(vertical and horizontal). Detail please refer the page 16 of this manual. Setting Up The Projector The projector's home page is as follow. 1. -
Page 14: Play Interface
PS: 1.Pro U6 upgraded projector supports U disk to directly play PPT, Word, Excel files. 2.If you enter from the [Video] menu, you can only play the video, The same as other 3 options. 2.2 Play Interface Playing setting Include... -
Page 15: Music Play Interface
Menu Content Mode Function Contrast Brightness Modify the picture Standard/Soft/ Picture Mode parameters in the Dynamic/Vivid/User Sharpness range 0 -100 Color Modify the sound Bass Standard/Music/ Sound Mode parameters in the Moive/News/Users Treble range 0 -100 2.3 Music Play Interface Playing setting Include Function... -
Page 16: Picture Play Interface
2.4 Picture Play Interface Playing setting Include Function change picture from the current Play List the pictures of current folder folder start playing slides from the current Play Slide start, stop folder Interval Time 3 sec, 5 sec, 8 sec, 12 sec set interval time of playing slides auto, full screen, zoom out, original, Aspect Ratio... -
Page 17: Wifi Setting
1. Go to home page - Press the left button - Select the [ Network ] menu - Select [ Wireless Net Mode ] - Select your home WiFi from the list - Connect the Pro U6 projector to your home WiFi 2. -
Page 18: Maxhubshare (For Android Devices)
3. Open the [ Control Center ] on your iOS device - Select the [ Screen Mirroring ] function - Select and connect the iOS Cast receiver named [ Pro U6 -XXXX ] - your iOS device screen will be displayed on the projection screen after 3 seconds. -
Page 19: Bluetooth Setting
- - Choose the Bluetooth device desired - - it will be paired and connected automatically. Note: 1.The Pro U6 projector is compatible with the Bluetooth headsets, Bluetooth speakers and Airpods, but not the Bluetooth keyboards or Bluetooth phones. 2.If you have any question, please feel free to email YABER via: aftersales@yabertech.com... -
Page 20: Projector Image Setting
5. Projector Image Setting 5.1 Projection Mode 5.2 Keystone Advanced & 4-Point Keystone 5.2.1 Vertical Keystone Correction Step 1: Select the [ Sides ] option in the [ Advanced keystone correction ] menu, then press the ▼ button to enter the [ Four -sided trapezoid ] menu. EN 18... -
Page 21: Keystone Advanced & 4 -Point Keystone
Step 2: If the projection image shows as (1), press the button on the remote controller or projector to increase the vertical parameter ( -50~0), until to achieve the projection image (2). Step 3: If the projection image shows as (3), then press the button on the remote controller or projector, and decrease the vertical parameter (0~50), until to achieve the projection image (4). - Page 22 Step 3: Keep pressing the OK button on the remote control or projector to select the point . Step 4: Press the arrow keys on the remote or projector to adjust the horizontal or vertical parameters, until the projection screen becomes the desired rectangle. OK Pick point : Keep pressing the OK button on the remote control or projector, until the positioning icon appears at the point desired, then release the button immediately.
-
Page 23: Digital Zoom
5.3 Digital Zoom 1. Open the [Custom Zoom] option. 2. Select [Zoom left and right] or [Zoom up and down]. 3. Press the left or right button on the remote control. 6. System Update EN 21... -
Page 24: Common
7. Common Menu Function Set up system language Language Input method Set current input method Wallpaper Change wallpaper Default source Set up default source: AV, HDMI1, HDMI2 Power mode Set power mode: standby, on, last System Recovery Recover the system and all data The device name Change projector name About the Standyby/on/last Power mode... -
Page 25: Signal Lines Connection
Signal Lines Connection YABER Pro U6 projector has 7 interfaces, HDMI ports*2/ USB ports*2/ 3.5mm headphone output/ AV in/ RJ45(Ethernet port). Please select the correct connecting port to connect your device (PC, Phone, DVD Player, Sound bar, USB, PS4 etc.) 1. -
Page 26: Connect To The Sound Bar/Speaker
3. Cover the lens and store the projector in a cool and dry place. Warranty Thank you so much for your purchase and support! We provide 3 -year warranty for Pro U6 projector. If you have any questions, please feel free to contact us via purchased from Amazon: support@yabertech.com... - Page 27 Brehmstr.56, 40239 Duesseldorf, Germany (Company address) declare under our sole responsibility that the product Trade name: Yaber Equipment: Entertainment Projector Model No. : V5 to which this declaration relates is in conformity with the essential requirement set out in the Council Directive on the Approximation of the laws of the Member States relating to RED Directive(2014/53/EU) &...
- Page 28 Scan and download the PDF user manual Where to Get More Help Support@yabertech.com Aftersales@yabertch.com www.yaberglobal.com @Yaber Entertainment Projector @Yaber Entertainment Projector...
Need help?
Do you have a question about the Pro U6 and is the answer not in the manual?
Questions and answers