Johnson Controls S300 Series Hardware Installation Manual
Hide thumbs
Also See for S300 Series:
- Hardware installation manual (47 pages) ,
- Hardware installation (44 pages) ,
- Hardware installation manual (31 pages)

Related Manuals for Johnson Controls S300 Series


Summary of Contents for Johnson Controls S300 Series
- Page 1 S300 Series S300-DIN-S Hardware Installation Manual December 2017 24-10239-359 Revision C...
- Page 2 No part of this document may be reproduced without the prior permission of Johnson Controls. If this document is translated from the original English version by Johnson Controls, all reasonable endeavors will be used to ensure the accuracy of translation. Johnson Controls shall not be liable for any translation errors contained herein or for incidental or consequential damages in connection with the furnishing or use of this translated material.
- Page 3 Declaration of Conformity United States: This equipment, S300-DIN-S, has been tested and found to comply with the limits for a Class B digital device, pursuant to Part 15 of the FCC rules. These limits are designed to provide reasonable protection against harmful interference in a residential installation.
- Page 4 UNDERWRITERS LABORATORIES COMPLIANCE VERIFICATION SHEET The following model number is listed under Underwriters Laboratories® (UL) 1076 for Proprietary Burglar Alarm Units and Systems, UL 294 for Access Control Systems Units, and Underwriters Laboratories of Canada ULC/ORD-C1076-86. S300-DIN-S When installed at the site the following requirements must be met to comply with these standards. The S300-DIN-S is intended to be used with listed sub-assemblies found in file BP4166, Vol.
- Page 5 CK722 controller, or a CK721-A controller). You can also mount a backup battery unit. The unit is composed of two 12V lead-acid batteries in one battery bracket. 24-10239-359 Rev. C This document contains confidential and proprietary information of Johnson Controls © 2017 Johnson Controls...
-
Page 6: Installation
Check the purchase order against the packing slips to ensure the order is complete. If the contents of a container are damaged in any way, notify the carrier and your Johnson Controls representative immediately. Report any discrepancies to your Johnson Controls representative. Save the packing materials for possible return shipments. Package Contents Backplate ... -
Page 7: Hardware Installation
1. Put one ring terminal over the screw in the side panel and secure with a nut. 2. Put the other ring terminal over the screw in the enclosure door and secure with a nut. Mounted ground strap 24-10239-359 Rev. C This document contains confidential and proprietary information of Johnson Controls © 2017 Johnson Controls... - Page 8 To connect AC power: 1. Put the cable from the S300-XFMR transformer through the knock out in the left or top panel of the enclosure. 24-10239-359 Rev. C This document contains confidential and proprietary information of Johnson Controls © 2017 Johnson Controls...
- Page 9 This power supply has a Listed 4A, 3AGC standard fuse. AC LED Mounting hole indicator (one of 4) Input Continuous output Battery Voltage connector selector 24-10239-359 Rev. C This document contains confidential and proprietary information of Johnson Controls © 2017 Johnson Controls...
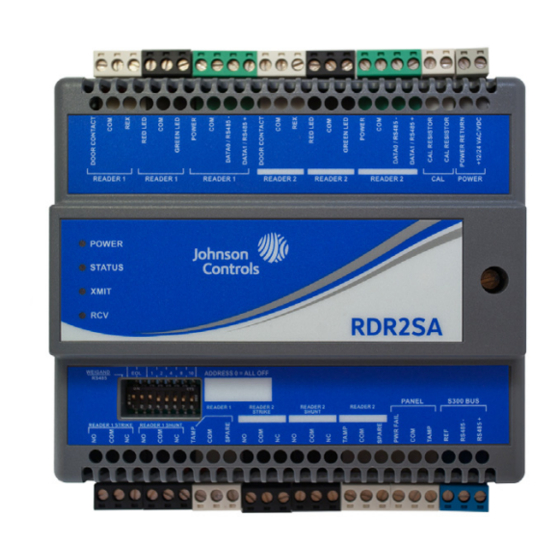
- Page 10 Do not connect the DC power cable to the DIN-mounted device until all wiring is complete. An S300-DIN-RDR2S module mounted in the S300-DIN-S 24-10239-359 Rev. C This document contains confidential and proprietary information of Johnson Controls © 2017 Johnson Controls...
-
Page 11: Cable Requirements
Connects to the DIN-mounted device +24 VDC connector Chassis ground Figure 1: DC Power Harness Power Wiring To construct the power wiring, use listed 18 AWG wires. 24-10239-359 Rev. C This document contains confidential and proprietary information of Johnson Controls © 2017 Johnson Controls... -
Page 12: Ground Wiring
Where grounding is required, connect only to the proven building electrical system ground (earth). 24-10239-359 Rev. C This document contains confidential and proprietary information of Johnson Controls © 2017 Johnson Controls... - Page 13 Brackets Mounting hardware Adhesive cable tie mounting pads S300-DIN Short and long Cable ties battery wiring battery wiring Figure 2: Battery Bracket Kit 24-10239-359 Rev. C This document contains confidential and proprietary information of Johnson Controls © 2017 Johnson Controls...
- Page 14 5. Secure the wires to the enclosure using mounting pads and cable ties. Battery’s connectors – – Mounting Bracket hardware Figure 3: Properly Installed S300-BAT-2.8AH Batteries 24-10239-359 Rev. C This document contains confidential and proprietary information of Johnson Controls © 2017 Johnson Controls...
- Page 15 4. Wire the tamper switch. The switch must be wired to an input point on a DIN-mounted device. Figure 4: Tamper Switch Properly Installed 24-10239-359 Rev. C This document contains confidential and proprietary information of Johnson Controls © 2017 Johnson Controls...
-
Page 16: Specification
Load regulation (no load to max): 0.05% typical Other Battery charge current: 150mA Battery cutoff voltage: None Battery fuse: Listed 4A, 3AGC standard fuse. S300-DIN-BRK Battery bracket kit 24-10239-359 Rev. C This document contains confidential and proprietary information of Johnson Controls © 2017 Johnson Controls... -
Page 17: Maintenance
2. Disconnect battery cable leads from battery terminals; note the polarity connections. Do not allow the leads to short or touch the case ground. 24-10239-359 Rev. C This document contains confidential and proprietary information of Johnson Controls © 2017 Johnson Controls... -
Page 18: Field Servicing
Troubleshoot the enclosure by substituting the suspected component with a replacement part. Replacement Parts All replaceable parts are available from Johnson Controls. For instructions on how to obtain order replacement parts, consult your Customer Success Center representative at (800) 482-2778. - Page 19 3. Replace the switch and secure it with the nut. 4. Wire the tamper switch to an input point of the DIN-mounted device. 24-10239-359 Rev. C This document contains confidential and proprietary information of Johnson Controls © 2017 Johnson Controls...
- Page 20 4-position terminal block, 12-24 AWG, to be used to connect the RS485 to the DIN-mounted device. 3-position terminal block, 12-24 AWG, to be used to connect the power supply to the DIN-mounted device. 24-10239-359 Rev. C This document contains confidential and proprietary information of Johnson Controls © 2017 Johnson Controls...
Need help?
Do you have a question about the S300 Series and is the answer not in the manual?
Questions and answers