Advertisement
Quick Links
TABLE OF CONTENTS
1 Safety Precautions----------------------------------------------- 2
2 Specifications ----------------------------------------------------- 3
3 Location of Controls and Components ------------------- 4
4 Operating Instructions------------------------------------------ 6
5 Troubleshooting Guide ----------------------------------------16
6 Disassembly and Assembly Instructions ---------------17
7 Wiring Connection Diagram ---------------------------------23
8 Exploded View and Replacement Parts List -----------25
Model No.
Model No.
Model No.
Model No.
Chassis
Product Color White
Destination
PAGE
© Panasonic Corporation 2010 Unauthorized copy-
ing and distribution is a violation of law.
Order No. PTW1007514CE
MX-151SG2WTN
MX-151SG2WTM
MX-151SG2WTB
MX-151SG2WTH
WTN : UAE , PGF
WTM : Oman
WTB : Saudi Arabia
WTH : Kuwait
Blender
PAGE
Advertisement

Related Manuals for Panasonic MX-151SG2WTN


Summary of Contents for Panasonic MX-151SG2WTN
-
Page 1: Table Of Contents
4 Operating Instructions------------------------------------------ 6 5 Troubleshooting Guide ----------------------------------------16 6 Disassembly and Assembly Instructions ---------------17 7 Wiring Connection Diagram ---------------------------------23 8 Exploded View and Replacement Parts List -----------25 © Panasonic Corporation 2010 Unauthorized copy- ing and distribution is a violation of law. -
Page 2: Safety Precautions
1 Safety Precautions... -
Page 3: Specifications
2 Specifications MX-151SG2 When the blender is used When the dry mill is used Power supply 220-240V 50-60Hz Power Consumption 205-225W Rated duration Continuous (Repetition 3 min. ON, 1 min. OFF) Continuous (Repetition 3 min. ON, 1 min. OFF) Container material Glass Plastic Dimensions (H x W x D) -
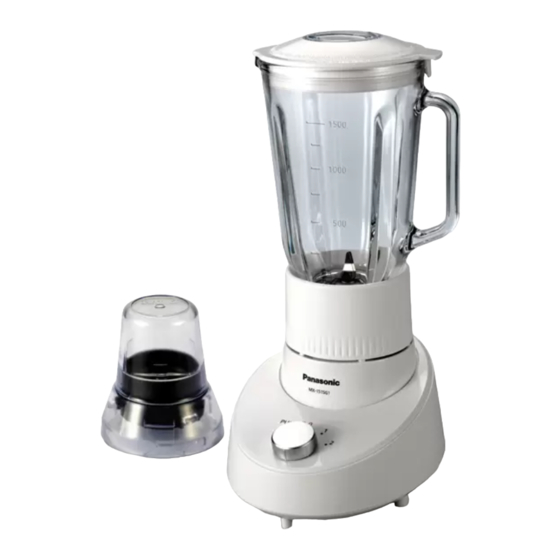
Page 4: Location Of Controls And Components
3 Location of Controls and Components... -
Page 6: Operating Instructions
4 Operating Instructions 4.1. How to Use Blender... - Page 9 4.2. How to Use Dry Mill...
- Page 12 4.3. Safety...
- Page 14 4.4. How to Clean...
-
Page 16: Troubleshooting Guide
5 Troubleshooting Guide Symptom Possible Cause Countermeasure • Motor fails to Armature Assy Or humming 1. Motor(Armature Assy. Field Assy) defec- 1. Replace Motor noise is head tive. (Armature Assy, Field Ass'y) 2. Wiring connection improper 2. Correct it 3. Switch defective 3. -
Page 17: Disassembly And Assembly Instructions
6 Disassembly and Assembly Instructions 6.1. Juice cup and Cutter Assy 1. Remove the cover, then turn the Juice cup up-side-down. 2. Secure the Juice cup and turn the cup base Assy counter clockwise. Then the packing can be removed. 3. - Page 18 4. Uses a minus driver and it removes a safety device by the point of the lever. (Make not lose a spring.) 6.2. Mill cup and Cutter Assy 1. Secure the mill cup and turn the cup base Assy counter clockwise.
- Page 19 6.3. Bottom plate 1. The bottom plate can be removed when its four screws are lossened. 6.4. Connector(Lower) 1. Hold the part under the motor shaft by means of a screws-driver, then turn the connector (lower) clockwise. The connector (lower) can be removed. •...
- Page 20 6.6. Motor Assy 1. Pull out while the faston terminal with the part of the Lead wire. 2. Takes out a motor from the body and it removes. The brush can be exchanged by metal fittings coming when bending fixation metal fittings. 6.7.
- Page 21 6.8. Switch Assy 1. Pull out a switch nob to the direction of the arrow which is shown in the right figure. 2. Pull out while the faston terminal with the part of the Lead wire. 3. Take out a switch from the body and remove it.
- Page 22 6.9. Safety unit 1. Safety unit can be removed when its two screws is loss- ened.
-
Page 23: Wiring Connection Diagram
7 Wiring Connection Diagram 7.1. Schematic diagram... - Page 24 7.2. Basic wiring diagram...
-
Page 25: Exploded View And Replacement Parts List
8 Exploded View and Replacement Parts List 8.1. PARTS LOCATION... - Page 26 REPLACEMENT PARTS LIST Notes:Important safety notice • Components identified by mark have special characteristics important for safety. • " When replacing any of these components use only manufacturer's specified parts." MODEL No.MX-151SG2WTN,MX-151SG2WTM,MX-151SG2WTB,MX-151SG2WTH Pcs/Set Safety Ref. No. Part No. Part Name & Description Remarks <PARTS LIST>...
- Page 27 8.3. PACKING INSTRUCTION...
Need help?
Do you have a question about the MX-151SG2WTN and is the answer not in the manual?
Questions and answers