Table of Contents
Advertisement
Quick Links
Advertisement
Table of Contents

Related Manuals for Progress PAI3101F


Summary of Contents for Progress PAI3101F
- Page 1 User Manual PAI3101F...
-
Page 2: Table Of Contents
VISIT OUR WEBSITE TO: Get usage advice, brochures, trouble shooter, service and repair information: www.progress-hausgeraete.de/support CONTENTS 1. SAFETY INFORMATION...................2 2. SAFETY INSTRUCTIONS.................4 3. INSTALLATION....................6 4. PRODUCT DESCRIPTION................9 5. DAILY USE...................... 10 6. HINTS AND TIPS.................... 13 7. CARE AND CLEANING...................14 8. - Page 3 Keep all packaging away from children and dispose of it • appropriately. WARNING: The appliance and its accessible parts become • hot during use. Keep children and pets away from the appliance when in use and when cooling down. If the appliance has a child safety device, it should be •...
-
Page 4: Safety Instructions
Do not use the appliance before installing it in the built-in • structure. Do not use a steam cleaner to clean the appliance. • After use, switch off the hob element by its control and do • not rely on the pan detector. If the glass ceramic surface / glass surface is cracked, •... - Page 5 2.2 Electrical Connection The isolation device must have a contact opening width of minimum 3 mm. WARNING! 2.3 Use Risk of fire and electric shock. WARNING! • All electrical connections should be made by a qualified electrician. Risk of injury, burns and electric shock. •...
-
Page 6: Installation
2.5 Service WARNING! • To repair the appliance contact the Risk of damage to the appliance. Authorised Service Centre. Use original spare parts only. • Do not keep hot cookware on the control • Concerning the lamp(s) inside this product panel. - Page 7 it. Make sure that the ends of the seal 4. Join the two ends of the seal stripe stripe are located in the middle of one together. side of the hob. 3. Add some millimetres to the length when you cut the seal stripe. 3.5 Assembly min.
- Page 8 min. 38 mm min. 2 mm R 5mm min. 55mm min. 12 mm min. 2 mm 3.6 Installation of more than one hob 490 mm min. 500 mm 270 mm ENGLISH...
-
Page 9: Product Description
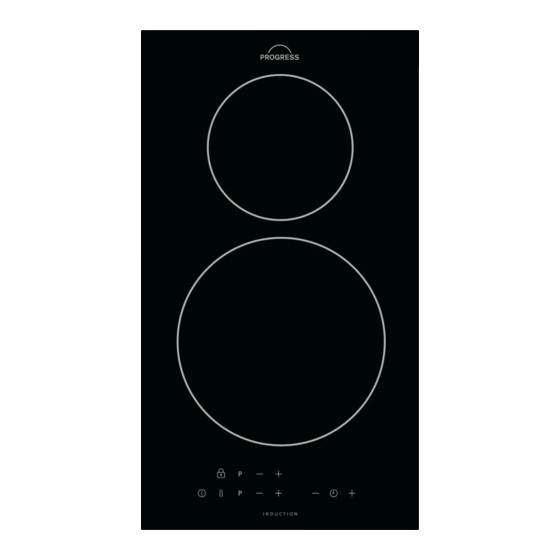
4. PRODUCT DESCRIPTION 4.1 Cooking surface layout Induction cooking zone Control panel 145 mm 210 mm 4.2 Control panel layout Use the sensor fields to operate the appliance. The displays, indicators and sounds tell which functions operate. Sensor Function Comment field On / Off To activate and deactivate the hob. -
Page 10: Daily Use
Sensor Function Comment field To increase or decrease the time. To set a heat setting. PowerBoost To activate the function. 4.3 Heat setting displays Display Description The cooking zone is deactivated. The cooking zone operates. Pause operates. PowerBoost operates. There is a malfunction. + digit OptiHeat Control (3 step Residual heat indicator): continue cooking / keep warm / re‐... - Page 11 5.5 PowerBoost • you do not deactivate a cooking zone or change the heat setting. After some time This function makes more power available to comes on and the hob deactivates. the induction cooking zones. The function can The relation between the heat setting and be activated for the induction cooking zone the time after which the hob deactivates: only for a limited period of time.
- Page 12 To activate the function: touch and then for 4 seconds. comes on. Deactivate touch of the timer to set the time. the hob with When the time finishes, an acoustic signal To deactivate the function: activate the hob sounds and 00 flashes. with .
-
Page 13: Hints And Tips
the previously activated cooking zones in zone selected last. The cooking zones will reverse order of selection. continue operating with the reduced heat • The heat setting display of the reduced setting. Change the heat settings of the zones changes between the initially cooking zones manually, if necessary. -
Page 14: Care And Cleaning
Heat setting Use to: Time Hints (min) Keep cooked food warm. as nec‐ Put a lid on the cookware. essary 1 - 2 Hollandaise sauce, melt: butter, 5 - 25 Mix from time to time. chocolate, gelatine. 1 - 2 Solidify: fluffy omelettes, baked 10 - 40 Cook with a lid on. -
Page 15: Troubleshooting
• Remove shiny metallic discoloration: use a solution of water with vinegar and clean the glass surface with a cloth. 8. TROUBLESHOOTING WARNING! Refer to Safety chapters. 8.1 What to do if... Problem Possible cause Remedy You cannot activate or operate The hob is not connected to an Check if the hob is correctly con‐... -
Page 16: Technical Data
Problem Possible cause Remedy The control panel becomes The cookware is too large or you Put large cookware on the rear hot to the touch. put it too close to the control pan‐ zones, if possible. There is no sound when you The sounds are deactivated. -
Page 17: Energy Efficiency
(if applicable). B. Stick it on Guarantee Card and keep this part (if applicable). 10. ENERGY EFFICIENCY 10.1 Product information* Model identification PAI3101F Type of hob Built-In Hob Number of cooking zones Heating technology Induction Diameter of circular cooking zones (Ø) Middle front 21.0 cm... -
Page 18: Environmental Concerns
* For European Union according to EU • When you heat up water, use only the 66/2014. For Belarus according to STB amount you need. 2477-2017, Annex A. For Ukraine according • If it is possible, always put the lids on the to 742/2019. - Page 20 867358354-D-042022...
Need help?
Do you have a question about the PAI3101F and is the answer not in the manual?
Questions and answers