
Related Manuals for Progress PAI3100F


Summary of Contents for Progress PAI3100F
- Page 1 Gebruiksaanwijzing User Manual Notice d'utilisation Benutzerinformation Kookplaat Table de cuisson Kochfeld PAI3100F...
-
Page 2: Table Of Contents
2 Progress INHOUDSOPGAVE Veiligheidsinformatie Onderhoud en reiniging Veiligheidsvoorschriften Probleemoplossing Beschrijving van het product Montage Dagelijks gebruik Technische gegevens Aanwijzingen en tips Energiezuinigheid Wijzigingen voorbehouden. VEILIGHEIDSINFORMATIE Lees zorgvuldig de meegeleverde instructies voor installatie en gebruik van het apparaat. De fabrikant is niet verantwoordelijk voor letsel of schade veroorzaakt door een verkeerde installatie of verkeerd gebruik. - Page 3 Progress 3 passen dat u de verwarmingselementen niet aanraakt. Houd kinderen jonger dan 8 jaar uit de buurt of onder permanent toezicht. Bedien het apparaat niet met een externe timer of een apart • afstandbedieningssysteem. WAARSCHUWING: Zonder toezicht koken op een kookplaat •...
-
Page 4: Veiligheidsvoorschriften
4 Progress VEILIGHEIDSVOORSCHRIFTEN Montage Aansluiting aan het elektriciteitsnet WAARSCHUWING! Alleen een erkende installatietechnicus mag WAARSCHUWING! Gevaar het apparaat installeren. voor brand en elektrische schokken. WAARSCHUWING! Gevaar • Alle elektrische aansluitingen moeten voor letsel of schade aan het door een gediplomeerd elektromonteur apparaat. - Page 5 Progress 5 dat het netsnoer na installatie bereikbaar • Gebruikers met een pacemaker moeten een afstand van minimaal 30 cm • Sluit de stroomstekker niet aan op een bewaren van de inductiekookzones als losse stroomaansluiting. het apparaat in werking is.
-
Page 6: Beschrijving Van Het Product
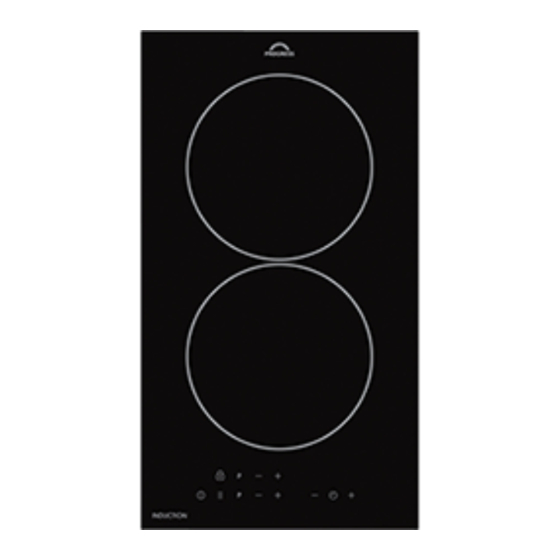
6 Progress Onderhoud en reiniging • Neem contact met uw plaatselijke overheid voor informatie m.b.t. correcte • Reinig het apparaat regelmatig om te afvalverwerking van het apparaat. voorkomen dat het materiaal van het • Haal de stekker uit het stopcontact. - Page 7 Progress 7 Bedieningspaneel lay-out Gebruik de tiptoetsen om het apparaat te bedienen. De displays, indicatielampjes en geluiden tonen welke functies worden gebruikt. Tip- Functie Opmerking toets AAN/UIT De kookplaat in- en uitschakelen. Toetsblokkering / Het kin- Het bedieningspaneel vergrendelen/ontgren- derslot delen.
-
Page 8: Dagelijks Gebruik
8 Progress Display Beschrijving De kookzone wordt gebruikt. STOP+GO-functie is in werking. Powerfunctie is in werking. Er is een storing. + cijfer Er is nog een kookzone heet (restwarmte). Toetsblokkering / Het kinderslot functie is in werking. Het kookgerei is niet geschikt of te klein, of er is geen kookgerei op de kookzone geplaatst. - Page 9 Progress 9 De kookstand resterende tijd telt af naar 00. Het indicatielampje van de kookzone gaat uit. aanraken om te verhogen. aanraken Als de tijd verstreken is, klinkt er om te verlagen. Raak tegelijkertijd een geluidssignaal en knippert aan om de kookzone uit te schakelen.
- Page 10 10 Progress Om de functie uit te schakelen: raak Als de functie op staat, kunt u de aan. De vorige kookstand gaat aan. geluiden alleen horen als: • u aanraakt Als u de kookplaat uitzet, stopt • Kookwekker naar beneden komt u deze functie ook.
-
Page 11: Aanwijzingen En Tips
Progress 11 AANWIJZINGEN EN TIPS slechts een deel van het vermogen dat door WAARSCHUWING! Raadpleeg de kookzone wordt gegenereerd. de hoofdstukken Veiligheid. Zie het hoofdstuk 'Technische Kookgerei informatie'. Bij een inductiekookzone zorgt Lawaai tijdens gebruik een sterk elektromagnetisch Als u dit hoort: veld ervoor dat het kookgerei erg snel heet wordt. -
Page 12: Onderhoud En Reiniging
12 Progress Kookstand Gebruik om: Tijd Tips (min) 1 - 2 Stollen: luchtige omeletten, ge- 10 - Met deksel bereiden. bakken eieren. 2 - 3 Zachtjes aan de kook brengen 25 - Voeg minstens tweemaal zo- van rijst en gerechten op melk-... -
Page 13: Probleemoplossing
Progress 13 • Verwijder nadat de kookplaat • Verkleuring glanzende metalen voldoende is afgekoeld: kalk- en verwijderen: reinig het glazen oppervlak waterkringen, vetspatten en met een doek en een oplossing van metaalachtig glanzende verkleuringen. water met azijn. Reinig de kookplaat met een vochtige doek en een beetje niet-schurend reinigingsmiddel. - Page 14 14 Progress Probleem Mogelijke oorzaak Oplossing De kookplaat schakelt uit. Verwijder het object van de U hebt iets op de tiptoets tiptoets. geplaatst. Het indicatielampje van rest- De zone is niet heet, omdat Als het lang duurt alvorens warmte gaat niet aan.
- Page 15 Progress 15 Probleem Mogelijke oorzaak Oplossing Er is een storing opgetreden Schakel de kookplaat uit. gaat branden. in de kookplaat, omdat er Verwijder het hete kookgerei. kookgerei is drooggekookt. Schakel na ongeveer 30 se- Automatische uitschakeling conden de zone opnieuw in.
-
Page 16: Montage
16 Progress Labels meegeleverd in de zak met accessoires Bevestig de stickers zoals hieronder weergegeven: MOD. MOD. MOD. TYPE PROD.NO. IP20 PROD.NO. PROD.NO. SER.NO. 0049 SER.NO SER.NO 03 IT DATA DATA MADE IN ITALY A. Plak het op de garantiekaart en verstuur C. - Page 17 Progress 17 De afdichting bevestigen afdichtstrip zich in het midden van een van de zijden van de kookplaat 1. Reinig het werkblad rond de plek waar bevinden. het gat moet worden uitgezaagd. 3. Tel een paar mm bij de af te knippen 2.
- Page 18 18 Progress min. 38 mm min. 2 mm R 5mm min. 55mm min. 12 mm min. 2 mm De montage van meer dan één Als er meerdere kookplaten van 30 cm kookplaat naast elkaar in dezelfde opening gemonteerd worden is hiervoor een...
-
Page 19: Technische Gegevens
Progress 19 TECHNISCHE GEGEVENS Specificatie kookzones Kookzone Nominaal ver- Powerfunctie Powerfunctie Diameter van mogen (max maximale het kookgerei warmte-in- duur [min] [mm] stelling) [W] Middenvoor 1800 2500 145 - 180 Middenachter 1800 2500 145 - 180 Het vermogen van de kookzones kan... - Page 20 20 Progress MILIEUBESCHERMING Gooi apparaten gemarkeerd met het Recycle de materialen met het symbool symbool niet weg met het huishoudelijk Gooi de verpakking in een geschikte afval. Breng het product naar het verzamelcontainer om het te recyclen. Help milieustation bij u in de buurt of neem om het milieu en de volksgezondheid te contact op met de gemeente.
-
Page 21: Safety Information
Progress 21 CONTENTS Safety information Care and cleaning Safety instructions Troubleshooting Product description Installation Daily use Technical data Hints and tips Energy efficiency Subject to change without notice. SAFETY INFORMATION Before the installation and use of the appliance, carefully read the supplied instructions. -
Page 22: Safety Instructions
22 Progress heating elements. Children less than 8 years of age shall be kept away unless continuously supervised. Do not operate the appliance by means of an external timer • or separate remote-control system. WARNING: Unattended cooking on a hob with fat or oil can •... - Page 23 Progress 23 • Do not install or use a damaged • Do not let the electricity mains cable appliance. tangle. • Follow the installation instruction • Make sure that a shock protection is supplied with the appliance. installed. • Keep the minimum distance from the •...
- Page 24 24 Progress • Do not change the specification of this • Do not let cookware to boil dry. appliance. • Be careful not to let objects or cookware • Make sure that the ventilation openings fall on the appliance. The surface can be are not blocked.
-
Page 25: Product Description
Progress 25 PRODUCT DESCRIPTION Cooking surface layout Induction cooking zone Control panel 180 mm 180 mm Control panel layout Use the sensor fields to operate the appliance. The displays, indicators and sounds tell which functions operate. Sen- Function Comment field ON / OFF To activate and deactivate the hob. -
Page 26: Daily Use
26 Progress Sen- Function Comment field To select the cooking zone. To increase or decrease the time. To set a heat setting. Power function To activate and deactivate the function. Heat setting displays Display Description The cooking zone is deactivated. - Page 27 Progress 27 Automatic Switch Off time. After this time the induction cooking zone automatically sets back to the highest The function deactivates the hob heat setting. automatically if: Refer to “Technical information” • all cooking zones are deactivated, chapter. • you do not set the heat setting after you...
- Page 28 28 Progress cooking zones do not operate. The heat for 4 seconds. comes on. Deactivate setting display shows the hob with To activate the function: touch To deactivate the function: activate the Touch of the timer to set the time.
-
Page 29: Hints And Tips
Progress 29 • The function divides the power between cooking zones. • The function activates when the total electricity loading of the cooking zones exceeds 3700 W. • The function decreases the power to the other cooking zones. • The heat setting display of the reduced zones changes between two levels. -
Page 30: Care And Cleaning
30 Progress setting, it is not proportional to the increase The data in the table is for of the cooking zone consumption of power. guidance only. It means that the cooking zone with the medium heat setting uses less than a half of its power. -
Page 31: Troubleshooting
Progress 31 Cleaning the hob stains, shiny metallic discoloration. Clean the hob with a moist cloth and non- • Remove immediately: melted plastic, abrasive detergent. After cleaning, wipe plastic foil, sugar and food with sugar. If the hob dry with a soft cloth. - Page 32 32 Progress Problem Possible cause Remedy Residual heat indicator does The zone is not hot because If the zone operated suffi- not come on. it operated only for a short ciently long to be hot, speak time. to an Authorised Service Centre.
- Page 33 Progress 33 Problem Possible cause Remedy There is an error in the hob Deactivate the hob. Remove comes on. because a cookware boiled the hot cookware. After ap- dry. Automatic Switch Off proximately 30 seconds, acti- and the overheating protec- vate the zone again.
-
Page 34: Installation
34 Progress Labels supplied with the accessories bag Stick the adhesive labels as indicated below: MOD. MOD. MOD. TYPE PROD.NO. IP20 PROD.NO. PROD.NO. SER.NO. 0049 SER.NO SER.NO 03 IT DATA DATA MADE IN ITALY A. Stick it on Guarantee Card and send C. - Page 35 Progress 35 edge of the glass ceramic. Do not 4. Push the two ends of seal stripe extend it. Make sure that the ends of together. the seal stripe are located in the middle of one side of the hob.
- Page 36 36 Progress min. 38 mm min. 2 mm R 5mm min. 55mm min. 12 mm min. 2 mm Installation of more than one If several 30 cm hobs are to be installed side by side into the same cut out, an...
-
Page 37: Technical Data
Progress 37 TECHNICAL DATA Cooking zones specification Cooking zone Nominal pow- Power func- Power func- Cookware di- er (maximum tion [W] tion maximum ameter [mm] heat setting) duration [min] Middle front 1800 2500 145 - 180 Middle rear 1800 2500... - Page 38 38 Progress ENVIRONMENTAL CONCERNS dispose appliances marked with the symbol Recycle the materials with the symbol with the household waste. Return the Put the packaging in applicable containers product to your local recycling facility or to recycle it. Help protect the environment contact your municipal office.
-
Page 39: Informations De Sécurité
Progress 39 TABLE DES MATIÈRES Informations de sécurité Entretien et nettoyage Consignes de sécurité En cas d'anomalie de fonctionnement Description de l'appareil Installation Utilisation quotidienne Caractéristiques techniques Conseils Rendement énergétique Sous réserve de modifications. INFORMATIONS DE SÉCURITÉ Avant d'installer et d'utiliser cet appareil, lisez soigneusement les instructions fournies. - Page 40 40 Progress Sécurité générale AVERTISSEMENT : L'appareil et ses parties accessibles • deviennent chauds pendant son fonctionnement. Veillez à ne pas toucher les éléments chauffants. Les enfants de moins de 8 ans doivent être tenus à l'écart, à moins d'être surveillés en permanence.
-
Page 41: Consignes De Sécurité
Progress 41 dispositifs de protection non adaptés peut entraîner des accidents. CONSIGNES DE SÉCURITÉ Installation l'absence d'un espace de ventilation adéquat. AVERTISSEMENT! L'appareil Branchement électrique doit être installé uniquement par un professionnel qualifié. AVERTISSEMENT! Risque AVERTISSEMENT! Risque de d'incendie ou d'électrocution. - Page 42 42 Progress pour remplacer le câble d'alimentation • Ne posez pas de couverts ou de s'il est endommagé. couvercles sur les zones de cuisson. • La protection contre les chocs des Elles sont chaudes. parties sous tension et isolées doit être •...
-
Page 43: Description De L'appareil
Progress 43 • Prenez soin de ne pas laisser tomber • Ne pulvérisez pas d'eau ni de vapeur d'objets ou de récipients sur l'appareil. pour nettoyer l'appareil. Sa surface risque d'être endommagée. • Nettoyez l'appareil avec un chiffon doux • Ne faites jamais fonctionner les zones de humide. - Page 44 44 Progress Description du bandeau de commande Les touches sensitives permettent de faire fonctionner l'appareil. Les affichages, les voyants et les signaux sonores indiquent les fonctions activées. Tou- Fonction Commentaire sen- siti- MARCHE/ARRÊT Pour allumer et éteindre la table de cuisson.
-
Page 45: Utilisation Quotidienne
Progress 45 Indicateurs de niveau de cuisson Affichage Description La zone de cuisson est désactivée. La zone de cuisson est activée. La fonction STOP+GO est activée. Fonction Booster est activée. Une anomalie de fonctionnement s'est produite. + chiffre Une zone de cuisson est encore chaude (chaleur résiduelle). - Page 46 46 Progress La relation entre le niveau de cuisson Sélectionnez d'abord le niveau de cuisson et la durée après laquelle la table de de la zone de cuisson, puis réglez la cuisson s'éteint : fonction. Pour sélectionner la zone de cuisson :...
- Page 47 Progress 47 cuisson. Appuyez sur pendant Cette fonction est sans effet sur le fonctionnement des zones de 4 secondes. s'allume. Éteignez la table cuisson. de cuisson en appuyant sur Pour désactiver la fonction : allumez la STOP+GO table de cuisson en appuyant sur .
-
Page 48: Conseils
48 Progress • La fonction diminue la puissance des Si la table de cuisson s'éteint en autres zones de cuisson. raison d'un problème • L'affichage du niveau de cuisson des d'alimentation électrique, les zones à puissance réduite oscille entre réglages précédents ne sont deux niveaux. - Page 49 Progress 49 différents matériaux (conception cuisson n'est pas linéaire. Lorsque vous « sandwich »). augmentez le niveau de cuisson, • un bourdonnement : vous utilisez un l'augmentation énergétique de la zone de niveau de puissance élevé. cuisson n'est pas proportionnelle. Cela •...
-
Page 50: Entretien Et Nettoyage
50 Progress Niveau de Utilisation : Durée Conseils cuisson (min) Faire bouillir de l'eau, cuire des pâtes, griller de la viande (goulasch, bœuf brai- sé), cuire des frites. Faire bouillir une grande quantité d'eau. La fonction Booster est activée. ENTRETIEN ET NETTOYAGE contenant du sucre. - Page 51 Progress 51 En cas d'anomalie de fonctionnement Anomalie Cause possible Solution Vous ne pouvez pas mettre La table de cuisson n'est pas Vérifiez que la table de cuis- en fonctionnement la table de connectée à une source son est correctement bran- cuisson.
- Page 52 52 Progress Anomalie Cause possible Solution Aucun signal sonore quand Les signaux sonores sont Activez les signaux sonores. vous appuyez sur les touches désactivés. Reportez-vous au chapitre sensitives. « Utilisation quotidienne ». La fonction Arrêt automati- Éteignez la table de cuisson s'affiche.
-
Page 53: Installation
Progress 53 Si vous ne trouvez pas de cas d'erreur de manipulation de la part de solution... l'utilisateur, le déplacement du technicien du service après-vente ou du vendeur Si vous ne trouvez pas de solution au pourra être facturé, même en cours de problème, veuillez contacter votre... - Page 54 54 Progress Tables de cuisson intégrées Installation du joint Les tables de cuisson encastrables ne 1. Nettoyez la zone de découpe du plan peuvent être mises en fonctionnement de travail. qu'après avoir été installées dans des 2. Placez le joint fourni sur le bord inférieur...
- Page 55 Progress 55 min. 38 mm min. 2 mm R 5mm min. 55mm min. 12 mm min. 2 mm Installation de plusieurs tables Si vous devez installer plusieurs tables de de cuisson cuisson de 30 cm les unes à côté des autres dans la même découpe, vous...
-
Page 56: Caractéristiques Techniques
56 Progress CARACTÉRISTIQUES TECHNIQUES Caractéristiques des zones de cuisson Zone de cuis- Puissance Fonction Fonction Diamètre de nominale (ré- Booster [W] Booster durée l'ustensile de glage de cha- maximale cuisson [mm] leur maxi- [min] mum) [W] Avant centrale 1800 2500 145 - 180 Arrière centrale... - Page 57 Progress 57 • Placez les plus petits récipients sur les • Vous pouvez utiliser la chaleur résiduelle plus petites zones de cuisson. pour conserver les aliments au chaud ou • Posez directement le récipient au centre pour faire fondre. de la zone de cuisson.
-
Page 58: Sicherheitshinweise
58 Progress INHALTSVERZEICHNIS Sicherheitshinweise Reinigung und Pflege Sicherheitsanweisungen Fehlersuche Gerätebeschreibung Montage Täglicher Gebrauch Technische Daten Tipps und Hinweise Energieeffizienz Änderungen vorbehalten. SICHERHEITSHINWEISE Lesen Sie vor der Montage und dem Gebrauch des Geräts zuerst die Gebrauchsanleitung. Bei Verletzungen oder Schäden infolge nicht ordnungsgemäßer Montage oder Verwendung des Geräts übernimmt der Hersteller keine... - Page 59 Progress 59 Allgemeine Sicherheit WARNUNG: Das Gerät und die zugänglichen Geräteteile • werden während des Betriebs heiß. Seien Sie vorsichtig und berühren Sie niemals die Heizelemente. Halten Sie Kinder unter 8 Jahren vom Gerät fern, wenn sie nicht ständig beaufsichtigt werden.
-
Page 60: Sicherheitsanweisungen
60 Progress SICHERHEITSANWEISUNGEN Montage Fehlen eines Belüftungsabstands entstehen, sind von der Garantie WARNUNG! Die Montage des ausgenommen. Geräts darf nur von einer Elektrischer Anschluss qualifizierten Fachkraft durchgeführt werden. WARNUNG! Brand- und WARNUNG! Verletzungsgefahr Stromschlaggefahr. sowie Risiko von Schäden am • Alle elektrischen Anschlüsse sind von Gerät. - Page 61 Progress 61 • Alle Teile, die gegen direktes Berühren • Legen Sie kein Besteck und keine schützen, sowie die isolierten Teile Topfdeckel auf die Kochzonen. Sie müssen so befestigt werden, dass sie werden heiß. nicht ohne Werkzeug entfernt werden • Bedienen Sie das Gerät nicht mit können.
-
Page 62: Gerätebeschreibung
62 Progress • Schalten Sie die Kochzonen niemals ein, • Reinigen Sie das Gerät mit einem wenn sich kein Kochgeschirr darauf weichen, feuchten Tuch. Verwenden Sie befindet, oder wenn das Kochgeschirr ausschließlich Neutralreiniger. Benutzen leer ist. Sie keine Scheuermittel, scheuernde •... - Page 63 Progress 63 Bedienfeldanordnung Bedienen Sie das Gerät über die Sensorfelder. Die Anzeigen, Kontrolllampen und akustischen Signale informieren Sie über die aktiven Funktionen. Sen- Funktion Kommentar sor- feld EIN/AUS Ein- und Ausschalten des Kochfeldes. Verriegeln / Kindersiche- Verriegeln/Entriegeln des Bedienfelds. rung STOP+GO Ein- und Ausschalten der Funktion.
-
Page 64: Täglicher Gebrauch
64 Progress Display Beschreibung Die Kochzone ist eingeschaltet. Die Funktion STOP+GO ist in Betrieb. Power-Funktion ist eingeschaltet. Eine Störung ist aufgetreten. + Zahl Eine Kochzone ist noch heiß (Restwärme). Die Funktion Verriegeln/Kindersicherung ist in Betrieb. Das Kochgeschirr ist ungeeignet oder zu klein bzw. es befindet sich kein Kochgeschirr auf der Kochzone. - Page 65 Progress 65 Auswählen der Kochzone:Berühren Sie Kochstufe Das Kochfeld so oft, bis die Anzeige der gewünschten wird ausgeschal- Kochzone aufleuchtet. tet nach Einschalten der Funktion oder Ändern 6 Stunden der Zeit: Berühren Sie oder , um die , 1 - 2 Dauer für den Timer einzustellen (00 - 99...
- Page 66 66 Progress Ist die Funktion eingeschaltet, lässt sich die Kochstufe innerhalb von 10 Sekunden Kochstufe nicht ändern. ein. Das Kochfeld kann jetzt benutzt werden. Wenn Sie das Kochfeld mit Die Funktion unterbricht nicht die Timer- ausschalten, wird diese Funktion wieder Funktionen.
-
Page 67: Tipps Und Hinweise
Progress 67 • Mit dieser Funktion wird die Leistung aller anderen Kochzonen reduziert. • Die Anzeige der Kochzonen mit reduzierter Leistung wechselt zwischen zwei Kochstufen. TIPPS UND HINWEISE Induktionskochzonen passen sich der WARNUNG! Siehe Kapitel Größe des Geschirrbodens bis zu einer "Sicherheitshinweise". - Page 68 68 Progress Anwendungsbeispiele für das die Kochzone, die auf eine mittlere Garen Kochstufe eingestellt ist, weniger als die Hälfte ihrer maximalen Leistung verbraucht. Das Verhältnis zwischen der Kochstufe und Bei den Angaben in der dem Energieverbrauch der Kochzone ist folgenden Tabelle handelt es nicht linear.
-
Page 69: Reinigung Und Pflege
Progress 69 REINIGUNG UND PFLEGE Lebensmittel. Andernfalls können die WARNUNG! Siehe Kapitel Verschmutzungen das Kochfeld "Sicherheitshinweise". beschädigen. Achten Sie darauf, dass sich niemand Verbrennungen zuzieht. Allgemeine Informationen Den speziellen Reinigungsschaber schräg zur Glasfläche ansetzen und über • Reinigen Sie das Kochfeld nach jedem die Oberfläche bewegen. - Page 70 70 Progress Störung Mögliche Ursache Abhilfe Schalten Sie das Kochfeld erneut ein und stellen Sie in- nerhalb von 10 Sekunden die Kochstufe ein. Zwei oder mehr Sensorfelder Berühren Sie nur ein Sensor- wurden gleichzeitig berührt. feld. Die Funktion STOP+GO ist in Siehe Kapitel „Täglicher Ge-...
- Page 71 Progress 71 Störung Mögliche Ursache Abhilfe Es wurde kein Kochgeschirr Stellen Sie Kochgeschirr auf leuchtet auf. auf die Kochzone gestellt. die Kochzone. Sie verwenden ungeeignetes Benutzen Sie geeignetes Kochgeschirr. Kochgeschirr. Siehe Kapitel „Tipps und Hin- weise“. Der Durchmesser des Koch-...
-
Page 72: Montage
72 Progress Im Zubehörbeutel mitgelieferte für die Reparatur durch einen Techniker oder Händler eine Gebühr an. Die Aufkleber Informationen zum Kundendienst und die Bringen Sie die Aufkleber, wie unten Garantiebedingungen finden Sie im gezeigt, an: Garantieheft. MOD. MOD. MOD. TYPE PROD.NO. - Page 73 Progress 73 Anbringen der Dichtung Enden des Dichtungsbands in der Mitte auf einer der Seiten des Kochfelds 1. Reinigen Sie die Arbeitsplatte um den befinden. Ausschnittbereich. 3. Geben Sie einige mm hinzu, wenn Sie 2. Bringen Sie das mitgelieferte die Länge des Dichtungsbands Dichtungsband umlaufend auf der zuschneiden.
- Page 74 74 Progress min. 38 mm min. 2 mm R 5mm min. 55mm min. 12 mm min. 2 mm Montage von mehr als einem Verwenden Sie den Montage-Bausatz, der Kochfeld einen seitlichen Stützträger und zusätzliche Dichtungen enthält, wenn mehrere 30-cm- Kochfelder nebeneinander in dieselbe Aussparung eingebaut werden.
-
Page 75: Technische Daten
Progress 75 TECHNISCHE DATEN Technische Daten der Kochzonen Kochzone Nennleistung Power-Funkti- Power-Funkti- Durchmesser (höchste on [W] on maximale des Kochge- Kochstufe) Einschaltdau- schirrs [mm] er [Min.] Vorne Mitte 1800 2500 145 - 180 Hinten Mitte 1800 2500 145 - 180 Die Leistung der Kochzonen kann Verwenden Sie für optimale... - Page 76 76 Progress UMWELTTIPPS Recyceln Sie Materialien mit dem Symbol mit diesem Symbol nicht mit dem Hausmüll. Bringen Sie das Gerät zu Ihrer . Entsorgen Sie die Verpackung in den örtlichen Sammelstelle oder wenden Sie entsprechenden Recyclingbehältern. sich an Ihr Gemeindeamt.
- Page 77 Progress 77...
- Page 78 78 Progress...
- Page 79 Progress 79...
- Page 80 867332060-A-412016...
Need help?
Do you have a question about the PAI3100F and is the answer not in the manual?
Questions and answers