Table of Contents
Advertisement
Quick Links
Advertisement
Table of Contents

Subscribe to Our Youtube Channel
Related Manuals for Flyingvoice FIP12WP


Summary of Contents for Flyingvoice FIP12WP
- Page 1 Version 1.2.0 Mar. 2022 Flyingvoice Network Technology Co., Ltd.
- Page 2 2. Disclaimer Flyingvoice network technology co., ltd. makes no warranty of any kind with regard to this guide, including, but not limited to, the implied warranties of merchantability and fitness for a particular purpose. Flyingvoice network technology co., ltd. shall not be liable for errors contained herein nor for incidental or consequential damages in connection with the furnishing, performance, or use of this guide.
- Page 3 End User License Agreement This End User License Agreement ("EULA") is a legal agreement between you and Flyingvoice. By installing, copying or otherwise using the Products, you: (1) agree to be bounded by the terms of this EULA, (2) you are the owner or an authorized user of the device, and (3) you represent and warrant that you have the right, authority and capacity to enter into this agreement and to abide by all its terms and conditions, just as if you had signed it.
- Page 4 Address: Room 207~209, 2/F, Bldg B52#, Zhongchuang Industrial park, Liuxian Avenue, Taoyuan Street, Nanshan District, Shenzhen Hereby, Flyingvoice Network Technology Co., Ltd. declares that this device is in compliance with the essential requirements and other relevant provisions of Directive 2014/53/EU A copy of the declaration of conformity can be obtained with this user manual;...
- Page 5 GNU GPL INFORMATION Flyingvoice phone firmware contains third-party software under the GNU General Public License (GPL). Flyingvoice uses software under the specific terms of the GPL. Please refer to the GPL for the exact terms and conditions of the license.
-
Page 6: Table Of Contents
Silencing or Rejecting Incoming Calls ..................19 Ending Calls ............................20 Holding and Resuming Calls ......................20 Forwarding Incoming Calls ......................21 Always Forward ........................21 Busy Forward ..........................22 No Answer Forward ........................ 23 Flyingvoice Network Technology Co., Ltd. I/III... - Page 7 Firmware Management ......................40 Provision ............................ 40 TR069 ............................42 Customizing Your Phone......................... 44 Changing the Administrator Password ..................44 Changing the Backlight and Time ....................44 Changing the Language ......................... 44 Time & Date............................45 Flyingvoice Network Technology Co., Ltd. II/III...
- Page 8 Viewing the Wireless Network Information............... 47 Disconnecting the Wireless Network Connection ............47 Deactivating the Wi-Fi Mode ....................47 Maintaining Your Phone .......................... 48 Rebooting Your Phone........................48 Resetting to Factory Settings ......................48 Flyingvoice Network Technology Co., Ltd. III/III...
-
Page 9: About This Guide
About This Guide About This Guide Thank you for choosing Flyingvoice FIP12WP IP phones, which deliver the industry’s leading HD audio quality and a wide range of business telephony features, such as Call Hold, Call Transfer, Busy Lamp Field, Call Recording, Paging and Conference over an IP network. -
Page 10: Getting Started With Your Phone
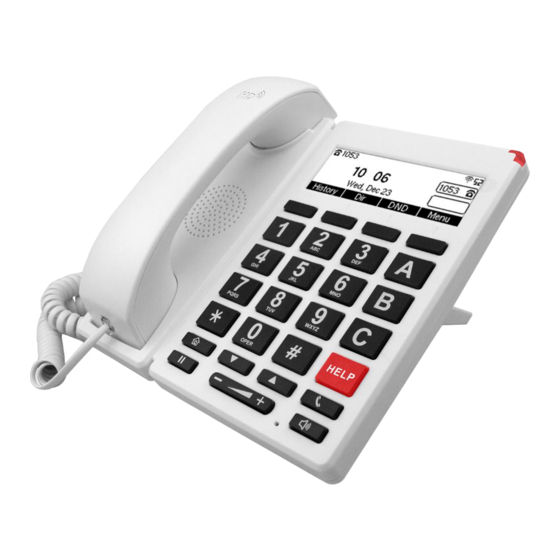
FIP12WP Hardware Item Description Handset to pick up and answer call Handset Shows information about your phone, such as calls, messages, soft keys, Phone Screen time and date Line Keys Access your phone lines and features Flyingvoice Network Technology Co., Ltd. -
Page 11: Screen And Icons
Other Icons Idle Screen The idle screen is made up of the status bar, line keys, and soft keys. The time & date in the status bar or middle of the screen varies by phone models. Flyingvoice Network Technology Co., Ltd. -
Page 12: Calls Screen
When there is an active call and a held call, the calls screen is shown below: You can press the Menu soft key and go to My Status to view Network and phone status. The phone screen is shown below: Icons in the Status Bar Flyingvoice Network Technology Co., Ltd. -
Page 13: Line Key Icons
Icons on the line key that vary by phone models. Icon indicators (associated with line) Icon Description The private line is registered successfully Register failed Other Icons Call History Icon Description Received Calls Placed Calls Missed Calls Flyingvoice Network Technology Co., Ltd. -
Page 14: Entering Characters
Select ABC, abc, 2aB mode, press the 0 key. Move cursor Press - or + to position the cursor. Delete one or more Position the cursor to the right of the character, and select the Delete soft key. characters Flyingvoice Network Technology Co., Ltd. -
Page 15: Internet Connection
Step 2. Enable the Wi-Fi option and the phone will scan and display the surrounding wireless network. Go to Available Network(s). Step 3. Using the ▲ and ▼ buttons to navigate, use the soft key "Connect" connection Flyingvoice Network Technology Co., Ltd. - Page 16 OK to confirm the connection. Step 5. If AP is connected, the wireless icon on the main screen of the LCD will appear as connected. Flyingvoice Network Technology Co., Ltd.
-
Page 17: Sip Registration
Password: Fill in the account password provided by the SIP server. Proxy Server: Fill in the IP address or domain name of the SIP server. Proxy Port: Fill in the port number of the SIP server. Transport: Select the corresponding transport of the account. Flyingvoice Network Technology Co., Ltd. - Page 18 SIP registration Step 3. Click Save&Apply on the bottom of the page. Step 4. Check the registration of the corresponding line on the screen or web status page. Flyingvoice Network Technology Co., Ltd.
-
Page 19: Call Features
Use the redial key In the standby mode, redial the number of the last call. Step 1. Press the redial key. Step 2. The phone will dial the last called number automatically. Call from the phone book Flyingvoice Network Technology Co., Ltd. -
Page 20: Answering Calls
Step 2. Use the ▲ and ▼ navigation keys navigate to 2 to the 2. Features settings and select the 2. Auto Answer. Step 3. Fill the relevant configuration according to LCD instructions: whether to enable auto Flyingvoice Network Technology Co., Ltd. -
Page 21: Switching Among The Handset An Speakerphone Modes
If the Call waiting function is disabled, the phone will reject the call automatically, the third party phone hears a busy tone. The function can be set from the LCD screen and Web interface. Flyingvoice Network Technology Co., Ltd. -
Page 22: Silencing Or Rejecting Incoming Calls
If the call waiting function is off, when C calls A in step 2, it will prompt the call to fail and have a busy tone. Silencing or Rejecting Incoming Calls When you receive an incoming call, you can choose to silence or reject the call instead of Flyingvoice Network Technology Co., Ltd. -
Page 23: Ending Calls
Step 2. At this point the A phone can Press New C or XFER soft key to enter another phone number to make a call. Step 3. A Press the HOLD button again to release the current hold status and resume the previous call. Flyingvoice Network Technology Co., Ltd. -
Page 24: Forwarding Incoming Calls
Step 4. At the bottom of the page, click ‘Save’ / ‘Save& Apply’, and the configuration is complete. How to Use Step 1. Phone A enabled Always Forward and the target number is Phone C. Step 2. Phone B makes a call to Phone A. Flyingvoice Network Technology Co., Ltd. -
Page 25: Busy Forward
Step 1. Phone A enabled Busy Forward and the target number is Phone C. Step 2. Phone A is talking with other phone (not B / C). Step 3. Phone B makes a call to Phone A. Step 4. Phone C rings. Phone A has no reaction. Flyingvoice Network Technology Co., Ltd. -
Page 26: No Answer Forward
Step 1. Phone A enabled No Answer Forward and the target number is Phone C. Step 2. Phone B makes a call to Phone A. Step 3. Phone A rings, but nobody answers. Step 4. After 20 seconds, Phone A stops ringing, and Phone C rings Flyingvoice Network Technology Co., Ltd. -
Page 27: Transferring Calls
Conference Calls The phone supports a three-way local conference and multi-way network conference. Step 1. A and B phone is in a call, A press the Conf soft key, the current call is held, A hears Flyingvoice Network Technology Co., Ltd. - Page 28 Step 4. If the A phone (conference host) hangs up, the other two calls will be disconnected; if the non-hosting party B / C side hangs first, A phone can still talk to the other party. Flyingvoice Network Technology Co., Ltd.
-
Page 29: Advanced Call Features
Step 4. Press the Save soft key to save your changes. From the Web interface: Step 1. Log in to the phone page and switch to the ‘Phone / Line1’ Configuration page. Step 2. Enable MWI and fill in the Voice Mail Number. Flyingvoice Network Technology Co., Ltd. -
Page 30: Phonebook
Step 1. Select Dir or navigate to Menu > Directory > Local Contacts. Step 2. Select AddGrp. 3. Enter the desired group name and select Ring Type. 4. Select Save. Editing Contact Groups You can change or add the group's information. Flyingvoice Network Technology Co., Ltd. - Page 31 5. Select the desired account from the Account field. 6. Select Save. From the Web interface Add the contact one by one: Go to Phone > Phone Book > Phone Book, click on add and enter the contact info. Flyingvoice Network Technology Co., Ltd.
- Page 32 1. Select Dir or navigate to Menu > Directory > Local Contacts. 2. Select the desired contact group or All Contacts. The contact names are displayed in alphabetical order. Editing Contacts You can update your contacts' information. Flyingvoice Network Technology Co., Ltd.
- Page 33 4. Select OK. Searching for Contacts In the Local Directory, you can enter search criteria to find your desired contact quickly. Procedure 1. Select Dir or navigate to Menu > Directory > Local Contacts. 2. Select Search. Flyingvoice Network Technology Co., Ltd.
-
Page 34: Blacklist
Step 1. Log in to the web interface and switch to the Phone > Phonebook > Blacklist configuration page. Step 2. Click the "Add" button and follow the prompts to add a blacklist. Step 3. Click "Save& Apply" / "Save" to make the configuration take effect Viewing Blacklist Contacts Flyingvoice Network Technology Co., Ltd. - Page 35 1. Navigate to Menu > Directory > Blacklist. 2. Highlight the desired contact, and then select Option. 3. Select Add to Contact list. The phone prompts you whether to move to contact. 4. Select OK. Flyingvoice Network Technology Co., Ltd.
-
Page 36: Call History
You can delete one or all call records from the call history list. Deleting a Call Record You can delete any call record from the call history list. Procedure 1. Press History. 2. Select the desired list. Flyingvoice Network Technology Co., Ltd. -
Page 37: Multi-Functional Key
Multi-Functional Key Parameters name Description Function key number Function key type Type Select the corresponding shortcut key function on the Shortcut Mode Keys. Select Line / Auto Select Line Enter the number Expansion Dial Rule Flyingvoice Network Technology Co., Ltd. - Page 38 Step 6. Press "Save" to save your changes Delete a dial plan: Step 1. Enable the dial plan Step 2. Select a dial plan Step 3. Click the "Delete" button to delete the dial plan Flyingvoice Network Technology Co., Ltd.
- Page 39 "9,8,010x": telephone input "9" after the dial tone, enter "0" after the dial tone stop Set the delay time For example: "<9: 111> T2": the phone will broadcast a valid number "2" Flyingvoice Network Technology Co., Ltd.
-
Page 40: Administration
If the user dials 777xxx ... x8, the phone rejects the number to dial out. Administration In this page, the user can configure the time / date, password, system log and so on. Management Time/Date Setting Parameters Description name NTP Enable Whether to enable NTP Flyingvoice Network Technology Co., Ltd. -
Page 41: Password Reset
Step 2. Enter the new password twice in the new password and confirm the password field. User mode change password: Step 1. Select the user from the drop-down list. Step 2. Enter the new password twice in the new password and confirm the password field. Web Access Flyingvoice Network Technology Co., Ltd. -
Page 42: System Log Setting
Step 3. The user can view the status / syslog page of the syslog. Remotely: Step 1. Enable remote system log enable and enter the IP address in Remote Syslog Server, as shown in Figure 2. Flyingvoice Network Technology Co., Ltd. -
Page 43: Factory Defaults Setting
1) Configuration allows the phone to automatically upgrade or automatically configure. 2) Phone support provides three ways: TFTP, HTTP and HTTPS. Before testing or using TFTP, the user should have a TFTP server and upgrade files and configuration files. Flyingvoice Network Technology Co., Ltd. - Page 44 Set the timing resynchronization, the default is 3600 seconds Resync Error Retry Delay(sec) If the last resynchronization is a failure, after the "Resync Error Retry Delay" time, ATA will retry the resynchronization, defaulting to 3600 seconds Flyingvoice Network Technology Co., Ltd.
-
Page 45: Tr069
Note that the specified file path is relative to the root directory of the TFTP server Upgrade Error Retry Turn on or off Delay(sec) Upgrade Rule Set the upgrade error retry delay interval, the default 3600 seconds TR069 Flyingvoice Network Technology Co., Ltd. - Page 46 TR069 The interval at which the server sends information Interval User Name TR069 The user name of the server connected to the phone Password TR069 The password for the server to connect to the phone Flyingvoice Network Technology Co., Ltd.
-
Page 47: Customizing Your Phone
Contact your system administrator to find out exactly which languages are supported on your phone. Procedure 1. Navigate to Menu > Basic > Language. 2. Select the desired language. 3. Select Save. The phone language is changed to the selected one. Flyingvoice Network Technology Co., Ltd. -
Page 48: Time & Date
The ring tones are used according to this priority: Contact ring tone>Group ring tone>Account ring tone >Phone ring tone. Setting a Ring Tone for the Phone You can choose a ring tone for all incoming calls. Procedure 1. Navigate to Menu > Basic> Ring >Ring Type. Flyingvoice Network Technology Co., Ltd. -
Page 49: Wireless Network
The phone scans the available wireless networks in your area. Connecting to the Wireless Network After you have activated the Wi-Fi mode, you can connect the phone to the wireless network. Connecting to an Available Wireless Network Manually Flyingvoice Network Technology Co., Ltd. -
Page 50: Viewing The Wireless Network Information
You should deactivate the Wi-Fi mode when you need to connect your phone to the wired network. Procedure 1. Navigate to Menu > Basic > Wi-Fi. 2. Select Off from the Wi-Fi field. 3. Select OK. Flyingvoice Network Technology Co., Ltd. -
Page 51: Maintaining Your Phone
The phone prompts you whether to reset the setting. 3. Select OK. The phone begins resetting. Note: Reset of your phone may take a few minutes. Do not power off until the phone has started up successfully. Flyingvoice Network Technology Co., Ltd.
Need help?
Do you have a question about the FIP12WP and is the answer not in the manual?
Questions and answers