
Subscribe to Our Youtube Channel
Related Manuals for WCP Omio CNC Router Stand

Summary of Contents for WCP Omio CNC Router Stand
- Page 1 Omio CNC Router Stand (Mobile Cart) - User Guide (Rev 1) Table of Contents Page 1 wcproducts.com...
-
Page 2: Table Of Contents
Omio CNC Router Stand (Mobile Cart) - User Guide (Rev 1) Table of Contents What is the Omio CNC Router Stand (Mobile Cart)? ���������������������������������������3 Omio CNC Router Stand Assembly Instructions ����������������������������������������������5 Assembly Note ������������������������������������������������������������������������������������������6 Step 1 ��������������������������������������������������������������������������������������������������������7 Step 2 ������������������������������������������������������������������������������������������������������ 10 Step 3 ������������������������������������������������������������������������������������������������������... -
Page 3: What Is The Omio Cnc Router Stand (Mobile Cart)
What is the Omio CNC Router Stand (Mobile Cart)? The Omio CNC Router Stand is a sturdy, mobile table for the Omio X8-2200L-USB (WCP- 0341). The stand will hold the computer or laptop used to control the router as well as the control box. - Page 4 Omio CNC Router Stand (Mobile Cart) - User Guide (Rev 1) Recommended Tools Picture Name Dead Blow Hammer Allen Wrench Set Table of Contents Page 4 wcproducts.com...
-
Page 5: Omio Cnc Router Stand Assembly Instructions
User Guide (Rev 1) Omio CNC Router Stand Assembly Instructions The following outlines the assembly instructions for the Omio CNC Router Stand. All tubing will be labeled with its own number to help with assembly. Tubing locations can also be found in the CAD model available on the product page. -
Page 6: Assembly Note
User Guide (Rev 1) Assembly Note Due to variations and differences in quality of the aluminum extrusion, WCP will install all tube plugs into the ends of the tubing where they are required. We do this to ensure all tube plugs fit correctly. Step 1 can be skipped as it will be completed before shipping. -
Page 7: Step 1
Omio CNC Router Stand (Mobile Cart) - User Guide (Rev 1) Step 1 2” x 2” Tube Plug Slide a 2” x 2” tube plug into the tube. Align the tapped holes on the sides of the tube plug with the clearance holes in the tubing. Install the six #10-32 x 3/8”L BHCS. - Page 8 Omio CNC Router Stand (Mobile Cart) - User Guide (Rev 1) 1”x1” Tube Plug (1/16” Wall Tubing) Slide a 1” x 1” tube plug into the tube plug adapter. Then slide both into the tubing. Align the tapped holes on the sides of the tube plug with the clearance holes in the tubing.
- Page 9 Omio CNC Router Stand (Mobile Cart) - User Guide (Rev 1) 1”x1” Tube Plug (1/8” Wall Tubing) Slide a 1” x 1” tube plug into the tube. Align the tapped holes on the sides of the tube plug with the clearance holes in the tubing. Install the two #10-32 x 3/8”L BHCS.
-
Page 10: Step 2
Omio CNC Router Stand (Mobile Cart) - User Guide (Rev 1) Step 2 Place tubing on a flat surface as shown below. All #10-32 rivnuts should be facing up with the 1/4-20 rivnuts in each corner facing down. Install the five #10-32 x 3/8”L BHCS screws into each tubing plug in the locations shown below. Note: Assembly for this step will be easier if all components are placed on a table so that there is access to the side holes�... -
Page 11: Step 3
Omio CNC Router Stand (Mobile Cart) - User Guide (Rev 1) Step 3 Place the MDF Cart Base on top of the aluminum structure from the previous step. The counter bores in the MDF Cart Base will line up with the rivnuts in the tubing. Install all #10-32 x 1.25”L bolts. -
Page 12: Step 4
Omio CNC Router Stand (Mobile Cart) - User Guide (Rev 1) Step 4 Install all tubes as shown in the locations shown below. Use five #10-32 x 3/8”L bolts to secure each one in place. Table of Contents Page 12 wcproducts.com... -
Page 13: Step 5
Omio CNC Router Stand (Mobile Cart) - User Guide (Rev 1) Step 5 Install all tubes as shown in the locations shown below. Use five #10-32 x 3/8”L bolts to secure each end of tube in place. Rivnuts need to be facing up on each tube. Table of Contents Page 13 wcproducts.com... -
Page 14: Step 6
Omio CNC Router Stand (Mobile Cart) - User Guide (Rev 1) Step 6 Install all tubes as shown in the locations shown below. Use five #10-32 x 3/8”L bolts to secure each end of tube in place. Rivnuts need to be facing up on each tube. Table of Contents Page 14 wcproducts.com... -
Page 15: Step 7
Omio CNC Router Stand (Mobile Cart) - User Guide (Rev 1) Step 7 Place the MDF Short Shelf and MDF Long Shelf on top of the aluminum structure from the previous step. The counter bores in the MDF Shelf will line up with the rivnuts in the tubing. -
Page 16: Step 8
Omio CNC Router Stand (Mobile Cart) - User Guide (Rev 1) Step 8 Install all tubes as shown in the locations shown below. Use four #10-32 x 3/8”L bolts to secure each end of tube in place. Install as many sets of dividers as desired. -
Page 17: Step 9
Omio CNC Router Stand (Mobile Cart) - User Guide (Rev 1) Step 9 Place tubing on a flat surface as shown below. All #10-32 rivnuts should be facing up. Install the five #10-32 x 3/8”L BHCS screws into each tubing plug in the locations shown below. Note: Assembly for this step will be easier if all components are placed on a table so that there is access to the side holes�... -
Page 18: Step 10
Omio CNC Router Stand (Mobile Cart) - User Guide (Rev 1) Step 10 Install the assembly from the previous step onto the assembly from step 8. Use five #10- 32 x 3/8”L BHCS in each tube plug in the shown locations. Table of Contents Page 18 wcproducts.com... -
Page 19: Step 11
Omio CNC Router Stand (Mobile Cart) - User Guide (Rev 1) Step 11 Flip the assembly from the previous step upside down, as shown in the image below. Attach each caster using three 1/4-20 x 3/4” L BHCS. Table of Contents Page 19 wcproducts.com... -
Page 20: Step 12
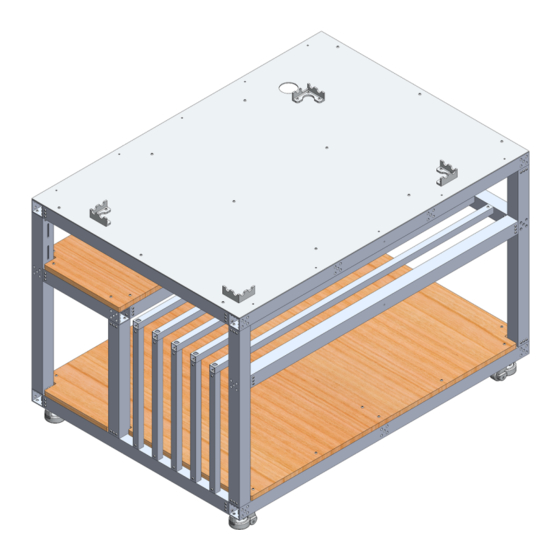
Omio CNC Router Stand (Mobile Cart) - User Guide (Rev 1) Step 12 Flip the assembly right side up, as seen below. Align the Aluminum Cart Top with the rivnuts in the top of the cart assembly. The counter bores in the aluminum sheet will be facing the rivnuts. -
Page 21: Step 13
Step 13 Install the four 3D printed Corner Guards using three #10-32 x 3/4”L bolts each. There are two different versions of this part that look very similar. The limit switch version (WCP-0342-018) will have a clearance notch for the Y axis limit switch. This part will go in the back left corner, as seen in the image below. Table of Contents Page 21... -
Page 22: Installing Omio X8 Cnc Router
Omio CNC Router Stand (Mobile Cart) - User Guide (Rev 1) Installing Omio X8 CNC Router If possible, it is recommended to build the Omio router in place on the cart. Once fully assembled, the router is hard to move around and will require multiple people to get in place on the cart. -
Page 23: Step 1
Omio CNC Router Stand (Mobile Cart) - User Guide (Rev 1) Step 1 Use two or more people to lift the Omio Router and help position it. Place the Omio router on the stand between the four corner guards. There should be a small amount of space between the inside of the corner guards and the router on all sides. -
Page 24: Step 2
Omio CNC Router Stand (Mobile Cart) - User Guide (Rev 1) Step 2 After the Omio router is in place, run all cable from the machine through the hole in the aluminum top plate. Ziptie the cables as needed and connect them to the controller. -
Page 25: Leveling Router Stand
Omio CNC Router Stand (Mobile Cart) - User Guide (Rev 1) Leveling Router Stand After moving the Router Stand to desired location, the Router Stand can be locked into place to prevent movement and can be leveled as well. The leveling process does not require precision and is mainly to prevent the Router Stand from rocking as the machine is operated. To prevent movement, rotate the red knob located inside the caster. This knob will lower or raise pad in the caster. Lower the pad till the wheel is lifted off the ground. Repeat this step will the remaining casters. -
Page 26: Kit Contents
Omio CNC Router Stand (Mobile Cart) - User Guide (Rev 1) Kit Contents Picture Name 2” x 2” x .125” Base Kit Tubing 1” x 1” x .125” Base Kit Tubing 1” x 1” x .0625” Base Kit Tubing Base Kit 2”... - Page 27 Omio CNC Router Stand (Mobile Cart) - User Guide (Rev 1) Picture Name Base Kit 1” x 1” Tube Plug Sleeve (pre-installed) Leveling Caster Base Kit MDF Cart Base Base Kit MDF Short Shelf Base Kit MDF Long Shelf Base Kit...
- Page 28 Omio CNC Router Stand (Mobile Cart) - User Guide (Rev 1) Picture Name Aluminum Cart Top Base Kit #10-32 x 3/8”L BHCS 354* Base Kit #10-32 x 1/2”L BHCS Base Kit #10-32 x 3/4”L BHCS Base Kit #10-32 x 1.25”L BHCS...
- Page 29 Omio CNC Router Stand (Mobile Cart) - User Guide (Rev 1) Picture Name 1/4-20 x 3/4”L BHCS Base Kit 3D Printed Corner Base Kit Guards 3D Printed Corner Base Kit Guards (Limit Switch) Table of Contents Page 29 wcproducts.com...
-
Page 30: Faq
Omio CNC Router Stand (Mobile Cart) - User Guide (Rev 1) Q: Will the Omio CNC Router Stand work with other machines? A: It is not guaranteed to fit other machines but any machine that is a similar size should fit fine. Some components, such as the 3D printed guards, may not fit and need to be removed. Table of Contents Page 30 wcproducts.com... -
Page 31: Revision Table
Omio CNC Router Stand (Mobile Cart) - User Guide (Rev 1) Revision Table Revision Date Revision # Description 5/4/2021 First revision created. Updated screw count and not on pre-installed 9/8/2021 tube plugs. Table of Contents Page 31 wcproducts.com...
Need help?
Do you have a question about the Omio CNC Router Stand and is the answer not in the manual?
Questions and answers