
Related Manuals for JVC CA-NXF30


Summary of Contents for JVC CA-NXF30
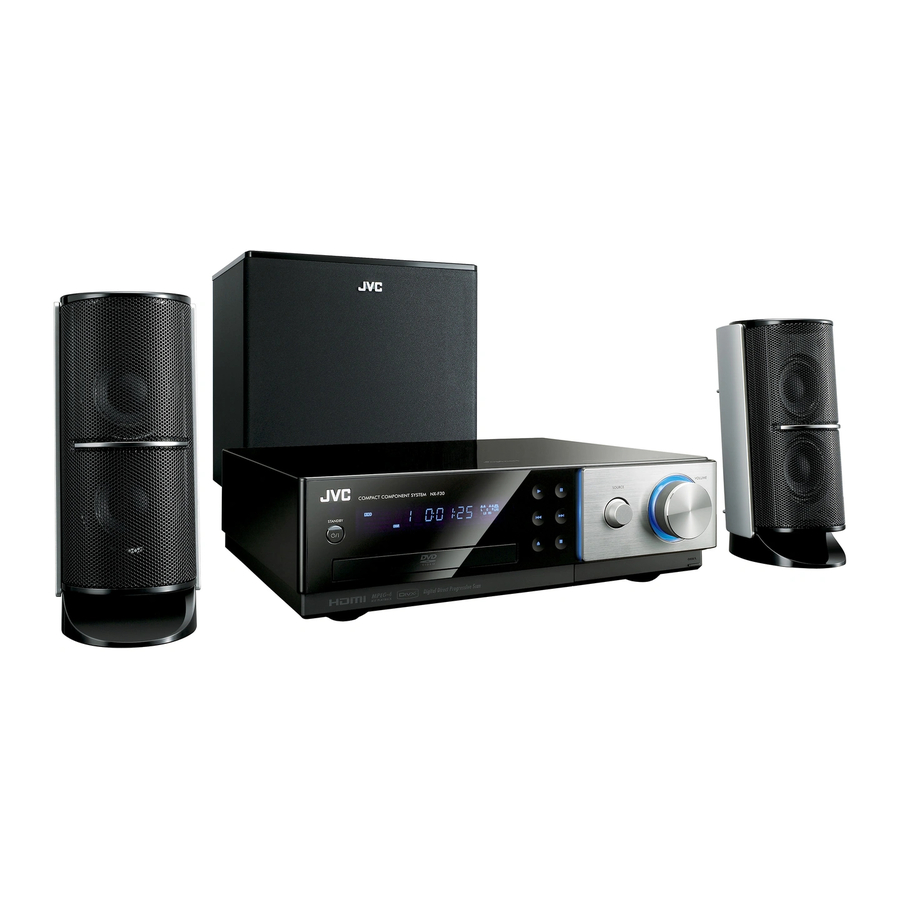
- Page 1 COMPACT COMPONENT SYSTEM NX-F30 Consists of CA-NXF30, SP-NXF30F and SP-NXF30W INSTRUCTIONS GVT0267-009A [US,UA,UG,UW]...
- Page 2 CAUTION To reduce the risk of electrical shocks, fire, etc.: 1. Do not remove screws, covers or cabinet. 2. Do not expose this appliance to rain or moisture. CAUTION The F button in any position does not disconnect the mains line. Disconnect the mains plug to shut the power off completely (the STANDBY lamp goes off).
- Page 3 Place on the level surface. Maintain adequate air path for ventilation by placing on a stand with a height of 10 cm or more. In addition, maintain the best possible air circulation. Front view of the main unit and speakers (CA-NXF30 and SP-NXF30F) SP-NXF30F Side view of the main unit (CA-NXF30) CAUTION •...
-
Page 4: Table Of Contents
Table of contents Thank you for purchasing a JVC product. Please read all instructions carefully before operation, to ensure your complete understanding and to obtain the best possible performance from the unit. Introduction Part description ...3 Using the remote control ...4 Inserting the batteries into the remote control ... - Page 5 Notes on discs/files ...60 Playable disc/file types...60 Data hierarchy...63 Handling discs...63 Troubleshooting...64 Specifications ...68 Main unit (CA-NXF30)...68 Speaker (SP-NXF30F) ...68 Subwoofer (SP-NXF30W) ...68 Supplied accessories ...68 How to read this manual • This manual explains the operations assuming that you will use the remote control.
-
Page 6: Part Description
Part description The numbers refer to the pages in which the parts are explained. Front view Refer to “Display window” below. STANDBY lamp Remote control sensor 10, 12, 41 15, 19, 20 Touch sensor panels Rear view The voltage selector is located on the rear of the main unit sold in countries/areas other than Thailand. -
Page 7: Using The Remote Control
Using the remote control 10, 12, 19–22, 26, 27, 30, 31, 47, 48 12, 17, 19, 21, 22, 27, 28, 30, 35, 36, 47, 49, 52–56 50, 51, 53, 54 10, 11, 16–19, 21, 27, 28, 30, 32–37, 47–55 10, 20, 26, 30, 36, 45, 48–52, 56 21, 22, 26–28, 45, 49 10, 11, 22, 28 13, 14, 32... -
Page 8: Preparation
Preparation Do not connect the power cable until all other connections have been made. Connecting the FM antenna Main unit (rear view) When radio reception with the supplied FM antenna is poor, or when using a communal antenna Main unit (rear view) Antenna cable (not supplied) Converter (not... -
Page 9: Connecting The Speakers And Subwoofer
Connecting the speakers and subwoofer Connect the speakers to the main unit by connecting the colored connectors to the same color terminals on the rear of the main unit. Speaker cable Gray Right speaker (rear view) Subwoofer (rear view) ■ IMPORTANT •... -
Page 10: Connecting A Tv
Preparation (continued) Do not connect the power cable until all other connections have been made. Speaker layout Main unit Left speaker Right speaker This system is designed to provide virtual surround sound by positioning the 3 speakers in front. (The set of the left and right speakers and the subwoofer refers to 2.1 channel.) The front surround function processes input signals to... -
Page 11: Connecting External Digital Audio Devices
■ IMPORTANT • Connect the main unit directly to a TV (or a monitor) without routing through a video cassette recorder (VCR) or an HDD/DVD recorder. Otherwise picture distortion may occur during playback. (Routing the connection through a VCR or an HDD/DVD recorder, however, does not affect the audio quality.) or HDD/DVD TV (or monitor) -
Page 12: Connecting External Analog Audio Devices
Preparation (continued) Do not connect the power cable until all other connections have been made. Connecting external analog audio devices Output Analog audio Audio cable (not supplied) Input Main unit (rear view) Selecting the voltage for your area (Only for countries/ areas other than Thailand) Before connecting the power cable to an AC outlet, device... -
Page 13: Selecting The Video Signal Type
Remote control mode selector ENTER Selecting the video signal type To view an image on the TV screen, select the video signal type correctly according to the TV after connecting the main unit to the TV. ■ IMPORTANT • Slide the remote control mode selector to [SHIFT]. - Page 14 [AUDIO]. • To check the compatibility of your TV, contact your local JVC customer service center. • Even if the main unit is turned off, the video signal type setting is stored.
-
Page 15: Basic Operations
Basic operations Number buttons ■ IMPORTANT • Slide the remote control mode selector to [AUDIO]. Using the number buttons Examples: 5: [5] 15: [ 10] → [1] → [5] 150: [ 10] → [ 10] → [1] → [5] → [0] Turning on/off the main unit Press [AUDIO on the main unit). -
Page 16: Turning Off The Sound Temporarily
Basic operations (continued) Turning off the sound temporarily Press [MUTING]. • Press [MUTING] again or [VOL +] or [VOL –], or turn the [VOLUME] control on the main unit to restore the sound. The sound is also restored when the main unit is turned off once and turned Adjusting the treble/bass Press [TREBLE/BASS] repeatedly to select “TRE”... -
Page 17: Selecting The Headphone Surround Mode
Selecting the headphone surround mode You can listen to surround sound via headphones connected to the [PHONES] terminal. ■ When headphones are connected to the [PHONES] terminal Press [SURROUND]. • Each time you press [SURROUND], the setting toggles between “H.P. SURR” and “H.PHONE” in the display window. -
Page 18: Using The Sleep Timer
Basic operations (continued) Using the sleep timer When the time you specify elapses, the main unit automatically turns off. Press [SLEEP]. • Each time you press [SLEEP], the time indicated in the display window changes. You can set the time to 10, 20, 30, 60, 90, 120, 150 or 180 minutes. -
Page 19: Listening To Fm Radio
Listening to FM radio Number buttons For the number button usage, refer to “Using the number buttons” on page 12. ■ IMPORTANT • Slide the remote control mode selector to [AUDIO]. Selecting an FM radio station Press [TUNER]. • Turning [SOURCE] on the main unit can also select an FM radio as the source. -
Page 20: Tuning In To A Preset Fm Radio Station
Listening to FM radio (continued) Tuning in to a preset FM radio station Presetting radio stations in the main unit allows you to easily tune in to a radio station. Presetting FM stations You can store up to 30 FM radio stations. Select a radio station you want to store. -
Page 21: Playing Back Sources From External Devices Playing Back Sources From External Devices
Playing back sources from external devices Remote control mode selector ■ IMPORTANT • Slide the remote control mode selector to [AUDIO]. Playing back sources from external devices Press [AUDIO IN] or [DIGITAL IN]. • [AUDIO IN] is for selecting the device connected to the [AUDIO IN] terminals. -
Page 22: Basic Operations Of Disc/File Playback
Basic operations of disc/file playback Number buttons For the number button usage, refer to “Using the number buttons” on page 12. ■ IMPORTANT • Slide the remote control mode selector to [AUDIO]. Playing back a disc This part explains how to play back the types of discs shown above. -
Page 23: Playing Back A File
Playing back a file This part explains how to play back 1) files recorded on the loaded disc, and 2) files recorded on a USB mass storage class device (hereinafter referred to as “USB device”) connected to the main unit. The operations are explained with a display of MP3 files as an example. -
Page 24: Display Window On The Main Unit For Disc/File Types
Basic operations of disc/file playback (continued) Press (cursor) to select a group and track. NOTE • You can also use the number buttons and to select a track. • You can also select a group by another method. (1) Slide the remote control mode selector to [SHIFT], (2) press [GROUP/TITLE], and then (3) use the number buttons to enter the desired group number while “_ _”... - Page 25 DVD VR ■ When a disc is played back Chapter number Elapsed playback time [DISPLAY] is pressed. Original program Chapter number number • When a play list is played back, “PL” is displayed instead of “PG”. ■ When a disc is stopped Original program number •...
- Page 26 Basic operations of disc/file playback (continued) ■ When a disc is played back Track number Elapsed playback time ■ When a disc is stopped Total number of tracks Total playback time [DISPLAY] is pressed. Disc type MP3/WMA/WAV/ASF/DivX/MPEG1/ MPEG2 file ■ When a file is played back Track number Elapsed playback time [DISPLAY] is pressed.
- Page 27 JPEG file ■ When a file is played back File number File type [DISPLAY] is pressed. Group number File number ■ When a file is stopped File number File type [DISPLAY] is pressed. File type For the locations of the remote control buttons, refer to page 19.
- Page 28 Basic operations of disc/file playback (continued) Guide icons on the TV screen (on-screen guide) : Play : Pause : Fast reverse/fast forward search : Slow motion playback (reverse/ forward directions) : Containing multi-view angles (Refer to page 35.) : Containing multi-audio languages (Refer to page 32.) : Containing multi-subtitle languages (Refer to page 32.)
-
Page 29: Stopping Playback
Stopping playback ■ When a disc/file is played back Press Resuming playback When playback is stopped in the middle, playback can be started from the stopped position. Temporarily stopping playback ■ When a disc/file is played back Follow any of the operations below. *1 *2 Press once to stop playback. -
Page 30: Playing Back From A Position 10 Seconds Before
Basic operations of disc/file playback (continued) Playing back from a position 10 seconds before ■ When a disc is played back Press NOTE • You cannot go back to the previous title and original program (play list). Slow motion playback ■... -
Page 31: Selecting A Chapter/Track From The Menu Screen
Selecting a chapter/track from the menu screen ■ When a disc is stopped or played back Press [TOP MENU/PG] or [MENU/ PL]. • The menu screen is displayed. • Pressing [TOP MENU/PG] may not work depending on the disc type. In this case, press [MENU/PL]. -
Page 32: Convenient Functions Of Disc/File Playback
Convenient functions of disc/file playback Number buttons For the number button usage, refer to “Using the number buttons” on page 12. ■ IMPORTANT • Some buttons change their functions according to the remote control mode. • Before using the functions described in “Convenient functions of disc/file playback”... - Page 33 Press the number buttons to program tracks/chapters. • You can refer to the program number in the display window by pressing [DISPLAY]. Display for a DVD VIDEO • Select a title number, and then a chapter number. Title number Chapter number [DISPLAY] is pressed.
-
Page 34: Playing Back A Disc/File In A Random Order (Random Playback)
Convenient functions of disc/file playback (continued) Playing back a disc/file in a random order (Random playback) (only on a loaded disc) ■ When a disc/file is stopped Press [PLAY MODE] repeatedly to display “RANDOM” in the display window. This indicator lights up when the random playback function is activated. -
Page 35: Selecting The Audio Language And Subtitle Language
Selecting the audio language and subtitle language ■ When a disc/file is played back ■ IMPORTANT • Slide the remote control mode selector to [SHIFT]. Press the desired button shown below. Function Button Available disc/file Audio [AUDIO] language Subtitle [SUBTITLE] language Example: TV screen for the subtitle language... -
Page 36: Adjusting The Picture Quality (Vfp)
Convenient functions of disc/file playback (continued) Adjusting the picture quality (VFP) ■ When a disc/file is played back or paused ■ IMPORTANT • Slide the remote control mode selector to [SHIFT]. Press [VFP]. • The current settings are displayed. Example: TV screen for the VFP mode Selected VFP mode Press (cursor) to select the... -
Page 37: Using The Status Bar And The Menu Bar
Using the status bar and the menu bar ■ When a disc/file is played back Press [ON SCREEN] twice. Example: TV screen for a DVD VIDEO Status bar Menu bar Press (cursor) to select an item you want to operate. Press [ENTER]. -
Page 38: Function List
Using the status bar and the menu bar (continued) Function list Changes the time information in the TIME display window and the status bar. Time display Instead of steps 3 and 4 on page 34, press [ENTER] repeatedly. Each time selection [ENTER] is pressed, the display changes on the status bar. -
Page 39: Playing Back A Specified Part Repeatedly (A-B Repeat Playback)
Playing back a specified part repeatedly (A-B repeat playback) (PBC off) You can play back a desired part repeatedly by specifying a start point (A) and an end point (B). ■ When a disc is played back Press [ON SCREEN] twice. •... -
Page 40: Changing The Initial Settings With The Preference Screen
Changing the initial settings with the preference screen You can use the preference screen to change the initial settings of the main unit according to the environment where the main unit is used. Remote control mode selector (cursor)/ ENTER ■ IMPORTANT •... -
Page 41: Picture
PICTURE Items Contents ( : initial setting) MONITOR Select the display method suitable for TYPE your TV. 16 : 9 NORMAL : For a widescreen TV whose aspect ratio is fixed at 16:9. When a conventional screen picture whose aspect ratio is 4:3 is input, black bars appear on the left and right sides of the screen. -
Page 42: Audio
Changing the initial settings with the preference screen (continued) AUDIO Items Contents ( : initial setting) DIGITAL Select the output signal type suitable to AUDIO the device connected to the [DIGITAL OUTPUT OUT] terminal. Refer to “List of relationships of DIGITAL AUDIO OUTPUT preference items and output signals”... -
Page 43: Language Codes
List of relationships of DIGITAL AUDIO OUTPUT preference items and output signals Playback disc/file 48 kHz, 16/20/24-bit linear PCM DVD VIDEO 96 kHz linear PCM DVD VIDEO DTS DVD VIDEO DOLBY DIGITAL DVD VIDEO CD/VCD/SVCD DTS CD MP3/WMA/WAV/DivX/MPEG1/ MPEG2 file NOTE •... -
Page 44: Enjoying Karaoke
Enjoying karaoke Number buttons* * For the number button usage, refer to “Using the number buttons” on page 12. ■ IMPORTANT • Slide the remote control mode selector to [AUDIO]. Singing a song in karaoke Turn on the main unit. •... - Page 45 • When a microphone is connected, the microphone mixing function is automatically activated. Display window These indicators light up when the microphone mixing function is activated. NOTE • If you prefer not to use the echo function, you can cancel it (page 44). Start playback of the desired source.
-
Page 46: Reducing The Volume Of The Original Vocals (Vocal Masking)
Enjoying karaoke (continued) Reducing the volume of the original vocals (Vocal masking) You can decrease or muffle the original vocal sound by using the vocal masking function. ■ When the “ ” indicator lights up in the display window Press [VOCAL MASKING] repeatedly. •... -
Page 47: Adjusting The Echo Effect
Adjusting the echo effect ■ When the “ ” indicator lights up in the display window Press [SETTING (KARAOKE)] repeatedly to select “ECHO LVL” in the display window. Display window Press [MIC VOLUME +] or [MIC VOLUME –] repeatedly to select the desired echo level. -
Page 48: Scoring Your Karaoke Performance
Enjoying karaoke (continued) Scoring your karaoke performance This function can score your karaoke performance by comparing your singing to the original vocals recorded on the playback source. The function also estimates the number of calories burned while singing. NOTE • This function can be used when “DVD” or “USB” is selected as the source. - Page 49 Changing the difficulty level during scoring ■ When the “ ” indicator lights up in the display window Press [SETTING (KARAOKE)] repeatedly to select “SCOR LVL” in the display window. Display window Press [MIC VOLUME +] or [MIC VOLUME –] repeatedly to select the desired setting.
-
Page 50: Programming Karaoke Songs (Karaoke Program Playback)
Enjoying karaoke (continued) Programming karaoke songs (Karaoke program playback) You can play back songs in the desired order. A maximum of 12 songs can be programmed. NOTE • This function can be used when “DVD” is selected as the source. •... -
Page 51: Usb Device
Recording from a CD to a USB device You can record sound from a CD to a USB device. CAUTION • It should be noted that it may be unlawful to re-record pre-recorded tapes, records, or discs without the consent of the owner of copyright in the sound or video recording, broadcast or cable program and in any literary, dramatic musical, or artistic work... -
Page 52: Recording Only One Track
Recording from a CD to a USB device (continued) NOTE • When you want to quit recording, press When you press after [ENTER] is pressed in step 6, sound having been recorded before pressed is stored. After pressing to disconnect the USB device, wait until the “REC”... -
Page 53: Deleting A Track/Group From A Usb Device
Deleting a track/group from a USB device Connect the USB device. • Refer to page 20. Press [USB Press to stop playback. TV screen Press repeatedly to select the desired track/group. Press [TITLE/DELETE] repeatedly to select “T. DELETE” or “G. DELETE” in the display window. -
Page 54: Adding (Editing) A Title To A Track/Group On A Usb Device
Recording from a CD to a USB device (continued) Adding (Editing) a title to a track/group on a USB device Connect the USB device. • Refer to page 20. Press [USB Press to stop playback. TV screen Press repeatedly to select the desired track/group. - Page 55 Entering a title The operation is explained with the time when to enter “F” as an example. Press (cursor) repeatedly to select the character type setting. • Each time you press selected character type setting changes to “ABCDE”, “abcde” or “01234” on the TV screen.
-
Page 56: Operating Other Equipment
Sanyo Sharp Sony Toshiba Zenith The initial code setting is “01 (JVC)”. Release [TV NOTE • It is recommended that you slide the remote control mode selector to [AUDIO] after using this function. Most of the other functions can be used when the remote control mode selector is at [AUDIO]. -
Page 57: Operating A Dbs Using The Remote Control
Using the remote control for the TV operation Before the TV operation, select the remote control mode for the TV. ■ IMPORTANT • Slide the remote control mode selector to the lowest position. Press [TV]. Operate the remote control by pointing it at the TV. -
Page 58: Operating A Vcr Using The Remote Control
Sanyo Sharp Shintom Sony Zenith The initial code setting is “01 (JVC)”. Release [DBS/VCR NOTE • It is recommended that you slide the remote control mode selector to [AUDIO] after using this function. Most of the other functions can be used when the remote control mode selector is at [AUDIO]. - Page 59 Using the remote control for the VCR operation Before the VCR operation, select the remote control mode for the VCR. ■ IMPORTANT • Slide the remote control mode selector to the lowest position. Press [VCR]. Operate the remote control by pointing it at the VCR.
-
Page 60: Basic Operations Of Hdmi Cec
• Not all HDMI devices are compatible with CEC. If the main unit is connected to non-CEC compatible devices, these devices cannot be controlled using the CEC function. • The CEC function may not work with some CEC devices. (When the main unit is connected to a non-JVC product, the CEC function may not work.) •... -
Page 61: Notes On Operations
Notes on operations Suitable locations for the main unit To minimize the need for servicing and maintain the high quality of this system, do not place the main unit in the following locations: • In a position subject to high humidity or considerable dust •... -
Page 62: License And Trademark
Notes on operations (continued) Safety Precautions Avoid moisture, water and dust Do not place the system in moist or dusty places. Avoid high temperatures Do not expose the system to direct sunlight and do not place it near heating equipment. When you are away When away on travel or for other reasons for an extended period of time, disconnect the power... -
Page 63: Notes On Discs/Files
Notes on discs/files Playable disc/file types Playable discs * Playable files recorded on a disc * Playable files recorded on a USB device * • Even though listed above, some types may be unplayable. Discs should be finalized before being played back. -
Page 64: Unplayable Discs
• Damaged discs and discs with an unusual shape (other than a disc of 12 cm or 8 cm in diameter) cannot be played back. • JVC does not guarantee the operation and sound quality of discs not authorized by CD-DA, which is CD specifications. - Page 65 USB device is selected as the source. • Always set the volume to the minimum on this system when connecting or disconnecting a USB device. • JVC bears no responsibility for any loss of data on the USB device while using this system. Core filter cable...
-
Page 66: Data Hierarchy
Notes on discs/files (continued) Data hierarchy DVD VIDEO/DVD VR A DVD VIDEO consists of “titles” and each title may be divided into “chapters”. A DVD VR consists of “original programs” or “play lists” and each original program/play list may be divided into “chapters”. -
Page 67: Troubleshooting
Troubleshooting ■ General Problem Possible cause Power does not come The power cable is not connected to an AC outlet. You cannot operate any Some specific operations are button. restricted. The remote control does The batteries are running low. not work. You cannot operate the Function assigned to some main unit using the... - Page 68 Troubleshooting (continued) ■ General (continued) Problem Possible cause No sound is produced. The speakers are not connected correctly. Headphones are connected. The sound is turned off. If “NO AUDIO” is displayed in the display window, the disc may have been produced through illegal copying.
- Page 69 ■ For a loaded disc (continued) Problem Possible cause You cannot change the The disc/file does not contain audio language/subtitle multiple audio languages/ language/view angle. subtitle languages/view angles. No subtitles are The disc/file contains no displayed. subtitles. You have not selected the subtitle language.
- Page 70 Troubleshooting (continued) ■ For the karaoke function Problem Possible cause The karaoke function A microphone is not connected cannot be activated. to the main unit. The microphone mixing function is not activated. The scoring function The menu screen of a DVD cannot be used.
-
Page 71: Specifications
Specifications Main unit (CA-NXF30) Tuner FM frequency: 87.50 MHz – 108.00 MHz Terminal (front of the main unit) • Microphone input terminal x 2 3.0 mV/12 kΩ • USB digital input terminal x 1 • Audio output headphone terminal x 1 16 Ω... - Page 72 Mains (AC) Line Instruction (Only for countries/areas other than Thailand) Main unit (rear view) HDMI CAUTION for mains (AC) line BEFORE PLUGGING IN, do check that your mains (AC) line voltage corresponds with the position of the voltage selector switch provided on the outside of this equipment and, if different, reset the voltage selector switch, to prevent from a damage or risk of fire/electric shock.
Need help?
Do you have a question about the CA-NXF30 and is the answer not in the manual?
Questions and answers