Advertisement
Quick Links
Advertisement

Related Manuals for OmniPrint FreeJet 330TX


Summary of Contents for OmniPrint FreeJet 330TX
- Page 1 F r e e J e t 3 3 0 T X O f f i c i a l U s e r M a n u a l 2 0 1 9 E d i t i o n...
- Page 3 With the talented, hard-working efforts of the personnel team at OmniPrint, we created the FreeJet 330TX; a DTG printer that not only had the best quality in the industry, but the best production and maintenance costs to enhance the user’s simplicity and profitability;...
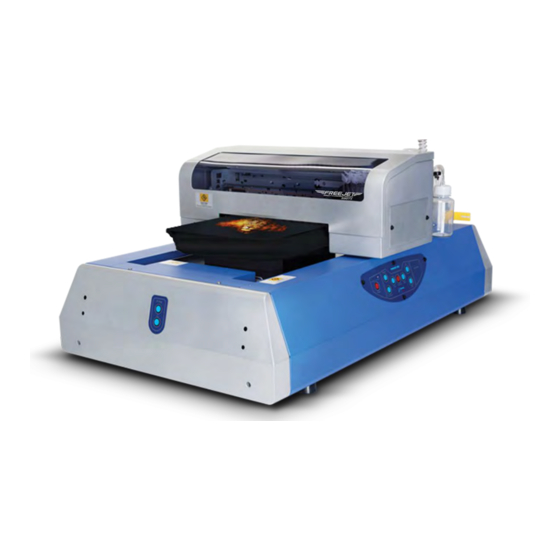
- Page 4 Anatomy Of A FreeJet DTG Printer Fig. 1: Side View Wet Cap System Gantry Platen Waste Container Control Panel Gantry Fig. 2: Front View Platen Z-Jog Up & Down Buttons (Continued On The Next Page)
- Page 5 Anatomy Of A FreeJet DTG Printer (Cont’d) Fig. 3: Under Gantry Cover Fig. 4: Printing Components Close-Up (Continued On The Next Page)
- Page 6 Anatomy Of A FreeJet DTG Printer (Cont’d) Fig 5: Printhead & Ink Delivery Components Close-Up Fig. 6: Back of Printer...
- Page 7 Control Panel & Shortcuts List FRONT FEEDING REAR Mainly used to manually Mainly used to auto-head Mainly used to manually Mainly used to manually move the gantry forward clean, stop a print job, & move the gantry to move the platen up toward the to the front of the printer other shortcut commands the back of the printer...
- Page 8 First introduced in 1994, DTG print technology has progressed to the worldwide phen- omenon it has become today and it’s only getting started! OmniPrint’s critically acclaimed DTG print technology has been recognized as one of the best in the industry for the last 3 years and pride themselves in offering the best quality prints at the lowest production costs.
- Page 9 Pretreating Garments Before we get into using the DirectRIP and printing, we need to cover the pretreatment of garments. This way you’ll have some shirts ready when it’s time for the first prints. It is always a good idea to start off with a white shirt to get familiar with the printing process.
- Page 10 Pretreating Garments (Cont’d) Types of Pretreatment: Light Garment Dark Garment Recommended For: Recommended For: White & Light Dark & Black Cotton Garments Cotton Garments Pretreating Using A Spraygun: For best results, follow the guidelines below when pretreating using a hand-held spraygun. (Continued On The Next Page)
- Page 11 Pretreating Garments (Cont’d) Pretreating Using A Spraygun (Cont’d): Hand-Held Spraygun Guidelines: MATERIAL PRETREATMENT WET WEIGHT TEMP PRESSURE DRYING TIME White/ Light DirectInk 18 grams °F 20 sec (2-3x) Cotton Light Garment Black/Dark DirectInk 25 grams °F 20 sec (3-5x) Cotton Dark Garment Pearl Pretreatment Machine Guidelines: MATERIAL...
-
Page 12: Powering On The Printer
Powering On The Printer IMPORTANT: PLEASE MAKE SURE YOU USE A 125V SURGE PROTECTOR WITH A CIRCUIT BREAKER. DO NOT RUN THE PRINTER & THE HEAT PRESS ON THE SAME CIRCUIT! • Plug the power cord into the back of the printer and the surge protector. •... - Page 13 Performing A Head Clean (Cont’d) Using A PC (Recommended): 1. In your PC, open your Control Panel. 2. Under the Hardware and Sound category, click on “View Devices and Printers” 3. Look for EPSON Stylus Photo R2400 & right-click on it. 4.
-
Page 14: Setting The Platen Height
Performing A Head Clean (Cont’d) 6. Click on the “Head Cleaning” option to open the Head Cleaning menu. 7. Click on the “Start” to initiate the Head Clean. 8. Allow for the head cleaning to run as the print head will make some movements. 9. - Page 15 Setting The Platen Height (Cont’d) Setting The Platen Height Manually Setting the platen height manually is recommended when printing on thicker garments or when using an interchangeable platen such as the hat platen, sleeve platen, toddler platen, etc. 1. Manually set your height by pressing and holding DOWN until your platen hits the lowest point it can go.
-
Page 16: Performing A Nozzle Check
Performing A Nozzle Check Performing a Nozzle Check is the final stage of your start-up procedure. This test print will let you know if all of the ink channels are printing properly, which aren’t (if any), and overall show whether or not the printer is ready to properly print a clean graphic. 1. - Page 17 Performing A Nozzle Check (Cont’d) 7A. If your nozzle check print looks bad, you will need to perform a head cleaning and prime those specific ink lines if the nozzle check still shows an excess of line gaps. 7B. If your nozzle check print looks good, you may move on to the next step.
- Page 18 Loading A Garment Onto The Platen (Cont’d) 4. Gently tuck the sides into the platen. Careful not to push it in tightly or this may cause stretching during the print. 5. Tuck the extra sides of the shirt under the platen. Do not block the area where the printer’s gantry will be moving.
- Page 19 Setting Up A Print In DirectRIP (Cont’d) 2. Open the DirectRIP program. 3. This is your workspace for DirectRIP. Here, you will set up everything needed to successfully print a garment. 4. A vital tool you will need is the Q Rip window, which is where you can set your print size and position on the platen.
- Page 20 Each environment has unique settings, color strength, highlight levels, resolution and much more. OmniPrint has provide a quick print solution to avoid adjusting and testing on your own. Below are all the Environment provided for the 330TX.
- Page 21 Setting Up A Print In DirectRIP (Cont’d) Guide To DirectRIP Environments (Cont’d) FreeJet 330TX Plus Quality Mode Environments (Cont’d): White Media - Should be used for 100% white cotton shirts. For best quality results, it is recommended that you pretreat your white cotton shirts.
- Page 22 Setting Up A Print In DirectRIP (Cont’d) 8. In your QRip window, you will need to change the posi- tion of the print on the platen. It defaults to Top Left Corner but you will need it to be Top Center to center the printed graphic on your shirt/garment.
- Page 23 Only set the printer’s Layer Setting to Layer A or Layer B. Refrain from using Layer C or Layer D as these are not applicable to the FreeJet 330TX Plus printer. • Press and hold the FUNCTION button on your printer’s control panel until the status...
- Page 24 Setting Up A Print In DirectRIP (Cont’d) How To Change The Printer’s Layer Setting (Cont’d): • Release the FUNCTION button and the status light should change to a solid light purple. You may now change the Layer Setting. • Press UP once to change the Layer Setting from A to B.
- Page 25 Setting Up A Print In DirectRIP (Cont’d) 15. Here you can preview the size and position of your print on different colored backgrounds to ens- ure your print will come out positioned and sized properly. 16. If your print looks good, you may start the print by clicking on the Printer icon on the top left of the Print Preview window.
- Page 26 Curing Printed Garments (Cont’d) PRESSURE DRYING TIME MATERIAL TEMP White/Light 330°F 45 sec (2x) Cotton Black/Dark 345°F 90 sec (2x) Cotton 1. Set your heat press to the applicable temperature and adjust the pressure to 1-2 prior to pressing your printed garment. 2.
- Page 27 2 and 225. The value 2 represents the amount of pixels that will be removed around the image. 90% of the time, 2 what is recommended by Omniprint, but if you find that there is still some white showing, the pixel reduction can be increased.
- Page 28 DirectRIP Image Adjustment Settings (Cont’d) DirectRIP Editing Options Cropping Image To Avoid Sizing Issues With Negative Space It's important that all negative space is removed from the image. Having extra space around the image will be read by DirectRIP as part of the image. Extra space around the image can be removed when creating the graphic in a graphics program, or you also have the option to crop the image using DirectRIP.
- Page 29 FreeJet Maintenance Keeping your FreeJet 330TX properly maintained is a vital yet very simple process and the key to hassle-free printing. It is very important to follow the proper procedures for each part of your printer maintenance. This section of your Training Guide will be broken down into 2 parts: Printer Shut Down It is vital that the printer is properly shut down to utilize the “Wet Capping”...
- Page 30 FreeJet Maintenance (Cont’d) Printer Shut Down (Cont’d) 3. Open the clip on your Cleaner Line located on the back of your printer near the Waste Ink Bottle. 4. Push the Choke Pump to pump cleaner into the wet cap station. 5.
- Page 31 FreeJet Maintenance (Cont’d) Printer Shut Down (Cont’d) 8. Open the clip on your Cleaner Line. 9. Pump cleaner into the Wet Cap a second time. 10. Pump cleaner only up to the edge of the wet cap. 11. Close the clip on your Cleaner Line. 12.
- Page 32 FreeJet Maintenance (Cont’d) Printer Shut Down (Cont’d) 15. Use a cleaning applicator swab to clean around the Wet Cap. Do not swab inside of the Wet Cap. 16. Close the clip on your Cleaner Line. 17. Push down on the Wet Cap Spring until the cleaner is suctioned out.
- Page 33 FreeJet Maintenance (Cont’d) Printer Shut Down (Cont’d) 22. Close the clip on your Cleaner Line for the final time and keep it closed until the next time you power up the printer. 23. Press the FUNCTION button once to return the printhead to the Wet Cap Station to “wet cap”...
-
Page 34: Daily Maintenance
FreeJet Maintenance (Cont’d) Printer Shut Down (Cont’d) You have successfully powered down your FreeJet 330TX If the machine has been sitting for over a week, it is recommended that you check to see if the Wet Cap needs to be topped off. - Page 35 FreeJet Maintenance (Cont’d) Weekly Maintenance (Cont’d) This is the Encoder Strip: the long, thin black film that runs across the gantry behind the printhead. 1. You will be able to clean the encoder strip while the printhead is centered away from the Wet Cap Station while “wet capping”...
-
Page 36: Monthly Maintenance
FreeJet Maintenance (Cont’d) Weekly Maintenance (Cont’d) 6. When you’ve finished cleaning your encoder strip, you may continue your daily maintenance and “wet cap” your printer. If you’ve already “wet capped” your printer, you may move on to the next step. (see “Printer Shutdown”... - Page 37 FreeJet Maintenance (Cont’d) Monthly Maintenance (Cont’d) Monthy Maintenance List: Lubricate the Carriage Bar Clean the Encoder Wheel This is the Print Carriage Bar, the large chrome bar in the printer that the printhead uses to move left and right. How to Lubricate The Carriage Bar While the printhead is moved away from the Wet Cap Station, you will need to clean off any build- up on the carriage bar with a clean cloth and lubricate it using the Blue Grease.
- Page 38 FreeJet Maintenance (Cont’d) Monthly Maintenance (Cont’d) 4. Press the FUNCTION button once to return the printhead back to the Wet Cap Station. This is the Encoder Wheel, the clear disk behind the rear encoder wheel cover on the left rear side of the printer. How to Clean the Encoder Wheel The Encoder Wheel is another key component that communicates the position of the carriage to the printer.
- Page 39 FreeJet Maintenance (Cont’d) Monthly Maintenance (Cont’d) 3. When all of the corner pins have been opened, you may remove the cover. 4. Switch off the back switch on the back of your printer. The printer must be completely off in order to properly clean the encoder wheel.
-
Page 40: Annual Maintenance
After one year of printer use, it is recommended that you take advantage of your warranty and schedule your annual maintenance appointment with OmniPrint International Technical Support. It is vital that this maintenance is done with the assistance of a technician to ensure that this is done properly and safely with no risk of damage to your printer. -
Page 41: Troubleshooting
Troubleshooting You may encounter some issues or errors that will affect the performance of the printer that will appear over time after heavy use for production purposes. These may come in the form of issues stemming from the pretreating process, internal parts issues accompanied by error lights, communication errors due to lack of proper maintenance, consumibles needing replacement, or other elements. - Page 42 Troubleshooting (Cont’d) Print & Image Quality Issues (Cont’d) Quality Issues - Mechanical (Cont’d) Side-to-Side Print Misalignment When the printed white underbase and color layer of your graphic are misaligned from side-to-side, this is commonly due to a registration error caused by a dirty encoder strip.
- Page 43 Troubleshooting (Cont’d) Print & Image Quality Issues (Cont’d) Quality Issues - Pretreatment The application of pretreatment to a garment is going to have the most significant effect to your print quality. At first, the pretreatment process will be a learning curve for you to master. Some get the hang of it on the first day and for some, it can take a while, as everyone’s level of proficiency is different.
- Page 44 Troubleshooting (Cont’d) Print & Image Quality Issues (Cont’d) Quality Issues - Pretreatment (Cont’d) 4. Wrong Pretreatment Used (Cont’d) ...you need to use dark pretreatment. This can be prevented by making sure you are using the right pretreatment bottle as well as noting what kind of pretreatment is currently in your hand sprayer’s reservoir.
- Page 45 Troubleshooting (Cont’d) Print & Image Quality Issues (Cont’d) Quality Issues - Ink Missing A Color During a print you may notice that the color looks really wrong and in some areas totally missing from the print. Generally this is due to the drop out of a color in the inks Cyan, Magenta, Yellow and Black.
- Page 46 Troubleshooting (Cont’d) Priming Ink Lines for White Ink Separation Normal Needs Priming If your printer has been inactive, the white ink will slowly separate in the lines. The white ink will appear transparent in the area around the ink clips and the ink will look weak if used to print.
- Page 47 Troubleshooting (Cont’d) Priming Ink Lines for White Ink Separation (Cont’d) 5. Monitor your ink waste bottle at the back of your printer to ensure ink is pumping properly. 6. Once the ink waste flowing into the bottle appears white or light gray, you may move on to the next step.
- Page 48 Troubleshooting (Cont’d) Priming Ink Lines for White Ink Separation (Cont’d) 11. Set your platen height and perform a Nozzle Check. *See the “Setting the Platen Height” & “How to Perform A Nozzle Check” Sections of this Training Guide* 12. Analyze your Nozzle Check print and if it looks good. Your printer should be ready to start printing.
- Page 49 Troubleshooting (Cont’d) You may encounter some issues or errors that will affect the performance of the printer that will appear over time after heavy use for production purposes. These may come in the form of issues stemming from the pretreating process, internal parts issues accompanied by error lights, communication errors due to lack of proper maintenance, consumibles needing replacement, or other elements.
- Page 50 Troubleshooting (Cont’d) Blinking LED Lights & Error Codes (Cont’d) 4. (Cont’d) If the Status Monitor shows “Paper Jam” you will need to do the following: Press the Standby button on the control panel to move the carriage to the front. Once at the front press the Feeding button.
- Page 51 Troubleshooting (Cont’d) Blinking LED Lights & Error Codes (Cont’d) Ink Light & Error Light Blinking Alternately If the Ink and Error lights are blinking together but not both at the same time then the Waste Ink Pad Reset will need to be completed. The printer will also be making a beeping sound. This error will need to be reset using the Epson Utility Adjustment Program.
- Page 52 Troubleshooting (Cont’d) Blinking LED Lights & Error Codes (Cont’d) Ink Light & Error Light Blinking Alternately If the Ink and Error lights are blinking together but not both at the same time then the Waste Ink Pad Reset will need to be completed. The printer will also be making a beeping sound. This error will need to be reset using the Epson Utility Adjustment Program.
- Page 53 Troubleshooting (Cont’d) Blinking LED Lights & Error Codes (Cont’d) Ink Light & Error Light Blinking Alternately (Cont’d) 5. In the folder, right click on the application file named “APSPR2400” and click on “Properties” at the bottom of the list. 6. When the properties window has opened, click on the “Compatibility”...
- Page 54 Troubleshooting (Cont’d) Blinking LED Lights & Error Codes (Cont’d) Ink Light & Error Light Blinking Alternately (Cont’d) 10. When the program opens, click on the “Particular Adjustment Mode” option. 11. When the pop-up window for Port Selection appears, click on “OK” to confirm Auto Selection.
- Page 55 Troubleshooting (Cont’d) Blinking LED Lights & Error Codes (Cont’d) Ink Light & Error Light Blinking Alternately (Cont’d) 14. A pop-up window will appear that will inform you that the waste ink pad counter’s value has been read properly. Click “OK” to close the pop-up window.
- Page 56 Start with thesimplest reasons and then work your way from the bottle to the print head. NEVER take anything apart or try to install new parts without speaking with an OmniPrint Tech Support Specialist.
- Page 57 Troubleshooting (Cont’d) Ink Flow Issues (Cont’d) 2.Basic Systems Check (Cont’d) Whenever you are having a problem with ink flow and your nozzle check is showing poor performance of a specific cannel or channels check the following areas to make sure some- thing simple is causing the problem.
- Page 58 Advanced diagnosis methods are best done with an understanding of the way the ink flows through your FreeJet 330TX. Ink Flow would all begin at the rear of the printer and end at the Print Head. Ink goes from the ink bottle and then through a Damper and down into the Print Head.
- Page 59 Troubleshooting (Cont’d) Ink Flow Issues (Cont’d) Even though this is due to lack of maintenance or negligence we still try and leave room at the bottom of the bottle just in case. Generally this only happens with white ink but can happen with colors after long periods of time.
- Page 60 Troubleshooting (Cont’d) Ink Flow Issues (Cont’d) Printhead (Cont’d) If the head has made contact with the surface or not has not been maintained properly it may need replacement. Once again, it is very important that you are in contact with Tech Support if you are having an issue.
- Page 61 Troubleshooting (Cont’d) Printhead Issues: Head Strike Recovery (Cont’d) Stopping The Print Process Once the print surface has lowered all the way you will need to turn the printer off by the emergency switch or “black switch” on the back. Cleaning the Printhead Using the factory supplied “Super Cleaner”...
- Page 62 Troubleshooting (Cont’d) Printhead Issues: Head Strike Recovery (Cont’d) Nozzle Check Adjust your print height on a clean Large Adult Shirt Board in order to perform a nozzle check. You will print the nozzle check to see the outcome of your cleaning and insure all the printers’...
- Page 63 The following list of parts should be kept on hand before the end of their life cycles. When one of these parts needs to be replaced, it is quicker to do so when they are already in your possession. FreeJet 330TX/Plus Damper FreeJet Clip FreeJet 330 Wiper Blade...
- Page 64 P-CB1013 P-SC1000 FreeJet 330 Ink Line P-CB1017 FreeJet 330TX Printhead P-PH1000 The printhead is a part that will need to be replaced over a period of time. However, with our Wet Cap System, proper use, and maintenance, the original printhead can last well beyond the other consumables on this list.
- Page 68 Official Video Tutorials List: All Videos Are Password-Protected Password: Omniprint2018 (case-sensitive) Basics How To Properly Start-Up: https://vimeo.com/263431542 How To Properly Shut Down: https://vimeo.com/263431884 How To Perform A Nozzle Check: https://vimeo.com/263432528 How To Perform A Head Cleaning: https://vimeo.com/263432370 DirectRIP Setting Up A Print From Start to Finish: https://vimeo.com/286964441 Fuzziness: https://vimeo.com/297190210 Color Strength: https://vimeo.com/297199694 Lowering The White Underbase: https://vimeo.com/297205677...
- Page 69 GET UP TO 15% OFF! RECEIVE 5% OFF FOR EACH GREAT REVIEW*! *ONE (1) REVIEW PER CUSTOMER PER PLATFORM ONLY. NOT COMBINABLE WITH ANY OTHER OFFERS. 5% OFF 5% OFF 5% OFF Thanks For Your Positive Review! Thanks For Your Positive Review! Thanks For Your Positive Review! REDEEM WITH ADMIN REDEEM WITH ADMIN...
- Page 70 HEATED LOWER PLATEN (Compatible With Hotronix & MAXX STX, MAXX, XRF, XRF2 Heat Presses) Manage Your Print Shop From Order Creation Until The Moment It’s Shipped Out The Door! LEARN MORE AT WURKFLOW.NET with Reduce Production Costs While Improving Image Quality By Implementing The Garment Color Into The RIP Process! LEARN MORE AT OMNIPRINTONLINE.COM/SOFTWARE-COLOR-IOS...
- Page 71 Having technical issues? Contact Technical Support! Email: support@omniprintonline.com Open a ticket at: omniprintonline.com/support Call: 1-855-373-3538, select option 2. Questions Regarding Your Training? Email: richard@omniprintonline.com or bryan@omniprintonline.com Need To Purchase Supplies & Parts? Visit: store.omniprintonline.com Follow Us On Social Media! Subscribe To Our YouTube Channel! youtube.com/omniprintinternational www.omniprintonline.com...
Need help?
Do you have a question about the FreeJet 330TX and is the answer not in the manual?
Questions and answers