Table of Contents
Advertisement
Quick Links
Download this manual
See also:
Service Manual
Instruction Manual
DZ-MV100A
HITACHI AMERICA, LTD.
HOME ELECTRONICS DIVISION
1855 Dornoch Court
San Diego, CA 92154-7225
Tel. 1-800-HITACHI
(1-800-448-2244)
Thank you for buying a Hitachi product. Please take time to become familiar with the manual and how
it is set up. Keep it handy for future reference.
QR32454 © Hitachi. Ltd. 2000
HITACHI CANADA LTD.
DIGITAL MEDIA DIVISON
6740 Campobello Road
Mississauga, Ontario L5N 2L8
CANADA
Tel. 1-800-HITACHI
(1-800-448-2244)
Printed in Japan 00-TH (HE)
Advertisement
Table of Contents

Related Manuals for Hitachi DZ-MV100A


Summary of Contents for Hitachi DZ-MV100A
-
Page 1: Instruction Manual
San Diego, CA 92154-7225 Tel. 1-800-HITACHI (1-800-448-2244) Thank you for buying a Hitachi product. Please take time to become familiar with the manual and how it is set up. Keep it handy for future reference. QR32454 © Hitachi. Ltd. 2000 HITACHI CANADA LTD. -
Page 2: Important Information
For Your Safety The POWER switch turns the DVD camcorder on and off, leaving the date/time fea- ture unaffected. If the camcorder is to be left unattended for a long period of time, turn it off . WARNING : To prevent fire or shock hazard, do not expose this unit to rain or moisture. - Page 3 WARNING : Many television programs and films are copyrighted. In certain cir- cumstances, copy-right law may apply to private in-home videotaping of copyrighted materials. This Class B digital apparatus meets all requirements of the Canadian Interference- Causing Equipment Regulations. Warning: This device complies with Part 15 of the FCC Rules. Operation is subject to the following two conditions: (1) This device may not cause harmful interference, and (2) this device must accept any interference received, includ- ing interference that may cause undesired operation.
-
Page 4: Important Safeguards
This page lists important information that will help to assure your enjoyment and proper use of DVD camcorder and accessory equipment. Please read it carefully before op- erating your video product and keep it in a handy place for future reference. - Page 5 Ventilation – Slots and openings in the cabinet are provided for ventilation to ensure reliable operation of the video product and to protect it from overheat- ing. These openings must not be blocked or covered. The openings should never be blocked by placing the video product on a bed, sofa, rug, or other similar sur- face.
- Page 6 Important Safeguards 14 Cleaning – Unplug this video prod- uct from the wall outlet before cleaning. Do not use liquid cleaners or aerosol cleaners. Use a damp cloth for cleaning. 15 Object and Liquid Entry – Never push objects of any kind into this video product through openings as they may touch dangerous voltage points or short- out parts that could result in a fire or elec-...
-
Page 7: Important Safety Instructions For Ac Adapter/Charger
IMPORTANT SAFETY INSTRUCTIONS FOR AC ADAPTER/CHARGER 1. Save these Instructions - This page contains important safety and oper- ating instructions for AC Adapter/ Charger Model DZ-ACP1. 2. Before using AC Adapter/Charger, read all instructions and cautionary markings on (1) AC Adapter/Charger, (2) battery and (3) product using bat- tery. -
Page 8: Read This First
A quick index for the information you use most often (this page). • A detailed table of contents directing you to specific information quickly (page 10). Get to know your DVD camcorder by using this manual, and get to know Hitachi. We appreciate your business. Quick Index Charging Battery Pack ... - Page 9 Read This First...
-
Page 10: Table Of Contents
DVD-RAM discs ... 33 Setups ... 39 Setting the battery ... 40 Using DVD camcorder with AC adapter/charger ... 45 Setting up the DVD camcorder ... 47 Setting date and time ... 52 Setting up the infrared remote control ... 54 Using the infrared remote control ... - Page 11 Checking remaining free space on DVD-RAM disc ... 135 Initializing DVD-RAM disc ... 136 Updating control information ... 138 Connecting DVD Camcorder to Other Devices ... 139 Viewing on TV screen ... 140 Recording image from other AV devices ... 142 Transferring data to PC ...
-
Page 12: Trial Record And Play Back
Trial Record and Play Back Power the DVD camcorder from AC outlet, make a trial recording and play it back. For actual take, thoroughly read “Setups” and “Recording” to ensure correct use of the DVD camcorder. Caution • Before beginning this manual, refer to “Checking Provided Accessories” on page 26 and make sure that all accessories are provided in package. - Page 13 2-2 Insert the small plug of DC power cable into DC OUT jack of AC adapter/ charger. 2-3 Insert the power cable plug into the AC input jack (AC IN) of AC adapter/ charger. 2-4 Connect the plug on the other end of power cable to AC outlet. DC power cable 3.
- Page 14 (see p.59). Open the LCD monitor if you want to check the image on the LCD screen. 5. Set the current date and time (see p. 52). When the DVD camcorder is first turned on, the date will be "January 1, 2000".
- Page 15 2. Stop playback. Pressing the button will terminate playback and set the DVD camcorder to the recording pause mode. 3. Turn power off. While holding button at the center of POWER switch, press the switch down: The red indicator of the button will go out.
-
Page 17: Before You Begin
Before You Begin Features of DVD camcorder ... 18 Cautions when using ... 20 Cautions when storing ... 24 Suggestions and restrictions ... 25 About this text ... 25 Checking provided accessories ... 26 Names of parts ... 29 DVD-RAM discs ... 33... -
Page 18: Features Of Dvd Camcorder
8 cm DVD-RAM, allows you to easily view the recorded image. Recording Movie and Still The DVD camcorder can record movies of events and sports, in the same way as with conventional camcorders. The DVD camcorder can also record stills as with a digital still camera. -
Page 19: Using With Various Devices
Features of DVD Camcorder Using with Various Devices Connect this DVD camcorder to your TV and you can enjoy the playback picture with your family and friends on the large TV screen; or connect it to a video printer (gener- ally available) to print the recorded image. -
Page 20: Cautions When Using
This DVD camcorder is a precision machine: Take great care that you do not strike it against a hard object or allow it to fall. • Do not use the DVD camcorder on a tripod in a place where it is subject to severe vibrations or impact. - Page 21 Heat on surface of product: The surface of the DVD camcorder will be slightly warm, but this does not indicate a fault. Be careful when touching the bottom of the DVD camcorder, since it will be hot.
- Page 22 If condensation occurs on the lens, wipe it off with a dry cloth. Even if the external surface of the DVD camcorder has dried, condensation may remain inside. Turn the DVD camcorder off and leave it in a dry place for at least 1-2 hours before using it again.
- Page 23 Be careful when removing the DVD-RAM disc: When the DVD camcorder is used for a long period of time, the temperature of DVD- RAM disc will be high: Wait for a few moments before removing the disc after the DVD camcorder is turned off.
-
Page 24: Cautions When Storing
The temperature inside a closed vehicle or trunk becomes very high in the hot sea- son. If you leave the DVD camcorder in such a place, it could malfunction or the case could be damaged. Also, do not expose the DVD camcorder to direct sunlight or place near a heater. -
Page 25: Suggestions And Restrictions
The recorded contents cannot be compensated for: Hitachi will not compensate for any damages caused when a recording is not made normally or the recorded contents cannot be played back because of a defect in the DVD camcorder or DVD-RAM disc. Also, Hitachi will not be responsible for your re- corded video and audio. -
Page 26: Checking Provided Accessories
Battery (model DZ-BP16): Portable power supply for this DVD camcorder: Charge it before use. Shoulder strap: Attach to the DVD camcorder to hang it from shoulder. AV input/output cable Used when viewing the picture played back on the DVD camcorder on TV screen, or input or output video from/to another video device. -
Page 27: Attaching Ferrite Cores
Attaching Ferrite Cores Although the cores are not attached in the illustrations of the cables in text, be sure to attach the ferrite core (provided) to the provided DC power cable using the following procedure (the ferrite core was attached to the AV input/output cable at the factory): (Ferrite cores reduce radio interference with your radio and TV.) 1. -
Page 28: Attaching Shoulder Strap
Pass the provided string through the hole in the lens cap and attach it to the hand strap of DVD camcorder. 1. Use the string to attach the cap to the DVD camcorder. 2. Push the both sides of cap inward and attach it over the lens. -
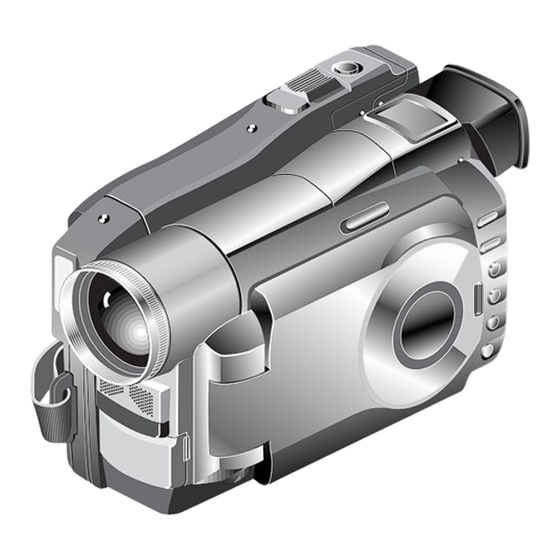
Page 29: Names Of Parts
Names of Parts Zoom lever (P. 64,67) Lens hood Optical 12X zoom lens Flash (P. 84) Stereo microphone (P. 80) Infrared receiver(P. 55) Tally lamp S-video (P. 89) Behind input/output jack (P. 142) the cover AV input/ output jack AUDIO/VIDEO (P. - Page 30 chapter 1_Before You Begin Disc eject button (P. 47) Eye cup (P. 59) Viewfinder (P. 42,59) Bottom Diopter control (P. 59) ACCESS indicator (P. 23) PROG.AE PUSH Battery attachment platform (P. 42) EXPOSURE Battery eject button FOCUS (P. 43) MENU PROG AE button (P.
- Page 31 DISC NAVIGATION button (P. 100) DELETE button (P. 101,108,109) SHIFT button (P. 101,104) 3.5-inch color LCD monitor (P. 60) Speaker CANCEL button (P. 101,120,121) RESET button (P. 134) Cursor button (P. 69,101,104) MENU button (P. 101) RECORDING MODE DISC NAVIGATION MENU DELETE SHIFT...
- Page 32 EXT.DISPLAY DIGITAL ZOOM SEARCH button PHOTO (P. 68) SKIP DIGITAL ZOOM button ZOOM ZOOM (P. 67) DISC NAVIGATION DISC NAVIGATION MENU DELETE button (P. 100) SHIFT CANCEL HITACHI MENU button (P. 68,102) CANCEL button (P. 120,121) Cursor buttons (P. 104)
-
Page 33: Dvd-Ram Discs
DVD-RAM disc conforming to this Book 2.1 standard is expected as the medium for digital recording because of its compactness and mass storage. It has been adopted to this DVD camcorder, a world first, as a home use DVD camcorder. (as of third- quarter, 2000) - Page 34 DVD-Video. Compatible Devices and Future Movement Since the DVD-RAM disc used in this DVD camcorder conforms to the newest stan- dards of DVD-RAM Book 2.1 and DVD video recording, it cannot be used with most DVD players and DVD-RAM drives available on the market as of third-quarter 2000.
- Page 35 Where exposed to heat from heater, etc. • Where there may be condensation. About Stored Data If you handle or use the DVD-RAM disc incorrectly, the recorded data may be lost. Hitachi cannot be responsible for damages from loss of recorded data. DVD-RAM Discs...
- Page 36 1_Before You Begin Removing DVD-RAM Disc from Cartridge The DVD-RAM disc used with this DVD camcorder can be removed from the car- tridge and used with DVD-RAM drives, DVD players and DVD recorders that are com- patible with 8 cm DVD-RAM discs. Refer to the disc instruction sheet for details on how to remove disc from cartridge.
- Page 37 Use dry, soft cloth to lightly wipe off dust or dirt that adheres to the disc. Never use solvents to clean the disc. • If the disc is removed from cartridge and the data stored by this DVD camcorder is rewritten on devices other than this DVD camcorder, recording or playback may not be normal, or Disc Navigation may not operate normally, when the disc replaced in cartridge is used on this DVD camcorder again.
- Page 38 1_Before You Begin • The cartridge protects the surfaces of disc on which high-density recording is possible. Once removed from cartridge, the disc can be replaced in the cartridge and used with this DVD camcorder, but be sure to observe the following: •...
-
Page 39: Setups
Before starting setups, make sure that you have all accessories, referring to page 26. When using the DVD camcorder outdoors, you will usually have to use a battery to power the DVD camcorder. First, while charging the battery, set up the DVD camcorder for recording. -
Page 40: Setting The Battery
Charge it before using the DVD camcorder. Caution • Be sure to use the DZ-BP16 or DZ-BP28 battery exclusively for the DVD camcorder: Using other batteries could cause the DVD camcorder to malfunction, or result in fire. - Page 41 The continuously DVD camcorder recordable time in the above table shows the time available when the DVD camcorder is in the recording mode without using any other function after recording is started. In actual recording, the battery will discharge 2-3 times faster than this reference, since the REC button and zoom are being operated, and playback is performed.
-
Page 42: Removing Battery
• For safety, be sure to turn the DVD camcorder off before attaching or removing the battery. • If the battery remains attached, minute level current will flow even if the DVD camcorder is off, and the battery will discharge. -
Page 43: Battery Remaining Level Indicator
Battery remaining level indicator: When the battery is used to power the DVD camcorder, the battery remaining level ap- pears in the viewfinder or on the LCD screen, and in the information LCD as follows:... -
Page 44: Battery Life
When you do not use DVD camcorder for a prolonged period of time: It is recommended that you fully charge the battery once a year, attach it to the DVD camcorder and use it up; then remove the battery and store it in a cool place again. Battery life:... -
Page 45: Using Dvd Camcorder With Ac Adapter/Charger
PC, etc. Caution • Be sure to use the specified AC adapter/charger (DZ-ACP1) to power the DVD camcorder. Using other AC adapters could cause electric shock or result in fire. 1. Attach the terminal device of provided DC power cable to the bat- tery attachment platform on DVD camcorder. - Page 46 Note: The AC adapter can be used around the world. An AC plug adapter is required in some foreign countries. If you need one purchase it from your Hitachi distributor. Caution • If the POWER indicator on AC adapter/charger does not light when it is plugged into AC outlet, unplug the AC adapter/charger from the AC outlet, wait for a few moments, and then plug it into the AC outlet again.
-
Page 47: Setting Up The Dvd Camcorder
Setting Up the DVD Camcorder Inserting DVD-RAM disc With this DVD camcorder the recorded video and audio are stored on the DVD-RAM disc. The 8 cm DVD-RAM disc for AV (provided) is already formatted: When using an uninitialized DVD-RAM disc, it must be formatted (see p. 136). - Page 48 If the cover does not close, remove the disc and reinsert it. 6. Push down the POWER switch to turn the DVD camcorder on. When the DVD camcorder is turned on, an image will appear in the viewfinder and disc recognition will start. After approximately 25 seconds, the DVD camcorder will enter the recording pause status.
- Page 49 • Turn the POWER switch off. Do not remove the battery to turn the DVD camcorder off: If you do this, the disc cannot be removed. 2. Push down the EJECT button: The cover of disc insertion block (hand strap) will open slightly.
- Page 50 (hand strap), to close the cover. Tip: • Even when the DVD camcorder is turned on, holding down the small projection at the center of EJECT button at least 2 seconds will unlock the disc (a click will be heard) when the DVD camcorder is not in recording status, and the disc can be removed.
- Page 51 DVD-RAM disc storage capacity The movies and stills that can be recorded on an 8 cm DVD-RAM disc used in this DVD camcorder are as follows: Prepare discs according to the scheduled recording time and conditions. Recordable time of movies on DVD-RAM disc Movie quality mode FINE (MPEG2, approx.
-
Page 52: Setting Date And Time
While holding down the button at the center of POWER switch, push the switch down. When the DVD camcorder is first turned on, the date will be "12:00AM 1/1/2000". 2. Press the MENU button in the recording pause mode to display the menu screen. - Page 53 This DVD camcorder incorporates a battery to back up the date and time. Connect the AC adapter/charger or charged battery to the DVD camcorder once every two months, and leave the connection status for at least 24 hours with camcorder power turned off: The built-in battery will be charged.
-
Page 54: Setting Up The Infrared Remote Control
DVD camcorder from a distance of up to approximately 18 feet (5 m). Caution • If the batteries are dead, pressing buttons on remote control will not operate the DVD camcorder: Replace the batteries. 1. Push the tab on the back of remote con- trol to open the battery compartment lid. -
Page 55: Using The Infrared Remote Control
• This DVD camcorder uses the "VCR2" remote control code of Hitachi VCRs. If you use a Hitachi VCR, etc. with the remote control code set to "VCR2", a VCR placed near the DVD camcorder will also be operated by the remote control: To prevent this, change the remote control code of the VCR. -
Page 57: Recording
Recording Two recording modes are available on this DVD camcorder: movie and still. Here we will explain the methods for each recording and various functions. Basic handling of DVD camcorder ... 58 Recording movie ... 66 Useful functions during recording of movie ... 71... -
Page 58: Basic Handling Of Dvd Camcorder
Doing this could cause the DVD camcorder to fall and be damaged. • Do not lift the DVD camcorder by holding the viewfinder or LCD monitor: If the viewfinder or LCD monitor comes off, the DVD camcorder will fall. -
Page 59: Viewing Subject Through Viewfinder
1. While pressing the button at the center of POWER switch, push the switch down. The red indicator of the button will light. The DVD camcorder starts to recognize the disc, and after approximately 25 seconds, it will enter the recording pause status. Viewing Subject through Viewfinder 1. -
Page 60: Opening Lcd Monitor
chapter 3_Recording Opening LCD Monitor If you open the LCD monitor, you can monitor subject image on the LCD screen. If the monitor is open, the viewfinder will be off. 1. Press the OPEN button to open the LCD monitor. The LCD monitor can be opened up to approxi- mately 115 . -
Page 61: Closing Lcd Monitor
• Be sure to return the LCD monitor at right angles to the DVD camcorder before closing it or replacing it on the DVD camcorder with its screen facing outside. If the LCD monitor is tilted, it cannot be closed to the DVD camcorder. -
Page 62: Information Display During Recording
: High video quality : Standard quality No remaining time will be displayed with a write-protected disc. If no disc is in the DVD camcorder, the DVD mark and remaining time will not appear. The displayed number of stills is for reference: The decreasing number may not be correct, depending on recording conditions. -
Page 63: Switching The Information Display Mode
1. Press the DISPLAY button. The full and minimum display modes will alternate. Tip: • The DVD camcorder does not record the recording date/ time as a part of image. However, the information when recording will be recorded with image as data, which can be checked during playback. - Page 64 Pressing MENU again will switch off the menu screen. The menu screen will appear even if no disc is in the DVD camcorder. (7) Select dial To adjust program AE, exposure, focus, and LCD screen brightness. This can also be used for setting menu items.
-
Page 65: Focusing When Recording Movie
Focusing When Recording Movie This DVD camcorder automatically focuses a subject at the center of screen (auto- focus). When the DVD camcorder is turned on, auto-focus will always be set. Focusing range • On T (tele) side: approximately 3.6 feet (1 m) from lens surface to infinity •... -
Page 66: Recording Movie
• For various functions available during recording of movie, see “Useful Functions during Recording of Movie” on page 71. 3. When recording is finished, turn the DVD camcorder off. Caution: • Hitachi cannot be responsible for video and audio that cannot be recorded or edited because of any defect. ACCESS... - Page 67 Especially when power save has been released, turn the DVD camcorder off if possible, except during recording. Zooming This DVD camcorder can zoom in on subject up to 12 times optically multiplied by 4 times digitally. 1. Slide the Zoom lever to "T" control side, and the subject image will gradually be- come telescopic: Slide to "W"...
-
Page 68: Switching Digital Zoom Off
chapter 3_Recording Switching Digital Zoom Off When the Zoom lever T control is held down, digital zoom will automatically start when optical 12X zoom range is exceeded. When digital zoom is engaged, the image quality will be a little rougher, so if you do not need digital zoom, you can switch it off by the following procedure: You can also use the DIGITAL ZOOM button on remote control to switch the digital zoom setting. - Page 69 The menu screen for setting camera functions will appear. Tips: • When the LCD monitor is open, you can use the cursor, MENU and ENTER buttons in place of the Select dial to operate the menu. 3. Turn the Select dial to move the high- light to "D.
- Page 70 • If you want to set another menu item, select it instead of pressing MENU in step 5. • You can check D.ZOOM ON or OFF by reviewing the on-screen information. • The pointer of zoom indicator shows whether the DVD camcorder is in the optical 12X zoom range or in the digital 4X zoom range.
-
Page 71: Useful Functions During Recording Of Movie
Selecting shooting mode to match the subject (switching program AE mode) This DVD camcorder automatically sets the shutter speed and aperture according to the subject brightness for optimum recording: You can also specify one of the five modes to suit the subject conditions, recording environment or purpose of filming. - Page 72 The set AE mode will change from characters in white background to white char- acters: To restore the full auto mode, press the PROG AE button twice. The shooting mode set as above will be stored in memory even if the DVD camcorder is turned off.
-
Page 73: Using The Electronic Image Stabilizer
Tips: • It is recommended that you release electronic image stabilizer when using the DVD camcorder on a desk or tripod. • When electronic image stabilizer is activated, there will be a slight difference between the actual movement and the movement on screen. -
Page 74: Manually Focusing Subject During Movie Recording
Note that the setting of electronic image stabilizer will not change when the DVD camcorder is turned off: After recording with EIS set to OFF, it is recommended that you return the setting to “ON” and then turn the DVD camcorder off, unless you always record with “OFF”... -
Page 75: Macro Recording
Tips • Manual focus is released when the DVD camcorder is turned off. When you turn the DVD camcorder on next time, auto focus will be restored. • To return to auto-focus from manual focus not yet locked, press the FOCUS button. -
Page 76: Recording An Image Of Yourself
Recording an Image of Yourself You can point the DVD camcorder at yourself, and record the image while monitoring it on the LCD screen. Use the infrared remote control to operate the DVD camcorder. 1. Open the LCD monitor approximately 90 and turn it so the monitor screen faces in the same direction as the lens. -
Page 77: Switching Movie Quality Mode
However, record critical subjects in the "FINE" mode. Block-like noise may appear in recorded image, or the outline of subject image is distored under the recording conditions listed below: Pan the camcorder as slowly as possible. (Block noise is likely to appear in the "STND" mode): •... -
Page 78: Adjusting Exposure Manually
You can check whether movie quality mode is FINE or STND by reviewing the on-screen information. The setting of movie quality mode will not change when the DVD camcorder is turned off. After recording with “STND”, it is recommended that you return the mode to “FINE”... - Page 79 4. Start recording. Tips • The exposure setting will be memorized even if the DVD camcorder is turned off. • To return to automatic exposure from manual exposure not yet locked, press the EXPOSURE button. White Balance (AUTO/HOLD) With this DVD camcorder you can switch the white balance between AUTO and HOLD.
- Page 80 Recording Sound with External Microphone Connect a high-performance microphone (generally available) to the external micro- phone jack of this DVD camcorder: Clearer sound can be recorded. Turn on the switch on the DVD camcorder and start recording. For details on microphone, see “Major Specifications” on page 161.
- Page 81 ON setting, and no indication will appear for OFF set- ting. The microphone filter setting will be held in memory until it is changed even after the DVD camcorder is turned off. Useful Functions during Recording of Movie Microphone filter indicator...
-
Page 82: Recording Stills
Recording Stills 1. Turn the DVD camcorder on and set the RECORDING MODE switch to 2. Make sure that monitor screen. Tip: • When switched to still recording, the image in the viewfinder or on the LCD screen will be rougher than during movie recording, but this will not affect the recorded image. -
Page 83: Image Quality
3. Press the button all the way in. You can also manually focus on the subject (see p. 89). Image quality: The quality of JPEG stills recordable on this DVD camcorder is 1280 x 960 pixels only. The quality of still recording cannot be switched. Recording Stills... - Page 84 • Use the electronic flash function to record a subject lighted from rear, for a clearer still. Shutter speed: The DVD camcorder automatically sets the shutter speed between 1/800 and 1/30 second according to the subject brightness. When the subject is darker, the shutter speed will automatically be slower;...
-
Page 85: Menu Screen
2. Use the Select dial to choose “CAMERA SETUP” and then “FLASH”. Options will be next to FLASH: “AUTO” is being highlighted. 3. Turn the Select dial to switch the option to “ON” (always emitting light) or “OFF” (never emitting light), and then press the select dial. -
Page 86: Interval Recording
3_Recording The setting of flash will not change when the DVD camcorder is turned off. After recording with FLASH ON or OFF, it is recommended that you return the option to AUTO and then turn the DVD camcorder off, unless you always record still with the same flash setting. - Page 87 2. Use the Select dial to choose “REC SETUP” and then “SELF. /INT.”. Options will be next to SELF. /INT. : “OFF” is be- ing highlighted. 3. Use the Select dial to choose “INT.”, and then press the Select dial. You can now set the recording interval.
-
Page 88: Self-Timer Recording
You can also press the STOP button in place of the PHOTO button to terminate interval recording. The interval recording mode is available at the specified interval while the DVD camcorder is turned on. To release the interval recording, choose OFF on the menu screen or turn the DVD camcorder off. Cautions: •... - Page 89 The tally indicator at the front of DVD camcorder will blink. Approximately 10 seconds later, the shutter will open. The self-timer mode is available while the DVD camcorder is turned on. To release it, choose “OFF” on the menu screen or turn the DVD camcorder off.
- Page 90 3. When the subject is focused, press the PHOTO Button. With manual focus, you do not need to press the PHOTO button half way. Manual focus will be released when the DVD camcorder is turned off.
-
Page 91: Playing Back, Deleting And Editing Your Recordings
Playing Back, Deleting and Editing Your Recordings You can immediately play back images recorded on the DVD camcorder, with the DVD camcorder alone. The built-in Disc Navigation tool allows you to do simple movie work with the DVD camcorder alone, such as attaching titles, creating special effects for stored movie and still, sorting the order of scenes, editing multiple scenes for continuous playback, etc. -
Page 92: Playing Back
Playing Back Buttons Used for Playback With this DVD camcorder, operations similar to those with conventional camcorders using tape, such as playback, rewind, fast forward, pause, are available. (1) Playback/pause button Press this button during recording pause after recording: The DVD camcorder will play back the scene recorded last from its first image. -
Page 93: Immediately Checking Recorded Scene
0.1 second. If part of the movie is deleted and video is spliced, sound may also be interrupted for approximately 0.5 seconds. • Use Disc Navigation to play back a disc recorded on another recorder on this DVD camcorder(see p 98). - Page 94 • Hold down for at least one second during playback pause to continuously locate the starts of following scenes. If you find the desired image, release the button: The DVD camcorder will return to the playback pause status. • Hold down for at least one second during playback to continuously locate the starts of previous scenes.
- Page 95 • Pressing or releasing the skip or search button will dim the screen for approximately one second. • Scenes are limited to those re- Speed corded on this DVD camcorder. • Speeds in this table are only for Still reference: The speed may be approx.
- Page 96 chapter 4_Playing Back, Deleting and Editing Your Recordings Frame Advance/Frame Back/Slow Playback 1. During playback pause, press the button once: Picture will advance one frame. Press once: Picture will go back 15 frames. 2. When the image you want appears, press Tips: •...
- Page 97 All information will appear. 1. Press the DISPLAY button. Pressing the button will switch the options as fol- lows: The setting of on-screen information display will be held in memory even after the DVD camcorder is turned off. Display OFF Partial display...
-
Page 98: Using Disc Navigation
Disc Navigation is a tool for editing scenes recorded on this DVD camcorder. Structure of Data Recorded on This DVD Camcorder Movies and stills recorded using this DVD camcorder will be stored on the DVD-RAM disc in units of scene, in the order of recording. -
Page 99: Editing Scenes
Editing Scenes The following editing functions are available by displaying all programs or a specific program in thumbnails: • Delete unnecessary scenes (p. 108). • Skip scenes you do not want to show to other people for playback without delet- ing (Skip, p. -
Page 100: Starting Disc Navigation
• Disc Navigation thumbnail screen, skip and title attached to each scene, and special effects (fade, wipe and B/W) are original functions of this DVD camcorder, and they do not conform to the DVD video recording standard: Note that these functions will not operate on DVD recorders or DVD players that conform to the DVD video recording standard. -
Page 101: Buttons Used For Operating Disc Navigation
DVD camcorder or remote control: Here is the explanation for using the buttons on the DVD camcorder. Tip: • For full-scale editing, connect the DVD camcorder to TV (see p. 140) and use the remote control • When are shown in explanation of Disc Navigation, use cursor buttons. - Page 102 If there are many scenes on a disc, editing may be easier if you select scenes from a specific day to be edited. The scenes recorded on this DVD camcorder are stored collectively as a “program” for each recording date. Selecting a program allows you to display the scenes recorded on a specific date.
- Page 103 The thumbnails of the scenes on selected date only will appear. Cautions: • The recording date will automatically be the title of the program. • Even if date is reset (see p. 52), the titles that have already been set and the display order will not change.
-
Page 104: Selecting A Scene
chapter 4_Playing Back, Deleting and Editing Your Recordings Selecting a Scene 1. Press while the thumbnail display screen is being displayed. The selected scene will be shadowed in blue. This is called a “cursor”. The number of the selected scene will appear at the top right of screen. cursor Press when the cursor is in the scene at the bottom right corner, or press... -
Page 105: Selecting Scenes Using Menu Screen
3. Press the cursor button to move the cur- sor to the last scene in the range you want to select. Tip: • You can also select scenes in reverse from the last scene in the range. To release multiple selection, press the SHIFT button again. Selecting Scenes using Menu Screen Using the Disc Navigation menu screen, you can select scenes from the first scene to the scene where the cursor is positioned, from the scene where the cursor is posi-... -
Page 106: Playing Back Selected Scenes Using Disc Navigation
chapter 4_Playing Back, Deleting and Editing Your Recordings 4. Choose “All” to specify all scenes, choose “Start → current” to specify the scene the cursor is designating and pre- ceding scenes, or “Current → end” to specify the scene the cursor is designat- ing and following scenes, and then press the ENTER button. - Page 107 • If the last or start image of a scene is reached by fast forward/fast back, forward slow/reverse slow, etc. during playback, the DVD camcorder will enter the playback pause status. Playing Back Only Stills (Slide Play) 1.
-
Page 108: Deleting Scenes Using Menu Screen
chapter 4_Playing Back, Deleting and Editing Your Recordings Deleting Scenes using Menu Screen 1. Select a scene to be deleted, and press the MENU button to dis- play the Disc Navigation menu screen. 2. Press to choose “Scene ”, and then press menu screen for editing scenes. -
Page 109: Playing Back By Skipping Scenes (Skip)
Cautions: • With still recording, the DVD camcorder will simultaneously record two types of still: A still to be played back on DVD camcorder and a still to be used on PC. However, the above deletion function will delete only stills to be played back on DVD camcorder. - Page 110 chapter 4_Playing Back, Deleting and Editing Your Recordings 2. Press to choose “Cancel skip”, and then press the ENTER button. After the proceeding message is displayed, skip- ping of the selected scene will be released, and the thumbnail display screen will be restored (the skip mark will disappear).
-
Page 111: Attaching Title
Attaching Title You can attach a title of up to 20 characters to a scene. 1. Select the scene for title attachment, and press the MENU button to display the Disc Navigation menu screen. You can also specify a range of scenes, and attach the same title to all of them. 2. - Page 112 chapter 4_Playing Back, Deleting and Editing Your Recordings For example, input “TOM 2000” using the following procedure: 4. Press the DISPLAY button to display Mode 1. Use the cursor keys to choose “T”, and then press the ENTER button. “T” will appear on the left end of title input box. 5.
- Page 113 9. The message for verification will appear. Choose “Yes” and press the ENTER but- ton. After the proceeding message appears, the thumbnail display screen will be restored. The entered title will appear at the bottom right of screen. Tips: • To delete any characters you entered by mistake, choose “Delete” and press the ENTER button. The last character will be deleted.
-
Page 114: Adding Special Effects
chapter 4_Playing Back, Deleting and Editing Your Recordings Adding Special Effects Special effects refer to effects to be added when scenes are switched, such as fade, wipe, B/W, etc. You can add different effects to the first and last images of one scene. There are three types of special effects: Fade Fades in from white screen, fades out to white screen... - Page 115 5. After selecting effects for “IN” and “OUT”, choose “Set”, and then press the ENTER button. After the proceeding message appears, the thumbnail display screen will be restored. The scenes for which special effects have been set will be attached with marks “ Tips: •...
-
Page 116: Dividing Movies
chapter 4_Playing Back, Deleting and Editing Your Recordings Dividing Movies You can divide a scene into two parts. To delete unnecessary portion of scene, first divide the scene, and then delete the unnecessary portion. You can also cut out a part of scene and use it in the play list. -
Page 117: Combining Multiple Scenes
Combining Multiple Scenes You can combine multiple scenes into one, and you can also combine divided scenes to restore the original scene. Be sure to select multiple scenes when combining. 1. Select multiple scenes by specifying the range, and then press the MENU button to display the Disc Navigation menu screen. - Page 118 chapter 4_Playing Back, Deleting and Editing Your Recordings Displaying Information using Disc Navigation You can display various information on a scene: the recording date/time and length, set memo and special effects. 1. Select a scene and press the MENU button to display the Disc Navigation menu screen.
-
Page 119: Creating New Play List
Creating New Play List 1. Display the thumbnails of the scenes you want to add to the play list. If you create a play list of scenes recorded on a specific day, display only the scenes for that day, referring to “Selecting Program” on page 102. You can also add scenes on another day or delete unnecessary scenes after- wards. -
Page 120: Adding Scenes To Play List
• Serial numbers are attached to play lists in the order of creation. Before titles are attached to play lists, the attached creating dates according to the date set on the DVD camcorder will be the titles of play lists. Even if you change the date and time of the created play list on this DVD camcorder to set them back, any scenes you record later will be included in the following programs. - Page 121 3. Choose “Play List”, “Edit”, and then press the ENTER button. The menu screen for selecting play list will ap- pear. 4. Select the number of the play list to which you want to add scenes, and then press the ENTER button. A screen for editing a play list will appear, and the thumbnails of the scenes that were displayed be- fore the menu screen will appear on the upper...
-
Page 122: Playing Back Play List
chapter 4_Playing Back, Deleting and Editing Your Recordings Selecting Play List To Be Played or Edited To play or edit the created play list, first select it and then display it with thumbnails. During playback you can use all buttons available for playback. 1. - Page 123 Editing play list You can perform the following for the play list being displayed: Operating play lists: Attach titles: Delete play lists: Operating individual scenes in play list: Delete scenes from play list: See p. 108 Set or release skip: Attach title: Add special effects: Divide a scene:...
-
Page 124: Deleting Play List
chapter 4_Playing Back, Deleting and Editing Your Recordings 3. After entering the title, choose “Enter” and press the ENTER button. 4. Choose "Yes" for verifying message, and press the ENTER button. The play list thumbnail display will be restored. Tip: •... -
Page 125: Trouble Messages
Trouble Messages A message may appear while you are operating the DVD camcorder. If a message appears, refer to the following table and take appropriate corrective action. Message Control info. error • Mismatch may occur between the recorded image and scene infor- mation. - Page 126 Remove the disc and wipe off fingerprints, dust, etc. before reusing it, or use another disc. Turn off the DVD camcorder with the disc being used in it, connect AC adapter/charger, and then power the DVD camcorder again. Scenes will be repaired.
- Page 127 DVD camcorder is powered by a battery. Cause Troubleshooting Turn the DVD camcorder off and wait for a while. The tempera- ture will be effectively decreased if the DVD camcorder is placed in a well-ventilated spot. Follow the instructions on...
- Page 128 chapter 4_Playing Back, Deleting and Editing Your Recordings Message Abnormality with the disc Error ocurred Please change / for- to be repaired. mat disc Cause Troubleshooting Initialize the disc before using it again, or use the other side of the same disc or another disc.
-
Page 129: Dvd Camcorder Settings
DVD Camcorder Settings Switching operating sound on or off ... 130 Releasing power save/changing off time ... 131 Changing display format of date and time ... 132 Initializing all settings to defaults ... 133 System reset ... 134 Checking remaining free space on DVD-RAM disc ... 135 Initializing DVD-RAM disc ... -
Page 130: Switching Operating Sound On Or Off
Switching Operating Sound On or Off This DVD camcorder will generate sound when the POWER or REC button is pressed or other operations are engaged. If you do not need operating sound, you can switch it off. 1. Press the MENU button in the recording pause status to display the menu screen. -
Page 131: Releasing Power Save/Changing Off Time
30 minutes. If you want to use up the battery when you have no intention to use the DVD camcorder for a long time, you can switch off the Power save function. -
Page 132: Changing Display Format Of Date And Time
Changing Display Format of Date and Time You can select one of three date display formats: month/day/year, day/month/year or year/month/day. Associated with the selected date display, the time display format will also change as follows: Display format M/D/Y D/M/Y Y/M/D 1. -
Page 133: Initializing All Settings To Defaults
Initializing All Settings to Defaults You can restore all camera menu settings to defaults (initial settings at the factory). (The date and time will not be reset.) 1. Press the MENU button in the recording pause status to display the menu screen. -
Page 134: System Reset
System Reset If the DVD camcorder does not operate normally, perform “System Reset”: The DVD camcorder may recover to normal. “System Reset” will reset all settings to factory defaults. The date and time will also be reset: Set the date and time again before using the DVD camcorder. -
Page 135: Checking Remaining Free Space On Dvd-Ram Disc
Checking Remaining Free Space on DVD- RAM Disc You can find out how long you will be able to record on one side of disc. 1. Press the DISC NAVIGATION button in the recording pause status. 2. Press the MENU button. The Disc Navigation menu screen will appear. -
Page 136: Initializing Dvd-Ram Disc
• If a DVD-RAM disc is initialized, all the recorded movies and stills will be erased: Be careful not to initialize the disc by mistake. • Use the AC adapter/charger to power the DVD camcorder when initializing disc. Initialization will not be possible when the battery used to power the DVD camcorder is discharged. - Page 137 6. Choose “Yes” and press the ENTER but- ton. When initializing one side of the disc is complete, the DVD camcorder will return to the recording pause status. When initializing the other side of disc, turn the disc over, and repeat the above pro- cedure from step 2.
-
Page 138: Updating Control Information
If you use some other device to edit the video data on the DVD-RAM disc recorded on this DVD camcorder, a mismatch will occur in the control informa- tion that may disable correct playback on Disc Navigation. In this case, update the control information so that the data can be played on Disc Navigation. -
Page 139: Connecting Dvd Camcorder To Other Devices
Connecting DVD Camcorder to Other Devices This section explains the methods for connecting to AV devices such as TV, and transferring the data on DVD-RAM disc to your PC. Viewing on TV screen ... 140 Recording image from other AV devices ... 142... -
Page 140: Viewing On Tv Screen
Viewing on TV Screen Connect this DVD camcorder to a TV and you can play back the recorded video or monitor the video being recorded on the TV screen. This is also useful when editing or playing back with Disc Navigation. - Page 141 • The infrared remote control is useful when operating the DVD camcorder while viewing an image on TV screen. However, if you use a Hitachi VCR, the remote control may inadvertently operate the VCR if it is near the DVD camcorder. To prevent this, set the remote control code of the VCR to a position other than "VCR2".
-
Page 142: Recording Image From Other Av Devices
DVD camcorder. • If you use a Hitachi VCR, it will be operated by the remote control provided with the DVD camcorder. When recording an image from a Hitachi VCR, change the remote control code of the VCR to other than "VCR2". - Page 143 6. Turn on the connected device, and start playback of picture. The picture will appear on the LCD screen or viewfinder of this DVD camcorder. 7. Start to record on this DVD camcorder. The operation of this line-input recording is the same as for recording on this DVD camcorder.
- Page 144 Video signal from video game or PC Video signal whose TV system is different from that of this DVD camcorder (NTSC color TV system) • During recording, do not switch the channel on TV, or switch the signal using video switcher, etc.
-
Page 145: Changing Method For Recording Stills
Changing Method for Recording Stills You can switch the method for recording stills of externally input images between FIELD and FRAME. The DVD camcorder can record an external image with little move- ment by specifying "FRAME", but "FIELD" is recommended for recording image with movement. -
Page 146: Transferring Data To Pc
Read following "Conditions in which PC connection software can be used" carefully. • When this DVD camcorder is connected to the USB terminal of PC, it will be recognized as an external DVD-RAM drive of PC. Data will be writable and readable on this DVD camcorder as the external DVD- RAM drive, but Hitachi does not guarantee these operations. - Page 147 UDF Reader Cautions: • No power is supplied to this DVD camcorder via PC connection cable: Use the AC adapter/charger to power the DVD camcorder. • The PC connection cable provided is exclusively for this DVD camcorder. A generally available USB cable cannot be used.
-
Page 148: Connecting To Pc
6_Connecting DVD Camcorder to Other Devices Connecting to PC Use the PC connection cable to connect this DVD camcorder to PC as follows: AUDIO/VIDEO EXT.MIC DIGITAL Display in information LCD monitor When the DVD camcorder is connected to PC, the 3.5" LCD monitor and viewfinder will be off: Close the LCD monitor and check with "PC connection display"... -
Page 149: Subsidiary Information
Subsidiary Information Cleaning ... 150 Trouble messages ... 151 Troubleshooting ... 153 Major specifications ... 161 Index ... 163 Introduction to optional accessories ... 167... -
Page 150: Cleaning
Cleaning Be sure to turn the POWER switch off before cleaning this DVD camcorder. Cleaning LCD screen and lens: Use dry, soft cloth to wipe dirt off. When cleaning the LCD screen, be careful not to use force, scratch it, or subject it to impact: Doing such could cause a defect in the screen, result in display unevenness, or damage the LCD monitor. -
Page 151: Trouble Messages
If this message appears, be sure to initialize the disc on this DVD camcorder before using it. Reinitializing even a DVD-RAM disc used on this DVD camcorder may be necessary (initializing will erase all recorded contents on disc). If this message appears, try to initialize the disc. - Page 152 DVD camcorder. Insert it. Condensation has occurred on the camcorder lens or DVD-RAM drive. Do not remove the disc; leave the DVD camcorder turned off in a place as dry as possible for 1-2 hours.
-
Page 153: Troubleshooting
Troubleshooting Check to see the following before asking for a repair. If the suggested solution still cannot restore the DVD camcorder to normal, do not attempt to repair it yourself, but consult your dealer. Symptom Power Power turns off supplies immediately after being turned on. - Page 154 Battery weakens fast Battery cannot be charged. Check to see Correction Is DVD camcorder Unplug the PC connected to PC connection cable. using PC connec- tion cable? Does DVD Press the DISC camcorder stop at...
- Page 155 REC. Set the switch to the movie mode. Is input image Copy-guarded copy-guarded? image cannot be recorded on this DVD camcorder. Is disc scratched Clean the disc. If or does dirt or there is still no fingerprint adhere improvement, to it? replace the disc.
- Page 156 Is it difficult to use Focus manually. auto focus with your subject? Does “FOCUS” The DVD camcorder is set appear? to manual focus. Focus the subject manually, or release manual focus. Reference page...
- Page 157 Playback of image been recorded by recorded on devices other than devices other than this DVD this DVD camcorder? camcorder may be impossible on this DVD camcorder. Has scene been If the scene edited by applica- recorded on this tions other than...
- Page 158 TV correctly? Is input selector of Change it to this DVD "CAMERA" mode. camcorder set to "LINE"? Is disc scratched Clean the disc. or does dirt or fingerprint adhere to it? Was the image The problem may...
- Page 159 Reset the date/time and each menu setting item as needed. Has the DVD The DVD camcorder been camcorder could be subjected to damaged. Consult impact? your dealer. Has the DVD The internal camcorder been...
- Page 160 7_Subsidiary Information Symptom Miscella- Disc cannot be neous removed. DVD camcorder cannot be operated from remote control. Disc cover cannot be closed. Check to see Correction Did you detach Connect the the battery or AC battery pack or adapter/charger...
-
Page 161: Major Specifications
Major Specifications CCD (number of effective pixels) Lens Focal length (converted to 35 mm camera) Focus Zoom Required minimum illumination Viewfinder LCD monitor Electronic image stabilizer Shutter speed Flash Self-timer recording External microphone jack Recording mode Maximum recordable time (on both sides of disc) Maximum number of record- able stills (on both sides of disc) - Page 162 chapter 7_Subsidiary Information Dimensions (W x H x D) Operating temperature (humidity) Storage temperature Weight Total weight when recording Provided accessories Specifications of DZ-ACP1 AC Adapter/Charger Power supply Input capacity DC output Charge output Weight External dimensions (W x H x Ambient temperature Allowable relative humidity approx.
-
Page 163: Index
Attaching to DVD camcorder ... 42 Charging ... 40 Disposition of dead battery ... 44 Life ... 44 Recordable time on DVD camcorder ... 41 Removing from DVD camcorder ... 42 Setting up ... 40 Beep ... 130 Built-in battery ... 53 Buttons and switches used when recording ... - Page 164 Macro recording ... 75 Manual focus When recording movie ... 74 When recording still ... 89 Menu ... 68 Messages Camcorder ... 151 Disc Navigation ... 125 Microphone (external) ... 80 Microphone filter ... 81 Mode 1 ... 111 Mode 2 ... 111 Movie mode ...
- Page 165 Switching ... 102 Title ... 102 Transferring data to PC ... 146 Trial recording ... 25 Troubleshooting ... 153 Turning camcorder on ... 67 Viewfinder ... 59 During playback ... 97 During recording ... 62 During recording of external input ... 144 Viewing on TV screen ...
- Page 166 For U.S.A. only Hitachi America, Ltd. Home Electronics Division Hitachi has made every effort to assure you hours of trouble free operation from your unit. However, should you require service, a network of Hitachi Authorized Service Facilities has been established in all 50 states and Puerto Rico. Each facility will provide you with conve- nient and expedient assistance.
-
Page 167: Introduction To Optional Accessories
Introduction to Optional Accessories Introduction to Optional Accessories Power Supplies DZ-BP16 battery: 7.2 V/1600 mAh DZ-BP28 battery: 7.2 V/2800 mAh... -
Page 168: To Order In The United States
To Order in the United States By Phone 1-800-HITACHI (1-800-448-2244) FOR AUTHORIZED HITACHI SERVICE FACILITY IN CANADA Please consult the following telephone number: Hitachi Canada Ltd. Digital Media Division 1-800-HITACHI (1-800-448-2244) during business hours Monday-Friday EST 9:00am-7:00pm Saturday EST 9:00am-5:00pm... - Page 169 MEMO...
- Page 170 MEMO...
Need help?
Do you have a question about the DZ-MV100A and is the answer not in the manual?
Questions and answers