Table of Contents
Advertisement
Quick Links
Advertisement
Table of Contents

Subscribe to Our Youtube Channel
Related Manuals for HIKVISION DS-2DB4236I-CWX


Summary of Contents for HIKVISION DS-2DB4236I-CWX
- Page 1 Explosion-Proof IR Zoom Bullet Camera Quick Start Guide Installation Video...
- Page 2 This Manual is the property of Hangzhou Hikvision Digital Technology Co., Ltd. or its affiliates (hereinafter referred to as “Hikvision”), and it cannot be reproduced, changed, translated, or distributed, partially or wholly, by any means, without the prior written permission of Hikvision.
- Page 3 SATISFACTORY QUALITY, OR FITNESS FOR A PARTICULAR PURPOSE. THE USE OF THE PRODUCT BY YOU IS AT YOUR OWN RISK. IN NO EVENT WILL HIKVISION BE LIABLE TO YOU FOR ANY SPECIAL, CONSEQUENTIAL, INCIDENTAL, OR INDIRECT DAMAGES, INCLUDING, AMONG OTHERS, DAMAGES FOR LOSS OF BUSINESS PROFITS,...
- Page 4 Explosion-proof IR Zoom Bullet Camera·Quick Start Guide OTHER PRIVACY RIGHTS. YOU SHALL NOT USE THIS PRODUCT FOR ANY PROHIBITED END-USES, INCLUDING THE DEVELOPMENT OR PRODUCTION OF WEAPONS OF MASS DESTRUCTION, THE DEVELOPMENT OR PRODUCTION OF CHEMICAL OR BIOLOGICAL WEAPONS, ANY ACTIVITIES IN THE CONTEXT RELATED TO ANY NUCLEAR EXPLOSIVE OR UNSAFE NUCLEAR FUEL-CYCLE, OR IN SUPPORT OF HUMAN RIGHTS ABUSES.
- Page 5 Explosion-proof IR Zoom Bullet Camera·Quick Start Guide Regulatory Information FCC Information Please take attention that changes or modification not expressly approved by the party responsible for compliance could void the user’s authority to operate the equipment. FCC compliance: This equipment has been tested and found to comply with the limits for a Class A digital device, pursuant to part 15 of the FCC Rules.
- Page 6 Explosion-proof IR Zoom Bullet Camera·Quick Start Guide LVD Directive 2014/35/EU, the RoHS Directive 2011/65/EU, the ATEX Directive 2014/34/EU. 2012/19/EU (WEEE directive): Products marked with this symbol cannot be disposed of as unsorted municipal waste in the European Union. For proper recycling, return this product to your local supplier upon the purchase of equivalent new equipment, or dispose of it at designated collection points.
- Page 7 Explosion-proof IR Zoom Bullet Camera·Quick Start Guide IP Degree: IP68 (1m, 1h) Ex Standards: IEC 60079-0: 2011 EN 60079-0: 2012 IEC 60079-1: 2014 EN 60079-1: 2014 IEC 60079-31: 2013 EN 60079-31: 2014 IEC 60079-28: 2015 Special Conditions for Safe Use (Conditions of Certification) The following conditions relate to safe installation and/or use of the equipment.
- Page 8 Explosion-proof IR Zoom Bullet Camera·Quick Start Guide Safety Instruction These instructions are intended to ensure that user can use the product correctly to avoid danger or property loss. The precaution measure is divided into “Warnings” and “Cautions” Warnings: Serious injury or death may occur if any of the warnings are neglected.
- Page 9 Explosion-proof IR Zoom Bullet Camera·Quick Start Guide The equipment must be connected to an earthed mains socket-outlet. A readily accessible disconnect device with the appropriate rating shall be incorporated external to the equipment. An overcurrent protective device with the appropriate rating shall be incorporated external to the equipment not exceeding the specification of the building.
- Page 10 Explosion-proof IR Zoom Bullet Camera·Quick Start Guide Dispose of used batteries according to the instructions. L’utilisation ou le remplacement inadéquats de la pile peuvent entraîner un risque d’explosion. Remplacez-la par le même type ou l’équivalent du même type seulement. Jetez les piles usagées conformément aux directives fournies par le fabricant de la pile.
- Page 11 Explosion-proof IR Zoom Bullet Camera·Quick Start Guide No naked flame sources, such as lighted candles, should be placed on the equipment. The serial port of the equipment is used for debugging only. Installation Install the equipment according to the instructions in this manual. To prevent injury, this equipment must be securely attached to the wall in accordance with the installation instructions.
- Page 12 Explosion-proof IR Zoom Bullet Camera·Quick Start Guide Use a power adapter provided by qualified manufacturers. It is recommended to provide an independent power adapter for each device as adapter overload may cause over-heating or a fire hazard. System Security Please understand that you have the responsibility to configure all the passwords and other security settings about the device, and keep your user name and password.
- Page 13 Explosion-proof IR Zoom Bullet Camera·Quick Start Guide Repair and overhaul shall comply with IEC 60079-19: latest version or its National equivalent. Cleaning Please use a soft and dry cloth to clean the inner and outer surfaces. Do not use alkaline detergents. Keep the surface clean and prevent dust accumulation.
- Page 14 Explosion-proof IR Zoom Bullet Camera·Quick Start Guide Time Synchronization Set up device time manually for the first time access if the local time is not synchronized with that of the network. Visit the device via web browser/client software and go to time settings interface. xiii...
-
Page 15: Table Of Contents
Explosion-proof IR Zoom Bullet Camera·Quick Start Guide Table of Contents 1 Overview..................1 1.1 Introduction ..............1 1.1.1 Power Supply............1 1.1.2 Explosion-proof Parameters ......... 1 1.1.3 Mechanical Specification ........1 1.1.4 Working Environment ........... 1 1.2 Model Description............2 1.3 Appearance Description .......... -
Page 16: Overview
Explosion-proof IR Zoom Bullet Camera·Quick Start Guide 1 Overview Introduction Explosion-Proof IR Zoom Bullet Camera is capable of video/audio collecting, smart encoding and network transmitting. It adopts an embedded system and a high-performed hardware process platform to achieve good stability and reliability. You can visit and configure your camera via web browser and client software. -
Page 17: Model Description
C: 100 VAC to 240 VAC D: 12 VDC/30 VDC Supplement Light: I: Infrared Zoom Ration Max. Resolution (MP) 4: Project Product Product Shape: B: Bullet camera Product Type: D: Network A: Analog Hikvision Front-end Product Figure 1-1 Model Explanation... -
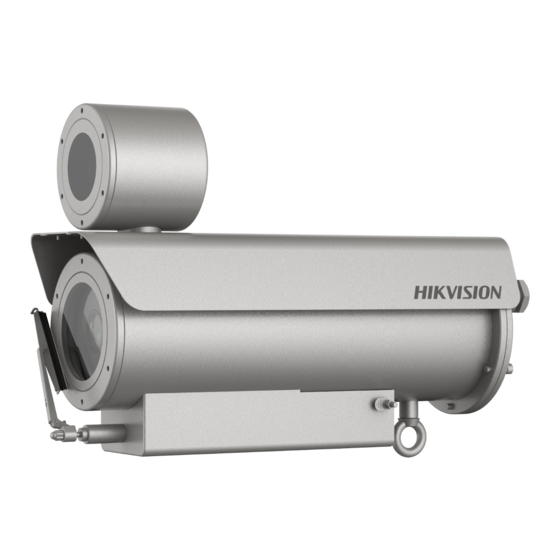
Page 18: Appearance Description
Explosion-proof IR Zoom Bullet Camera·Quick Start Guide Appearance Description This camera series has four appearance types: Type I: camera Type II: camera with wiper Type III: camera with IR and wiper Type IV: camera with IR 1.3.1 Type I Overview Figure 1-2 Overview of Type I Camera Table 1-1 Description of Type I Camera Description... -
Page 19: Type Ii Overview
Explosion-proof IR Zoom Bullet Camera·Quick Start Guide Note: Grounding should be applied properly via the grounding screw to avoid static electricity accumulation on the device case. 1.3.2 Type II Overview Figure 1-3 Overview of Type II Camera Table 1-2 Description of Type II Camera Description Description Sun shield... -
Page 20: Type Iii Overview
Explosion-proof IR Zoom Bullet Camera·Quick Start Guide 1.3.3 Type III Overview Figure 1-4 Overview of Type III Camera Table 1-3 Description of Type III Camera Description Description Grounding screw Sun shield Ring for safety rope Transparent glass Mounting base Wiper Note: Grounding should be applied properly via the grounding screw to avoid static electricity accumulation on the device case. -
Page 21: Type Iv Overview
Explosion-proof IR Zoom Bullet Camera·Quick Start Guide 1.3.4 Type IV Overview Figure 1-5 Overview of Type IV Camera Table 1-4 Description of Type IV Camera Description Description Sun shield Transparent glass Ring for safety rope Mounting base Grounding screw Note: Grounding should be applied properly via the grounding screw to avoid static electricity accumulation on the device case. -
Page 22: Cable Description
Explosion-proof IR Zoom Bullet Camera·Quick Start Guide Cable Description Power Cord RS-485 Cable Audio Cable Alarm Cable Network Cable Optical Fiber Figure 1-6 Cable Description Notes: Cables vary depending on different camera models. The three cables of the power cord should be connected to corresponding wires. -
Page 23: Installation
Explosion-proof IR Zoom Bullet Camera·Quick Start Guide 2 Installation Before you start: Make sure the device in the package is in good condition and all the assembly parts are included. Make sure your power supply matches with your camera. Refer to specification for standard power supply of different camera models. - Page 24 Explosion-proof IR Zoom Bullet Camera·Quick Start Guide Note There is no wall mounting bracket included in the package. You have to prepare a wall mounting bracket if you choose this mounting type. The shown bracket below is only for demonstration. 4-Ø...
-
Page 25: Run The Device In Safe Area
Explosion-proof IR Zoom Bullet Camera·Quick Start Guide Ø 8.5 Ø 17 Ø 10 *90±0.1 543.5 Ø 13 Figure 2-3 Dimension of a Wall Mounting Bracket Type II (mm) Run the Device in Safe Area It is recommended to trial run the device in the safe area before installation. -
Page 26: Wall Mounting With Bracket Type I
Explosion-proof IR Zoom Bullet Camera·Quick Start Guide Wall Mounting with Bracket Type I Note: The camera series shares similar installation steps. We take type III camera as example. Steps: 1. Disassemble the PT joint. 2. Install the pedestal of the PT joint to the mounting base of the camera with four M6 ×... - Page 27 Explosion-proof IR Zoom Bullet Camera·Quick Start Guide Figure 2-5 Install the Pedestal to Camera 3. Install the PT joint to the wall mounting bracket with four supplied screws. Note: Adjust the panning position of the PT joint to desired angle when installing.
- Page 28 Explosion-proof IR Zoom Bullet Camera·Quick Start Guide Note: Adjust the tilting position of the camera to desired angle when installing. Use at least three screws on each side of the PT joint to secure the camera. Figure 2-7 Fix the Camera 5.
- Page 29 Explosion-proof IR Zoom Bullet Camera·Quick Start Guide 2). Drill four screw holes for expansion bolts with a Φ16 mm drill. 3). Insert the expansion bolts (M12 × 120) and fix the mounting base at the direction indicated by the "UP" mark. Expansion Bolt Flat Washer...
-
Page 30: Wall Mounting With Bracket Type Ii
Explosion-proof IR Zoom Bullet Camera·Quick Start Guide Safety Rope Figure 2-10 Fix the Wall Mounting Bracket to Mounting Base Wall Mounting with Bracket Type II Note: The camera series shares similar mounting steps. We take type I camera as example. Steps: Disassemble the PT joint. - Page 31 Explosion-proof IR Zoom Bullet Camera·Quick Start Guide Figure 2-11 PT Joint Figure 2-12 Install the Pedestal to Camera Install the PT joint to the wall mounting bracket with four M6 × 16 screws. Note: Adjust the panning position of the PT joint to desired angle when installing.
- Page 32 Explosion-proof IR Zoom Bullet Camera·Quick Start Guide Figure 2-13 Screw the PT Joint to Wall Mounting Bracket Fix the wall mounting bracket to wall with expansion bolts (M8 × 100). Figure 2-14 Install Bracket to Wall Fix the camera to the bracket. Use safety rope to hook the camera and the bracket.
-
Page 33: Protective Measures For Outdoor Installation
Explosion-proof IR Zoom Bullet Camera·Quick Start Guide Figure 2-15 Install Camera to Bracket Protective Measures for Outdoor Installation If the device is installed outdoors, necessary protective measures should be taken to ensure safety. Scan the following QR code to get protective measures for outdoor installation. -
Page 34: Setting The Network Camera Over The Lan
Explosion-proof IR Zoom Bullet Camera·Quick Start Guide 3 Setting the Network Camera over the Note: You shall acknowledge that the use of the product with Internet access might be under network security risks. For avoidance of any network attacks and information leakage, strengthen your own protection. -
Page 35: Activating The Camera
Explosion-proof IR Zoom Bullet Camera·Quick Start Guide Figure 3-2 Connecting via a Switch or a Router Activating the Camera Purpose: You are required to activate the camera first by setting a strong password for it before you can use the camera. Activation via web browser, activation via SADP, and activation via client software are supported. - Page 36 Explosion-proof IR Zoom Bullet Camera·Quick Start Guide Notes: The default IP address of the camera is 192.168.1.64. The computer and the camera should belong to the same subnet. For the camera enables the DHCP by default, you need to use ...
-
Page 37: Activation Via Sadp Software
Explosion-proof IR Zoom Bullet Camera·Quick Start Guide Confirm the password. Click OK to activate the camera and enter the live view interface. 3.2.2 Activation via SADP Software SADP software is used for detecting the online device, activating the camera, and resetting the password. Get the SADP software from the supplied disk or the official website, and install the SADP according to the prompts. -
Page 38: Modifying The Ip Address
Explosion-proof IR Zoom Bullet Camera·Quick Start Guide 3. Create a password and input the password in the password field, and confirm the password. STRONG PASSWORD RECOMMENDED–We highly recommend you create a strong password of your own choosing (using a minimum of 8 characters, including upper case letters, lower case letters, numbers, and special characters) in order to increase the security of your product. - Page 39 Explosion-proof IR Zoom Bullet Camera·Quick Start Guide For IP address modification via client software, refer to the user manual of client software. Steps: 1. Run the SADP software. 2. Select an active device. 3. Change the device IP address to the same subnet with your computer by either modifying the IP address manually or checking the Enable DHCP checkbox.
- Page 40 Explosion-proof IR Zoom Bullet Camera·Quick Start Guide 4. Input the admin password and click Modify to activate your IP address modification. The batch IP address modification is supported by SADP. Refer to the user manual of SADP for details.
-
Page 41: Accessing Via Web Browser
Explosion-proof IR Zoom Bullet Camera·Quick Start Guide 4 Accessing via Web Browser System Requirement: Operating System: Microsoft Windows XP SP1 and above version CPU: 2.0 GHz or higher RAM: 1G or higher Display: 1024×768 resolution or higher Web Browser: Internet Explorer 8.0 and above version, Apple Safari 5.0.2 and above version, Mozilla Firefox 5.0 and above version and Google Chrome 18 and above version Steps:... - Page 42 Explosion-proof IR Zoom Bullet Camera·Quick Start Guide Figure 4-1 Login Interface 5. Install the plug-in before viewing the live video and managing the camera. Follow the installation prompts to install the plug-in. Note: You may have to close the web browser to finish the installation of the plug-in.
- Page 43 UD24174B-A...
Need help?
Do you have a question about the DS-2DB4236I-CWX and is the answer not in the manual?
Questions and answers