Harman PELLET P61A Installation & Operating Manual
Harman stove company stove user manual
Hide thumbs
Also See for PELLET P61A:
- Installation & operating manual (42 pages) ,
- Installation and operating manual (36 pages) ,
- Owner's manual (44 pages)
Table of Contents
Advertisement
installation & Operating Manual
P61A Pellet Stove Owners Manual
"Ce manuel est disponible en Français sur demande"
R18
SAFetY nOtice
PleASe ReAd thiS entiRe MAnuAl beFORe YOu inStAll And uSe YOuR new ROOM heAteR. FAiluRe
tO FOllOw inStRuctiOnS MAY ReSult in PROPeRtY dAMAge, bOdilY injuRY, OR even deAth.
FOR uSe in the u.S. And cAnAdA. SuitAble FOR inStAllAtiOn in MObile hOMeS.
iF thiS hARMAn StOve iS nOt PROPeRlY inStAlled, A hOuSe FiRe MAY ReSult. FOR YOuR SAFetY, FOllOw
inStAllAtiOn diRectiOnS. dO nOt uSe MAkeShiFt cOMPROMiSeS.
cOntAct lOcAl building OR FiRe OFFiciAlS AbOut ReStRictiOnS And inStAllAtiOn inSPectiOn
ReQuiReMentS in YOuR AReA.
cOntAct YOuR lOcAl AuthORitY (Such AS MuniciPAl building dePARtMent, FiRe dePARtMent, FiRe
PReventiOn buReAu, etc.) tO deteRMine the need FOR A PeRMit.
cette guide d'utiliSAtiOn eSt diSPOnible en FRAncAiS. chez vOtRe cOnceSSiOnnAiRe de hARMAn
hOMe heAting.
SAve theSe inStRuctiOnS.
# 3-90-05822
Advertisement
Table of Contents

Related Manuals for Harman PELLET P61A


Summary of Contents for Harman PELLET P61A
-
Page 1: Safety Notice
FOllOw inStRuctiOnS MAY ReSult in PROPeRtY dAMAge, bOdilY injuRY, OR even deAth. FOR uSe in the u.S. And cAnAdA. SuitAble FOR inStAllAtiOn in MObile hOMeS. iF thiS hARMAn StOve iS nOt PROPeRlY inStAlled, A hOuSe FiRe MAY ReSult. FOR YOuR SAFetY, FOllOw inStAllAtiOn diRectiOnS. dO nOt uSe MAkeShiFt cOMPROMiSeS. - Page 2 8cm min 3"min P61A Pellet Stove...
-
Page 3: Table Of Contents
S627-00, and ULC/ORD-C1482-M1990. This appliance is also approved for installation into a shop. Division of Hearth & Home Technologies, Inc 352 Mountain House Road Halifax, PA 17032 P61A Pellet Stove table of contents Safety Information Installation Venting ESP Control Automatic Operation... -
Page 4: Safety Information
FlY ASh builduP, it iS StROnglY RecOMMended thAt YOu hAve YOuR StOve PROFeSSiOnAllY cleAned And SeRviced AnnuAllY. thiS includeS All PARtS OF the StOve, And the entiRe venting SYSteM. cAutiOn AlwAYS be SuRe theRe iS nO unbuRned Fuel in the ASh PAn PRiOR tO lighting A FiRe. -
Page 5: Installation
The P61A is bolted (1/4 x 1" hex head bolts) to the skid to prevent movement during shipping. To free the stove from the skid you must remove the hold-down bolts in the rear of the pedestal base. Removing rear cover panels The rear cover panels are secured to the stove with three bolts each. - Page 6 Place the stove on a noncombustible floor or on a floor protector that extends a minimum of 6 inches to the front, (measured from the glass) 6 inches to the sides and 1 inch to the rear of the hopper. It is also recommended that floor protection be installed under any horizontal venting and extending 2 inches beyond the vent measurement.
-
Page 7: Venting
H. A vent must not be installed within 3 feet (90 cm) above a gas meter/regulator assembly when measured from the horizontal center-line of the regulator. = Venting Terminal P61A Pellet Stove venting I. The clearance to service regulator vent outlet must be a minimum of 6 feet. - Page 8 The use of a starting collar is not always necessary. The first piece of pipe must be secured, with at least 2 fasteners, to the flue collar of the stove. The 2 screws provided are self-drilling, however, drilling a 3/32"...
-
Page 9: Vent Configurations
1-00-08543 (25') the total house demand. House demand may consume some air needed for the stove, especially during a power failure. It may be necessary to add additional ventilation to the space in which the pellet appliance is located. - Page 10 This vertical section will provide natural draft in the event of a power failure. If the stove is installed below grade be sure the vent termination is at least 18" above grade. The outlet 3 ft.
- Page 11 *The chimney should be inspected and cleaned before installing your stove. If you discover that the chimney does not have a clay tile liner or has cracks or flaking of the tile liner you will need to install a stainless steel liner within the chimney.
- Page 12 The pipe or liner inside the chimney should be 4" diameter. In this method a cap should also be installed on the chimney to keep out rain. P61A Pellet Stove...
- Page 13 #8 installing through the ceiling Through the ceiling vent, follow PL vent manufacturers recommendations when using wall and ceiling pass through. note: do not place joints within wall pass- throughs. P61A Pellet Stove venting Storm collar Flashing 3" min. No insulation...
-
Page 14: Esp Control
50 minutes. A six blink status may be set if the stove is allowed to run out of pellets. To reset, turn mode selector to "OFF" then back on to the desired mode. If the unit was not out of pellets, see Troubleshooting section, Page 27, for more details. -
Page 15: Automatic Operation
In the Room Temperature Mode the stove constantly monitors the temperature in the room and adjusts the size of the fire and the heat output of the stove so that the room is kept at a constant temperature. Room mode, in the AUTO position, has the added advantage... - Page 16 Shut down Procedure The best way to shut down the stove is to simply let it run out of pellets. The stove will shut down automatically. Alternatively, you can turn the Mode Selector to “off”.
- Page 17 First, scrape the ashes off the front of the burn pot into the ash pan. Then, scrape the top surface of the burn pot downward into the base of the burn pot. When the stove is ignited these scrapings will be pushed out by the feeder and burned.
-
Page 18: Manual Operation
MAnuAl ignitiOn/OPeRAtiOn The P61A Pellet Stove is capable of manual operation. This also allows the operator to manually control operation during an emergency (i.e. igniter failure, when using a 502H battery backup, as opposed to the 512H, or when using certain generators.) The unit can be switched between "AUTO"... - Page 19 Then, scrape the top surface of the burn pot downward into the base of the burn pot. When the stove is ignited these scrapings will be pushed out by the feeder and burned.
-
Page 20: Low Draft Voltage Adjustment
-.35 to -.45 even with the set screw completely counter-clockwise. ideally, you should just set it as low as possible. Fig. 23 P61A Pellet Stove... -
Page 21: Maintenance
"OFF" to allow the unit to shut down. Call the fire department, and be sure everyone is out of the residence. Before re-using the appliance, have it, and the venting system thoroughly inspected and replace any damaged components. - Page 22 1. Lift the latch handle to open the ash door and remove the ash pan. Use ash pan handle to carry and dispose of ashes. 2. Slide the ash pan back into the stove and latch the door by pushing down on the latch handle when closed.
- Page 23 Blower cover 10. Reinstall the blower cover and close the latch. removed. 11. Slide the ash pan into stove and latch the door. Soot and Fly Ash The products of combustion will contain small particles of fly ash which must be removed from the inner walls of the stove and from the venting system periodically.
-
Page 24: Burn Pot Cleaning And Maintenance
Fig. 36 DANGER before removing cover. WARNING P61A Pellet Stove... -
Page 25: Safety Features
If the switch opens when the cycle is at rest, the power lights for the feed motor or igniter will not illuminate. Be sure all doors, including the hopper lid, are securely closed when operating the appliance. P61A Pellet Stove 5/16" Hex Head Screws (2 on... -
Page 26: Troubleshooting
Whenever your stove is not burning, take the opportunity to scrape the burn pot to remove carbon buildup. A vacuum cleaner is handy to remove the residue. be sure the stove is cold if you use a vacuum. Carbon buildup can be scraped loose with the fire burning using the special tool provided with your stove. -
Page 27: Fuel Specifications
ONLY. Burning of any other fuel will void your warranty. Hearth & Home Technologies is not responsible for stove performance or extra maintenance required as a result of using fuel with higher ash or mineral content. -
Page 28: Mixing Corn With Pellets
Maximum feed has been reached when the fire bed is about ½ to 1 inch from the end of the burn pot. It is recommended that after burning at the desired settings, turn the stove off and allow it to cool, then turn it back on in “Room Temp”... -
Page 29: Power Failure / Back-Up
Always keep appliance doors and hopper lid closed and latched during operation and during power failures to minimize risk of smoke or burn-back. -
Page 30: Options
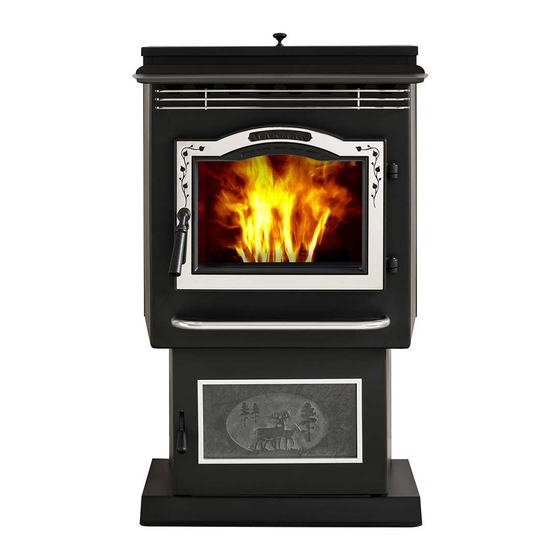
The decorative slate tiles measure 11.938" x 5.938". The tile/slate frame is not necessary to hold the tile in place on the stove. There are 4 decorative slate choices. See dealer for samples. The Brushed Stainless deer cutout, pictured below, is another option available. -
Page 31: Wiring Diagram
Pellets- corn/Pellet Mixture Flue Size 3 inch Outside Air Size 2 3/8" i.d. Fuse Rating 5 amp P61A Pellet Stove wiring diagram HARMAN P43/P61A/P68 PELLET STOVE WIRING DIAGRAM MALE/FEMALE CONNECTIONS BROWN WHITE LOW PRESSURE SWITCH N.O. CONTACTS FEEDER AUGER MOTOR COMBUSTION MOTOR Specifications 9"... -
Page 32: Warranty
Hearth & Home Technologies Inc., on behalf of its hearth brands (”HHT”), extends the following warranty for HHT gas, wood, pellet, coal and electric hearth appliances that are purchased from an HHT authorized dealer. WARRANTY COVERAGE: HHT warrants to the original owner of the HHT appliance at the site of installation, and to any transferee taking ownership of the appliance at the site of installation within two years following the date of original purchase, that the HHT appliance will be free from defects in materials and workmanship at the time of manufacture. - Page 33 WARRANTY CONDITIONS: • This warranty only covers HHT appliances that are purchased through an HHT authorized dealer or distributor. A list of HHT authorized dealers is available on the HHT branded websites. • This warranty is only valid while the HHT appliance remains at the site of original installation. •...
-
Page 34: Service Parts
1-90-05801-2 (charcoal) (june 2011) 1-90-05801-3 (goldenfi re) (june 2011) 1-90-05801-4 (Metallic blue) (jan 2010) 2 & 3 Part number list on following page. Service Parts Steel Pellet Stove 1-90-05801-1 (black) Retired units P61A Pellet beginning Manufacturing date: n/A ending Manufacturing date: Active... - Page 35 IMPORTANT: THIS IS DATED INFORMATION. When requesting service or replacement parts for your appliance please provide model number and serial number. All parts listed in this manual may be ordered from an authorized dealer. iteM description Hopper Assembly Hopper Switch 48” #2 Pre Serial number 008085092 Feeder Assembly Feeder Assembly Air Intake Damper Assembly...
- Page 36 #3 Post Serial number 008085803 Feeder Assembly 3.16 IMPORTANT: THIS IS DATED INFORMATION. When requesting service or replacement parts for your appliance please provide model number and serial number. All parts listed in this manual may be ordered from an authorized dealer. iteM description Feeder Assembly...
- Page 37 IMPORTANT: THIS IS DATED INFORMATION. When requesting service or replacement parts for your appliance please provide model number and serial number. All parts listed in this manual may be ordered from an authorized dealer. iteM description Flue Tail Pipe Auger Motor Cover Auger Motor Shield Differential Switch Distribution Blower...
- Page 38 IMPORTANT: THIS IS DATED INFORMATION. When requesting service or replacement parts for your appliance please provide model number and serial number. All parts listed in this manual may be ordered from an authorized dealer. iteM description Arrow Burn Pot Scraper Cradle Assembly Igniter Holder, Cradle, &...
- Page 39 Service & Maintenance log P61A Pellet Stove...
- Page 40 Service & Maintenance log Date Of Service Performed By Description Of Service P61A Pellet Stove...
- Page 41 P61A Pellet Stove...
- Page 43 Proudly Printed On 100% Recycled Paper...
Need help?
Do you have a question about the PELLET P61A and is the answer not in the manual?
Questions and answers