Advertisement
Quick Links
○ бензинова косачка
○ gasoline lawn mower
○ maşina de tuns iarba cu
motor pe benzina
○ benzinska kosilica
RD-GLM01S
USER'S MANUAL
www.raider.bg
Contents
2
BG
схема
4
BG
оригинална инструкция за употреба
21
EN
original instructions' manual
37
RO
instructiuni
42
HR
uputstva za upotrebu
Advertisement

Subscribe to Our Youtube Channel
Related Manuals for Raider Power Tools RD-GLM01S


Summary of Contents for Raider Power Tools RD-GLM01S
- Page 1 Contents ○ бензинова косачка схема ○ gasoline lawn mower оригинална инструкция за употреба ○ maşina de tuns iarba cu motor pe benzina original instructions’ manual ○ benzinska kosilica instructiuni RD-GLM01S uputstva za upotrebu USER’S MANUAL...
- Page 2 Носете защитни очила! Носете защитни антифони! Wear safety glases! Always wear hearing protection! Носете защитна маска! Прочетете ръководството преди употреба! Wear dust mask! Refer to instruction manual / booklet!
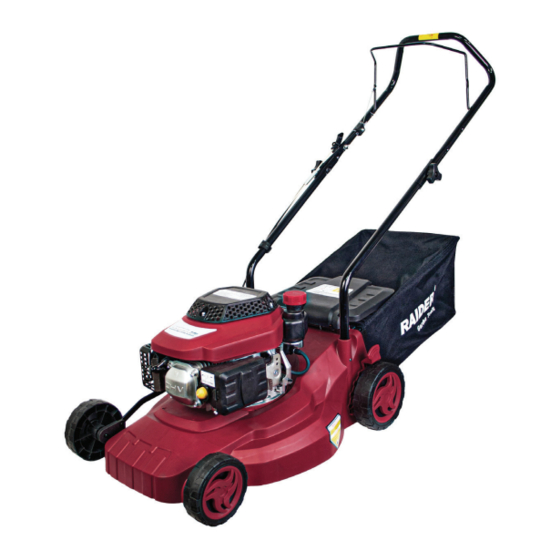
- Page 3 Изобразени елементи: 1. Лост на газта (Бавно/Бързо). 2. Лост за контрол на ножа. 3. Кош, в който се събира окосената трева. 4. Двигател. 5. Ръчен стартер. 6. Колело. 7. Резервоар за бензин. 8. Корпус. 9. Въздушен филтър. НЕ КОСЕТЕ, ДОКАТО В НЕПОСРЕДСТВЕНА БЛИЗОСТ СЕ НАМИРАТ ДРУГИ ЛИЦА, ОСОБЕНО ДЕЦА...
- Page 4 Поздравления за покупката на бензинова косачка за трева от най- успешно развиващата се марка на пазара - RAIDER. При правилно инсталиране и експлоатация, RAIDER са сигурни и надеждни машини и работата с тях ще Ви достави истинско удоволствие. За Вашето удобство е изградена и отличната...
- Page 5 Ниво на звуково налягане (Lp 74.7 Ниво на измерена звукова мощност (Lw 93.9 Стойност на вибрационните ускорения (ah) по-слаби от 2.5 Клас на защита на електроизолацията Степен на защита IPX4 ПРЕДУПРЕЖДЕНИЕ Не накланяйте машината при наличие на наклон над 15 градуса (което представлява...
- Page 6 а не играчка. Следователно, упражнявайте особено внимание по всяко време. Уредът е предназначен за извършване на една работа: да коси трева. Не го използвайте за други цели. • Никога не позволявайте на деца под 14 години да управляват косачката.
- Page 7 работи лесно и в двете посоки и автоматично да се връща в • изключено състояние, когато се освободи. • Никога не работете с косачката в мокра трева, когато е възможно. Винаги бъдете сигурни във Вашата стабилност. Подхлъзване или падане може да доведе до...
- Page 8 • Не косете близо до наклони, изкопи или насипи. Операторът може да загуби баланс. • Да не се косят наклони по-голями от 15 градуса, както е показано на склона габарит. • Да не се коси на мокра трева. Влажните условия могат да доведат до...
- Page 9 • Дръжте всички гайки, болтове и винтове здраво затегнати за да сте сигурни, че оборудването е в добри работни условия. • Никога не променяйте устройствата за безопасност. Проверявайте редовно за правилната им работа. • При попадане на чуждо тяло, спрете двигателя, извадете кабела от свещта и...
- Page 10 ВНИМАНИЕ: B.1 Прочетете ръководството за уптреба В.2 Дръжте далеч от странични лица. В.3 Отделете по-голямо внимание на ръцете и краката на оператора, за да се избегне нараняване. В.4 Отработените газове на двигателя са вредни за вашето здраве. Не използвайте във вътрешността на къщата. В.5 Петрола...
- Page 11 ИЗКЛЮЧВАНЕ НА КАБЕЛА ЗА СВЕЩА Преди да сглобите Вашата косачка, извадете кабела на свеща от щепсела за свеща и го заземете срещу двигателя посредством каучуков болт или метална щипка към присъедителната клема на двигателя. Виж фигура-4 Раздел 4: УКАЗАНИЯ ЗА СГЛОБЯВАНЕ Елементи, необходими...
- Page 12 Стъпка 3: Повдигнете задния капак и фиксирайте коша за трева към оста на капака, така че коша и косачката да се съединят. РАЗДЕЛ 5: УПРАВЛЕНИЕ РЪЧЕН СТАРТЕР Дръжката на ръчния стартер е прикрепена към горната дръжка. Виж Фигура 5: Застанете...
- Page 13 рязане. Виж фигура 6. ЗАБЕЛЕЖКА: За груби или неравномерни тревни площи, преместете лоста за регулиране на височината на по-висока позиция. Това ще помогне да се избегне повреда на уреда. РАЗДЕЛ 6: РАБОТА С КОСАЧКАТА ВНИМАНИЕ: Дръжте ръцете и краката си далеч от зоната на улея на косящия апарат.
- Page 14 Моля, почистете косачката, особено колана и колелата. Ако оставите косачката недокосната дълго време, моля проверете смазването в скоростната кутия. РАБОТА 1. Преди да започнете, моля пуснете регулатора на височината на най-ниското ниво. 2. Преди да започнете, моля поставете лоста на модула за газта в средно...
- Page 15 ОПАКОВАНЕ НА ОКОСЕНАТА ТРЕВА: Косачката Ви може да събира окосената трева. Следвайте следните стъпки за да приготвите косачката за събиране на трева в коша. Стъпка 1. Повдигнете капака на улея. Стъпка 2. Плъзнете кутията върху адаптера. ИЗПРАЗВАНЕ НА КОША ЗА ТРЕВА Хванете...
- Page 16 ръководство на двигателя опаковано с уреда. Свещта трябва да се почиства веднъж на сезон. Смяната на свеща се препоръчва в началото на всеки сезон за косене. Проверете ръководството на двигателя за правилния тип свещ. Почиствайте редовно двигателя с кърпа или четка. Да се съхранява на хладно...
- Page 17 • Не забравяйте да инсталирате ножа със страна на острието, маркирана с номера на частта с лице към земята, когато косачката е в работно положение. • Плъзнете адаптера на ножа към коляновия вал на двигателя. • Поставете острието на адаптера. Уверете се, че ножа е поставен правилно и е легнал...
- Page 18 масло. Виж фигура 11. Двигател: Следвайте ръководството на двигателя за инструкции относно процеса на смазване. Раздел 9: СЪХРАНЕНИЕ СЛЕД СЕЗОНА НА КОСЕНЕ Почистете и смажете косачката добре, както е описано в инструкциите за смазване. Следващите стъпки трябва да бъдат предприети в подготовката...
- Page 19 една и съща височина. Заострете или сменете ножа. При необходимост, ремонтът на Вашата косачка е най-добре да се извършва само от квалифицираните специалисти в сервизите на RAIDER, където се използват само оригинални резервни части. По този начин се гарантира тяхната безопасна работа. РЕЗРВНИ ЧАСТИ...
- Page 20 РЕЗЕРВНИ ЧАСТИ ¹ Име ¹ Име Горна дръжка 16” Корпус Лост за управление Ключ на ножа Контролер на ножа 16” Държач на ножа Превключвател 16” Нож Шестограм H6*55 Болт Лост за газта Шайба Напред-надясно Болт M8*52 Лост за регулиране...
- Page 21 Congratulations on the purchase of electric grass mower of the most successfully growing brands on the market - RAIDER. When properly installed and operating, RAIDER are safe and reliable machines and work with them will deliver a real pleasure. For your convenience has been built and excellent service network of 35 service station across the country.
- Page 22 Vibrations (ah) less than 2,5 Isolation Class Protection Class IPX4 WARNING Do not on inclines with a slope in excess of degrees(a rise of approximately 2.5 feet(0.76m) every 10 feet(3.05m)). If operating a walk behind mower on such a slope.lt is extremely difficult to maintain your footing and you could slip resulting in serious injury.
- Page 23 • Keep the area of operation clear of all persons. Particularly small children and pets. Stop engine when they are in the vicinity of your mower to help prevent blade contact to thrown object injury. Although the area of operation should be completely cleared of foreign objects.
- Page 24 • Never operate mower with defective guards or without grass catcher, plates or other safety protective devices in place. • Muffler and engine become hot and can cause a burn. Do not touch. • Only use accessories approved for this machine by the manufacturer. Read, understand, and follow all instructions provided with the approved accessory.
- Page 25 spark such as a gas water heater, space heater or furnace. • Never run an engine inside a closed area. • Allow the engine to cool before storing in any enclosure. To reduce the fire hazard, keep the engine silencer and petrol storage area free of grass, leaves or excessive grease. •...
- Page 26 WARNING: B.1 Read Operator’s Manual. B.2 Keep Bystanders Away. B.3 Pay more attention to the operator’s hands and feet to avoid injured. B.4 The engine exhaust is harmful to your health. Don’t use inside of house. B.5 Petrol is highly flammable, avoid exploding, Don’t incline.
- Page 27 DISCONNECT SPARK PLUG WIRE Before setting up your lawn mower.disconnect the spark plug wire from the spark plug. and ground it against the engine by attaching rubber boot to a bolt or metal clip to the groundling post on the engine.See figure-4 SECTION 4: SET-UP INSTRUCTIONS ITEMS REQUIRED FOR ASSEMBLY •...
- Page 28 Step3: Lift the rear flap ,fix the grass bag to the flap’s axleto make the bag and the unit together. SECTION 5: CONTROLS RECOIL STARTER The recoil starter handle is attached to the upper handle.See figure 5, stand behind the unit in the operating position to start the unit.
- Page 29 NOTE: For rough or uneven lawns, move the height adjustment lever to a higher position. This will help stop scalping. SECTION 6: OPERATION WARNING: Keep hands and feet away from the chute area on the cutting deck. See the eyes, which can result in severe eye damage.Always wear safety glasses or eye shields. NOTE: For best results raise the cutting position until it is determined which height is best for your lawn.
- Page 30 6.When the collector is full.please release the CLUTCH CONTROL LEVER and then release the BLADE CONTROL LEVER (see Figure 7). WARNING: The blade continues to rotate for a few seconds after the engine is shut off. USING YOUR ROTARY MOWER Be sure that the lawn is clear of stones, sticks, wire, or other objects which could damage the lawn mower or the engine.
- Page 31 bagging adaptor on the mower. While holding the lower handle lift up the rear section of the grass catcher as shown in Figure 9. the box will open and the grass clippings will fall out. See Figure 8. When replacing your grass catcher, be sure the top of the box rests on the wire support between the handles.
- Page 32 • When removing the cutting blade for sharpening or replacement. Protect your hands with a pair of heavy gloves or use a heavy rag to hold the blade. • Remove the bolt and the washer that hold the blade and the blade adapter to the engine crankshaft.
- Page 33 Wheels: Lubricate the wheels at least once a season with light oil (or engine oil). Also, if the wheels are removed for any reason, lubricate the surface of the axle bolt and the inner surface of the wheel with light oil. See Figure 11. Engine:Follow engine manual for lubrication instructions.
- Page 34 SECTION 10: TROUBLE SHOOTING GUIDE information NOTE:For repairs beyond the minor adjustments listed above.contact your nearest authorized service dealer. Trouble Possible Cause(s) Corrective Action Blade control handle disengaged. Engage blade control handle. Spark plug wire disconnected. Connect wire to spark plug.
- Page 35 SPARE PART...
- Page 36 PART LIST Item Name Item Nane Upper Handle 16” Housing Assembly Blade Control Lever Flat Key Blade Throttle 16” Blade Support Controling Spanner ass’ y 16” Blade Hex. Bolt H6*55 Fasten Bolt Oil Throttle Dishing Washer Cantroling Bolt M8*52...
- Page 37 Felicitări pentru achiziţionarea acestei maşini electrica de tuns iarbă marca RAIDER. Atunci când sunt instalate şi utilizate corespunzator, produsele RAIDER sunt sigure şi fiabile maşini şi să lucreze cu ei va livra o adevarata placere. Pentru confortul dvs. a fost construit şi de reţea de service-uri in întreaga ţară.
- Page 38 Instructiuni generale pentru funcţionarea în condiţii de siguranţă. Citiţi cu atenţie toate instrucţiunile. Neîndeplinirea corespunzatoare a următoarelor instrucţiuni poate provoca un şoc electric, incendii şi/sau de accidente grave. Păstraţi aceste instrucţiuni într-un loc sigur. 1.1. Instructiuni de siguranţă. Este indicat ca masina de tuns iarba sa fie alimentata la un prelungitor cu protectie.
- Page 39 1.31 Nu înclinaţi maşina când motorul functioneaza cu excepţia cazului în care este necesar datorită prezenţei de iarba foarte mare. În acest caz, ridicaţi partea din spate a maşinii apăsând mânerul în jos. Când executaţi lucrari cu maşina, ţineţi-o ferm cu ambele mâini. 1.32.
- Page 40 În tabelul de mai jos sunt prezintate cateva posibile defectiuni şi modalitati de remediere a acestora.Dacă nu puteţi găsi şi repara problema urmând instrucţiunile din tabel contactati cel mai apropiat service autorizat Raider. Atenţie: Înainte de a începe rezolvarea problemelor, opriti masina de tuns şi deconectaţi de la reţeaua de alimentare.
- Page 41 4. Aderarea la clemă de cablu pentru a manipula. 5. Trântă cu fructe cu coajă şi samozakontryashti bolţuri de fixare superioară la cea mai mică mâner. 6. Cavitate, care colecteaza decupaje iarbă. 7. Găuri în corpul navei, care include ambele capete ale mâner. 8.
- Page 42 Zahvaljujemo na kupovini električne kosačice za travu, marke RAIDER, koja se naj uspešnije razvija na tržištu. Pri pravilnom instaliranju i korišćenju, mašine RAIDER su sigurne i stabilne i rad sa njima predstavljaće Vam pravo zadovoljstvo. Zbog Vaše sigurnosti izgrađena je odlična servisna mreža s 32 servisa u celoj zemlji.
- Page 43 Radite sa kosačicom poprečno u odnosu na naklon. ODELJAK 2: VAŽNO bezbedna praktična upotrba PAŽNJA: Ovaj simbol označava preporuku za bezbednost, ne poštovanje istih može da ugrozi vašu ličnu bezbednost / kako vašu tako i bezbednost ostalih koji se nalaze u vašoj blizini. Pročitajte i pridržavajte se svih instrukcija navedenih u ovom uputstvu pre nego što počnete sa upotrebom kosačice.
- Page 44 • Izduvni lonac i motor se zagrevaju i mogu izazvati opekotine. Ne dodirujte ih. • Koristite samo pribor za ovu mašinu odobren od proizvodjača. Pročitajte i sledite sve instrukcije predvidjene za odobreni pribor. • Ako se pojavi problem koji nije obuhvaćen u ovom uputstvu obratite se za pomoć.
- Page 45 Komponente koša za travu su takodje, podložne habanju i oštećenju što može da dovede do oštećenja pokretnih delova ili do izbacivanja predmeta. U cilju zaštite vaše bezbednosti, proveravajte često komponente i zamenite ih novim kada je to neophodno. Noževi su oštri i mogu da vas poseku. Obmotajte nož (а) ili nosite rukavice i budite izuzetno pažljivi prilikom servisiranja istih.
- Page 46 Korak 3: Podignite zadnji poklopac i fiksirajte korpu za travu na osi poklopca tako da su korpa i kosačica sastavljene. Korak 5: Upravljanje Ručni starter Rukohvat ručnog startera je pričvršćen uz gornji rukohvat. Pogledaj sliku 5: Stanite iza kosčice u radni položaj da bi ste upalili (starovali) kosačicu.
- Page 47 KORIŠĆENJE KOSAČICE Pre početka rada uverite se da u travi nema kamenja, pruća, žice i drugih predmeta, koji mogu da oštete kosačicu ili motor. Takvi predmeti mogu slučajno biti odbačeni kosačicom u neodređenom pravcu i izazvati ozbiljne povrede operatera ili drugih lica (objekata). Kako bi postigli naj-bolje rezultate izbegavajte da kosite mokru travu, jer se ona lepi za donji deo kosačice, sprečava (otežava) pravilno funkcionisanje, dovodi do proklizavanja i padanja.
- Page 48 Ako je neophodno, remont Vaše kosačice, naj bolje je da izvrši kvalifikovani radnik u servisu RAIDER, gde se koriste samo originalni rezervni delovi. Na taj način se garantuje njihov bezbedan rad.
- Page 49 SPARE PART RD-GLM01S...
- Page 50 PART LIST RD-GLM01S...
- Page 51 № Име № Име Горна дръжка 16” Корпус Лост за управление Ключ на ножа Контролер на ножа 16” Държач на ножа Превключвател 16” Нож Шестограм H6*55 Болт Лост за газта Шайба Напред-надясно Лост за Болт M8*52 регулиране на височината Назад-надясно Лост за Обла...
- Page 52 Euromaster Import Export Ltd. Address: Sofia 1231, Bulgaria, 246 Lomsko shausse Blvd. Product: Gasoline Lawnmower. Brand: RAIDER. Type Designation: RD-GLM01S The above listed product is in conformity with the following EC Directives: Directive 2006/42/EC of the European Parliament and of the Council of 17 may 2006 on machinery;...
- Page 53 ЕО ДЕКЛАРАЦИЯ ЗА СЪОТВЕТСТВИЕ Евромастер Импорт Експорт ООД Адрес: София 1231, България, “Ломско шосе“ 246. Продукт: Коса бензинова с нож и корда Запазена марка: RAIDER Модел: RD-GLM01S е проектиран и произведен в съответствие със следните директиви: 2006/42/EО на Европейския парламент и на Съвета от 17 май 2006 година...
- Page 54 ГАРАНЦИОННА КАРТА МОДЕЛ............................. СЕРИЕН № ............................ СРОК ............................... (за подробности виж гаранционните условия) №, дата на фактура / касов бон....................ДАННИ ЗА КУПУВАЧА ИМЕ/ФИРМА ..........................(попълва се от служителя) АДРЕС............................. (попълва се от служителя) ПОДПИС НА КУПУВАЧА....................... (запознат съм с гаранционните условия и правилата за експлоатация, изделието...
- Page 55 - 24 месеца за физически лица за инструменти от серията Raider Pneumatic; - 12 месеца за юридически лица за инструменти от серията Raider Pneumatic; - 24 месеца за физически лица за всички бензинови машини от сериите: Raider Power Tools и Raider Garden tools - 12 месеца...
- Page 56 територията на Република България, е както следва: - 18 месеца за батерията и зарядното устройство от сериите: Raider Industrial, Raider Pro; - 12 месеца за батерията и зарядното устройство от сериите: Raider Power Tools, Raider Garden Tools; Гаранционният срок започва да тече от датата на закупуване. Гаранцията покрива всички дефекти, възникнали...
- Page 57 - когато е правен опит за ремонт, монтаж, демонтаж, модификация от потребителя или промени от неупълномощени лица или фирми; - при използване на батерията и зарядното устройство не по предназначение; - повреди причинени в резултат на използването и съхранението на батерията и/или зарядното в друга среда...
- Page 58 GARANTNI LIST MODEL ............................. SERIJSKI BROJ..........................GARANCIJSKI ROK......................... PRODAVAC IME/FIRMA............................ADRESA............................DATUM I PEČAT ..........................DEKLARACIJA Naziv proizvođača: Euromaster Import-Export Co. Ltd, Adresa proizvođača: Bulgaria, Sofia, Lomsko shose blvd., 246, tel.:934 1010 UVOZNIKE: “BRIKO SPEC” D.O.O, “Dorda Stanojevica” 12, 11070, Beograd, Srbija SERVIS: ELMAG, ADRESA: NIS, TRG UCITELJ TASE 4, TEL.: 018/240 799 PRIJEMNI DATUM...
- Page 59 Elektroinstrumenti „RAIDER” su konstruisani i proizvedeni u saglasnosti sa normativnim dokumentima i standardima u skladu sa svim zahtevima za bezbednost koji važe na teritroiji Srbija Sadržaj i obuhvat trgovačke garancije Uslovi garancije Garantni rok na teritoriji Srbija je 2 godine i teče od datuma kupovine elektrouredjaja.
- Page 60 Seria de fabricatie a produsului______________________________________________ Caracteristici tehnice______________________________________________________ Garantie comerciala: PODUS HOBBY. Termen de garantie: 24 luni de la data vanzarii catre consumatorii casnici (pentru toata gama RAIDER). Durata medie de utilizare: 3 ani. Vandut prin societatea_________________________________________din localitatea _______________________________str.___________________nr.____________cu factura nr._______________din__________________...
- Page 61 LISTA CENTRELOR SERVICE AUTORIZATE Denumire Localitate Adresa Telefon SC Stefan Alex Calarasi Str.Parcului 0735.199.024 Bl.K4,ScE,Ap.1 Str.Babadag ABC International SRL Tulcea nr.5, Bloc1Sc.A 0240.518.260 parter,Tulcea Sos.Chitilei 60A sect1, Euro 94 SRL Bucuresti Bucuresti 021.668.72.60 SC VIVA METAL STR. ALBESTI NR. 10 0722.531.168 DECOR SRL CURTEA DE ARGES...
- Page 62 Denumirea produsului___________________________________________________ Seria de fabricatie a produsului____________________________________________ Caracteristici tehnice____________________________________________________ Garantie comerciala : PODUS HOBBY.Termen de garantie: 24 luni de la data vanzarii catre consumatorii casnici (pentru toata gama RAIDER). Durata medie de utilizare: 3 ani Vandut prin societatea____________________________________din localitatea _______________________________str.___________________nr.____________cu factura nr._______________din__________________...
- Page 63 Garantia presupune repararea gratuita a defectelor datorate producatorului,in cadrul termenului de garantie 1.Vanzatorul care comercializeaza produsul are obligatia sa faca demonstratia de functionare a produsului si sa explice consumatorului modul de utilizare al acestuia,in cazul in care consumatorul solicita acest lucru. 2.Produsul defect va fi receptionat de catre unitatea de service de care apartine care va efectua diagnosticarea defectului.
- Page 64 EUROMASTER IMPORT EXPORT LTD 1231, Sofia, Bulgaria, 246 Lomsko shose Blvd., tel.: +359 700 44 155 fax: + 359 2 934 00 90 www.euromasterbg.com; e-mail: info@euromasterbg.com...
Need help?
Do you have a question about the Power Tools RD-GLM01S and is the answer not in the manual?
Questions and answers