Table of Contents
Advertisement
Available languages
Available languages
Quick Links
Advertisement
Chapters
Table of Contents

Subscribe to Our Youtube Channel
Related Manuals for Renfert SIMPLEX 3D-Filament-Drucker


Summary of Contents for Renfert SIMPLEX 3D-Filament-Drucker
- Page 1 SIMPLEX 3D-Filament-Drucker ORIGINALBEDIENUNGSANLEITUNG Made in Germany...
- Page 3 SIMPLEX 3D-Filament-Drucker ORIGINALBEDIENUNGSANLEITUNG Made in Germany...
-
Page 4: Table Of Contents
Inhalt Einleitung ����������������������������������������������������������������������������������������������������������������������������������������������������������������������������������������������������������������������������������������������������������� 1�1 Allgemeine Beschreibung ������������������������������������������������������������������������������������������������������������������������������������������������������������������������������������������������������������� 1�2 Verwendete Symbole �������������������������������������������������������������������������������������������������������������������������������������������������������������������������������������������������������������������������� Sicherheit ����������������������������������������������������������������������������������������������������������������������������������������������������������������������������������������������������������������������������������������������������������� 2�1 Bestimmungsgemäße Verwendung ������������������������������������������������������������������������������������������������������������������������������������������������������������������������������������� 2�2 Bestimmungswidrige Verwendung ���������������������������������������������������������������������������������������������������������������������������������������������������������������������������������������� 2�3 Umgebungsbedingungen für den sicheren Betrieb ���������������������������������������������������������������������������������������������������������������������������������������������� 2�4 Umgebungsbedingungen für Lagerung und Transport ������������������������������������������������������������������������������������������������������������������������������������� 2�5 Gefahren- und Warnhinweise ����������������������������������������������������������������������������������������������������������������������������������������������������������������������������������������������������� 2�5�1 Allgemeine Hinweise �����������������������������������������������������������������������������������������������������������������������������������������������������������������������������������������������������������������������... - Page 5 11�4 Düse erneuern ���������������������������������������������������������������������������������������������������������������������������������������������������������������������������������������������������������������������������������������� 11�4�1 Montage der Düse ������������������������������������������������������������������������������������������������������������������������������������������������������������������������������������������������������������������������� 11�5 Anbringen einer neuen Kapton-Folie ������������������������������������������������������������������������������������������������������������������������������������������������������������������������������� 11�6 Firmware - Update ������������������������������������������������������������������������������������������������������������������������������������������������������������������������������������������������������������������������������ 11�6�1 SIMPLEX 3D-Filament-Drucker zurücksetzen ���������������������������������������������������������������������������������������������������������������������������������������������������������������� 11.7 Pufferbatterie wechseln ����������������������������������������������������������������������������������������������������������������������������������������������������������������������������������������������������������������� 11�8 Transportriemen der X- und Y-Achse spannen ������������������������������������������������������������������������������������������������������������������������������������������������������ 11�9 Ersatzteile ��������������������������������������������������������������������������������������������������������������������������������������������������������������������������������������������������������������������������������������������������� 12 Störungen beseitigen ��������������������������������������������������������������������������������������������������������������������������������������������������������������������������������������������������������������...
-
Page 6: Einleitung
Filamenten zu vereinfachen und zu perfektionieren� Es bietet ein hervorragendes Herstellungser- lebnis ohne vorherige Programmier- oder 3D-Druckerfahrung� Zum Drucken eines 3D-Objektes benötigen Sie den SIMPLEX 3D-Filament-Drucker, die SIMPLEX sliceware und ein SIMPLEX Filament Ihrer Wahl� „App Store“, „Apple“, „Google“, „Play Store“, „Android“ sind eingetragene Warenzeichen der Firmen Apple oder Google�... -
Page 7: Sicherheit
Modul ist nicht für alle Länder verfügbar� Bestimmungswidrige Verwendung An diesem Produkt dürfen nur die von der Firma Renfert GmbH gelieferten oder freigegebenen Zubehör- und Ersatzteile verwendet werden� Die Verwendung von anderen Zubehör- oder Ersatzteilen kann die Sicherheit des Gerätes beeinträchtigen, birgt das Risiko schwerer Verletzungen, kann zu Schäden an der Umwelt oder zur Beschädigung des Produkts führen�... -
Page 8: Spezifische Hinweise
► Anschlussleitungen (wie z.B. Netzkabel), Schläuche und Gehäuse (wie z.B. Bedienfolie) regelmä- ßig auf Beschädigungen (z.B. Knicke, Risse, Porosität) oder Alterung überprüfen. Geräte mit schadhaften Anschlussleitungen, Schläuchen oder Gehäuseteilen oder anderen De- fekten dürfen nicht mehr betrieben werden! ► Beschädigte Geräte unverzüglich außer Betrieb nehmen. Netzstecker ziehen und gegen wieder Einschalten sichern. Gerät zur Reparatur einschicken! ► Gerät nur unter Aufsicht betreiben. ► Beachten Sie die nationalen Unfallverhütungsvorschriften! ► Informationen zu REACH und SVHC finden Sie auf unserer Internetseite unter www.renfert.com im Support Bereich. 2.5.2 Spezifische Hinweise ► Haube und Tür haben eine Sicherheitsfunktion. Der Betrieb ohne Haube und/oder ohne Tür ist untersagt. ► Halten Sie das Netzkabel von heißen Oberflächen fern. ► Berühren Sie keine beweglichen Teile oder erhitzte Elemente, dies kann zu Verletzungen führen. ► Greifen Sie während des Druckvorgangs niemals in das eingeschaltete Gerät. Verschiedene Teile der Maschine (hauptsächlich der Extruder und das beheizte Druckbett) arbeiten bei sehr hohen Temperaturen und können schwere Verbrennungen verursachen. ► Stellen Sie vor Wartungsarbeiten sicher, dass das Gerät ausgeschaltet und das Netzkabel vom Netz getrennt ist. Warten Sie nach dem Herausziehen des Netzsteckers mindestens 5 Minuten, bis das Gerät abgekühlt ist, bevor Sie zur Wartung in den Drucker greifen. ► Schalten Sie den Drucker immer aus und trennen Sie ihn vom Computer, wenn Sie ihn nicht ver- wenden. ► Der SIMPLEX 3D-Filament-Drucker schmilzt während des Druckvorgangs Filamente aus Kunst- stoff. Während des Druckvorgangs werden plastische Gerüche / Gase freigesetzt. Stellen Sie sicher, dass der SIMPLEX 3D-Filament-Drucker an einem gut belüfteten Ort aufgestellt wird. -
Page 9: Produktbeschreibung
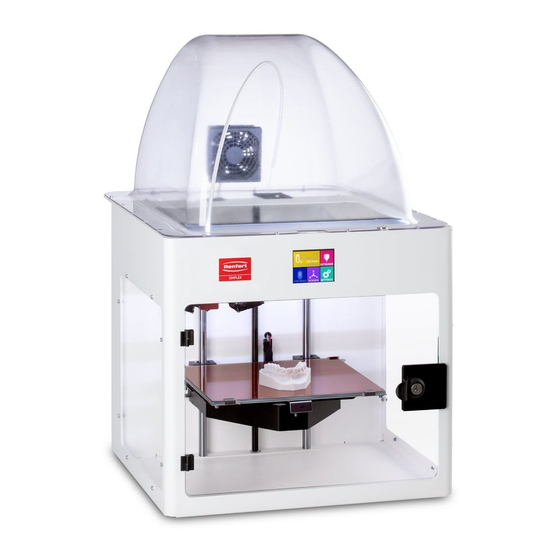
Produktbeschreibung Baugruppen und Funktionselemente 12 USB B-Buchse für Anschluss an PC Touchscreen-LCD-Display / Hauptmenü Filamentführungsrohr 13 EIN/AUS Schalter / Netzanschluss Düse 14 Anschluss Filamentsensor 15 Anschluss Haubenlüfter Abnehmbare Glasplatte Nivellierungsknöpfe 16 Distanzkarte 6 Z-Achsenstange 17 Menü - TEMPERATUR 7 Filamentspulenhalter 18 Menü - EXTRUDER Filamentspule 19 Menü... -
Page 10: Inbetriebnahme
⇒ Entnehmen Sie vorsichtig die mitgelieferte Zubehörbox, diese schützt den Extruder während des Trans- portes� Die mitgelieferte Box enthält das Zubehör für den SIMPLEX 3D-Filament-Drucker� ⇒ Heben Sie den SIMPLEX 3D-Filament-Drucker aus dem Versandkarton, indem Sie seitlich in den Rah- men greifen�... - Page 11 Zusammenbau des Druckers 4.2.1 Installieren des Filamentspulenhalters ⇒ Entfernen Sie die Schraube (31) an der Oberseite hinten mit Hilfe des mitgelieferten Inbusschlüssels� ⇒ Befestigen Sie den Filamentspulenhalter (7) mit der Schraube an dieser Position� Abb. 2 4.2.2 Installieren des Filamentsensors (FMS) ⇒ Entfernen Sie die Schraube (30) an der Oberseite hinten mit Hilfe des mitgelieferten Inbusschlüssels�...
- Page 12 4.2.5 Montage der Haube ⇒ Entfernen Sie die vier Schrauben (32) an der Oberseite des Geräts mit Hilfe des mitgelieferten Inbusschlüssels� ⇒ Setzen Sie die Haube auf� ⇒ Schließen Sie den Lüfter an der Buchse (15) auf der Geräte- rückseite an� Achten Sie auch später darauf, dass der SIMPLEX ausge- schaltet ist, wenn Sie den Lüfter anschließen, da es sonst zu einem Kurzschluss kommen kann.
-
Page 13: Erste Schritte
Seite zurück zu gehen, eine Einstellung zu be- enden, einen Vorgang abzubrechen oder um das Hauptmenü wieder zu erreichen. Einstellen der Sprache Zu diesem Thema finden Sie ein Video über den folgenden Link www.renfert.com/simplex-2-de sowie über den abgebildeten QR-Code. ⇒ Wählen Sie das Menü EINSTEL� �... -
Page 14: 5�2 Einstellen Der Temperatureinheit
⇒ Geben Sie das Passwort des gewählten WLAN-Netzwerks ein� ⇒ Bestätigen Sie das Passwort mit dem Häkchen � Eine Verbindung mit dem ausgewählten WLAN-Netzwerk konnte hergestellt werden: ♦ Der Name des verbunden WLAN-Netzwerks wird angezeigt ♦ Die für den SIMPLEX 3D-Filament-Drucker vergebene IP-Adresse (LAN IP) wird angezeigt� Es konnte keine Verbindung mit dem ausgewählten WLAN-Netzwerk herge- Abb. 15 stellt werden: ♦ Eine Fehlermeldung wird angezeigt: „Keine Verbindung zum Host <Name des WLAN-Netzwerks>“... -
Page 15: 5�4 Nivellierung Des Druckbetts
Nivellierung des Druckbetts Zu diesem Thema finden Sie ein Video über den folgenden Link www.renfert.com/simplex-4-de sowie über den abgebildeten QR-Code. Der SIMPLEX verfügt über ein Nivellierungsverfahren welches sicherstellt, dass der Extruder und das beheizte Druckbett einen optimalen Abstand (0,3 mm) aufweisen und gleichmäßig nivelliert sind�... -
Page 16: 5�5 Druckkopf Manuell Verfahren
, bis Sie das Hauptmenü wieder er- reicht haben� Druckkopf manuell verfahren Zu diesem Thema finden Sie ein Video über den folgenden Link www.renfert.com/simplex-5-de sowie über den abgebildeten QR-Code. Für die folgenden Arbeitsschritte sollte der Druckkopf in eine günstige Position bewegt werden�... -
Page 17: 5�5�1 Montage Der Filamentspule
(7), dass das Filament von unten in den Filamentsensor eingeführt werden kann� Achten Sie darauf, dass die Filamentspule so auf dem Fila- mentrollenhalter platziert ist, dass das Filament im Uhrzeiger- sinn von unten in den FMS eingeführt werden kann (Abb. 20). Ausschließlich Renfert - Filamente verwenden da diese beim Druckvorgang keine gesundheitsschädigende Gase entwi- ckeln. Bei der Verwendung alternativer Filamente prüfen, dass während des Druckvorgangs keine gesundheitlichen Gase freigesetzt werden. - Page 18 ⇒ Entfernen Sie das Filamentführungsrohr (2) aus der Öffnung oben am Extruder (10)� ⇒ Führen Sie das Ende des Filaments von unten durch den FMS in das Filamentführungsrohr ein, bis es auf der anderen Seite austritt� Achten Sie darauf, dass das Filament nicht von der Rolle springt oder sich verknotet. Das Filament muss sauber auf der Rolle aufgewickelt sein. Unsauber aufgewickelte oder verknotete Filamente können zu unsauberen Drucken oder sogar zu Fehldrucken führen.
-
Page 19: 5�7 Fms-System
Das FMS-System wird negativ beeinflusst und die Drucküberwachung ist fehlerhaft. 5.7.1 FMS-System kalibrieren Zu diesem Thema finden Sie ein Video über den folgenden Link www.renfert.com/simplex-7-de sowie über den abgebildeten QR-Code. Damit das FMS-System richtig arbeitet, muss es kalibriert werden� Durch die vorherigen Schritte ist der Extruder bereits aufgeheizt und das Filament wurde geladen�... -
Page 20: 5�8 Objekt Drucken
, bis Sie das Hauptmenü wieder erreicht haben� Objekt drucken Zu diesem Thema finden Sie ein Video über den folgenden Link www.renfert.com/simplex-10-de sowie über den abgebildeten QR-Code. Zum Drucken eines 3D-Objekts benötigt der SIMPLEX Werkzeugweginformationen, die aus 3D-ObjektCAD-Dateien wie �obj oder �stl generiert werden� Werkzeugweginformationen werden als “G-Code”... - Page 21 ♦ Das Gerät erwärmt den Extruder und das Druckbett auf die im G-Code hinter- legten Temperaturen� ♦ Solange die Temperaturen noch nicht erreicht wurden, werden im Display die zwei Buchstaben „H“ und „B“ in rot dargestellt� H: Head = Druckkopf B: Bed = Druckbett Abb.
-
Page 22: Weitere Einstellungen
Im Folgenden werden weitere Optionen des Menüs EINSTELLUNGEN vorgestellt� 6.1 Datum/Uhrzeit einstellen / Betriebsstundenzähler zurücksetzen Zu diesem Thema finden Sie ein Video über den folgenden Link www.renfert.com/simpl-11-de sowie über den abgebildeten QR-Code. Sie können Datum/Uhrzeit einstellen und den Betriebsstundenzähler zurückset- zen� Diese Funktion hilft dabei, die Betriebsstunden zwischen den Wartungen zu verfolgen�... -
Page 23: 6�3 Aktivierung Der Lüfter
Die Einstellung des Objektlüfters kann auch während des Druckvorgangs verändert werden. Im Renfert-Modus sind die Druckparameter für ein perfektes Druckergebnis hinterlegt. Alle not- wendigen Settings für den KFO-Bereich sind optimal konfiguriert und auf das Filament abge- stimmt. Diese sorgen für hohe Prozesssicherheit und Einfachheit. Werden die Lüftereinstellungen geändert, verändert man die vorinstallierten Parameter während eines Druckvorgangs. -
Page 24: 6�6 Wlan Des Simplex Verwenden
6.6 WLAN des SIMPLEX verwenden Das WLAN Modul ist nur in den Mitgliedsstaaten der EU und den USA verfügbar. Nur bei verfüg- baren WLAN Modul ist die Taste mit dem WLAN -Symbol bedienbar. SIMPLEX stellt ebenfalls ein WLAN als Host zur Verfügung� Um es verwenden zu können, nehmen Sie folgende Einstellungen vor: ⇒... -
Page 25: Bedienung
Bedienung 7.1 Gespeicherte Filamente Im SIMPLEX 3D-Filament-Drucker werden die Temperaturwerte für den Extruder (= Druck-Temp�) und das Druckbett (= Bett-Temp�) von vier unterschiedlichen Filamenten gespeichert� • TEMP1: SIMPLEX study model / working model / multi-use • TEMP2: SIMPLEX aligner model • USER1: freie Eingabe • USER2: freie Eingabe 7.2 Einstellen individueller Druck- und Betttemperatur Die Werte für die Filamente TEMP1 und TEMP2 sind optimiert und können nicht verstellt werden! Geändert werden können nur die Werte für die Filamente USER1 und USER2. -
Page 26: 7�4 Laden Des Filaments
7.4 Laden des Filaments Zu diesem Thema finden Sie ein Video über den folgenden Link www.renfert.com/simplex-6-de sowie über den abgebildeten QR-Code. Die Vorgehensweise zum Laden eines Filaments finden Sie im Abschnitt „Erste Schritte“. 7.5 Extrudieren Zu diesem Thema finden Sie ein Video über den folgenden Link www.renfert.com/simplex-6-de... -
Page 27: Bewegen Des Druckkopfs Und Des Druckbetts
Bewegen des Druckkopfs und des Druckbetts In dem Menü ACHSEN können Sie den Druckkopf und das Druckbett manuell beliebig bewegen oder automatisch in ihre Ausgangsposition (Home) fahren� Achten Sie darauf, das bei Fahrten in die Ausgangsposition keine Objekte auf dem Druckbett vor- handen sind. Die Ausgangsposition des Druckkopfs befindet sich in der vorderen linken Ecke der Bauplatte. Die Ausgangsposition des Druckbetts befindet sich in der obersten Position. ⇒ Wählen Sie das Menü ACHSEN � Ausgangspositionen anfahren ⇒... -
Page 28: Renfert Connect App
Sie bei der Installation der Software Probleme haben, wenden Sie sich bitte an den Renfert Service unter Support@renfert.de. ⇒ Installieren Sie die Renfert CONNECT App aus dem App Store (Apple) oder dem Google Play Store (Android) auf Ihrem mobilen Endgerät� ⇒ Öffnen Sie die App und melden Sie sich mit einem bereits bestehenden Account an (Anmelden) oder erstellen Sie sich für Ihr Labor / Ihre Praxis einen Renfert Account (Registrieren)�... -
Page 29: Objekte Drucken
“G-Code” bezeichnet� Das Programm SIMPLEX sliceware konvertiert 3D-Designdateien in einen G-Code� Das Programm SIMPLEX sliceware erhalten Sie über die Renfert CONNECT App (siehe Kap. 9) Den erzeugten G-Code können Sie mit dem Programm SIMPLEX print an den Drucker senden und ausdrucken, oder auf einen USB Stick kopieren und darüber einen Ausdruck erstellen�... -
Page 30: 10�2 Aktionen Während Des Usb-Druckvorgangs
Settings für den KFO-Bereich sind optimal konfiguriert und auf das Filament abgestimmt. Diese sorgen für hohe Prozesssicherheit und Einfachheit. Werden diese Einstellungen geändert, verändert man die vorinstallierten Parameter. Renfert übernimmt in diesem Fall keine Garantie für die Qualität des Drucks. - Page 31 Abb. 62 figuriert und auf das Filament abgestimmt. Diese sorgen für hohe Prozess- sicherheit und Einfachheit. Werden diese Einstellungen geändert, verändert man die vorinstallierten Parameter. Renfert übernimmt in diesem Fall keine Garantie für die Qualität des Drucks. Beleuchtung / Helligkeit des Displays: Ändern der Helligkeit der Hintergrundbeleuchtung des Displays�...
-
Page 32: 10�3 Drucken Mit Simplex Print
Wird ein Druckvorgang mit dem Programm SIMPLEX print ausgeführt, erfolgt die Kontrolle des Druckvorgangs ausschließlich über SIMPLEX print� Auf dem SIMPLEX 3D-Filament-Drucker wird nur das Hauptmenü angezeigt� Es sollten keine Aktionen über das Display ausgeführt werden� Die im vorherigen Kapitel 10�2 beschriebenen Möglichkeiten stehen Ihnen nur über SIMPLEX print zur Verfügung�... -
Page 33: 11�2�1 Schmierung Der Z-Achse
11.2.1 Schmierung der Z-Achse Führungs- und Gewindestange der Z-Achse befinden sich im Innenraum des Druckers an der Rückseite. ⇒ Wählen Sie das Menü ACHSEN (Abb� 8)� ⇒ Fahren Sie den Druckkopf und das Druckbett in die Ausgangsposition ⇒ Drucker ausschalten und Netzstecker ziehen� ⇒ Schieben Sie ein gefaltetes Papiertuch oder einen fusselfreien Lappen zwischen die Gewindestange und die Rückwand, um andere Bereiche des Druckers vor eventuell auftretendem Übersprühen zu schützen�... -
Page 34: 11�3 Verstopfung Des Extruders Beseitigen
11.3 Verstopfung des Extruders beseitigen Ein verstopfter Extruder ist das häufigste Problem bei jedem 3D-Filament-Drucker und kann nicht zu 100 % verhindert werden� Eine Verstopfung kann häufig vermieden werden, wenn zum Laden / Entladen des Filaments abgewartet wird, bis der Extruder die zu dem Filament gehörige Temperatur erreicht hat� Es ist besonders wichtig, zwischen der Verwendung verschiedener Filamente alte Filamentreste zu entfernen. Die unterschiedlichen Filamenteigenschaften (selbst das Drucken des gleichen Materials in einer anderen Farbe) können zu Verstopfungen aufgrund von Inkonsistenzen führen. -
Page 35: 11�4�1 Montage Der Düse
⇒ Ziehen Sie den Temperatursensor und die Heizpatrone gerade nach hinten heraus� Abb. 71 ⇒ Lösen Sie die zwei Schrauben am Kühlkörper und ziehen Sie die Düseneinheit nach unten heraus� Schrauben nur lösen, nicht herausdrehen! Abb. 72 ⇒ Stecken Sie den größten Inbusschlüssel in die Bohrung der Heizpatrone und schrauben Sie den Heatbreak ab�... -
Page 36: 11�6 Firmware - Update
11.6 Firmware - Update Ein Firmware-Update erhalten Sie ausschließlich über die Renfert CONNECT App (siehe Kap� 8)� Mit der Renfert CONNECT App wird sichergestellt, dass Sie über den neusten Stand der Firmware infor- miert werden� Eine neue Firmware verbessert die Leistungsfähigkeit des SIMPLEX 3D-Filament-Druckers und sollte immer über das Update installiert werden�... -
Page 37: 11�6�1 Simplex 3D-Filament-Drucker Zurücksetzen
11.6.1 SIMPLEX 3D-Filament-Drucker zurücksetzen Werden bei einem Firmware-Update mehrere Versionen übersprungen, kann es notwendig sein, den Drucker zurückzusetzen� Wenn nach einem Firmware-Update der Drucker nicht mehr reagiert und das Display dunkel bleibt, muss der Drucker ebenfalls zurückgesetzt werden� 1. LCD Display zurücksetzen: ⇒ Lokalisieren Sie die Reset-Taste� Von vorne gesehen befindet sie sich auf der Display-Leiterkarte rechts unten. -
Page 38: 11�8 Transportriemen Der X- Und Y-Achse Spannen
⇒ Schrauben wieder fest anziehen� ⇒ Abdeckung auflegen und Stecker für LED Beleuchtung wieder einstecken� Abb. 79 ⇒ Abdeckung anschrauben� 11.9 Ersatzteile Verschleiß- bzw. Ersatzteile finden Sie in der Ersatzteilliste im Internet unter www�renfert�com/p918. Geben Sie dort die folgende Artikelnummer ein: 17350000. Aus der Garantieleistung ausgeschlossene Teile (Verschleißteile, Verbrauchsteile) sind in der Ersatzteilliste gekennzeichnet� Seriennummer, Herstelldatum und Geräte-Version befinden sich auf dem Geräte- Typenschild� 12 Störungen beseitigen Die FAQ’s entsprechen dem Stand bei Drucklegung. - Page 39 • Stecker komplett einstecken� Fataler Fehler! richtig gesteckt� • Nur im ausgeschalteten Zustand einstecken� Kurzschluss auf der 12V- Leitung! Spule deckt den An- • Spule zu groß� • Kleinere Spule verwenden� Renfert Filament verwenden� schluss für den Fila- mentsensor (RJ45 Buch- se) ab. Datum / Uhrzeit ist ver- • Pufferbatterie der Uhr ist entladen. • Pufferbatterie wechseln (siehe Kap. 11.7). stellt. FMS System meldet •...
- Page 40 Druckbett abgesetzt� Modell dell und Druckbett sichtbar sein� Das Modell muss plan sich. hat nur geringen Kontakt auf dem und geschlossen auf dem virtuellen Druckbett platziert Auf der Unterseite zei- Druckbett und somit unzureichende werden� gen sich unerwünschte Haftung� • Tipp: „Absetzen“ im Renfert-Mode nutzen. Linien. - 38 -...
-
Page 41: Technische Daten
13 Technische Daten Artikelnummer 1735 0000 Nennspannung 100 - 240 V zulässige Netzspannung: 90 - 264 V Netzfrequenz: 50/60 Hz Stromaufnahme: Maße (Breite x Höhe x Tiefe), incl� 415 x 635 x 500 mm aller Anbauten: [16�3 x 25�0 x 19�7 inch] 16,3 kg Gewicht: [36 lbs] Dieses Produkt enthält eine Lichtquelle Lichtquelle: der Energieeffizienzklasse G... -
Page 42: Garantie
14 Garantie Bei sachgemäßer Anwendung gewährt Renfert Ihnen auf alle Teile des Gerätes eine Garantie von 3 Jahren� Voraussetzung für die Inanspruchnahme der Garantie ist das Vorhandensein der Original-Verkaufsrech- nung des Fachhandels� Ausgeschlossen aus der Garantieleistung sind Teile, die einer natürlichen Abnutzung ausgesetzt sind (Verschleißteile) sowie Verbrauchsteile�... - Page 43 - 41 -...
- Page 45 SIMPLEX 3D-Filament-Drucker Made in Germany...
- Page 46 Contents Introduction ���������������������������������������������������������������������������������������������������������������������������������������������������������������������������������������������������������������������������������������������������� 1�1 General description ����������������������������������������������������������������������������������������������������������������������������������������������������������������������������������������������������������������������������� 1�2 Symbols used ��������������������������������������������������������������������������������������������������������������������������������������������������������������������������������������������������������������������������������������������� Safety ������������������������������������������������������������������������������������������������������������������������������������������������������������������������������������������������������������������������������������������������������������������������ 1�3 Intended use ������������������������������������������������������������������������������������������������������������������������������������������������������������������������������������������������������������������������������������������������ 1�4 Improper use ����������������������������������������������������������������������������������������������������������������������������������������������������������������������������������������������������������������������������������������������� 1�5 Ambient conditions for safe operation ������������������������������������������������������������������������������������������������������������������������������������������������������������������������������� 1�6 Ambient conditions for storage and transport ������������������������������������������������������������������������������������������������������������������������������������������������������������ 2�1 Hazard and warning information ���������������������������������������������������������������������������������������������������������������������������������������������������������������������������������������������...
- Page 47 9 Renfert CONNECT app ����������������������������������������������������������������������������������������������������������������������������������������������������������������������������������������������������� 9.1 Installing SIMPLEX sliceware / SIMPLEX print ����������������������������������������������������������������������������������������������������������������������������������������������������� 10 Printing objects ������������������������������������������������������������������������������������������������������������������������������������������������������������������������������������������������������������������������������������ 10.1 Printing using a USB flash drive ������������������������������������������������������������������������������������������������������������������������������������������������������������������������������������������� 10�2 Actions during USB printing ������������������������������������������������������������������������������������������������������������������������������������������������������������������������������������������������������ 10�2�1 Stop ������������������������������������������������������������������������������������������������������������������������������������������������������������������������������������������������������������������������������������������������������ 10.2.2 Settings / optimization ���������������������������������������������������������������������������������������������������������������������������������������������������������������������������������������������������������������� 10.2.3 Pause next layer ���������������������������������������������������������������������������������������������������������������������������������������������������������������������������������������������������������������������������� 10�2�4 Pause �������������������������������������������������������������������������������������������������������������������������������������������������������������������������������������������������������������������������������������������������� 10.3 Printing with SIMPLEX print ������������������������������������������������������������������������������������������������������������������������������������������������������������������������������������������������������ 11 Cleaning / maintenance ����������������������������������������������������������������������������������������������������������������������������������������������������������������������������������������������������� 11�1 Cleaning �������������������������������������������������������������������������������������������������������������������������������������������������������������������������������������������������������������������������������������������������������� 11�2 Lubrication ��������������������������������������������������������������������������������������������������������������������������������������������������������������������������������������������������������������������������������������������������...
-
Page 48: Introduction
Introduction General description Congratulations on the purchase of your SIMPLEX 3D filament printer and welcome to the world of 3D printing! The SIMPLEX 3D filament printing system was developed by Renfert with the goal of simplifying and perfecting the 3D printing process with filaments. It offers an excellent manufacturing experience without the need for prior knowledge of programming or 3D printing. To print a 3D object, you need the SIMPLEX 3D filament printer, SIMPLEX sliceware, and a SIMPLEX filament of your choice. "App Store", "Apple", "Google", "Play Store", and "Android" are registered trademarks of Apple or Google� Symbols used Symbols with the following meanings are used in these instructions or on the equipment: Danger Immediate danger of injury. -
Page 49: Safety
SIMPLEX 3D filament printer. Transfer your files to your SIMPLEX 3D filament printer using a USB flash drive or Wi-Fi. The Wi-Fi module is not available for all regions. Improper use Only spare parts and accessories supplied or authorized by Renfert GmbH may be used with this prod- uct. If other spare parts or accessories are used, this could have a detrimental effect on the safety of the equipment, increase the risk of serious injury and lead to damage to the environment or the product itself�... -
Page 50: Specific Information
► The product is altered in any way other than those alterations described in the operating instruc- tions. ► The product is not repaired by an authorized dealer or if original Renfert spare parts are not used. ► The product continues to be used despite obvious safety defects or damage. -
Page 51: Product Description
Product description Assemblies and functional elements 12 USB B port for connection to a PC Touchscreen LCD display / main menu Filament guiding tube 13 ON/OFF switch / connection for mains pow- er supply Nozzle 14 Port for filament sensor Removable glass plate 15 Port for cover fan Leveling knobs 16 Distance card Z-axis rod 17 Menu - TEMPERATURE Filament spool holder Filament spool 18 Menu - EXTRUDER... -
Page 52: 3�2 Scope Of Delivery
The unit must be stored at room temperature for at least 3 hours before startup. Do not apply force to the unit during unpacking, setup, operation, or maintenance. Unpacking and setup A video on this topic is provided under the following link www.renfert.com/simplex-1-en and via the QR code shown. ⇒ Place the shipping box on a flat surface on the floor. Ensure that you have enough space available�... -
Page 53: 4�2 Printer Assembly
Printer assembly 4.2.1 Installing the filament spool holder ⇒ Remove the screw (31) on the top rear using the Allen key pro- vided� ⇒ Secure the filament spool holder (7) with the screw in this posi- tion� Fig. 2 4.2.2 Installing the filament sensor (FMS) ⇒ Remove the screw (30) on the top rear using the Allen key pro- vided� ⇒ Secure the FMS (9) with the screw in this position. ⇒ Plug the FMS connection cable into the rear of the unit (14). Fig. 3 Fig. 4 4.2.3 Installing the filament guiding tube ⇒ Insert one end of the filament guiding tube (2) into the FMS (9) from above�... -
Page 54: 4�2�6 Connecting The Power Cord
4.2.5 Attaching the cover ⇒ Remove the four screws (32) on the top of the unit using the Allen key provided� ⇒ Place the cover into position� ⇒ Connect the fan to the socket (15) on the rear of the unit. Also ensure subsequently that the SIMPLEX unit is switched off when you connect the fan as otherwise a short circuit could occur. The cover does not necessarily have to be secured again with the screws. -
Page 55: Getting Started
Setting the language A video on this topic is provided under the following link www.renfert.com/simplex-2-en and via the QR code shown. ⇒ Select the SETTINGS menu. �... -
Page 56: 5�2 Setting The Temperature Unit
Setting the temperature unit A video on this topic is provided under the following link www.renfert.com/simplex-3-en and via the QR code shown. ⇒ Select the SETTINGS menu. � ⇒ Use the right arrow to go to page 2 (as shown here in the image). ⇒ Press the button with the temperature icon �... -
Page 57: 5�4 Leveling The Print Bed
Leveling the print bed A video on this topic is provided under the following link www.renfert.com/simplex-4-en and via the QR code shown. The SIMPLEX unit features a leveling process that ensures that the extruder and heated print bed are optimally spaced (0.3 mm) and leveled uniformly. A smaller gap or uneven leveling can result in damage to the Kapton film (orange colored tape on the print bed), the print bed, the extruder, or in printing issues. The gap between the extruder and the print bed is set using three adjustment screws under the print bed: The print bed should be leveled after initial installation and approx. 1x every month. -
Page 58: Moving The Print Head Manually
Moving the print head manually A video on this topic is provided under the following link www.renfert.com/simplex-5-en and via the QR code shown. The print head must be moved to an appropriate position for the following steps�... -
Page 59: Attaching The Filament Spool
Ensure that the filament spool is placed on the filament spool holder in such a way that the filament can be inserted clock- wise into the FMS from underneath (Fig. 20). Only use Renfert filaments, as they do not result in any gases during printing that are harmful to health. If using alternative filaments, ensure that no gases are re- leased during printing that are harmful to health. - Page 60 ⇒ Remove the filament guiding tube (2) through the opening on top of the extruder (10). ⇒ Insert the end of the filament from underneath through the FMS into the filament guiding tube until it exits on the other side. Ensure that the filament does not spring off the spool or become tangled. The filament must be neatly wound on the spool. Improperly wound or knot- ted filaments can lead to printing errors or even misprints. Fig. 23 Fig. 24 ⇒ Move the lever at the top of the extruder to the left (Fig. 25). Fig. 25 Fig. 26 Fig. 27 ⇒ Push the filament through the top opening of the extruder until the filament is between the two guide wheels (Fig. 26). ⇒ Now move the lever of the extruder to the right (Fig. 27) ⇒ Ensure that the filament is held by the two guide wheels by gently pulling on the filament and feeling resistance� ⇒ Heating of the extruder was already started in the previous step. ♦ The head temperature is shown in white in the TEMPERATURE menu. ⇒ Wait until "Ready to print" is shown in the TEMPERATURE menu. ⇒ Select the EXTRUDER menu� Fig. 28 If you select the EXTRUDER menu too early and the extruder has not yet reached the required temperature, a warning message is shown�...
-
Page 61: Fms System
The FMS system is negatively impacted, and printing is not correctly monitored. 5.7.1 Calibrating the FMS system A video on this topic is provided under the following link www.renfert.com/simplex-7-en and via the QR code shown. The FMS system must be calibrated in order for it to operate correctly. As a result of the previous steps, the extruder is already heated up and the fila- ment is loaded�... -
Page 62: 5�8 Printing An Object
Printing an object A video on this topic is provided under the following link www.renfert.com/simplex-10-en and via the QR code shown. To print a 3D object, SIMPLEX requires toolpath information that is generated from 3D object CAD files such as �obj or �stl� Toolpath information is known as a "G-code"� Sample G-codes are stored on the USB flash drive provided. You can use these to immediately carry out test prints. Make sure to use the G-code for the currently loaded filament. Using an incorrect G-code can cause misprints or damage to the printer. - Page 63 Printing is complete: ♦ For easier removal of the object, the print bed is automatically lowered a little and the print head is moved to the home position� ♦ A corresponding message is shown on the display. This can be confirmed with "OK"� Fig. 38 Caution! Danger of burns! The print head and print bed could still be hot. Wear protective gloves! ⇒ If necessary, you can use the "AXES" menu (see Chap. 5.5) to lower the print bed further. ⇒...
-
Page 64: Other Settings
• Calibrating an FMS system. Additional options in the SETTINGS menu are presented below. Setting the date/time / resetting the operating hours meter A video on this topic is provided under the following link www.renfert.com/simpl-11-en and via the QR code shown. You can set the date/time and reset the operating hours meter. This function helps you to track operating hours between maintenance work�... -
Page 65: 6�4 Audio Settings
The setting of the object fan can also be modified during printing. In Renfert mode, the printing parameters are stored for a perfect printing result. All of the nec- essary settings for orthodontic applications are optimally pre-configured and tailored to the filament. This ensures a high level of process reliability and simplicity. If the fan settings are changed, the pre-installed parameters are modified during printing. This can impair print quality, cause misprints, or cause damage to the printer. ⇒ Press the lower left arrow until you are back in the main menu�... -
Page 66: The Fms System
The FMS system The filament sensor (FMS) controls the filament flow during printing. You must ensure that the FMS system is always calibrated with the currently loaded filament and the corresponding temperature. If this is not the case, the filament flow cannot be properly moni- tored during printing. The FMS system is negatively impacted, and printing is not correctly monitored. If a jam is detected during printing, the printer attempts to fix this itself as part of an automatic fault correc- tion process� Automatic fault correction process: • The printer switches to pause status and the print head moves to the pause position� •... -
Page 67: Operation
� ⇒ Exit the settings window with the lower left arrow � Heating the printer Fig. 50 A video on this topic is provided under the following link www.renfert.com/simplex-6-en and via the QR code shown. To load/unload the filament and for manual extrusion, the printer must be heated in accordance with the type of filament used. If heating is switched on (extruder or print bed), this is signaled by showing the corresponding tempera- ture in white on the displays that show temperature� If the temperature is shown in gray, the corresponding heating is switched off. -
Page 68: Loading The Filament
Loading the filament A video on this topic is provided under the following link www.renfert.com/simplex-6-en and via the QR code shown. The procedure for loading a filament can be found in the "Getting Started" section. Extrusion A video on this topic is provided under the following link www.renfert.com/simplex-6-en and via the QR code shown. -
Page 69: Moving The Print Head And The Print Bed
Moving the print head and the print bed In the AXES menu, you can manually move the print head and the print bed as required or automatically move them to their home position� Ensure that there are no objects on the print bed when moving to the home position. The home position of the print head is in the front left corner of the build plate� The home position of the print bed is the uppermost position�... -
Page 70: Renfert Connect App
Renfert CONNECT app Using the Renfert CONNECT app you can download the SIMPLEX sliceware and SIMPLEX print pro- grams and install them on your computer as well as obtain firmware updates for your SIMPLEX 3D filament printer. If there is no mobile device available you can install the Renfert CONNECT App to, or you encoun- ter problems during installation, please contact the Renfert service under Support@renfert.de. ⇒ Install the Renfert CONNECT app from the App Store (Apple) or the Google Play Store (Android) on your mobile device� ⇒ Open the app and log in with an existing account, or register to create a Renfert account for your labo- ratory / dental office. ⇒ Go to "My Equipment". ⇒ Select "Add device"� ⇒ Select "SIMPLEX" as the device type. ⇒ Enter the serial number of your printer. -
Page 71: Printing Objects
10 Printing objects To print a 3D object, SIMPLEX requires toolpath information that is generated from 3D object CAD files such as �obj or �stl� Toolpath information is known as a "G-code"� The SIMPLEX sliceware program converts 3D design files into a G-code. You can obtain the SIMPLEX sliceware program via the Renfert CONNECT app (see Chap. 9) You can use the SIMPLEX print program to send the generated G-code to the printer and print it out, or copy it to a USB flash drive and use it to create a print object. Ensure that the print bed has been correctly leveled before printing (see Chap. 5.4). If you use a different filament for printing than for the previous print object, you must recalibrate the FMS system (see Chap. 5.7.2). -
Page 72: 10�2 Actions During Usb Printing
• Backlight / brightness of the display • Object fan control • FMS settings Changes you make here overwrite the settings in the G-code� Caution! In Renfert mode, the printing parameters are stored for a perfect printing result. All of the nec- essary settings for orthodontic applications are optimally pre-configured and tailored to the filament. This ensures a high level of process reliability and simplicity. Changing these settings modifies the pre-installed parameters. In this case, Renfert does not guarantee printing quality. Temperature: The nozzle and print bed temperature can be changed via the object fan of the head�... -
Page 73: Pause Next Layer
Printing speed / flow rate: The printing speed and extrusion volume can be changed as a percentage of the original� Use the reset button to return to the G-code values� Caution! In Renfert mode, the printing parameters are stored for a perfect printing result. All of the necessary settings for orthodontic applications are opti- mally pre-configured and tailored to the filament. This ensures a high level Fig. 62 of process reliability and simplicity. Changing these settings modifies the... -
Page 74: Cleaning / Maintenance
If this display is shown, at least the following components must be replaced: • Nozzle • Kapton film Fig. 66 Service and oil the recommended parts as often as recommended in the Cleaning section. Only use the maintenance materials recommended by Renfert. 11.1 Cleaning ⇒ Clean the housing and the cover of the SIMPLEX 3D filament printer with a damp cloth. Cleaning the print bed: ⇒... -
Page 75: Lubrication Of The X/Y-Axis
⇒ Connect the power plug and switch on the printer� ⇒ Select the AXES menu (Fig. 8). ⇒ Move the print bed to the lowest position � ⇒ Switch off the printer and disconnect the power plug. ⇒ Slide a folded paper towel or lint-free cloth between the threaded rod and the back to protect other areas of the printer from any overspray that may occur� ⇒... -
Page 76: 11�4 Replacing The Nozzle
11.4 Replacing the nozzle To replace the nozzle, proceed as follows: ⇒ If you have not already done so, remove the filament (see Chap. 7.6). ⇒ Turn off the heating of the extruder and print bed and allow both to cool down. ⇒ Move the print bed into the lowest position (AXES menu), Chap. 8). ⇒ Place a cloth or a cardboard box on the print bed to protect the Kapton film. ⇒ Switch off the printer. ⇒ Manually move the print head to a working position that is convenient for you. ⇒ Loosen the two screws holding the fan assembly approx. 1 turn (Fig. 68). ⇒ Pull the fan assembly forwards to lift it off. ⇒ Disconnect the connector and set the fan assembly aside� Fig. 68 ⇒... -
Page 77: Applying A New Kapton Film
⇒ Insert the largest Allen key into the bore hole in the heater car- tridge and unscrew the heatbreak� ⇒ Then unscrew the nozzle, countering it again with the Allen key� Fig. 73 11.4.1 Attaching the nozzle ⇒ Screw in the new nozzle and heatbreak, countering it again with the Allen key�... -
Page 78: Firmware - Update
11.6 Firmware – update You can only obtain a firmware update via the Renfert CONNECT app (see Chap. 8). Using the Renfert CONNECT App it is ensured, that you get informed about the lastes firmware version. A new firmware will improve the efficiency of the SIMPLEX 3D-Filament-printer and should always be installed using the update� To execute a firmware update, you need to install the SIMPLEX print software on your computer first (see Chap. 8 and 8.1). You will receive a push notification via your Renfert CONNECT app as soon as new firmware is available for your printer� If you want to load the firmware, press the load button, You will receive a link to the mail adresse, stored during your registration ⇒ Open the mail with a mail client on your computer� ⇒ Click on the link in the mail� ⇒ Download the firmware ZIP file to your computer and extract it. -
Page 79: 11�7 Replacing The Backup Battery
⇒ screw on the upper panel� Fig. 79 11.9 Spare parts You can find wear parts and spare parts in the spare parts list available online at www.renfert.com/p918� Enter the following item number: 17350000. The components excluded from the warranty (wear parts, consumables) are marked in the spare parts list� The serial number, date of manufacturing and equipment version are shown on the nameplate of the equipment�... -
Page 80: Troubleshooting
Fatal error! erly inserted� • Only insert when the unit is switched off. Short circuit on the 12 V line! Spool covers the con- • Spool too large� • Use a smaller spool. Use Renfert filament. nection for the filament sensor (RJ45 socket). Date / time is incorrectly • Backup battery of the clock is flat. • Replace the backup battery (see Chap. 11.7). set. - Page 81 • When enlarging, a gap should not be visible between the bed and loosen. sliceware. Model has little contact model and the print bed. The model must be placed flat Unwanted lines are with the print bed and therefore and fitted on the virtual print bed. shown on the underside. insufficient adhesion. • Tip: Use "Drop" in Renfert mode� • - 37 -...
-
Page 82: Technical Data
13 Technical data Item no. 1735 0000 Nominal voltage 100 - 240 V Permissible mains voltage: 90 - 264 V Mains frequency: 50/60 Hz Power consumption: Dimensions (width x height x 415 x 635 x 500 mm depth), including all attachments: [16.3 x 25.0 x 19.7 inches] Weight: 16�3 kg [36 lbs.] Light source: This product contains a light source of energy efficiency class G. -
Page 83: Warranty
14 Warranty Renfert offers a 3-year warranty on all parts of the equipment, provided that the equipment is properly used� Warranty claims may only be made upon presentation of the original sales receipt from the authorized dealer� Parts which are subject to natural wear and tear (wear parts) and consumables are excluded from the warranty� These parts are marked in the spare parts list� The warranty is voided in the case of improper use; failure to observe the operating, cleaning, mainte- nance, and connection instructions;... - Page 85 EG-Konformitätserklärung EC Declaration of conformity Renfert GmbH, Industriegebiet, 78247 Hilzingen / Germany Renfert GmbH, Industriegebiet, 78247 Hilzingen / Germany Hiermit erklären wir, dass das Produkt Herewith we declare that the product SIMPLEX 3D Drucker SIMPLEX 3D Drucker allen einschlägigen Bestimmungen der folgenden Richtlinien...
- Page 88 Tel.: +49 7731 82 08-0 • Fax: +49 7731 82 08-70 www.renfert.com • info@renfert.com Renfert USA • 3718 Illinois Avenue • St. Charles IL 60174/USA Tel.: +1 6307 62 18 03 • Fax: +1 6307 62 97 87 www.renfert.com • info@renfertusa.com...
Need help?
Do you have a question about the SIMPLEX 3D-Filament-Drucker and is the answer not in the manual?
Questions and answers