
Related Manuals for RADWAG PM 5Y


Summary of Contents for RADWAG PM 5Y
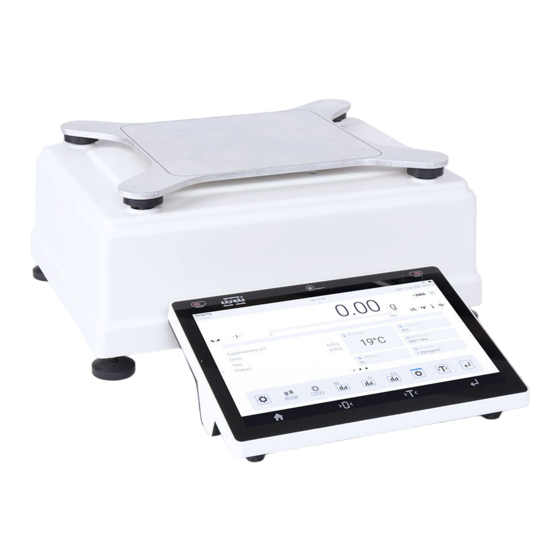
- Page 1 IMMB-16-01-03-22-EN-PL Start Up Guide Szybki start Precision Balances Wagi Precyzyjne • PM 5Y...
- Page 2 To view the complete User Manual, go to the website or scan the QR code: Aby wyświetlić pełną instrukcję obsługi, przejdź do strony internetowej lub zeskanuj kod QR: radwag.com/en/manuals/14352 1. CONTENT ZAWARTOŚĆ PM 5Y (d = 0.01 g) Precision balance Weighing pan Power supply* Waga precyzyjna...
-
Page 3: Recommendations And Warnings
2. UNPACKING ROZPAKOWANIE PM 5Y (d = 0.01 g, d = 0.1 g) Keep the packaging for warranty and service purposes. Zachowaj opakowanie do celów gwarancyjnych i serwisowych. PM 5Y (d = 0.2 g) 3. RECOMMENDATIONS AND WARNINGS ZALECENIA I OSTRZEŻENIA Operate the device in a room where the temperature ranges between 10 –... - Page 4 Nie odważaj materiałów wybuchowych i łatwopalnych. 4. TRANSPORT LOCK REMOVAL USUNIĘCIE BLOKAD TRANSPORTOWYCH PM 5Y (d = 0.2 g) Prior to balance assembly, remove the transport lock. Przed montażem wagi usuń blokady transportowe.
-
Page 5: Components Assembly
5. COMPONENTS ASSEMBLY MONTAŻ ELEMENTÓW WAGI PM 5Y (d = 0.01 g) PM 5Y (d = 0.1 g) PM 5Y (d = 0.2 g) -
Page 6: Preparing For Work
6. PREPARING FOR WORK PRZYGOTOWANIE WAGI DO PRACY Place the device at the workstation, wait until it reaches room temperature. Ustaw urządzenie w miejscu jego użytkowania i pozostaw je do osiągnięcia temperatury pokojowej. 6.1. Temperature Stabilization Stabilizacja temperatury wagi up to 1- 8 h Prior to switching the device Connect the power supply cable to the DC socket on Connect the power supply... -
Page 7: Balance Levelling
Weighing Weighing John Smith John Smith ast Dosing ast Dosing Wed 14.07.2021 09:30:00 Wed 14.07.2021 09:30:00 0.000000 0.00 Leveling Netto weight Temperature Air Humidity Netto weight Temperature Air Humidity 0.000000 g 0.00 g Gross weight Gross weight 0.000000 g 0.00 g 19°C 19°C Tare... -
Page 8: Home Screen
7. HOME SCREEN EKRAN GŁÓWNY information about the currently used working mode, logged-in operator, date, time, active connection with a computer. informacja o aktualnie używanym modzie pracy, zalogowanym użytkowniku, dacie, czasie, aktywnym połączeniu z komputerem. weighing result win- Weighing John Smith ast Dosing Wed 14.07.2021 09:30:00... - Page 9 Weighing Weighing John Smith John Smith ast Dosing ast Dosing Wed 14.07.2021 09:30:00 Wed 14.07.2021 09:30:00 Adjustment Adjustment Adjustment Internal adjustment Adjustment test Internal adjustment Adjustment test Mass determination Adjustment weights Report printout Adjustment weights Report printout GLP projekt Adjustment history GLP projekt Adjustment history Press „Internal adjustment”.
-
Page 10: Working Modes
8.4. Working Modes Tryby pracy Slide down the top menu, press “Working modes” pictogram to display the list of available working modes. Rozwiń menu w górnej części ekranu i naciśnij ikonę „Mody pracy”, aby wyświetlić listę dostępnych trybów pracy. Weighing John Smith ast Dosing Wed 14.07.2021... -
Page 11: Administrator Login
9. SETTINGS USTAWIENIA Some balance settings are available only for the Administrator. Prior to the balance parameters setup, log in as the Administrator. Niektóre ustawienia wagi są dostępne wyłącznie dla Administratora. Przed ustawieniem parametrów wagi zaloguj się jako Administrator. 9.1. Administrator Login Logowanie administratora Weighing Weighing... -
Page 12: Operator Settings
9.2. Operator Settings Konfiguracja użytkowników Prior to operators configuration, log in as the Administrator (see section 9.1). Przed konfiguracją użytkowników zaloguj się jako Administrator (patrz punkt 9.1). Weighing Weighing Admin Admin ast Dosing Wed 14.07.2021 09:30:00 ast Dosing Wed 14.07.2021 09:30:00 Operators Admin... - Page 13 9.3. Proximity Sensors Setup Konfiguracja czujników zbliżeniowych You can assign a function of your choice to each proximity sensor. In addition, you can assign various func- tions to the same sensor in different working modes. See the exemplary procedure for sensors configuration for the „Weighing”...
-
Page 14: Connecting Peripherals
10. CONNECTING PERIPHERALS PODŁĄCZENIE URZĄDZEŃ PERYFERYJNYCH Smartphone Tablet Computer Printer Computer Printer Smartfon Tablet Komputer Drukarka Komputer Drukarka RJ45 hotspot HDMI (Free Link) HDMI USB-C Barcode Computer* Printer Display Spreadsheet scanner Skaner kodów Arkusz Komputer* Drukarka Ekran kreskowych kalkulacyjny ® Wi-Fi is a registered trademark of Wi-Fi Alliance. -
Page 15: Cleaning And Maintenance
11. CLEANING AND MAINTENANCE CZYSZCZENIE I KONSERWACJA 11.1. Guidelines and Precautions Zalecenia i ostrzeżenia Prior to cleaning it is necessary Use soft cloth made of either natural Apply the cleanser to the cloth. Re- to disconnect the device from the or synthetic fibers exclusively. -
Page 16: Cleaning Instructions
• Suche resztki próbek możesz usunąć za pomocą pędzla lub małego ręcznego odkurzacza. • Wyczyszczone elementy możesz osuszyć miękką, suchą ściereczką lub użyć bezpyłowego papierowego ręcznika, aby wchłonął pozostałą wilgoć. • Zamontuj wszystkie elementy urządzenia dopiero po ich całkowitym wysuszeniu. www.radwag.com...
Need help?
Do you have a question about the PM 5Y and is the answer not in the manual?
Questions and answers