Advertisement
Quick Links
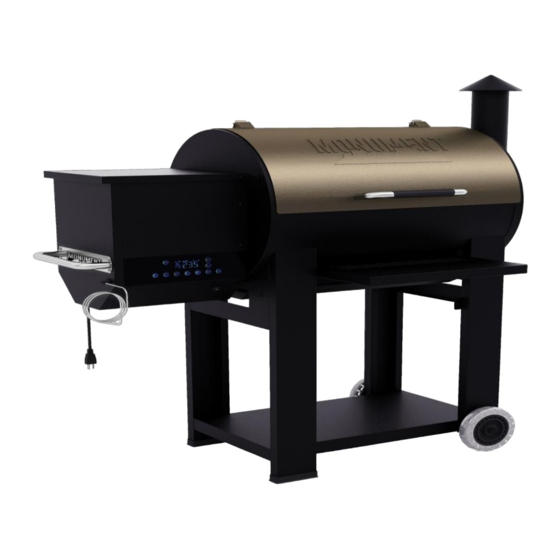
MONUMEMT PELLET GRILL
USE AND CARE MANUAL
S1251801T
Please read this entire manual before installation and use of this pellet fuel -burning
appliance.
Failure to follow these instructions could result in property damage, bodily injury
or even death.
Contact local building or fire officials about restrictions and installation
inspection requirements in your area.
Save these instructions.
THIS Pellet Grill IS DESIGNED FOR OUTDOOR USE ONLY
SAVE THESE INSTRUCTIONS FOR FUTURE REFERENCE
WWW.MONUMENTGRILLS.COM
Advertisement

Subscribe to Our Youtube Channel
Related Manuals for Monument Grills S1251801T


Summary of Contents for Monument Grills S1251801T
- Page 1 MONUMEMT PELLET GRILL USE AND CARE MANUAL S1251801T Please read this entire manual before installation and use of this pellet fuel -burning appliance. Failure to follow these instructions could result in property damage, bodily injury or even death. Contact local building or fire officials about restrictions and installation inspection requirements in your area.
- Page 2 Guide directory 1. Safety warning page 3-4 2. Certification sticker Page 5 3. Exploded View Page 6 4. Single part list Page 5. Fixing elements Page 6. Mounting steps Page 7--18 7. Use of smoked stove Page 19-20 Page 21-23 Button function description 9.
-
Page 3: Safety Warning
1.Safety warning ※Please read the entire manual carefully before assembling and using the smoker, and install and use it as required. The company will not be responsible for property damage, personal injury or even death caused by failure to follow the instructions. - Page 4 • Connect the equipment into an outlet on a circuit different from that to which the receiver is connected. • Consult the dealer or an experienced radio/TV technician for help. This device complies with Part 15 of the FCC rules. Operation is subject to the following two conditions: (1) this device may not cause harmful interference, and (2) this device must accept any interference received, including interference that may cause undesired operation.
-
Page 5: Certification Label
2. Certification label... -
Page 6: Exploded View
3. Exploded View... -
Page 7: Single Part List
4. Single part list Seq. Appellation Seq. Appellation Cast iron grill Long legs Oil guide plate Burning chamber handle Chimney cover assembly Barbecue probe Chimney assembly Control box assembly Chimney insulation cotton power cable Fire board Control box handle assembly Furnace assembly Control box screen Ash tray... - Page 8 A : 8PCS...
- Page 9 ② ① A : 4PCS...
- Page 10 A : 4PCS...
- Page 11 The screws have been pre assembled A : 2PCS...
- Page 12 B : 2PCS A : 8PCS C : 8PCS...
- Page 13 A : 2PCS C : 2PCS The screws have been pre assembled ① ②...
- Page 14 B : 2PCS D : 4PCS The screws have been pre assembled ① ②...
- Page 15 A : 5PCS Please pay attention C : 5PCS to protect the temperature probe during installation to prevent damage A : 3PCS ① ②...
- Page 19 7. Use of smoked stove 7.1 Placement of equipment The smoke oven should be placed in an open and ventilated place, at least as shown in the surrounding fixed facilities, and away from inflammable and explosive materials. 40" 12" 12" 7.2 Fuel selection The smoked stove should use standard wood pellet fuel.
- Page 20 7.5 Ignition instructions Clean the remaining ash in the combustion chamber before each ignition. Then pour new fuel into the control box, not to exceed the control box screen (about 2/3), and then put a small amount of new fuel into the combustion chamber. The fuel is pyramid-shaped to cover the best layer of the ignition rod 1~2.
- Page 21 8. Button function description The key is the device key, the key is turned on, other keys can be operated, the key is closed, the device is in the stop state, other key operations are invalid, and the corresponding keys in the APP have the same function. This button is the cooking button.
- Page 22 mode. The corresponding icon on the LCD screen lights up. Select the default setting, you can also set the countdown time yourself (the LCD screen SET area will have corresponding display), the App will automatically synchronize with the device, the corresponding key in the App has the same function, the device starts working after the setting is completed, after the set time, the device The beep will prompt, you can press any key to cancel the buzzer, if there is no operation for 2 minutes, it will stop automatically.
- Page 23 extinguished. Press any key to cancel the buzzer. If there is no operation for 2 minutes, it will stop automatically. 9. Troubleshooting common faults Fault description Troubleshooting Troubleshooting The equipment is Fuel is not ignited Try to re-ignite not on fire The fuel particles are too large to enter Replace small pellet fuel the feeder...
Need help?
Do you have a question about the S1251801T and is the answer not in the manual?
Questions and answers