Advertisement
Quick Links
ASSEMBLY & OPERATING INSTRUCTIONS
Charcoal Grill
!
WARNING:
Read this Owner's manual carefully and be
sure your grill is properly assembled, installed
and maintained. Failure to follow these
instructions could result in serious injury and/or
property damage. This gas grill is intended for
outdoor use only and is not intended to be
installed in or on recreational vehicles or boats.
Note to Installer
Leave this Owner's Manual with the customer
after delivery and/or installation.
Note to Consumer
Leave this Owner's Manual in a convenient
place for future reference.
Customer Service Helpline:
For parts ordering, call:
1-8
00 3
-
0-9 33
1
5
MFG No.: 52101
UPC No.:856597007263
Please make sure the cylinder valve
connection device shall properly and safely
mate with the connection device attached to
the inlet of the pressure regulator.
• Parts
• Assembly
• Safety Rules
• Use and Care
Advertisement

Related Manuals for Monument Grills 52101


Summary of Contents for Monument Grills 52101
- Page 1 00 3 0-9 33 installed in or on recreational vehicles or boats. MFG No.: 52101 Note to Installer UPC No.:856597007263 Leave this Owner’s Manual with the customer Please make sure the cylinder valve after delivery and/or installation.
-
Page 2: Table Of Contents
•WARNING! This barbecue will become very hot, do marketplace internet retailer from any entity other than not move it during operation. Monument Grills is not an original purchase and will •CAUTION! The maximum filling capacity for charcoal not qualify for a warranty... -
Page 3: Hardware List
Contents for Hardware Pack The following table illustrates a breakdown of the hardware pack. It highlights what components are used in the various stages of assembly. Tools required for assembly Philips Head Screwdriver (not included). Note: The left and right sides of the grill are on your left and right as you face the front of the grill. Philips Head Screwdriver... -
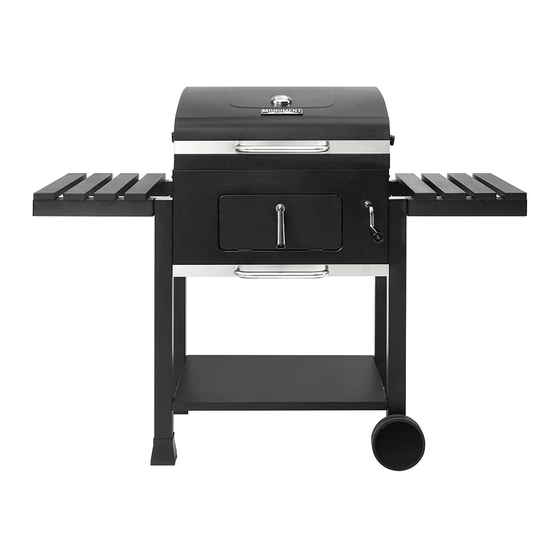
Page 4: Parts Diagram
Model 52101 Parts Diagram... -
Page 5: Parts List
Model 52101 Parts List Appellation Appellation Qty Seq. Seq. Material Material Code Code A0212741 Temperature Gauge D010016831 Front Right Leg D016900120 Temperature Gauge Seat A02120256 Foot Pad D30X001997 Main Lid D010014737 Wheel Axle D30X002001 Left arm of lifting mechanism D010017488... -
Page 6: Assembly Instructions
Assembly Instructions Install Part No.12 No.13(2pcs) & No.14 with 8 A34 screws. Figure 1 Step one: Install two back legs(Part No.22 No.24) onto side panels(Part No.13) with 4 A34 screws. Step Two: Install Part No.27 foot pad onto Part No. 22 with A34 screw. Figure 2... - Page 7 Turn over the whole grill body as shown Step one: Install two front legs(Part No.26 No.30) onto side panels(Part No.13) with 4 A34 screws. Step Two: Install Part No.27 foot pad onto Part No. 30 Figure 3 with A34 screw. Install bottom panel (Part No.29) onto four legs with 4 A34 screws.
- Page 8 Install the wheels(Part No.23) onto right two legs (No.24 & No. 26) with wheel axle(Part No. 28) Figure 5 Install the air vent(Part No.6) onto side panels Handy wrench and Philips (No.13) with two A32 screwdriver needed & two A35 Figure 6...
- Page 9 Figure 7.1 Figure 7.1 Exit the bolt from the Lifting shaft(Part No.10) as pictures shown Figure 7.2 Figure 7.2 Assemble No.4 & No.5 onto the lifting Shaft . Fix the bolt afterward Figure 7 Step two: Step One: Install whole shifting mechanism Pre-install an onto A34 screw Figure 8.2...
- Page 10 Install the gearing cover (No. part:15) onto the relevant place as pictures shown with two A34 Figure 9 screws Step Three: Install back the bolt Step Two: Insert the handle Step One: Exit the bolt Install the gearing handling (Part No.16) as pictures shown above Figure 10...
- Page 11 Handy wrench needed Install the door handle(Part No.19) as pictures shown Figure 11 above) Step One: Pre-install four A39 Screws onto four l Legs. Figure 12. . 1 Step Two: Put the two side Figure 12. . 3 Shelves onto the Step Three: Screws and fix Install additional A39...
- Page 12 Install Part No.21 onto Part No.31 with 8 A40 screws Figure 13 Install charcoal shelf Above(No.21 & No.31) onto lifting mechanism Figure 14 With four A34 screws...
- Page 13 Install No 7 onto the main lid(Part No.3) with four A36 screws Figure 15 Install air vent (Part No. 6) and lid handle (Part No.8) Onto the main lid as Pictures shown Figure 16...
- Page 14 Install the main lid onto the grill body with four A36 screws Figure 17 Install the handle(Part No.8) onto the ash collection pan (Part No.17) Figure 18...
- Page 15 Figure 19.1 Place the warming rack (Part No. 11) in the relevant place Figure 19.2 Insert the ash collection tray into the grill body Figure 19 Figure 20.3 Figure 20.1 Install the temperature gauge(Part No.1 & No.2) onto the maid lid as shown Figure 20.2 Figure 20...
- Page 16 Place the cooking grid (Part No. 9) in the relevant place Figure 21 Figure 22...
-
Page 17: Cleaning And Maintenance
PREPARING TO USE YOUR GRILL SMOKING WOOD For a more robust smoke flavor while using charcoal Before cooking, the following steps should be closely briquettes or lump charcoal, try adding wood chips or followed to both cure the finish and season the several wood chunks to the fire. -
Page 18: Cooking Chart
COOKING RECEIPT-DIRECT HEAT...
Need help?
Do you have a question about the 52101 and is the answer not in the manual?
Questions and answers