Table of Contents
Advertisement
Quick Links
Advertisement
Table of Contents

Subscribe to Our Youtube Channel
Related Manuals for Bartscher 18180D


Summary of Contents for Bartscher 18180D
- Page 1 18180D 610839...
- Page 2 Bartscher GmbH Phone: +49 5258 971-0 Franz-Kleine-Str. 28 Fax: +49 5258 971-120 Technical Support Hotline: +49 5258 971-197 D-33154 Salzkotten Germany www.bartscher.com Version: 1.0 Date of preparation: 2021-11-03...
-
Page 3: Table Of Contents
Original instruction manual Safety ......................2 Explanation of Signal Words ..............2 Safety instructions..................3 Intended Use ................... 8 Unintended Use ..................8 General information ..................9 Liability and Warranty ................9 Copyright Protection ................9 Declaration of Conformity ................ 9 Transport, Packaging and Storage .............. -
Page 4: Safety
Safety Diese Bedi enungsanlei tung besc hrei bt di e Installation, Bedi enung und Wartung des Geräts und gilt als wic htige Infor mationsquelle und N achschl agewer k. Di e Kenntnis aller enthaltenen Sic herheits hi nweis e und H andlungs anweisungen schafft die Vorauss etz ung für das sichere und s ac hger echte Ar beiten mit dem Gerät. D arüber hi naus müs sen die für den Ei ns atz ber eic h des Geräts geltenden ör tlichen Unfall verhütungs vorsc hriften und allgemeinen Sicherheits besti mmungen eing ehalten wer den. Dies e Bedi enungs anleitung is t Bes tandteil des Produkts und muss i n unmi ttelbarer N ähe des Ger äts für das In¬s tall ations-, Bedi enungs-, Wartungs- und R einigungspers onal jederzeit z ugänglich auf¬bewahrt werden. Wenn das Ger ät an eine dritte Pers on weiterg egeben wird, muss die Bedi enungsanlei tung mit ausgehändigt wer den. -
Page 5: Safety Instructions
Safety WARNING! The signal word WARNING warns against hazards that may lead to moderate or severe injuries or death if the hazards are not avoided. CAUTION! The signal word CAUTION warns against hazards that may lead to light or moderate injuries if the hazards are not avoided. , di e IMPORTANT! The signal word IMPORTANT indicates possible property damages,... - Page 6 Safety • Always completely unwind the power cord. • Never place the appliance or other objects on the power cord. • Always take hold of the plug to disconnect the appliance from the power supply. • Check the power cord regularly for damage. Do not use the appliance if the power cord is damaged.
- Page 7 Safety • Do not use the appliance for preparation of fresh or hard-boiled eggs, either in shell or peeled, as eggs may explode. • Food products with thick skins, such as potatoes, pumpkins, apples or chestnuts, should be pierced prior to heating. •...
- Page 8 Safety Safety of Microwave Oven Operation • Do not fry any food products in the appliance. Hot oil can lead to skin burns and/or damage to the appliance. • Food products prepared in the appliance are heated unevenly. Also, containers are usually hotter than the food products inside.
- Page 9 Safety Halten Sie Verpac kungsmateriali en und Styropor teile von Ki ndern fern. Si e können sich darin verfangen und erstic ken. Operating personnel • The appliance can be used by children of 8 years old and older, as well as by people with reduced physical, sensory or mental abilities and those with limited experience/knowledge as long as they are under supervision or have been instructed on safe use of the appliance and possible risks.
-
Page 10: Intended Use
Safety Intended Use As described below, every use of the appliance for a purpose differing and/or diverging from its intended standard use, is prohibited and considered to be an unintended use. The following is an intended use: – heating-up and defrosting foods with the use of suitable cookware. This appliance is intended for use in households and similar places, e.g.: –... -
Page 11: General Information
General information General information Liability and Warranty All information and instructions in this instruction manual account for legal regulations in force, current level of technical engineering knowledge as well as our expertise and experience, developed over the years. If special models or additional options are ordered, or state-of-the-art technical solutions were implemented, the actual scope of delivery of the appliance may, in some circumstances, differ from descriptions and numerous drawings in this instruction manual. -
Page 12: Transport, Packaging And Storage
Transport, Packaging and Storage Transport, Packaging and Storage Delivery Check Immediately upon reception, check the delivery for completeness and possible shipping damage. In the case of visible transport damage refuse to accept the appliance or accept it conditionally. Mark and note the scope of damage in shipping documents/consignment list of the shipping company and lodge a complaint. -
Page 13: Technical Data
Technical Data Technical Data Technical Specifications Name: Microwave 18180D 610839 Art. No.: Material: stainless steel Thermal processing chamber material: stainless steel, ceramic Chamber dimensions (W x D x H), in mm: 330 x 310 x 175 Volume, in l: Microwave output, in W:... -
Page 14: List Of Components Of The Appliance
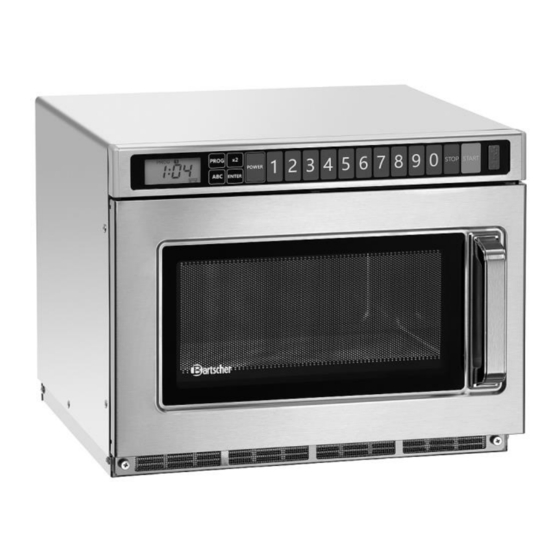
Technical Data List of Components of the Appliance Fig. 1 1. Door safety lock system 2. Door handle 3. Door with sight glass 4. Internal lighting 5. Splash guard 6. Thermal processing chamber 7. Control panel 8. USB connection 9. Housing 10. -
Page 15: Functions Of The Appliance
Installation and operation Functions of the Appliance The 1,800 W microwave unit featuring 2 magnetrons, timer and 30 available program settings is designed for heating up and defrosting foods with the used cookware suitable for use in microwave units. With the use of suitable touch keys you may set output and time, as required for a given dish. - Page 16 Installation and operation • To ensure proper functioning, the device must have sufficient ventilation. • Never block the ventilation ducts! • It is necessary to maintain the following safe distances: – above the device: 20 cm – at rear of device: 10 cm –...
- Page 17 Installation and operation 2. Fix the connection plate (b)between both units and align respective screw holes with openings in the connection plate. Fig. 3 3. Put 6 screws (a) back in their original positions and tighten them. Fig. 4 Power supply connection •...
-
Page 18: Basics Of Thermal Processing In Microwave
Installation and operation Basics of Thermal Processing in Microwave Instead of traditional heat sources, a microwave oven applies an electron lamp which emits electromagnetic waves. These waves, like radio waves, are invisible but their effects can be observed. Such waves can pass through materials such as glass, porcelain, artificial materials and paper. - Page 19 Installation and operation • Do not use products from recycled materials, as they may contain small pieces of metal. If such containers are used, sparks and even fire may result. • Dishes of oval and round shapes should be used, as food products cook more quickly in the corners of square-shaped containers.
-
Page 20: Operation
Installation and operation Operation Before Use 1. Empty the thermal processing chamber. 2. Before use, clean the appliance, observing instructions in section 6 'Cleaning'. 3. Leave the door open for the chamber to dry completely. Indications for User • With first connection, all indicators are displayed in the digital display for 2 seconds and an audible signal sounds. - Page 21 Installation and operation Messages and Key Functions Fig. 5 (1) Digital display The digital display shows the set thermal processing time, power output level, selected programs/thermal processing steps, options and current mode. (2) PROG key For saving thermal processing programs, memory lock, lamp, etc. (3) Key x2 By pressing this key you may extend or shorten the thermal processing time.
- Page 22 Installation and operation Messages ① Thermal processing with x2 function Programming of the thermal ② processing ③ Thermal processing stages ④ Selected power output levels Fig. 6 Warning Indications WARNING Risk of scalding! Heated foods and the used cookware and appliance surfaces may become very hot.
- Page 23 Installation and operation Appliance Start-up 1. Plug the appliance into a suitable single socket. When the unit is connected for the first time, the digital display shows all indicators (functions, thermal processing stages, power output levels, thermal processing times, etc.); next, no values are shown. 2.
- Page 24 Installation and operation 4. Set the 1st stage of the thermal processing program: – press POWER key repeatedly to select the power output level (Tab. 2); – next, set the thermal processing time using numpad keys; – press ENTER key to save the setting. 5.
- Page 25 Installation and operation In the 3rd stage of thermal processing, the indicators are off and the indicator blinks. 9. When the thermal processing time elapses, open the appliance door and take out the ready food. 10. Place more food in the thermal processing chamber, close the appliance door and press START key to start the selected thermal processing program, or STOP key to return to the Standby mode.
- Page 26 Installation and operation Starting Thermal Processing Programs For example: starting A-04 thermal processing program. 1. Open the appliance door in the Standby mode, put food in the thermal processing chamber and close the appliance door. 2. Press the numpad key 4 once. 3.
- Page 27 Installation and operation x2 Function The thermal processing time of programs/stages may be extended or shortened depending on the setting of x2 key. The x2 function is by factory default set to 2.0. Example: Execution of B-04 thermal processing program with x2 function doubled time.
- Page 28 Installation and operation When the number reaches the value of 100,000, the 'CHEC' message blinks after each new use. The 'CHEC' message may be acknowledge the following way: 1. Open the appliance door in the Standby mode. 2. Press and hold START key, and press the numpad key 4 once. NOTE! After a pause in the thermal processing, the system will register the new thermal processing.
- Page 29 Installation and operation 3 seconds later the digital display shows 'PROG', ' ' and 'P00'. 3 seconds later the digital display shows 'PROG', ' ' and '00:00'. 3 seconds later the digital display shows 'PROG' and '2 18'. 3 seconds later the system returns to the Standby mode. Checking Another Memory Information 1.
- Page 30 Installation and operation 4. Press ENTER key once. 5. Press STOP key once to return to the Standby mode. NOTE! The factory default setting is 'LR1', and the lighting is ON, when the appliance door is open. Buzzer setting function: 1.
- Page 31 Installation and operation Child Safety Lock The safety lock prevents children from unintentional operation. 1. To set the child safety lock on, press and hold STOP key for 3 seconds in the Standby mode. The appliance switches automatically to the child safety lock mode. The safety lock indicator light is on.
-
Page 32: Cleaning
Cleaning Cleaning Safety Instructions for Cleaning • Before cleaning, disconnect the appliance from the power supply. • Leave the appliance to cool down completely. • Make sure water does not enter the appliance. Do not immerse the appliance in water or other liquids during cleaning. Do not clean the appliance with a pressurized water jet. - Page 33 Cleaning Housing and Control Panel NOTE! Leave the appliance door open to avoid accidental switching on. 1. Wipe the housing and control panel with a soft, damp cloth only. Filter 1. Periodically clean the filter located in front section of the appliance. 2.
- Page 34 Cleaning Upper Splash Guard 1. Clean the splash guard regularly. 2. Remove the splash guard for cleaning. Proceed the following way: – Press both levers (b) at the same time, at the left and right hand side, and release the splash guard from fixing openings.
-
Page 35: Possible Malfunctions
Possible Malfunctions Possible Malfunctions Mögliche If the microwave does not work: 1. Check if the appliance is correctly connected to the power supply. Remove the plug from the socket and wait for approx. 10 minutes before re-connecting it correctly. 2. Check if a fuse has not been tripped or if the main switch is not switched off. If they operate correctly, check the connection with another appliance. -
Page 36: Disposal
Disposal Disposal Electrical Appliance Electric appliances are marked with this symbol. Electrical appliances must be disposed of and recycled in a correct and environmentally friendly manner. You must not dispose of electric appliances with household waste. Disconnect the appliance from the power supply and remove power cord from the appliance.
Need help?
Do you have a question about the 18180D and is the answer not in the manual?
Questions and answers