Table of Contents
Advertisement
Quick Links
Advertisement
Table of Contents

Related Manuals for Bartscher 21170D


Summary of Contents for Bartscher 21170D
- Page 1 21170D 610189 Original-Gebrauchsanleitung V1/0916...
-
Page 2: Table Of Contents
5.3 Suitable dishes for use in the microwave oven ............. 49 5.4 Operation ......................50 6. Cleaning ........................61 7. Possible Malfunctions .................... 63 8. Waste disposal ......................64 Bartscher GmbH Franz-Kleine-Str. 28 33154 Salzkotten phone: +49 (0) 5258 971-0 Germany... -
Page 3: Safety
Read this instruction manual before using and keep them available at all times! This instruction manual contains information about the installation, operation and maintenance of the device and should be consulted as an important source of information and reference guide. Awareness of the safety instructions and instructions for use in this manual will ensure the safe and correct use of the device. -
Page 4: Safety Instructions
CAUTION! This symbol highlights dangerous situations which could lead to light injuries, or damage, malfunction, and/or destruction of the device. NOTE! This symbol highlights recommendations and information aimed for effective and trouble-free device operation. 1.2 Safety instructions The device can be used by children 8 years and up, as well as by people with disabilities and those with limited experience/ knowledge as long as they are under supervision or have been instructed on proper use of the device and its possible dangers. - Page 5 To prevent hazards and to ensure optimum efficiency, no modifications or alterations to the device that are not explicitly approved by the manufacturer may be undertaken. DANGER! Electric shock hazard! To avoid effects of this risk, follow the safety instructions presented below: ...
- Page 6 Do not use any acid agents and make sure no water ingresses the device. Never operate the device with moist hands or standing on wet floor. Remove the plug from its socket: when the device is not used, in case of anomalies during operation, before cleaning.
- Page 7 Door seals must be tight and clean, as dirt and damage may allow electromagnetic waves to escape from the microwave oven. Take care to prevent buildup of any residues (e.g. cleaning agents, dust, grease, etc.). HOT SURFACE! Burn hazard! To avoid effects of this risk, follow the safety instructions presented below: ...
- Page 8 For that reason avoid using tall, narrow containers with a thin neck. Place a spoon (only in exceptional cases use a metallic one) or glass stirrer in the beverage, then place the dish in the center of the rotating tray. Stir the liquid prior to heating and after half the heating time has elapsed.
-
Page 9: Proper Use
Do not prepare food products and beverages in closed or sealed containers. Such containers may crack inside the device or injure the user when being opened! Do not use the device for preparation of fresh or hard-boiled eggs, either in shell or peeled, as eggs may explode. ... -
Page 10: General Information
2. General information 2.1 Liability and Warrantees All the information and instructions in this manual take into account standard safety regulations, current levels of technical engineering as well as the expertise and experience we have developed over the years. The instruction manual was translated with all due care and attention. However, we do not accept liability for any translation errors. -
Page 11: Transport, Packaging And Storage
3. Transport, packaging and storage 3.1 Delivery check Please check the delivery upon completeness and transport damage immediately after receipt. In case of visible damage do not accept or accept the delivery with reservation only. Note the extent of damage on the carrier’s bill of delivery. Trigger off the complaint. Hidden damages should be reclaimed immediately after notice, as claims for damages can only be asserted within the effective period for complaints. -
Page 12: Technical Data
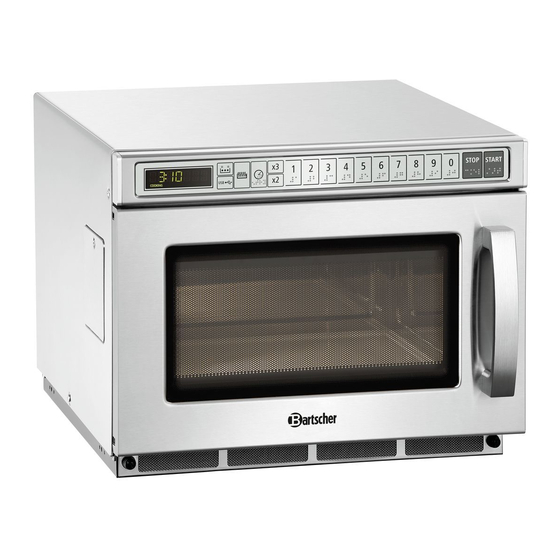
4. Technical data 4.1 Overview of parts Safety lock system Door handle Glass door Cooking compartment lighting Cooking compartment Upper anti-splash cover Control panel Cooking compartment ceramic bottom USB port Housing Filter - 43 -... -
Page 13: Functions Of Display And Buttons
4.2 Functions of display and buttons (10) (2) (4) (1) Digital display (2) USB memory button (3) Defrosting program button (4) Power level selection button (5) Manual time adjustment button (6) Button x2 (7) Button X3 (8) (10) Numeric buttons (9) STOP button (10) START button (1) The digital display shows the preset cooking time and power level,... - Page 14 (4) Power level selection button That button switches to the power level selection in the manual entering mode or programming mode. The power levels are assigned to the individual numeric buttons and may be selected by pressing such button. (5) Manual time setting That button is used for manual setting of required cooking time.
-
Page 15: Technical Specification
4.3 Technical specification Name Microwave oven 21170D 610189 Code- no.: Material: Housing and cooking chamber: stainless steel functions: heating, defrosting preset cooking programs: 100 control: electronic Realization: digital display interior lighting tactile buttons Microwave power output: 2.1 kW... -
Page 16: Installation And Operation
5. Installation and operation 5.1 Installation Positioning Unpack the device and remove the packing material. CAUTION! Never remove the nameplate and warning signs from the device. Place the device on a flat, stable surface which can support the weight of a microwave oven. -
Page 17: Guidelines For Cooking With The Microwave Oven
Connection DANGER! Electric shock hazard! The device can cause injuries due to improper installation! Before installation and connecting the local power grid specification should be compared with that of the device (see rating plate). Connect the device only in case of compliance! ... -
Page 18: Suitable Dishes For Use In The Microwave Oven
5.3 Suitable dishes for use in the microwave oven 1. Check that a dish is suitable to be used in a microwave oven. Test: place the empty dish together with a glass of water, then heat at the highest power level for 60 seconds. Never switch the device on when empty or with only an empty container inside. -
Page 19: Operation
5.4 Operation Before the first use Prior to the first use, clean the device so that the remnants of packing material do not affect the taste of food products. Wipe the interior and exterior of the device with a soft, moist cloth and dry thoroughly afterwards. - Page 20 Button / option Settings Description OP:50 Inactive OP:51 Active Quick start OP:60 Inactive OP:61 Active Door reset OP:70 60 minutes Max. cooking time OP:71 10 minutes OP:80 Manual programming inactive Manual OP:81 Manual programming active programming OP:90 One-digit 10-programming mode Two-digit OP:91 Two-digit 100-programming mode...
- Page 21 Settings Standby mode When no button is pressed and oven door is not opened or closed, the device changes after time set in OP 4 (buttons/display) (preset to 60 seconds) to the ready mode. Hint: Follow the table 1 “User options” on pages 50-51. ...
- Page 22 Pause mode That mode allows for pausing the ongoing cooking cycle in order to try or stir the food. When during the manual / preset cooking the device door is opened or closed, or “STOP” buton is pressed, the device switches to the pause mode. ...
- Page 23 Manual cooking mode When the device is in that mode and “START” button is pressed, the manual cooking mode is activated. When the device is in that mode, the remaining cooking time is shown. The cooling fan and lighting are activated. ...
- Page 24 Quick start mode When the device operates and OP 51 (quick start active) is selected, after pressing one of numeric buttons the saved cooking program for that button is activated automatically. The digital display shows the remaining cooking time. ...
- Page 25 Delicate food such as paste / cakes, cream, cheese or bread should be only partially defrosted and the defrosting process should be finished at room temperature. This way the food will not be too hot on the outside while still frozen on the inside. ...
- Page 26 When during setting “STOP” button is pressed, the device switches to the open door mode. The program which is not saved is lost. When there is a cooking program saved under one of numeric buttons, it may be started by pressing that button. When no cooking program is saved, the acoustic signal is emitted after pressing that button.
- Page 27 the digital display shows “TRIPLE”. After pressing When setting is made with use of numeric buttons, the preset cooking time is shown on the display. Example: The preset cooking time for numeric button “5” is 1 minute. After pressing the cooking time is changed: 1: 0 *2 = 2 (2 minutes).
- Page 28 d. Press “7” button, the digital display shows “1:25 70”. Setting of cooking stage 1 is finished. e. Press “ ”, the digital display shows “STAGE-2”. f. Press buttons “5”, “4”, and “0” to set the cooking time for that stage. The digital display shows the cooking time “5:40”.
- Page 29 Options mode The options mode allows the user to select between various settings (table 1 “User options”, pages 50-51). Open the door and press the numeric button “2” for 5 second, the acoustic signal is activated and the device switches to the options mode. ...
-
Page 30: Cleaning
6. Cleaning WARNING! Disconnect the device from the power supply (pull the plug from the socket!) before cleaning. The device is not designed for direct washing via water jets! Make sure no water gets into the device. Important tips o Clean the device regularly. If the device is not kept clean, this may affect the durability of the device and has a negative impact on its operation and lead to accumulation of fungi and bacteria. - Page 31 Housing and control panel o Wipe the housing and control panel with a soft, moist cloth. TIP! Leave the door open to avoid its accidental switching on. o Make sure no water gets inside the device. o To protect the elements inside the device against damage, make sure no moisture gets into the device through the holes.
-
Page 32: Possible Malfunctions
Upper anti-splash cover o Remove the anti-splash cover for washing. Press both handles together (a) on left and right side, loosen the cover from the fixing holes, press it down and remove. o Wash the cover in warm water and gentle cleaning agent, then dry thoroughly. -
Page 33: Waste Disposal
CAUTION! For the disposal of the device please consider and act according to the national and local rules and regulations. Bartscher GmbH Franz-Kleine-Str. 28 33154 Salzkotten phone: +49 (0) 5258 971-0 Germany...
Need help?
Do you have a question about the 21170D and is the answer not in the manual?
Questions and answers