
Related Manuals for Moxa Technologies V2403C Series


Summary of Contents for Moxa Technologies V2403C Series
- Page 1 V2403C Series Quick Installation Guide Embedded Computers Version 1.0, September 2021 Technical Support Contact Information www.moxa.com/support 2021 Moxa Inc. All rights reserved. P/N: 1802024030110 *1802024030110*...
-
Page 2: Package Checklist
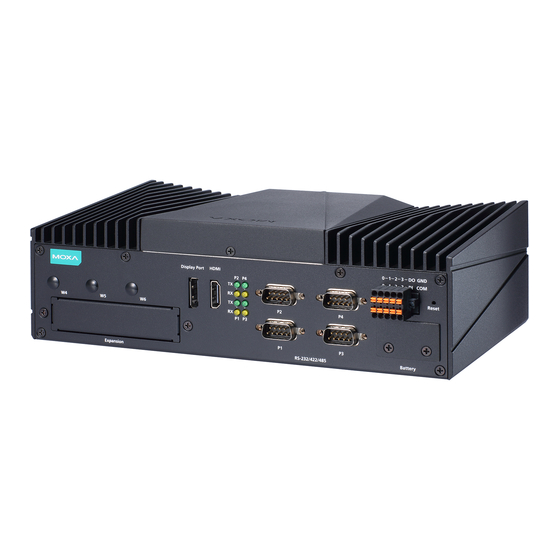
Overview The V2403C Series embedded computers are based on the Intel® 7th generation processor and feature 4 RS-232/422/485 serial ports, 4 LAN ports, and 4 USB 3.0 ports. The V2403C computers come with 1 DisplayPort and 1 HDMI port with 4-k resolution support, fulfilling various requirements for industrial applications. - Page 3 Dimensions LED Indicators The following table describes the LED indicators located on the front and rear panels of the V2403C computer. LED Name Status Function Power Green Power is on (On power No power input or any other power error button) Ethernet Green...
- Page 4 Installing the V2403C The V2403C computer comes with two wall-mounting brackets. Attach the brackets to the computer using four screws on each side. Ensure that the mounting brackets are attached to the V2403C computer in the direction shown in the following figure. The eight screws for the mounting brackets are included in the product package.
- Page 5 Connecting the Power The V2403C computers are provided with 3-pin power input connectors in terminal block on the front panel. Connect the power cord wires to the connectors and then tighten the connectors. Push the power button. The Power LED (on the power button) will light up to indicate that power is being supplied to the computer.
- Page 6 Ethernet Ports The V2403C has 4 100/1000 Mbps RJ45 Ethernet ports with RJ45 connectors on the front panel. Refer to the following table for pin assignments: 10/100 Mbps 1000 Mbps ETx+ TRD(0)+ ETx- TRD(0)- ERx+ TRD(1)+ – TRD(2)+ – TRD(2)- ERx- TRD(1)- –...
- Page 7 3. Turn the disk and tray arrangement around to view the rear side of the tray. Fasten the four screws to secure the disk to the tray. 4. Remove all screws on the rear panel of the V2403C computer. 5. Take out the rear cover of the computer and find the location of the storage disk sockets.
- Page 8 7. Place the tray on the socket and push upward so that the connectors on the storage disk tray and the socket can be connected. Fasten two screws on the bottom of the tray. For instructions on installing other peripheral devices or wireless modules, refer to the V2403C Hardware User’s Manual.
- Page 9 2. Unfasten the two screws on the battery cover. 3. Take off the cover; the battery is attached to the cover. 4. Separate the connector and remove the two screws on the metal plate. 5. Replace the new battery in the battery holder, place the metal plate on the battery and fasten the two screws tightly.
- Page 10 6. Reconnect the connector, place the battery holder into the slot, and secure the cover of the slot by fastening the two screws on the cover NOTE • Be sure to use the correct type of battery. Incorrect battery may cause system damage. Contact Moxa’s technical support staff for assistance, if necessary.
Need help?
Do you have a question about the V2403C Series and is the answer not in the manual?
Questions and answers