Table of Contents
Advertisement
Quick Links
Advertisement
Table of Contents

Related Manuals for Vello FREEWAVE PLUS


Summary of Contents for Vello FREEWAVE PLUS
- Page 1 FREEWAVE PLUS WIRELESS SHUTTER RELEASE USER MANUAL...
- Page 2 INTRODUCTION Thank you for choosing the Vello The FreeWave Plus does not require line-of-sight FreeWave Plus Wireless Remote Shutter alignment, as its radio Release. This device triggers your waves pass through and camera in either wired or wireless mode, around objects such as allowing you to trip the shutter without walls, windows, and floors.
-
Page 3: Safety Warnings
• Turn off the camera’s power before inserting or removing the remote cord. • Do not operate the FreeWave Plus in • Keep out of the reach of children. This the presence of flammable gases or device contains small parts which may •... -
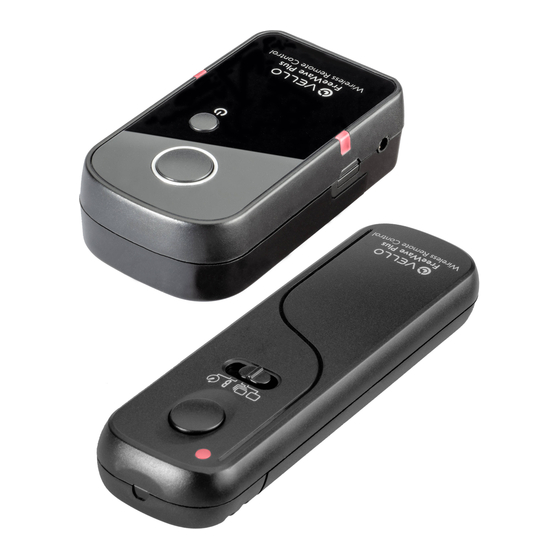
Page 4: Features Diagram
FEATURES DIAGRAM Confirmation LED Mode Selector Receiver Shutter Release Shutter Release Button Button Power Button Confirmation LEDs Single Shot Transmitter Continuous Shooting Battery Compartment Bulb Shooting Self Timer Shutter Release Port Battery Compartment... - Page 5 SETTING THE DEVICE CHANNEL AND INSERTING THE BATTERIES Set the DIP switches located in the battery compartments of the Transmitter and Receiver. The DIP switches set a different radio frequency (channel) for each Transmitter/ Receiver pair to prevent radio interference. Use any combination of the DIP switches so long as both the Transmitter and Receiver are set to the same position.
-
Page 6: Powering On And Off
POWERING ON & OFF Turn ON the Receiver: Press and hold There is no need for a power button the Power button for 2 seconds. The on the transmitter. The Transmitter LEDs will flash red at 2 second intervals to is always ready to fire and uses power indicate that the receiver is working. -
Page 7: Mounting The Receiver
MOUNTING THE RECEIVER If using the FreeWave wirelessly, mount the Receiver on your camera’s hot shoe, facing forwards or backwards. If your camera’s hot shoe is in use, you can mount the receiver to a bracket or cage via its mounting foot or 1/4-20 socket. With your camera and Receiver OFF, connect the shutter release cable’s sub-mini plug end to the Receiver, and... -
Page 8: Single Shot Mode
SINGLE SHOT MODE 1. Set the Transmitter and camera to Single Shot mode. 3. Press the Transmitter’s shutter release button halfway to wake or focus your camera (if set to Auto Focus).The LED will turn blue. 4. Fully depress the shutter button to take the photograph. -
Page 9: Continuous Mode
CONTINUOUS MODE 1. Set the transmitter to Continuous 3. A full press of the Transmitter’s To access your camera’s fastest drive Shooting. shutter button will trigger the camera speed: to take continuous photos at 1 second 2. Press the Transmitter’s shutter release 1. -
Page 10: Bulb Mode
BULB MODE 1. Set the Transmitter and camera to Bulb Shooting. 2. Press the Transmitter’s shutter release button halfway to wake or focus your camera (if set to Auto Focus). The LED will turn blue. 3. Fully depress the shutter button to begin the exposure. - Page 11 SELF TIMER MODE 1. Set the Transmitter to Self Timer mode. 2. Set your camera to the Single Shot setting. 3. Press the Transmitter’s shutter release button halfway to wake or focus your camera (if set to Auto Focus). The LED will turn blue.
- Page 12 WIRED RELEASE TRIGGER You can use the FreeWave Plus receiver as 3. Press the shutter release button fully a wired trigger and it can be used with the to take a photo. If your camera is receiver’s power turned off.
-
Page 13: Troubleshooting
This device complies with Part 15 of the Transmitter and Receiver, and change FCC Rules. Operation is subject to the Problems with the FreeWave Plus can the channel by rearranging the DIP following two conditions: usually be traced to the following most switches to a different combination, common causes. -
Page 14: Specifications
SPECIFICATIONS Transmitter Receiver Power 2 x AAA 2 x AAA Battery Life 1000 hr. 400 hr. Dimensions (L×W×H) 3.94 × 1.34 × .63 in. (100 × 34 × 16 mm) 2.7 × 1.5 × 1.02 in. (71 × 38 × 26 mm) Weight 29 g 25 g... -
Page 15: One-Year Limited Warranty
This VELLO product is warranted to the This warranty does not cover damage or number, and return the defective product to Vello along with the RMA number and proof of original purchaser to be free from defects defect caused by misuse, neglect, accident, purchase. - Page 16 All other trademarks are the property of their respective owners.
Need help?
Do you have a question about the FREEWAVE PLUS and is the answer not in the manual?
Questions and answers