Advertisement
Table of Contents
- 1 Key Features
- 2 Before You Begin
- 3 Safety Warnings
- 4 Features Diagram
- 5 Powering on & off
- 6 Mounting the Receiver
- 7 Single Shots/Wireless
- 8 Four Second Delay | Wireless
- 9 Continuous Mode
- 10 Continuous Mode at 1 Second Intervals
- 11 Bulb Mode (Long Exposure)
- 12 Single Shots/Wires
- 13 Camera Release Cables
- 14 Specifications & Troubleshooting
- 15 Fcc Compliance
- Download this manual
Advertisement
Table of Contents

Related Manuals for Vello FreeWave Plus


Summary of Contents for Vello FreeWave Plus
- Page 1 FreeWave Plus user Manual...
- Page 2 Your Vello FreeWave Plus camera around corners. to approach, such as wildlife. It also Wireless Remote Shutter Release The FreeWave Plus uses the 2.4GHz Kit contains: eliminates vibrations caused by pressing wireless frequency for extended your camera’s shutter release button Wireless Transmitter range and reduced interference.
-
Page 3: Key Features
Key Features 2.4GHz Radio Frequency: Reduced Multi-exposure: Take multiple shots with interference and improved wireless one press of the trigger. signal quality. Long Exposure: Control the length of the Extended Range: up to 100m (320 ft.) exposure remotely. 16 Possible Channels: One transmitter Multi-function: Trigger your camera can trigger multiple receivers. -
Page 4: Before You Begin
Any combination will work so long as the switches are set identically in both the Transmitter and Receiver of a single FreeWave Plus set. A total of 16 different combinations can be selected. Insert 2 AA batteries into both the... -
Page 5: Safety Warnings
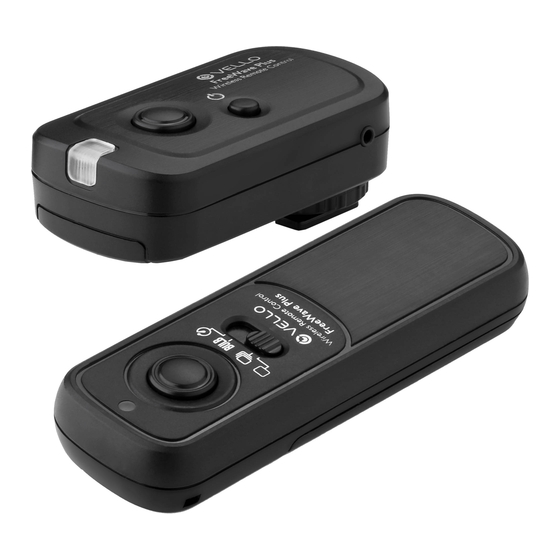
• Turn off the camera’s power before certain to align batteries with correct inserting or removing the remote cord. • Do not operate the FreeWave Plus in polarity. the presence of flammable gas or vapors. • Dispose used batteries, packaging, •... - Page 6 Features dIagraM Confirmation LED Confirmation LED Receiver Mode Selector Power Button Shutter Button Power Button Single Shot Transmitter Continuous Shooting Battery Compartment Bulb Shooting Self Timer Battery Compartment...
- Page 7 PoWerIng on & oFF Turn on the Receiver: Press and hold There is no need for a power button the Power button for 2 seconds. The on the transmitter. The Transmitter LED will flash red at 2 second intervals to is always ready to fire and uses power indicate that the receiver is working.
-
Page 8: Mounting The Receiver
MountIng the receIver If using the FreeWave wirelessly, mount the Receiver on your camera’s hot shoe, facing forwards or backwards. If your camera’s hot shoe is in use, you can use an accessory shoe to attach the Receiver to your camera, tripod, or other suitable surface. - Page 9 sIngle shots | WIreless 1. Turn on the Receiver by pressing and holding the Power button until the LED lights up. 2. Set the Transmitter to Single Shot. 3. Set your camera to the Single Shot setting. 4. Press and hold the Transmitter’s shutter release button halfway to wake or focus your camera (if set to Auto Focus).The LED will turn green.
- Page 10 Four second delay | WIreless 5. Fully depress the shutter button on 1. Turn on the Receiver by pressing and the Transmitter. The LED will turn red holding the Power button until the and the shutter will be triggered after a LED lights up.
- Page 11 contInuous Mode | WIreless 4. Press and hold the Transmitter’s continuous photos until you half press 1. Turn on the Receiver by pressing and shutter release button halfway to wake or fully press the shutter button again. holding the Power button until the or focus your camera (if set to Auto LED lights up.
- Page 12 contInuous Mode at 1 second Intervals | WIreless 3. Set your camera to the Single Shot 5. A full press of the Transmitter’s 1. Turn on the Receiver by pressing and setting. shutter button will trigger the camera holding the Power button until the LED to take continuous photos at 1 second lights up.
- Page 13 BulB Mode (long exPosure) | WIreless 5. Fully depress the Transmitter’s shutter 1. Turn on the Receiver by pressing and button. The LED on the Transmitter holding the Power button until the LED will flash red and the LED on the lights up.
- Page 14 | WIred The FreeWave Plus Receiver can also 1. Press and hold the Receiver’s shutter be used as a wired, off-camera shutter release button halfway to wake or focus release. your camera (if set to Auto Focus). The confirmation LED will not display,...
- Page 15 contInuous Mode | WIred your camera (if set to Auto Focus). 3. A full press of the Receiver’s shutter 1. Set your camera to the Continuous The confirmation LED will not display, button will trigger the camera to take Shots setting. so be sure to manually focus or allow continuous photos until you release the 2.
- Page 16 BulB Mode (long exPosure) | WIred 1. Set your camera to Bulb mode. 2. Press and hold the Receiver’s shutter release button halfway to wake or focus your camera (if set to Auto Focus). The confirmation LED will not display, so be sure to manually focus or allow the camera to Auto Focus without confirmation.
- Page 17 / d300s / d700 / d800 / d800e Fuji s3pro / s5Pro Kodak dcs-14n The FreeWave Plus includes a Camera RCC-C1 – Canon eos 30/ 33/ 50/ 300/ / 60d/ digital rebel: (300d) / xt (350d) / xti (400d) / xsi (450d) / xs (1000d)
- Page 18 & trouBleshootIng Troubleshooting Transmitter Receiver Problems with the FreeWave Plus can usually be Power 2 x AAA 2 x AAA traced to the following most common causes. Perform the following steps to diagnose and Battery Life 3 Years 300 Hours...
-
Page 19: Fcc Compliance
Fcc coMPlIance This equipment generates, uses, and If this equipment does cause harmful Operation is subject to the following can radiate radio frequency energy, and interference to radio or television two conditions: if not installed and used in accordance reception, which can be determined by 1. - Page 20 Limited one-Year Warranty vello provides a limited warranty that this product is free from defects in materials and workmanship to the original purchaser under normal use for a period of one (1) year from the original purchase date. vello's responsibility with respect to this limited warranty shall be limited solely to repair or replacement, at its option, of any product which fails during normal consumer use.
Need help?
Do you have a question about the FreeWave Plus and is the answer not in the manual?
Questions and answers
my vello freewave plus will not trigger my nikon z711 and I do have both transmitter and receiver on the same channel