Table of Contents
Advertisement
Advertisement
Table of Contents

Related Manuals for Vello ShutterBoss II


Summary of Contents for Vello ShutterBoss II
- Page 1 SHUTTERBOSS II USER MANUAL...
- Page 2 INTRODUCTION The Vello ShutterBoss II features advanced timer functionality and control for shooting self-timed photos, long exposures, or for use as an intervalometer. This makes it easy to program in specific delayed shutter-release times, lengthy exposure times, or timed intervals between a sequence of shots.
- Page 3 PRECAUTIONS • Do not disassemble or perform any • Avoid operating this device in the presence • Keep out of reach of children. This device unauthorized modifications. Use only of magnetic fields. A strong static charge contains small parts which may pose a with compatible devices specified in this or electromagnetic field generated by choking hazard.
-
Page 4: Features Diagram
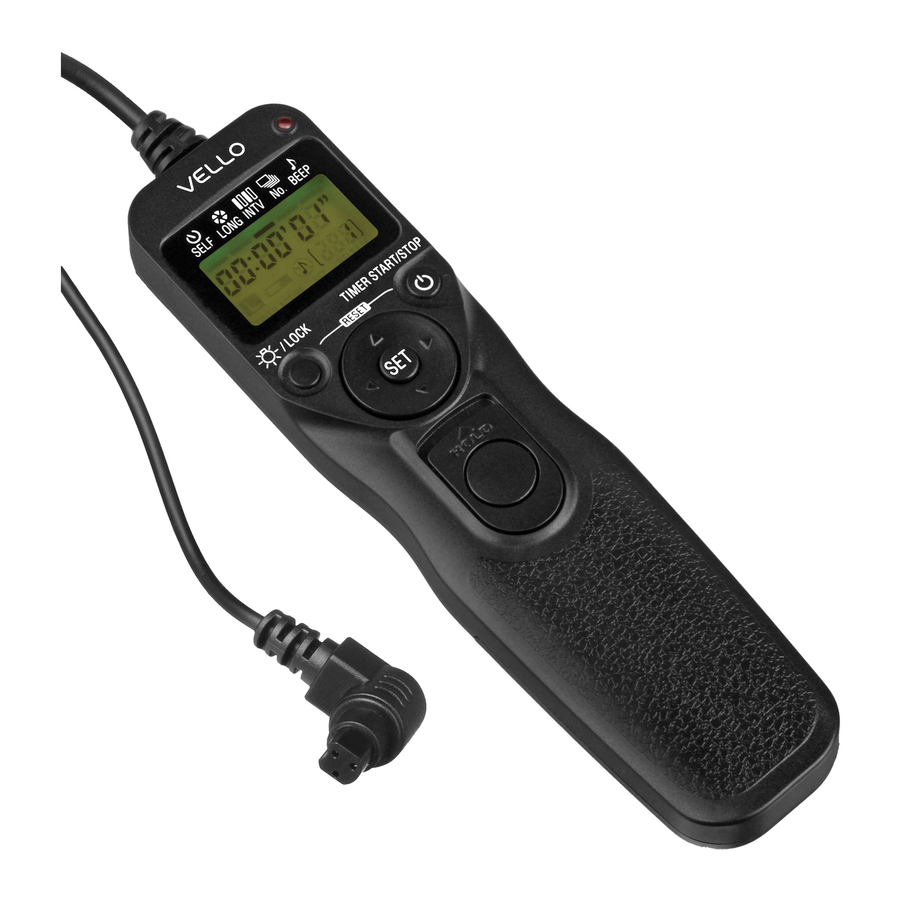
FEATURES DIAGRAM Confirmation LED Display Panel Connector Cable Power On/Off - Timer Start/Stop button Shutter Release Button Hold switch Eyelet For Strap Or Lanyard Backlight/Lock Button Set Button Control Selection Button Battery compartment *Includes two AAA batteries cover... -
Page 5: Display Panel
DISPLAY PANEL Exposure Function Number of Shots Function Interval Function Self-Timer Function Audible Beep Function SELF LONG INTV No. BEEP Function Cursor Time Display Low battery Indicator Audible Beep Indicator LOCK Indicator Number of Shots Indicator TIMER ACTIVE SET RELEASE RELEASE Indicator TIMER/ACTIVE Indicator SET Indicator... -
Page 6: Inserting The Batteries
INSERTING THE BATTERIES POWERING ON/OFF 1: Slide and remove the battery Press and hold the button for compartment cover. approximately 3 seconds to power the remote on and off. 2: Insert the two included AAA batteries as shown, following the diagrams inside the battery compartment. -
Page 7: Connecting The Remote
CONNECTING THE REMOTE The ShutterBoss comes in a variety of models that are compatible with many different cameras. The only difference in the ShutterBoss models is the connector on the end of the cable. Your ShutterBoss and camera may look different from those pictured in this guide. -
Page 8: Backlight Button
CONTROLS Backlight Button Timer Start/Stop Button The Timer Start/ Stop button starts Press the button to activate the LCD’s RESET backlight. It will remain lit for about 6 and stops any of the timer functions and seconds. sequence of shots. Lock Button Reset The LOCK button locks all controls except... -
Page 9: Directional Pad
Set Button Shutter Release Button The SET button enables you to enter and This button triggers your camera to take a HOLD adjust timer functions and settings. shot. Press SET once to engage settings. Press once for a single shot, or press and Information displayed on the LCD will begin hold to keep the shutter open for longer to blink. -
Page 10: Manual Release
MANUAL RELEASE The simplest way of using the ShutterBoss 1. Adjust your camera settings, such as is as a manual release. You can trigger your exposure mode, shutter speed, and camera by pressing the remote’s shutter focus and shooting modes. release button. -
Page 11: Using The Timer Functions
USING THE TIMER FUNCTIONS Cursor The ShutterBoss’s internal timer functions With the ShutterBoss’s timer controls, you are ideal for taking self-timed photos, long can select any combination of the following: exposures, or for use as an intervalometer. SELF LONG INTV No. BEEP SELF (Delay): Time before a sequence Note: Every camera handles remote is started or a shot is triggered. -
Page 12: Activity Indicators
Activity Indicators Release When RELEASE is blinking on the LCD, it Timer Active means the remote is triggering the camera’s SELF LONG INTV No. BEEP When TIMER ACTIVE is blinking on the shutter. LCD, it means that a timed function and Note: Before you adjust any timer settings, sequence is running. - Page 13 Cursor SELF – Timed Delay 1. Press the arrows to position the cursor beneath SELF. SELF allows you to set a timed delay before SELF LONG INTV No. BEEP triggering a single shot or sequence of shots. 2. Press the SET button to change You can select a self-timed delay from 1 the delayed-timer settings.
- Page 14 Cursor LONG – Exposure Time 1. Set your camera’s exposure mode to Bulb. LONG sets the exposure time for each 2. Press the arrows to position the SELF LONG INTV No. BEEP shot. This can be much longer than the cursor beneath LONG.
- Page 15 Cursor INTV – Timed Interval 1. Press the arrows to position the cursor beneath INTV. INTV is the time between shots in the SELF LONG INTV No. BEEP sequence. You can select intervals from 1 2. Press the SET button to change the second to 99 hours 59 minutes 59 seconds, interval time settings.
- Page 16 Cursor No. – Shot Count 1. Press the arrows to position the cursor beneath No. No. is the number of shots selected for SELF LONG INTV No. BEEP the sequence. You can trigger the camera’s 2. Press the SET button to change the shot- shutter up to 399 times or infinite.
- Page 17 Cursor Beep 1. Use the button to move the cursor under BEEP. The ShutterBoss will emit a beep to confirm SELF LONG INTV No. BEEP settings and for the last three seconds of a 2. Press the SET button. The beep indicator countdown delay or interval.
-
Page 18: Specifications
SPECIFICATIONS FCC COMPLIANCE This device complies with Part 15 of the FCC Supported Cameras Visit www.vellogear.com Rules.Operation is subject to the following Self-Timer Delay 0 sec. to 99 hr. 59 min. 59 sec., in 1 sec. increments two conditions: Exposure Range 0 sec. -
Page 19: One-Year Limited Warranty
ONE-YEAR LIMITED WARRANTY This VELLO product is warranted to the original purchaser to be free MERCHANTABILITY OR FITNESS FOR A PARTICULAR PURPOSE. This from defects in materials and workmanship under normal consumer use warranty provides you with specific legal rights, and you may also have for a period of one (1) year from the original purchase date or thirty (30) additional rights that vary from state to state. - Page 20 www.vellogear.com...
Need help?
Do you have a question about the ShutterBoss II and is the answer not in the manual?
Questions and answers