Table of Contents
Advertisement
Quick Links
Advertisement
Table of Contents

Related Manuals for Renkforce RF-ARA-300


Summary of Contents for Renkforce RF-ARA-300
- Page 1 Operating Instructions RF-ARA-300 Car Radio Item No. 2373345...
-
Page 2: Table Of Contents
Table of contents Page Introduction ................................3 Description of symbols ............................3 Intended use ................................4 Delivery content ..............................4 Safety information ..............................5 Features and functions ............................6 Overview ................................7 Mechanical installation ............................8 a) Installation into the radio recess ........................8 b) Removal ................................9 c) DAB antenna ..............................9 Electrical connection ............................10 a) Connecting the antennas .......................... -
Page 3: Introduction
1. Introduction Dear customer, Thank you for purchasing this product. This product complies with statutory, national and European regulations. To ensure that the product remains in this state and to guarantee safe operation, always follow the instructions in this manual. These operating instructions are part of this product. -
Page 4: Intended Use
3. Intended use With the Renkforce car radio, you can receive radio programmes in vehicles, play audio data from suitable media and amplify and play audio signals. It also serves as a hands-free set and a playback device for Bluetooth -capable ®... -
Page 5: Safety Information
5. Safety information Read the operating instructions carefully and observe in particular the safety instructions. If you do not follow the safety information and information on proper handling in these operating instructions, we will assume no liability for any resulting personal injury or damage to property. Such cases will invalidate the warranty/guarantee. -
Page 6: Features And Functions
6. Features and functions • DAB+ receiver for digital radio reception • FM radio module with RDS function • USB and SD interface • Bluetooth hands-free set ® • Music playback via Bluetooth interface (A2DP) ® • High output power (4 x 40 W max.) •... -
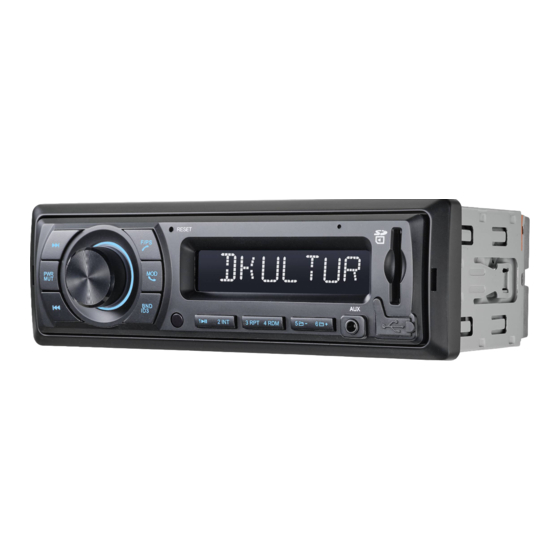
Page 7: Overview
7. Overview 2 3 4 RESET F/PS 2 INT 3 RPT 4 RDM 12 13 14 15 16 17 18 19 13 2/INT button button 14 3/RPT button 2 F/PS/ button 15 4/RDM button 3 MOD/ button 16 5/ button 4 RESET button 17 6/ button... -
Page 8: Mechanical Installation
8. Mechanical installation An installation cut-out for the car radio is provided in most vehicles. The choice of the installation location depends on safety aspects. Therefore we recommend that you actually install the car radio in this place. The device requires a DIN installation cut-out with the dimensions 182 x 53 mm; these dimensions are standardised and most vehicle manufacturers comply with them. -
Page 9: B) Removal
b) Removal • Unlock the device by inserting the two unlocking keys into the slots on the side of the device frame. • Carefully pull the car radio out of the installation frame. • Loosen all plug connectors on the back of the device. c) DAB antenna For adhesive installation, a minimum temperature of 15 °C is required. -
Page 10: Electrical Connection
• The antenna should be mounted within the upper corner of the windscreen and A-pillar (at the top right from the driver's perspective). • Use the picture below to determine the mounting position. • The black electronics box and antenna wire should be attached to the windscreen and the copper-coloured ground plane to a metal part of the windscreen frame. -
Page 11: A) Connecting The Antennas
In most vehicles, the cables for the electric connection and the connection of the speakers have been laid directly to the installation recess. If this is not the case, please ensure that any cables placed later are secured by the respective on-board fuses (see vehicle operation manual). -
Page 12: D) Connecting The Speakers And The Power Supply
d) Connecting the speakers and the power supply Vehicles equipped with an ISO plug can be connected directly to the ISO terminal (21), provided the same plug configuration applies (please check in advance!). If the plug configuration differs, a commercially available vehicle- specific adapter should be used. -
Page 13: Operation
10. Operation Do not put the device into operation until you have familiarised yourself with the functions and these operating instructions. Check all the connections again. When you have done so, reconnect the negative pole of the car battery. a) General operation PWR/MUT button (8) •... -
Page 14: B) Menu Settings
RESET function • This button resets all the settings to factory defaults. • Use a pointed object such as a straightened paper clip to press the RESET button (4) in the following cases: - when you have completed the installation and connection - when the device does not respond to any button presses - when the display shows undefined characters b) Menu settings... - Page 15 • PTY search: The PTY search function enables to search for stations with a pre-defined programme type (PTY) only (see “RDS as reception concept”). PTY OFF >> PTY search switched off PTY SPEECH >> PTY search for programmes with the speech programme type PTY MUSIC >>...
- Page 16 • EQ - EQUALIZER EQ OFF >> equaliser off POP >> pop music preset ROCK >> rock music preset CLASSIC >> classical music preset JAZZ >> jazz music preset FLAT >> equaliser on, linear frequency response • DX/LOCAL DX >> All stations are received. LOCAL >>...
-
Page 17: C) Using The Dab Radio
c) Using the DAB radio Station search • If you cannot receive a DAB station after selecting DAB mode, press and hold down the BND/ID3 button (11). • After that, the device searches for stations in the DAB reception area and saves those found in the station list. •... -
Page 18: D) Using The Fm Radio
d) Using the FM radio RDS as reception concept The abbreviation “RDS” stands for Radio Data System, i.e. additional inaudible coded information is transmitted via the RDS station. Your car radio is a device that can evaluate these coded data that are transmitted by most radio stations. The following essential additional data is transmitted: - Programme Identification (PI) - Traffic Programme (TP) - Page 19 Programme Type (PTY) This code gives the receiver information about the type of the transmitted programme (e.g. sports, classic, news etc.). The listener can select his favourite programme purposefully. A national disaster alarm can also be transmitted this way. However, not all radio stations offer the PTY service. Therefore, when you leave the transmission area, the RDS system favourably automatically switches to a similar station that can be better received.
-
Page 20: E) Usb/Memory Card Operation
F/PS/ button(2) • Keep this button pushed to activate automatic storage of stations. This function enables automatic assignment of all stations with a strong signal to station buttons 1-6 (12-17). • After this procedure, the stored stations are played for a few seconds. •... - Page 21 Buttons (1) and These buttons enable playback of individual tracks or get to a specific section within a track. The arrows on the buttons indicate whether it is a rewind or fast forward. • Briefly press the buttons to move to the next or previous track. •...
-
Page 22: F) Bluetooth Operation
• In your mobile phone settings, activate search for nearby Bluetooth devices. ® • Once the car radio has been found, its name (RF-ARA-300) appears on the display of your Bluetooth device. ® • Connect your mobile phone to the car radio. - Page 23 Accepting/declining an incoming phone call • When you receive an incoming phone call, display (5) shows the caller's number. If the caller has blocked their calling line identification or the mobile phone net does not support this feature, the caller ID will not be displayed. •...
-
Page 24: Maintenance And Cleaning
11. Maintenance and cleaning • Regularly check the technical condition of the car radio, e.g. for damage to the connecting cables or the housing. • If you suspect that safe operation is no longer possible, stop using the product immediately and prevent unauthorised use. - Page 25 Playback only through one speaker • The balance control is wrongly adjusted. Adjust the balance control as described. • The speaker connection has come loose. Remove the device and/or speakers and check the connections. Playback only through the front or rear speakers •...
-
Page 26: Declaration Of Conformity (Doc)
13. Declaration of Conformity (DOC) Conrad Electronic SE, Klaus-Conrad-Straße 1, D-92240 Hirschau, hereby declares that this product conforms to Directive 2014/53/EU. Click on the following link to read the full text of the EU declaration of conformity: www.conrad.com/ downloads Select a language by clicking on the corresponding flag symbol, and then enter the product order number in the search box. -
Page 27: Technical Data
15. Technical data Operating voltage ..........12 V/DC Fuse ..............vehicle blade fuse 10 A Output power ............4 x 40 W (max.) Speaker impedance ..........4 - 8 ohms FM reception range ..........87.5 - 108.0 MHz DAB+ reception range ........Band III 174 - 240 MHz Station memory slots ........24 (18x FM + 6x DAB) Bluetooth version ..........4.2 BR/EDR... - Page 28 This is a publication by Conrad Electronic SE, Klaus-Conrad-Str. 1, D-92240 Hirschau (www.conrad.com). All rights including translation reserved. Reproduction by any method, e.g. photocopy, microfilming, or the capture in electronic data processing systems require the prior written approval by the editor. Reprinting, also in part, is prohibited. This publication represent the technical status at the time of printing.
Need help?
Do you have a question about the RF-ARA-300 and is the answer not in the manual?
Questions and answers