Advertisement
Quick Links
Advertisement

Related Manuals for Kogan KA23LSSFRYA


Summary of Contents for Kogan KA23LSSFRYA
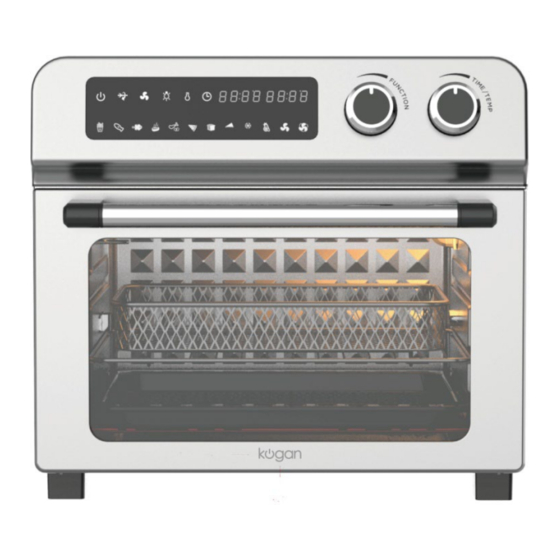
- Page 1 23L 1700W DIGITAL AIR FRYER OVEN (STAINLESS STEEL) KA23LSSFRYA...
-
Page 3: Safety And Warnings
Please handle this product with care and inspect it regularly to ensure it is in good working order. If the product, power supply cord or plug shows any signs of damage: stop use, unplug and contact Kogan.com support. When using an electrical appliance, basic safety precautions should always be followed, including the following: •... - Page 4 Contact kogan.com for examination, repair, or adjustment. • The use of accessory attachments not recommended by Kogan.com may cause injury. • Do not use outdoors.
- Page 5 • Extreme caution must be used when moving an appliance containing hot oil or other hot liquids. • To disconnect, press the power button to turn off the appliance and then remove plug from wall outlet. • Do not force the power cord to bend or stretch. If the power cord is damaged, stop using the appliance immediately and replace the cord before the appliance is used again.
- Page 6 OVERVIEW Rotisserie Spit Assembly Fetch Rack Wire Rack Removable Crumb Tray Baking Pan Air Fryer Oven Air Fryer Basket Rolling Cage...
- Page 7 Rotisserie Shaft, Forks & Set Screws This is used for roasts and whole chickens. • Force the shaft lengthwise through the meat so that it is centred on the shaft. • Slide the forks onto the shaft from either end into the meat, and then lock them in place with the set screws, aligning them with the indentations on the shaft.
- Page 8 Functions Power Button Start or stop the oven after setting a function Rotating Control Button Control the rotating. Fan Speed Adjusting Button Adjust desired fan speed. The icon will be illuminated when the machine is on low fan speed. The icons will be illuminated when the machine is on high fan speed.
- Page 9 Program Overview Heating elements Temperature Time Function Icon Fan Speed (°C) (minutes) Bottom Fries 4 ON 2 OFF 2 ON Fish 2 ON Rotisseries 4 ON 2 OFF Air broil 2 ON 2 ON Air roast 4 ON 2 OFF Pizza 2 ON 2 ON...
-
Page 10: Operation
OPERATION Before First Use Unpack the appliance and remove all packaging materials. Clean the appliance according to the Cleaning and Care section of this manual. Place the appliance, on a flat, stable, level surface. Ensure that the oven is 2 to 4 inches away from the wall or any other objects. - Page 11 Fish Place food on the wire rack; then place wire rack in middle rack position. Connect the oven to the power supply, the oven light is off. Under this condition, turning any knob can activate appliance by entering standby mode. Turn the Function knob to select the Fish function.
- Page 12 Air Roast Place the baking pan in the middle position of the oven Connect the oven to the power supply, the oven light is off. Under this condition, turning any knob can activate appliance by entering standby mode. Turn the Function knob to select the Air Roast function. Under this mode, time, temperature, and fan speed display as below.
- Page 13 Pizza Place pizza on the wire rack; then place the wire rack in the middle rack position. Connect the oven to the power supply, the oven light is off. Under this condition, turning any knob can activate appliance by entering standby mode. Turn the Function knob to select the Pizza function.
- Page 14 Defrost Place the baking pan in the middle position of the oven Connect the oven to the power supply, the oven light is off. Under this condition, turning any knob can activate appliance by entering standby mode. Turn the Function knob to select the Defrost function. Under this mode, time, temperature, and fan speed display as below.
- Page 15 Rotisseries Place one rotisserie fork on the end of the rotisserie spit, with the fork facing the centre, and tighten the rotisserie screw. Slide the solid end of the rotisserie shaft through the centre of the food to be cooked. Place the other fork on the other end of the spit with the fork facing the food to be cooked.
- Page 16 Trussing Poultry Place the poultry on the cutting board breast up. Place twine under the wings then pull the twine evenly between legs and breast. Cross the twine. Run the twine under the end of the legs. Wrap the twine up and around legs, bring them together then tie the twine into a knot and a bow to secure.
- Page 17 Run rotisserie rod through the cavity of the poultry. Secure the rotisserie fork between legs and into to back of the poultry then tighten down the screw on the rotisserie fork. Place the other rotisserie on the rotisserie rod already inserted. Slide down and secure the rotisserie fork into both side of the breast.
-
Page 18: Cleaning And Care
CLEANING & CARE • Unplug your appliance and allow it to completely cool before cleaning. Do not use abrasive cleaners, as they will damage the finish. Simply wipe the exterior with a clean, damp cloth and dry thoroughly. Apply the cleaning agent to a cloth, not directly onto the appliance. - Page 19 NOTES...
- Page 20 Need more information? We hope that this user guide has given you the assistance needed for a simple set-up. For the most up-to-date guide for your product, as well as any additional assistance you may require, head online to help.kogan.com...
Need help?
Do you have a question about the KA23LSSFRYA and is the answer not in the manual?
Questions and answers