
Related Manuals for Kramer DSP-1


Summary of Contents for Kramer DSP-1
- Page 1 USER MANUAL MODEL: DSP‑1 Digital Sound Processor P/N: 2900-301163 Rev 2 www.kramerAV.com...
-
Page 2: Table Of Contents
Setting the Audio Output Parameters Setting Device Parameters Managing Web Page Security Viewing the About Page Upgrading the Firmware Technical Specifications DSP‑1 Performance Graphs Default Communication Parameters Protocol 3000 Understanding Protocol 3000 Kramer Protocol 3000 Syntax Protocol 3000 Commands DSP‑1 – Contents... -
Page 3: Introduction
Safety Instructions Caution: There are no operator serviceable parts inside the unit. Warning: Use only the Kramer Electronics power supply that is provided with the unit. Warning: Disconnect the power and unplug the unit from the wall before installing. DSP‑1 – Introduction... -
Page 4: Overview
European Advanced Recycling Network (EARN) and will cover any costs of treatment, recycling and recovery of waste Kramer Electronics branded equipment on arrival at the EARN facility. For details of Kramer’s recycling arrangements in your particular country go to our recycling pages at www.kramerav.com/support/recycling. -
Page 5: Typical Applications
Attach the rubber feet and place the unit on a flat surface. • Fasten a bracket (included) on each side of the unit and attach it to a flat surface. For more information go to www.kramerav.com/downloads/DSP-1. • Mount the unit in a rack using the recommended rack adapter (see www.kramerav.com/product/DSP-1). -
Page 6: Defining Dsp-1 Digital Sound Processor
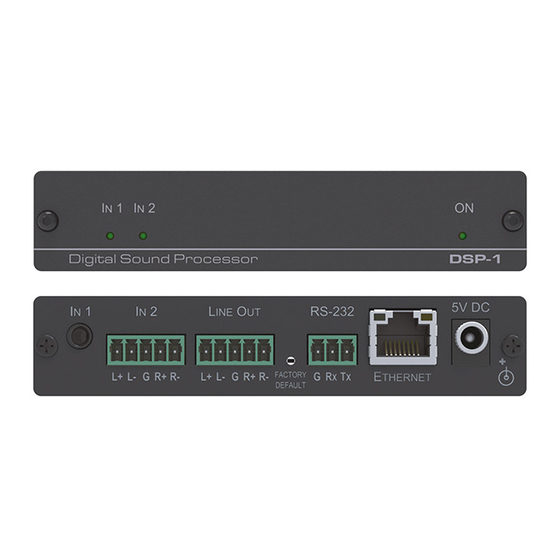
Kramer Electronics Ltd. Defining DSP‑1 Digital Sound Processor This section defines DSP‑1. Figure 1: DSP‑1 Digital Sound Processor Feature Function IN 1 LED Lights green when a signal is present on IN 1. IN 2 LED Lights green when a signal is present on IN 2. -
Page 7: Connecting Dsp-1
Kramer Electronics Ltd. Connecting DSP‑1 Always switch off the power to each device before connecting it to your DSP‑1. After connecting your DSP‑1, connect its power and then switch on the power to each device. Figure 2: Connecting to the DSP‑1 Rear Panel To connect DSP‑1 as illustrated in Figure 2:... -
Page 8: Connecting To Dsp-1 Via Rs-232
Kramer Electronics Ltd. Connecting to DSP‑1 via RS-232 You can connect to the DSP‑1 via an RS-232 connection to the RS-232 port using, for example, a PC. Connect the RS-232 terminal block on the rear panel of the DSP‑1 to a PC/controller, as... - Page 9 Kramer Electronics Ltd. The Local Area Connection Properties window for the selected network adapter appears as shown in Figure Figure 4: Local Area Connection Properties Window 4. Highlight either Internet Protocol Version 6 (TCP/IPv6) or Internet Protocol Version 4 (TCP/IPv4) depending on the requirements of your IT system.
- Page 10 Kramer Electronics Ltd. Figure 6: Internet Protocol Version 6 Properties Window 6. Select Use the following IP Address for static IP addressing and fill in the details as shown in Figure For TCP/IPv4 you can use any IP address in the range 192.168.1.1 to 192.168.1.255 (excluding 192.168.1.39) that is provided by your IT department.
-
Page 11: Using The Web Pages
Kramer Electronics Ltd. Using the Web Pages • The web pages enable you to control the DSP‑1 via the Ethernet and enable performing the following operations: • Setting the Audio Output Parameters on page 11. • Setting Device Parameters on page 12. - Page 12 Kramer Electronics Ltd. If the Web pages are password protected, the Authentication window appears: Figure 9: Using the Embedded Web Pages – Authentication Window 3. Enter the User Name and Password (Admin and Admin by-default) and click OK. The Output Settings page appears.
-
Page 13: Setting The Audio Output Parameters
Kramer Electronics Ltd. Setting the Audio Output Parameters The Speaker Output Mixer enables performing the following operations: • Mixing the Input Signal Levels on page 11. • Setting Equalization Levels on page 11. • Setting the Master Volume and Balance on page 11. -
Page 14: Setting Device Parameters
Kramer Electronics Ltd. Setting Device Parameters The Device Settings Web page shows the device details, such as name, MAC address and firmware version. It also allows the following functions: • Changing the name of the unit by typing the name in the Unit name text box and clicking Set next to the name. - Page 15 Kramer Electronics Ltd. 2. Set DHCP to ON or OFF. 3. If DHCP is set to OFF, change any of the parameters (IP Address, Netmask and/or Gateway), if required. 4. Click Set. • After changing the IP address, reload the web page with the new IP address.
-
Page 16: Managing Web Page Security
Kramer Electronics Ltd. Managing Web Page Security Use the Authentication page to set Web access permission. To access Web pages without using the password: 1. In the Navigation pane, click Security. The Authentication page appears (see Figure 12). Figure 12: Authentication Page 2. -
Page 17: Viewing The About Page
A message indicating that the password was changed successfully appears. 10. Click OK. The web pages are locked Viewing the About Page The About page lets you view the web page version and Kramer Electronics Ltd details. DSP‑1 – Using the Web Pages... -
Page 18: Upgrading The Firmware
You can upgrade the DSP‑1 via the Ethernet or RS-232 using Kramer K-UPLOAD tool. The latest firmware version and the latest version of K-UPLOAD and installation instructions can be downloaded from the Kramer Web site at www.kramerav.com/downloads/DSP-1. DSP‑1 – Upgrading the Firmware... -
Page 19: Technical Specifications
Net Weight 0.2kg (0.4lbs) Shipping Weight 0.6kg (1.3lbs) approx. Accessories Included Power adapter and cord Optional For optimum range and performance use the recommended Kramer cables available www.kramerav.com/product/DSP-1 Specifications are subject to change without notice at www.kramerav.com DSP‑1 – Technical Specifications... -
Page 20: Dsp-1 Performance Graphs
Kramer Electronics Ltd. DSP‑1 Performance Graphs The following graphs present the DSP‑1 performance. DSP‑1 Frequency Response Figure 14: Frequency Response DSP‑1 Signal to Noise Ratio Figure 15: Signal to Noise Ratio DSP‑1 – Technical Specifications... - Page 21 Kramer Electronics Ltd. DSP‑1 THD + N Figure 16: THD + N DSP‑1 Crosstalk Figure 17: Crosstalk DSP‑1 – Technical Specifications...
-
Page 22: Default Communication Parameters
Kramer Electronics Ltd. Default Communication Parameters RS-232 Baud Rate: 115,200 Data Bits: Stop Bits: Parity: None Command Format: ASCII #X-AUD-LVL 1,2,-10 Example (Change the volume of input 2 to -10 DB): TCP/IP Parameters IP Address: 192.168.1.39 Subnet mask: 255.255.000.000 Default gateway: 192.168.0.1... -
Page 23: Protocol 3000
PC to the serial or Ethernet port, depending on your device. To enter CR press the Enter key (LF is also sent but is ignored by the command parser). Commands sent from various non-Kramer controllers (e.g., Crestron) may require special coding for some characters (such as, /X##). For more information, refer to your controller’s documentation. -
Page 24: Understanding Protocol 3000
Kramer Electronics Ltd. For more information about Protocol 3000 commands, see: • Understanding Protocol 3000 on page 22. • Kramer Protocol 3000 Syntax on page 23. • Protocol 3000 Commands on page 24. Understanding Protocol 3000 Protocol 3000 commands are structured according to the following: •... -
Page 25: Kramer Protocol 3000 Syntax
Kramer Electronics Ltd. Kramer Protocol 3000 Syntax The Kramer Protocol 3000 syntax uses the following delimiters: • CR = Carriage return (ASCII 13 = 0x0D) • LF = Line feed (ASCII 10 = 0x0A) • SP = Space (ASCII 32 = 0x20) Some commands have short name syntax in addition to long name syntax to enable faster typing. -
Page 26: Protocol 3000 Commands
Kramer Electronics Ltd. Protocol 3000 Commands This section includes the following commands: • System Commands on page 24. • Audio Commands on page 28. • Communication Commands on page 34. System Commands All devices running Protocol 3000 use these commands. - Page 27 Kramer Electronics Ltd. BUILD-DATE? Functions Permission Transparency – – – Set: BUILD-DATE? Get: End User Public Description Syntax – – Set: #BUILD-DATE?CR Get: Get device build date Response ~nn@BUILD-DATESPdateSPtimeCR LF Parameters date – Format: YYYY/MM/DD where YYYY = Year, MM = Month, DD = Day time –...
- Page 28 Kramer Electronics Ltd. MODEL? Functions Permission Transparency – – – Set: MODEL? Get: End User Public Description Syntax – – Set: #MODEL?CR Get: Get device model Response ~nn@MODELSPmodel_nameCR LF Parameters model_name – string of up to 19 printable ASCII chars...
- Page 29 Kramer Electronics Ltd. Functions Permission Transparency – – – Set: Get: End User Public Description Syntax – – Set: #SN?CR Get: Get device serial number Response ~nn@SNSPserial_numberCR LF Parameters serial_number – 14 decimal digits, factory assigned K-Config Example “#SN?”,0x0D NAME...
- Page 30 Kramer Electronics Ltd. Audio Commands These commands are used by audio devices running Protocol 3000. Command Description AUD-FILTER Set/get filter/state AUD-IN-CONF Set/get threshold and time AUD-LVL Set/get audio level in specific amplifier stage AUD-MIX Set/get mixer level AUD-SIGNAL? Get audio input signal status...
- Page 31 Kramer Electronics Ltd. AUD-IN-CONF Functions Permission Transparency Set: AUD-IN-CONF End User Public Get AUD-IN-CONF? End User Public Description Syntax #AUD-IN- Set: Set threshold and time to indicate CONFSPChannel,ThresholdDbLevel,TrigTimeDelayCR when signal is presents or not. #AUD-IN-CONF?CRChannel Get: Get threshold and time...
- Page 32 Kramer Electronics Ltd. AUD-LVL Functions Permission Transparency AUD-LVL Set: End User Public AUD-LVL? Get: End User Public Description Syntax #AUD-LVLSPstage,channel,volume,mutebehaviorCR Set: Set volume level #AUD-LVL?SPstage,channelCR Get: Get volume level Response ~nn@AUD-LVLSPstage,channel,volumeCR LF Parameters stage – 1 (For output processing) channel – 1 (LINE OUT) volume –-80db to 10dB (Set volume level), -- (Decrease volume), ++ (Increase volume) or by a set dB...
- Page 33 Response ~nn@BALANCESPchannel,balance_levelCR LF Parameters channel – 1 (LINE OUT) balancelevel – -15 to +15 (audio parameter in Kramer units, minus sign precedes negative values) ++ increase current value -- decrease current value K-Config Example Set the LINE OUT balance to +12: “#BALANCE 1,12”,0x0D...
- Page 34 Kramer Electronics Ltd. EQ-FREQ Functions Permission Transparency EQ-FREQ Set: End User Public EQ-FREQ? End User Public Description Syntax #EQ- FREQSPStage,Channel,EqType,EqFreqCR Set: Set equalizer frequency #EQ- FREQ?SPStage,Channel,EqTypeCR Get: Get equalizer frequency Response FREQSPStage,Channel,EqType,EqFreqCR LF ~nn@EQ- Parameters Stage – 1 (Output) Channel – 1 (LINE OUT) EqType –...
- Page 35 Kramer Electronics Ltd. EQ-Q Functions Permission Transparency EQ-Q Set: End User Public EQ-Q? End User Public Description Syntax #EQ-QSPChannel,EqType,Q_levelCR Set: Set Q level #EQ-Q?SPChannel,EqTypeCR Get: Get Q level Response ~nn@EQ-QSPChannel,EqType,Q_levelCR LF Parameters Channel – 1 (LINE OUT) EqType – 0 (Bass), 1 (Middle), 2 (Treble) Q_level –...
- Page 36 Kramer Electronics Ltd. Communication Commands These commands are used by network devices running Protocol 3000. Command Description NET-CONFIG Set/get a network configuration ETH-PORT Set/get Ethernet port protocol NET-DHCP Set/get DHCP mode NET-MAC? Get MAC address NET-CONFIG Functions Permission Transparency NET-CONFIG...
- Page 37 Kramer Electronics Ltd. NET-DHCP Functions Permission Transparency NET-DHCP Set: Administrator Public NET-DHCP? Get: End User Public Description Syntax #NET-DHCPSPmodeCR Set: Set DHCP mode #NET-DHCP?CR Get: Get DHCP mode Response ~nn@NET-DHCPSPmodeCR LF Parameters mode – 0 (do not use DHCP. Use the IP address set by the factory or the NET-IP command), 1 (try to use DHCP.
- Page 38 This limited warranty gives you specific legal rights, and you may have other rights which vary from country to country or state to state. This limited warranty is void if (i) the label bearing the serial number of this product has been removed or defaced, (ii) the product is not distributed by Kramer Electronics or (iii) this product is not purchased from an authorized Kramer Electronics reseller.
- Page 39 SAFETY WARNING Disconnect the unit from the power supply before opening and servicing For the latest information on our products and a list of Kramer distributors, visit our Web site where updates to this user manual may be found. We welcome your questions, comments, and feedback.
Need help?
Do you have a question about the DSP-1 and is the answer not in the manual?
Questions and answers