Advertisement
DSP-1 Quick Start Guide
This guide helps you install and use your DSP-1 for the first time.
Go to
upgrades are available.
Scan for full manual
Step 1: Check what's in the box
DSP-1 Digital Sound Processor
1 Power adapter and cord
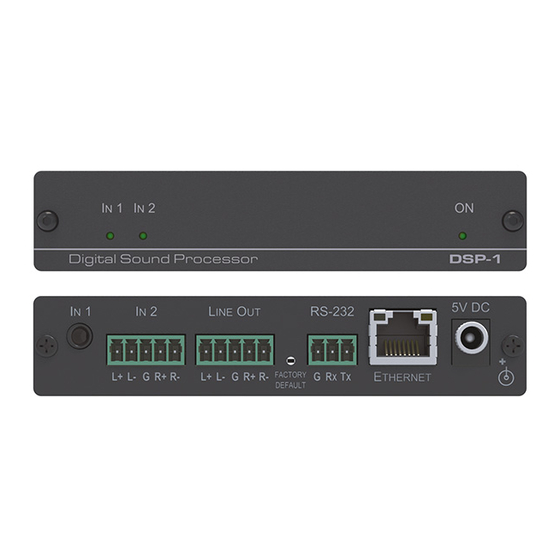
Step 2: Get to know your DSP-1
#
Feature
1
IN 1 LED
2
IN 2 LED
3
ON LED
4
IN 1 3.5mm Mini Jack
5
IN 2 5-pin Terminal Block Connector
6
LINE OUT 5-pin Terminal Block Connector
7
FACTORY DEFAULT Recessed Button
8
RS-232 (G, Rx, Tx) 3-pin Terminal Block Connector
9
ETHERNET RJ-45 Port
10 5V DC
Step 3: Install DSP-1
Install DSP-1 using one of the following methods:
•
Attach the rubber feet and place the unit on a flat surface.
•
Fasten a bracket (included) on each side of the unit and attach it to a flat surface. For more information go to
www.kramerav.com/downloads/DSP-1.
•
Mount the unit in a rack using an optional RK-3T rack adapter.
DSP-1 Quick Start (P/N: 2900-300909QS REV 3)
www.kramerav.com/downloads/DSP-1
4 Rubber feet
1 Quick start guide
to download the latest user manual and check if firmware
1 Bracket set
Function
Lights green when a signal is present on IN 1.
Lights green when a signal is present on IN 2.
Lights green when the device is powered.
Connect to an unbalanced stereo audio input.
Connect to a balanced stereo audio input.
Connect to a balanced stereo audio output.
Press and hold while powering the device to reset IP settings to
factory default values.
Connect to a PC or a serial controller.
Connect to the Ethernet.
5V DC connector for powering the unit.
P/N:
2900- 300909QS
Rev:
3
Advertisement
Table of Contents

Related Manuals for Kramer DSP-1


Summary of Contents for Kramer DSP-1
- Page 1 DSP-1 Quick Start Guide This guide helps you install and use your DSP-1 for the first time. www.kramerav.com/downloads/DSP-1 Go to to download the latest user manual and check if firmware upgrades are available. Scan for full manual Step 1: Check what’s in the box...
- Page 2 Step 4: Connect the inputs and outputs Always switch OFF the power on each device before connecting it to your DSP-1. For best results, we recommend that you always use Kramer high-performance cables to connect AV equipment to DSP-1. Step 5: Connect the power Connect the 5V DC power adapter to DSP-1 and plug it into the mains electricity.
Need help?
Do you have a question about the DSP-1 and is the answer not in the manual?
Questions and answers