Table of Contents
Advertisement
Quick Links
Operator's Manual
VRTEX
Register your machine:
www.lincolnelectric.com/register
Authorized Service and Distributor Locator:
www.lincolnelectric.com/locator
Save for future reference
Date Purchased
Code: (ex: 10859)
Serial: (ex: U1060512345)
IM10319
| Issue Date 15-Sep
© Lincoln Global, Inc. All Rights Reserved.
ENGAGE
®
™
For use with machines having Code Numbers:
12497, 12498, 12499, 12500
Advertisement
Table of Contents

Related Manuals for Lincoln Electric VRTEX ENGAGE


Summary of Contents for Lincoln Electric VRTEX ENGAGE
- Page 1 Operator’s Manual VRTEX ENGAGE ® ™ For use with machines having Code Numbers: 12497, 12498, 12499, 12500 Register your machine: www.lincolnelectric.com/register Authorized Service and Distributor Locator: www.lincolnelectric.com/locator Save for future reference Date Purchased Code: (ex: 10859) Serial: (ex: U1060512345) IM10319 | Issue Date 15-Sep ©...
- Page 2 THANK YOU FOR SELECTING A QUALITY PRODUCT BY KEEP YOUR HEAD OUT OF THE FUMES. DON’T get too close to the arc. LINCOLN ELEC TRIC. Use corrective lenses if necessary to stay a reasonable distance away from the arc. READ and obey the Safety Data PLEASE EXAMINE CARTON AND EQUIPMENT FOR Sheet (SDS) and the warning label DAMAGE IMMEDIATELY...
- Page 3 MAGNETIC FIELDS MAY W117.2-1974. A Free copy of “Arc Welding Safety” booklet BE DANGEROUS E205 is available from the Lincoln Electric Company, 22801 St. Clair Avenue, Cleveland, Ohio 44117-1199. 2.a. Electric current flowing through any conductor BE SURE THAT ALL INSTALLATION, OPERATION, causes localized Electric and Magnetic Fields (EMF).
- Page 4 SAFETY ELECTRIC SHOCK ARC RAYS CAN BURN. CAN KILL. 3.a. The electrode and work (or ground) circuits are 4.a. Use a shield with the proper filter and cover plates to protect your electrically “hot” when the welder is on. Do eyes from sparks and the rays of the arc when welding or not touch these “hot”...
- Page 5 SAFETY WELDING AND CUTTING CYLINDER MAY EXPLODE IF SPARKS CAN CAUSE DAMAGED. FIRE OR EXPLOSION. 7.a. Use only compressed gas cylinders containing the correct shielding gas for the process used 6.a. Remove fire hazards from the welding area. If and properly operating regulators designed for this is not possible, cover them to prevent the welding sparks the gas and pressure used.
- Page 6 Electromagnetic Compatibility (EMC) Product Standard for Electrical equipment, in metallic conduit or equivalent. Shielding should be Equipment. It is for use with other Lincoln Electric equipment. It is electrically continuous throughout its length. The shielding should be designed for industrial and professional use.
- Page 7 VRTEX ® ENGAGE™ SAFETY Ventilation As a rule of thumb, for many mild steel electrode, if the air is visibly clear and you are comfortable, then the ventilation is generally There are many methods which can be selected by the user to adequate for your work.
- Page 8 TLV and PEL values are as of April 2006. Always check Material Know Act of 1986 and of 40CFR 370 and 372. Safety Data Sheet (MSDS) with product or on the Lincoln Electric website at http://www.lincolnelectric.com (b) The PEL for chromium (VI) is .005 milligrams per cubic meter as an 8 hour time weighted average.
- Page 9 VRTEX ® ENGAGE™ NOTES...
-
Page 10: Table Of Contents
VRTEX ® ENGAGE™ TABLE OF CONTENTS Page Installation ..........................Section A Graphic Symbols That Appear On This Machine Or In This Manual ..........A-1 Technical Specifications ......................A-2 Select Suitable Location ......................A-2 Environmental Area ......................A-2 Stacking ..........................A-2 Tilting ..........................A-2 Lifting .......................... - Page 11 VRTEX ® ENGAGE™ TABLE OF CONTENTS Page Operation (User Mode) ......................Section B User Mode ...........................B-9 System Information ........................B-9 Operating Modes .........................B-9 Login Screen ..........................B-10 On Screen Keyboard, Menu, Continue, USB Indicator ............B-10 Theory Screen ...........................B-11 Joint Configuration Selection Screen ..................B-11 Process Selection Screen ......................B-11 Environment Screen ........................B-11 Gas Setup Screen ........................B-12...
- Page 12 VRTEX ® ENGAGE™ NOTES...
-
Page 13: Installation
VRTEX ® ENGAGE™ INSTALLATION GRAPHIC SYMBOLS THAT APPEAR ON THIS MACHINE OR IN THIS MANUAL INPUT POWER INPUT VOLTAGE INPUT CURRENT PROTECTIVE GROUND WARNING or CAUTION INPUT POWER Documentation must be con- sulted in all cases where this symbol is displayed. SINGLE PHASE ALTERNATING CURRENT Explosion... -
Page 14: Technical Specifications
• This machine may interfere with operation of other equipment in STACKING work/training area. The VRTEX Engage can be stacked two high for storage and shipping • High frequency processes, such as TIG machines, may interfere purposes only. with the operation of this machine. -
Page 15: Shore Power
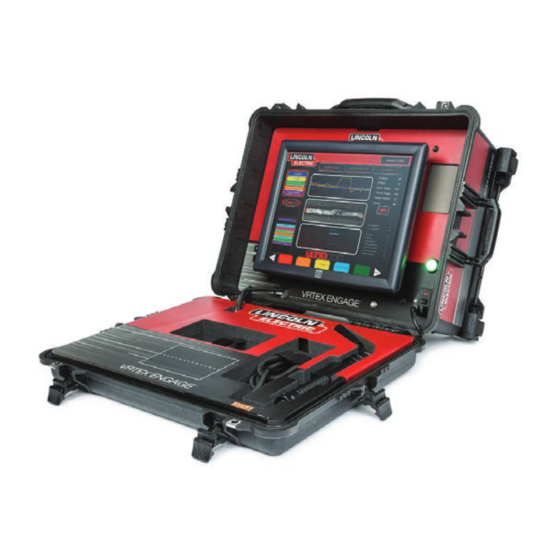
Having these types of objects in the area can cause interference and result in increased jitter and/or distortion in the motion tracking. K4299-4 K4299-3 K4299-2 K4299-1 For best results, do not install VRTEX Engage machine in the welding K4299-2 K4299-1 K4299-4 K4299-3 lab. Electrical interference from power lines, though generally small, can be present. - Page 16 VRTEX ® ENGAGE™ INSTALLATION HARDWARE OVERVIEW 1. Touchscreen monitor 2. GMAW gun 3. Speakers 4. USB port 5. VGA plug 6. Welding area 7. Green circular button 8. Fused power switch Figure A.2 – Hardware overview...
-
Page 17: Instructor Mode
2. Pressing and holding the green circular button, on the lower right 6. The USB port located at the front of the machine is used to upload side of the machine, for 5 seconds powers up the VRTEX Engage software and download user data from the system. -
Page 18: To Enter Instruction Mode
VRTEX ® ENGAGE™ OPERATION (INSTRUCTOR MODE) TO ENTER INSTRUCTOR MODE Figure B.6 – Instructor menu 1. Touch the “Key” icon located in the lower left corner of the screen. See Figure B.4. Figure B.4 – Menu and instruction key 2. The default password is 1, 2, 3, 4, 5. To change the password, use the icon with the key and + sign. -
Page 19: Weldometer
VRTEX ® ENGAGE™ OPERATION (INSTRUCTOR MODE) RESET TRIP The instructor mode includes the following: Selecting Reset Trip zeroes out all items in the trip column. This • Weldometer™ • License Info allows an instructor to track VR material savings over a certain time •... -
Page 20: Update
The update screen, in the instructor mode, allows the user to update their software or to update specific configuration files from the USB memory device in the front of the VRTEX Engage. See Figure B.9. Selecting this brings up two options: •... -
Page 21: Tolerance Editor
9. Select white arrows and continue icon to scroll through tolerance setup options. Figure B.13 – Tolerances CHOOSE TOLERANCE TO LOAD This displays the list of all tolerance sets currently stored on the USB device. Files can be transferred to and from a VRTEX Engage with a USB memory device. -
Page 22: Edit
VRTEX ® ENGAGE™ OPERATION (INSTRUCTOR MODE) EDIT USB EDIT This menu icon affects the file currently being shown in the choose This menu relates only to the files on the USB memory device. If tolerance setup window. This menu has the following options: there is a file name currently listed in the choose tolerance to load box, selecting the options on the menu will take action on that file. -
Page 23: Tolerances: Joint Configuration Selection Screen
VRTEX ® ENGAGE™ OPERATION (INSTRUCTOR MODE) TOLERANCES: JOINT CONFIGURATION SELECTION TOLERANCES: GAS SCREEN SCREEN This screen allows for the modification of (See Figure B.17): The user selects which configuration to modify. See Figure B.14. • Gas Mixture Selected Figure B.14 – Joint configuration screen •... -
Page 24: Tolerances: Pattern And Aim Screen
VRTEX ® ENGAGE™ OPERATION (INSTRUCTOR MODE) TOLERANCES: PATTERN AND AIM SCREEN TOLERANCES: WHIP AND TRAVEL SPEED SCREEN This screen allows the user to change the type of pattern being used This screen allows for the modification of technique parameters (stringer, box weave, straight weave, whip, triangle weave) and the relating to the whipping welding technique and travel speed including position of the root of the weld. -
Page 25: Operation (User Mode)
VRTEX ® ENGAGE™ OPERATION (USER MODE) USER MODE OPERATING MODES The VRTEX Engage has two operating modes, Freeweld Mode and Lesson Mode. SYSTEM INFORMATION Freeweld Mode allows the user to practice various welding When setting up the virtual equipment, the user must set the welding procedures without having the scores and lesson progress recorded. -
Page 26: Login Screen
If the user selects “Yes”, the VRTEX Engage will shut down. CAUTION THIS METHOD SHOULD ALWAYS BE USED TO SHUT DOWN THE VRTEX ENGAGE. Failure to do this could cause damage to the system. ------------------------------------------------------------------------- CONTINUE After the user enters their information and/or has made all necessary selections, the green icon is selected to continue to the next process. -
Page 27: Theory Screen
ENVIRONMENT SCREEN The user selects which joint configuration they want to virtually weld. The VRTEX Engage comes pre-configured with three different virtual First, the user selects the joint. A rotating view of the highlighted welding environments (Power Plant, Ironwork, Motorsports). To select coupon shows in the upper area. -
Page 28: Gas Setup Screen
VRTEX ® ENGAGE™ OPERATION (USER MODE) GAS SETUP SCREEN WELD MACHINE SETTINGS SCREEN On this screen, the user selects the gas mixture and gas flow rate. The user must enter the proper welding procedure and process See Figure B.28. The correct gas mixture and flow rate must be settings, including wire feed speed, amperage, voltage and polarity entered according to the tolerance editor. -
Page 29: Virtual Welding Overview
VRTEX ® ENGAGE™ OPERATION (USER MODE) VIRTUAL WELDING OVERVIEW ORANGE ACTION AND CUES ICON Upon entering the weld environment the Welding Camera view is The orange action menu icon has the following options: displayed on the monitor. See Figure B.32. •... -
Page 30: New Coupon
Student reports are not saved The Travel/Work Angle cue can be used with GMAW or FCAW internally on the VRTEX Engage. If the file is not saved on the USB processes. See Figure B.37. The goal of this cue is to center the device at the time of the weld and another weld is made, the previous circle in the cross hair and keep the color green. -
Page 31: Laser Screen
VRTEX ® ENGAGE™ OPERATION (USER MODE) LASER SCREEN SCORE (Live Action Student Evaluation Report) On the upper right of the screen, a score for each parameter is calculated. The closer each parameter is to the ideal value, the This screen summarizes the student’s welding performance. Detailed higher the score will be (out of 100). -
Page 32: Technique Parameters
VRTEX ® ENGAGE™ OPERATION (USER MODE) Figure B.41 – LASER screen (graph, defects, discontinuities, etc.) WELD TECHNIQUE GRAPH DISCONTINUITY INDICATOR TECHNIQUE PARAMETERS The upper left area of the screen shows the technique parameters being tracked and the graph of these parameters is located to the right. -
Page 33: Pass Number
VRTEX ® ENGAGE™ OPERATION (USER MODE) Figure B.44 – Travel angle Position is the user’s ideal weld root location. This location can change with each pass. When weaving, the ideal location is considered the centerline of the weave. Contact Tip to Work Distance (CTWD) for GMAW and FCAW are the distances from the tip of the GMAW/FCAW gun to a plane going through the ideal position location. -
Page 34: Select Group Screen
VRTEX ® ENGAGE™ OPERATION (USER MODE) SELECT GROUP SCREEN LESSON OVERVIEW SCREEN The select group screen allows the user to choose the desired The lesson overview screen offers an explanation of the selected training group. See Figure B.46. The center information box contains lesson and also displays the current progress of the lesson. -
Page 35: User Interface Overview
(GMAW and FCAW). 2. Pressing and holding the green circular button, on the lower right side of the machine, for 5 seconds powers up the VRTEX Engage 5. The polarity selector switch icon is used to indicate the welding system. -
Page 36: Freeweld Mode
VRTEX ® ENGAGE™ OPERATION (USER MODE) Figure B.56 – Weld process FREEWELD MODE 1. Select the Freeweld Mode icon. See Figure B.53. Figure B.53 – Freeweld mode 5. Select the welding environment (Power Plant, Ironwork, Motorsports) and select Continue icon. See Figure B.57. 2. - Page 37 VRTEX ® ENGAGE™ OPERATION (USER MODE) 7. Set the polarity, wire feed speed and voltage. Select the continue 9. When the environment screen appears tap the screen to skip to icon. See Figure B.59. See the WPS Book for the correct settings. welding.
- Page 38 VRTEX ® ENGAGE™ OPERATION (USER MODE) Figure B.65 – LASER screen 11. When finished, select the Menu icon and choose the appropriate action (Replay Mode, Save Weld To USB, Change Process, Change Coupon Type, Logout). Confirm the selection by selecting Yes. See Figure B.66.
-
Page 39: Lesson Mode
5. Using the on-screen keyboard, enter the username and select the Continue icon. The username must be at least three characters long and unique to this VRTEX Engage unit. See Figure B.71. 2. Select the New Profile icon to begin setting up a new user profile. - Page 40 Back icon and correct the profile information. Once verified a Select continue when the desired training group is shown in the new profile will be created and added into this VRTEX Engage unit. center box. The user should record and save the login information in a secure NOTE: This guide will take the user step-by-step through the location.
- Page 41 VRTEX ® ENGAGE™ OPERATION (USER MODE) Figure B.80 – Lesson instruction screen 12. Using the touch screen monitor, select the appropriate lesson (First Person Safety) by tapping either the red arrow(s) or the small box (with the lesson name in it) above or below the center box.
- Page 42 VRTEX ® ENGAGE™ OPERATION (USER MODE) 17. The lesson overview screen will now be displayed and the 20. This lesson (Workplace Inspection 1) will be completed by progress will be updated to reflect the user progress. See Figure performing a safety inspection of the workplace, including B.83.
- Page 43 VRTEX ® ENGAGE™ OPERATION (USER MODE) Figure B.91 – WPS readings 23. The lesson overview screen will provide a brief description of the next lesson (WPS Reading). Select the Start Lesson icon to begin the lesson. See Figure B.89. Figure B.89 – Lesson overview 26.
- Page 44 VRTEX ® ENGAGE™ OPERATION (USER MODE) Figure B.96 – Equipment setup 28. The lesson overview screen will provide a brief description of the next lesson (Equipment Setup). Select the Start Lesson icon to begin the lesson. See Figure B.94. Figure B.94 – Lesson overview 31.
- Page 45 VRTEX ® ENGAGE™ OPERATION (USER MODE) 33. The lesson overview screen will provide a brief description of 36. Using the on-screen icons, set the gas mixture and gas flow. See the next lesson (GMAW Short 10 Ga Mild Steel 2F). Select the Figure B.102.
- Page 46 VRTEX ® ENGAGE™ OPERATION (USER MODE) Figure B.105 – Incorrect settings 41. Once a passing score has been achieved, select the Go To Lesson View icon to continue. See Figure B.108. Figure B.108 – LASER screen 39. After the correct settings have been entered the user will be taken to the weld environment of choice.
- Page 47 VRTEX ® ENGAGE™ OPERATION (USER MODE) 44. The lesson instruction screen will provide instructions on how 47. The lesson overview screen will now be displayed and the to complete the lesson. See Figure B.111. Read the on-screen progress will be updated to reflect the user progress. See Figure instructions and tap the screen to begin the lesson.
- Page 48 VRTEX ® ENGAGE™ NOTES...
- Page 49 VRTEX ® ENGAGE™ ACCESSORIES There are no options or accessories available at this time for the VRTEX Engage.
- Page 50 VRTEX ® ENGAGE™ NOTES...
-
Page 51: Maintenance
VRTEX ® ENGAGE™ MAINTENANCE MONITOR CAUTION The monitor is a touchscreen and can be damaged by poking it with any object other than the pad of your finger. Use care when cleaning screen. Use only a soft dry cloth (cotton or flannel). Avoid chemicals and solvents (alcohol, benzine, acidic or alcazine solvent cleaners). - Page 52 VRTEX ® ENGAGE™ NOTES...
-
Page 53: Troubleshooting
HOW TO USE TROUBLESHOOTING GUIDE WARNING Service and repair should be performed by only Lincoln Electric Factory Trained Personnel. Unauthorized repairs performed on this equipment may result in danger to the technician and machine operator and will invalidate your factory warranty. For your safety and to avoid Electrical Shock, please observe all safety notes and precautions detailed throughout this manual. -
Page 54: Troubleshooting Guide
See the Operation Section. CAUTION If for any reason you do not understand the test procedures or are unable to perform the test/repairs safely, contact the Lincoln Electric Automation Department for electrical troubleshooting assistance before you proceed. Call 1-888-935-3878. - Page 55 3. Fuse may be faulty. CAUTION If for any reason you do not understand the test procedures or are unable to perform the test/repairs safely, contact the Lincoln Electric Automation Department for electrical troubleshooting assistance before you proceed. Call 1-888-935-3878.
- Page 56 VRTEX ® ENGAGE™ DIAGRAMS...
- Page 57 Except for special instructions, experiments on welding machines are conducted in accordance with the general standard of IEC60974-1; experiments on welding consumables are conducted in accordance with the general standard of AWS; for speci c applicable standards on welding consumables please refer to the product page. The product performance data of this website and related attachments are from LINCOLN ELECTRIC American application engineering laboratory.
Need help?
Do you have a question about the VRTEX ENGAGE and is the answer not in the manual?
Questions and answers