Table of Contents
Advertisement
Quick Links
Advertisement
Table of Contents

Subscribe to Our Youtube Channel
Related Manuals for JUNO JB126D2


Summary of Contents for JUNO JB126D2
- Page 1 User Manual Oven JB126D2 JB126S2...
-
Page 2: Table Of Contents
Subject to change without notice. VISIT OUR WEBSITE TO: Get usage advice, brochures, trouble shooter, service and repair information: www.juno.de/support SAFETY INFORMATION Before the installation and use of the appliance, carefully read the supplied instructions. The manufacturer is not responsible for any injuries or damage that are the result of incorrect installation or usage. - Page 3 WARNING: Keep children and pets away from the • appliance when it operates or when it cools down. Accessible parts become hot during use. If the appliance has a child safety device, it should be • activated. Children shall not carry out cleaning and user maintenance •...
-
Page 4: Safety Instructions
SAFETY INSTRUCTIONS Installation Depth with open 1022 mm WARNING! Only a qualified door person must install this Ventilation opening 560x20 mm appliance. minimum size. Open‐ • Remove all the packaging. ing placed on the • Do not install or use a damaged bottom rear side appliance. - Page 5 • If the mains socket is loose, do not • Make sure that the ventilation openings connect the mains plug. are not blocked. • Do not pull the mains cable to • Do not let the appliance stay disconnect the appliance. Always pull unattended during operation.
- Page 6 • This appliance is for cooking purposes – any removable objects (including only. It must not be used for other shelves, side rails etc., provided purposes, for example room heating. with the product) particularly any • Always cook with the oven door closed. non-stick pots, pans, trays, utensils •...
-
Page 7: Installation
Internal lighting Service • To repair the appliance contact the WARNING! Risk of electric Authorised Service Centre. shock. • Use original spare parts only. • Concerning the lamp(s) inside this Disposal product and spare part lamps sold separately: These lamps are intended WARNING! Risk of injury or to withstand extreme physical suffocation. - Page 8 (*mm) min. 550 min. 560 Securing the oven to the cabinet...
-
Page 9: Product Description
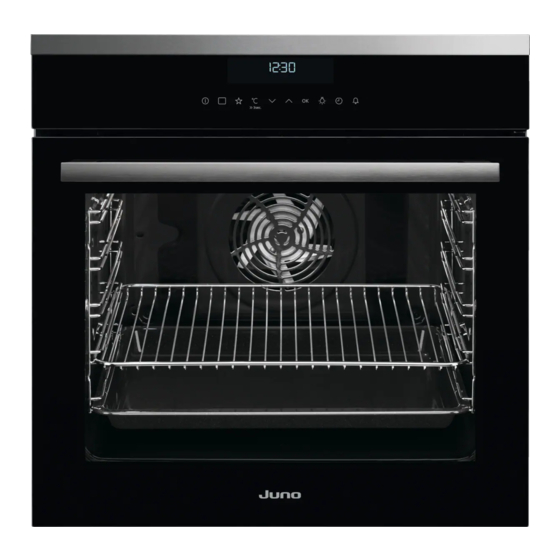
PRODUCT DESCRIPTION General overview Control panel Electronic programmer Heating element Lamp Shelf support, removable Shelf positions Accessories To bake and roast or as pan to collect fat. • Wire shelf • Telescopic runners For cookware, cake tins, roasts. With the telescopic runners you can put •... - Page 10 Sensor Function Description Field Options To set a heating function or an automatic pro‐ gramme. My Favourite Pro‐ To store your favourite programme. Use it to have gramme access to your favourite programme directly or when the oven is off. Temperature / Fast To set or check the temperature.
-
Page 11: Before First Use
Symbol Name Description Automatic programme You can choose an automatic programme. My favourite programme The favourite programme operates. kg / g An automatic programme with a weight in‐ put operates. h / min A clock function operates. Temperature / Fast heat up The function operates. -
Page 12: Daily Use
Preheat the empty oven before the first use. Step 2 Set the maximum temperature for the function: Let the oven operate for 1 h. Step 3 Set the maximum temperature for the function: Let the oven operate for 15 min. The oven can emit an odour and smoke during preheating. - Page 13 If you turn on the oven and do not set any heating function or programme, the oven Oven func‐ Application turns off automatically after 20 seconds. tion How to set: Temperature Use this function to pre‐ pare bread and bread Press to change the rolls with professional-...
-
Page 14: Clock Functions
CLOCK FUNCTIONS Clock functions table Clock function Application Time of Day To show or change the time of day. You can change the time of day only when the oven is on. Duration To set how long the oven works. End Time To set when the oven turns off. -
Page 15: Automatic Programmes
1. Set a heating function and and the time setting . The oven turns temperature. off automatically. 2. Set the Duration. 4. Press a sensor field to stop the signal. 5. Turn off the oven. 3. Press again and again until the display shows flashing How to set: Time Delay 4. -
Page 16: Using The Accessories
display shows the default cooking times 2. Touch for all automatic programmes. The display shows , a symbol and the number of the automatic programme. List of automatic programmes 3. Touch to choose the automatic programme. Programme 4. Touch or wait five seconds until ROAST BEEF the appliance automatically starts to work. -
Page 17: Additional Functions
Wire shelf: Push the shelf between the guide bars of the shelf support and make sure that the feet point down. Baking tray / Deep pan: Push the tray between the guide bars of the shelf support. Wire shelf, Baking tray / Deep pan: Push the tray between the guide bars of the shelf support and the wire shelf on the guide bars above. - Page 18 Using Child Lock 1. To turn on the function turn on the oven. The Child Lock prevents an accidental 2. Turn on an oven function or setting. operation of the oven. 3. Touch and hold at the When the pyrolytic cleaning is same time for 2 seconds.
-
Page 19: Hints And Tips
• Day brightness: To exit the Settings menu, press – when the appliance is activated. press and hold – if you touch a sensor field during the night brightness (apart from Automatic switch-off ON / OFF), the display goes back to the day brightness mode for the For safety reasons the oven turns off after next 10 seconds. - Page 20 Leave the meat for approximately 15 Initially, monitor the performance when minutes before carving so that the juice you cook. Find the best settings (heat does not seep out. setting, cooking time, etc.) for your cookware, recipes and quantities when To prevent too much smoke in the oven you use this appliance.
- Page 21 (°C) (min) Brownie baking tray or dripping 25 - 30 Soufflè, 6 pieces ceramic ramekins on 25 - 30 wire shelf Sponge flan flan base tin on wire 15 - 25 base shelf Victoria sand‐ baking dish on wire 40 - 50 wich shelf Poached fish,...
- Page 22 Information for test institutes Tests according to IEC 60350-1. (°C) (min) Small Conven‐ Baking 20 - 30 cakes, tional tray 20 per Cooking tray Small True Fan Baking 150 - 20 - 35 cakes, Cooking tray 20 per tray Small True Fan Baking 2 and 4...
-
Page 23: Care And Cleaning
(°C) (min) Spong True Fan Wire 2 and 4 40 - 60 Preheat the e cake, Cooking shelf oven for 10 mi‐ cake nutes. mould Ø26 Short True Fan Baking 140 - 20 - 40 bread Cooking tray Short True Fan Baking 2 and 4 140 -... - Page 24 Notes on cleaning Clean the front of the oven with a soft cloth with warm water and a mild de‐ tergent. Use a cleaning solution to clean metal surfaces. Clean stains with a mild detergent. Cleaning Agents Clean the cavity after each use. Fat accumulation or other residue may cause fire.
- Page 25 WARNING! There is a risk of CAUTION! If there are other burns. appliances installed in the same cabinet, do not use them at the same time as this function. It can cause damage to the oven. Before the Pyrolysis: Turn off the oven and Remove all accessories.
- Page 26 CAUTION! Do not use the oven without the glass panels. Step 1 Fully open the door and find the hinge to the right side of the door. Step 2 Use a screwdriver to lift and turn fully the right side hinge lever. Step 3 Find the hinge to the left side of the door.
- Page 27 Step Clean the glass panels with water and soap. Dry the glass panels carefully. Do not clean the glass panels in the dishwasher. Step After cleaning, install the glass pan‐ els and the oven door. Make sure that you put the glass panels (A and B) back in the correct sequence.
-
Page 28: Troubleshooting
Back lamp Step 1 Turn the glass cover to remove it. Step 2 Clean the glass cover. Step 3 Replace the lamp with a suitable 300 °C heat-resistant lamp. Step 4 Install the glass cover. TROUBLESHOOTING WARNING! Refer to Safety chapters. - Page 29 Problem Possible cause Remedy It takes too long to cook the The temperature is too low Adjust the temperature if dishes or they cook too or too high. necessary. Follow the ad‐ quickly. vice in the user manual. Steam and condensation You left the dish in the oven Do not leave the dishes in settle on the food and in the...
-
Page 30: Energy Efficiency
We recommend that you write the data here: Serial number (S.N.) ......... ENERGY EFFICIENCY Product Information and Product Information Sheet* Supplier's name Juno JB126D2 949498195 Model identification JB126S2 949498196 Energy Efficiency Index 81.2 Energy efficiency class Energy consumption with a standard load, conventional 0.93 kWh/cycle... -
Page 31: Environmental Concerns
Cooking with fan Keep food warm When possible, use the cooking functions Choose the lowest possible temperature with fan to save energy. setting to use residual heat and keep a meal warm. The residual heat indicator or Residual heat temperature appears on the display. If a programme with the Duration or End Time selection is activated and the Cooking with the lamp off... - Page 32 867368323-A-352021...
Need help?
Do you have a question about the JB126D2 and is the answer not in the manual?
Questions and answers