
Related Manuals for Clarke IBC4


Summary of Contents for Clarke IBC4
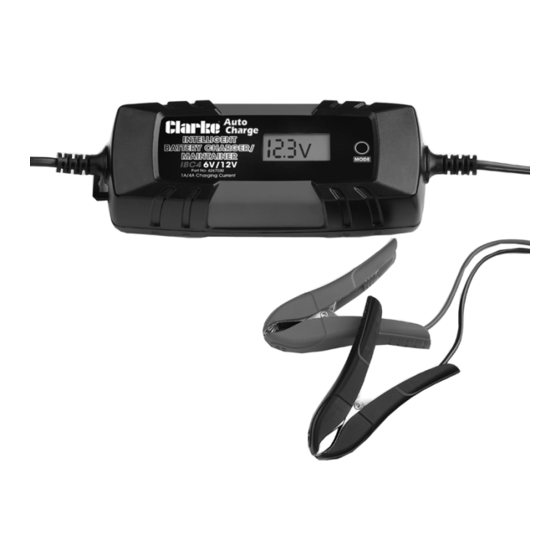
- Page 1 6V/12V INTELLIGENT BATTERY CHARGER MODEL NO: IBC4 PART NO: 6267030 OPERATION & MAINTENANCE INSTRUCTIONS ORIGINAL INSTRUCTIONS DL0721...
-
Page 2: Environmental Recycling Policy
GUARANTEE This CLARKE product is guaranteed against faulty manufacture for a period of 12 months from the date of purchase. Please keep your receipt as proof of purchase. -
Page 3: Specifications
SPECIFICATIONS Model Number IBC4 Input Voltage / Current 230 V, 50Hz Battery Charging Voltages: 6V & 12V Power Variable Power, 60W Max Charging Current 6V: 1A, 12V: 1A/4A Charging Steps 8 steps, (smart charger) Charging Battery Size 6V: From 1.2 up to 40Ah 12V: From 1.2 up to 120Ah... -
Page 4: Safety Precautions
SAFETY PRECAUTIONS WARNING: ALWAYS SWITCH OFF THE CHARGER WHEN CONNECTING OR DISCONNECTING LEADS TO AVOID SPARKING AS HIGHLY INFLAMMABLE HYDROGEN GAS CAN BE RELEASED IN THE PROCESS OF BATTERY CHARGING PLEASE READ BEFORE USING THIS UNIT 1. Batteries can generate explosive gases during normal operation. ALWAYS use in well ventilated area. - Page 5 Have it checked and repaired if damaged. 21. NEVER attempt any repairs yourself. If you have a problem with your charger contact your local CLARKE dealer or contact service@clarkeinternational.com 22. When charging is complete, ensure that the vehicle battery leads are secured to the proper terminals which should be clean, and lightly smeared with petroleum jelly to prevent corrosion.
-
Page 6: Electrical Connections
ELECTRICAL CONNECTIONS WARNING! READ THESE ELECTRICAL SAFETY INSTRUCTIONS THOROUGHLY BEFORE CONNECTING THE PRODUCT TO THE MAINS SUPPLY. Before switching the product on, make sure that the voltage of your electricity supply is the same as that indicated on the rating plate. This product is designed to operate on 230VAC 50Hz. - Page 7 3 LCD Display Screen Charging Clamp Negative (Black) The IBC4 is designed to charge all types of 1.2-30AH 6V & 1.2-120AH 12V lead- acid batteries, including WET (Flooded), MF (Maintenance Free), EFB (Enhanced Flooded Battery), VRLA, Lead Calcium, SLA, GEL and AGM (Absorbed Glass Mat) batteries.
-
Page 8: Charger Location
PREPARATION 1. It may be necessary to remove the battery from a vehicle to charge it. • Always remove the grounded terminal from the battery first. • Ensure all accessories in the vehicle are switched off to prevent sparking. 2. Clean the battery terminals. Be careful to keep any corrosive matter from coming in contact with eyes.If corrosive matter enters your eye, immediately flood eye with running clean cold water for at least 15 minutes and seek medical attention immediately. - Page 9 BATTERY CHARGER DISPLAY INDICATORS 1 12V STD Mode COLD Mode 3 6V STD Mode Battery Charging Level Indicator (in 20% increments) 5 Reverse Polarity Connection Faulty Battery Indicator (Battery Indicator voltage is lower than 1V/Battery can’t hold the charge/Battery voltage can’t reach to the threshold after after charging in the required period) 7 Clamp Indicator (Open Circuit/...
-
Page 10: Charging Modes
CHARGING MODES The IBC4 battery charger has the following five modes. DO NOT operate the charger until you have confirmed the appropriate charge mode for your battery. ATTERY XPLANATION ISPLAY 1A 12V STD 1.2 - 30 Charging 12V WET/GEL/MF/EFB Batteries... - Page 11 CHARGE CYCLES TAGE UNCTION ESCRIPTION Testing Checking if battery has connected with the charger and also check battery voltage Analysis Will show the vehicle battery’s voltage on the screen first. Analyse if the connected battery is 12v or 6V, and will enter into the corresponding charging mode in 1 minute Desulphation...
-
Page 12: Operation
OPERATION CONNECTING TO THE BATTERY 1. Identify the polarity of the battery terminals. The positive battery terminal is typically marked by the letters or symbols (POS,P,+). The negative battery terminal is typically marked by the letters or symbols (NEG,N,-). 2. DO NOT make any connections to the carburetor, fuel lines or thin metal parts. -
Page 13: Care & Maintanence
CARE & MAINTANENCE This battery charger requires minimal maintenance. As with any appliance or tool, a few common sense rules will prolong its working life. WARNING: ALWAYS BE SURE THE CHARGER IS UNPLUGGED BEFORE PERFORMING ANY MAINTENANCE OR CLEANING. ANY REPAIRS MUST BE DONE BY A QUALIFIED SERVICE TECHNICIAN. -
Page 14: Parts Diagram
PARTS DIAGRAM PARTS LIST ESCRIPTION ESCRIPTION Charging Clamp Positive (Red) LCD Display Screen Charging Clamp Negative Printed Circuit Board (Black) Charging Cable Hanging Hook Clamp Grommet Hanging Hook Case Front Cover Grommet Case Back Cover Power Cable Case Seal 5A Fused 3 Pin Plug Parts &... -
Page 15: Declaration Of Conformity
DECLARATION OF CONFORMITY Parts & Service: 020 8988 7400 / E-mail: Parts@clarkeinternational.com or Service@clarkeinternational.com...
Need help?
Do you have a question about the IBC4 and is the answer not in the manual?
Questions and answers