
Related Manuals for Clarke Start'N'Charge WBC180


Summary of Contents for Clarke Start'N'Charge WBC180
- Page 1 BATTERY CHARGER-STARTER MODEL NO: WBC180 PART NO: 6261500 OPERATION & MAINTENANCE INSTRUCTIONS ORIGINAL INSTRUCTIONS DL0621 - ISS 3...
-
Page 2: Environmental Recycling Policy
Battery Charger will give you long and satisfactory service. GUARANTEE This CLARKE product is guaranteed against faulty manufacture for a period of 12 months from the date of purchase. Please keep your receipt as proof of purchase. -
Page 3: Specifications
SPECIFICATIONS Model Number WBC180 Battery Voltages 12 & 24V Suitable Battery Types Lead Acid inc GEL, WET, AGM IP Rating IP20 Maximum Battery Size 500 Ah Operating Temperature Range 0 to 40°C Dimensions (D x W x H) 274 x 370 x 590 mm Weight 14.1 kg Estimated Engine Capacity... -
Page 4: Safety Precautions
SAFETY PRECAUTIONS WARNING: HIGHLY INFLAMMABLE HYDROGEN GAS IS RELEASED IN THE PROCESS OF BATTERY CHARGING. ALWAYS REMEMBER TO SWITCH OFF THE CHARGER/STARTER FIRST TO AVOID SPARKING. PLEASE READ BEFORE USING THIS UNIT 1. Battery acid is very corrosive. If spilled, clean the area immediately and wash with water. - Page 5 9. Always consult the vehicle manufacturers instructions for disconnecting / charging the vehicle battery. CAUTION: SOME VEHICLE ELECTRONIC EQUIPMENT CAN BE DAMAGED BY BOOST CHARGING OR USE OF THE START FACILITY. CHECK YOUR VEHICLE HANDBOOK BEFORE USING YOUR STARTER/CHARGER. IF IN DOUBT CONSULT THE VEHICLE MANUFACTURER.
-
Page 6: Electrical Connection
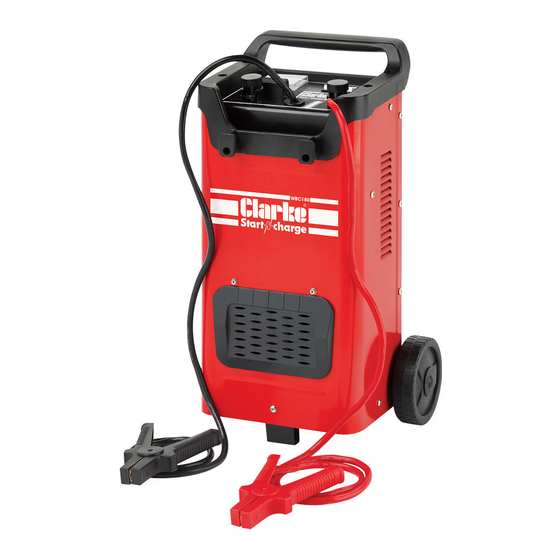
ELECTRICAL CONNECTION WARNING! READ THESE ELECTRICAL SAFETY INSTRUCTIONS THOROUGHLY BEFORE CONNECTING THE PRODUCT TO THE MAINS SUPPLY. WARNING! THIS APPLIANCE MUST BE EARTHED Connect the mains lead to a standard, 230 Volt (50Hz) electrical supply through an approved 13 amp BS1363 plug, or a suitably fused isolator switch, If the plug has to be changed because it is not suitable for your socket or because of damage, it must be removed and a replacement fitted, following the wiring instructions shown below. - Page 7 OVERVIEW 1 Fuse Holder Power On/Off Switch 2 Charging condition meter (Amps) Positive Terminal +24V 3 High/Low Charging Selector Positive Terminal +12V 4 Min/Boost Charge Charging Selector Negative (BLACK) lead 5 Battery Charge/Jump Start Mode 10 Positive (RED) lead Selector switch The WBC180 model is provided with a pair of leads complete with clamps for connection to a battery via the appropriate outlet connections - 12V and 24V, as shown.
- Page 8 ASSEMBLY ASSEMBLY 1. Pass the axle through the holes in the body of the machine and fit circlips to the axle at the position shown. 2. Slide the wheels onto each end of the axle and secure with further circlips outside each wheel. 3.
-
Page 9: General Preparation
GENERAL PREPARATION CHARGER LOCATION 1. Place the charger as far away from the car battery as possible. 2. Do not position the charger above the battery during the charging procedure. Gases from the battery will cause corrosion and damage the charger. -
Page 10: Connecting To A Battery
CONNECTING TO A BATTERY WARNING: A SPARK NEAR THE BATTERY MAY CAUSE BATTERY EXPLOSION. TO REDUCE THE RISK OF A SPARK NEAR THE BATTERY: • Turn off the charger before you connect/disconnect the DC output connectors. • Do not let the connectors touch each other. •... - Page 11 2. Connect the POSITIVE (RED) lead to the POSITIVE post on the battery. 3. Connect the NEGATIVE (BLACK) lead at arms length to the NEGATIVE post on the battery. 4. When you disconnect the charger from the battery, always do it in the opposite order to the sequence of connection and remove the first connection at arms length from the battery.
-
Page 12: Operation Of The Charger
OPERATION OF THE CHARGER TO CHARGE THE BATTERY 1. Connect the charger to the battery. 2. Connect the charger to the mains supply and switch on. 3. Set the mode switch to the CHARGE function indicated by the battery symbol. 4. -
Page 13: Procedure For Engine Starting
PROCEDURE FOR ENGINE STARTING CAUTION: WE RECOMMEND THAT BEFORE ATTEMPTING TO BOOST START, YOU CHARGE THE BATTERY FOR 10-15 MINUTES. THIS WILL IMPROVE THE CHANCE OF A FIRST TIME START, PARTICULARLY WITH LARGER ENGINES. CAUTION: WHEN THE BATTERY IS COMPLETELY FLAT, YOU MUST CHARGE THE BATTERY BEFORE ATTEMPTING TO START THE ENGINE, OTHERWISE YOU MAY CAUSE DAMAGE TO THE VEHICLE ELECTRONIC SYSTEM. -
Page 14: Replacing The Fuse
Replace only with an identical fuse and with the same rating, as supplied with your starter/charger. • Replacements are available from your Clarke dealer. Parts & Service: 020 8988 7400 / E-mail: Parts@clarkeinternational.com or Service@clarkeinternational.com... - Page 15 MAINTANENCE This charger requires minimal maintenance. As with any appliance or tool, a few common sense rules will prolong the life of the battery charger. WARNING: ALWAYS BE SURE THE CHARGER IS UNPLUGGED BEFORE PERFORMING ANY MAINTENANCE OR CLEANING. 1. Clean the case and leads with a moist cloth. 2.
-
Page 16: Parts Diagram
PARTS DIAGRAM Parts & Service: 020 8988 7400 / E-mail: Parts@clarkeinternational.com or Service@clarkeinternational.com... -
Page 17: Parts List
PARTS LIST NO DESCRIPTION NO DESCRIPTION Thermostat Varistor Front Handle Resistor Selector Switch Diverter On/Off Switch Fuse Cover Ammeter Fuse (110A) Power Cable & Plug Rectifier Bridge Earth Clamp (black) Cable Gland Live Clamp (Red) Transformer Wheel Back Panel Axle Bottom Panel Circlip Foot... -
Page 18: Troubleshooting
TROUBLESHOOTING Problem Cause Solution Battery does not Lack of AC input power. Make sure that the charger charge is plugged into a suitable power outlet and the ON/ OFF switch lights up. Faulty connections to Unplug the charger and battery terminals. check the battery connection;... -
Page 19: Declaration Of Conformity
DECLARATION OF CONFORMITY Parts & Service: 020 8988 7400 / E-mail: Parts@clarkeinternational.com or Service@clarkeinternational.com...
Need help?
Do you have a question about the Start'N'Charge WBC180 and is the answer not in the manual?
Questions and answers