
Related Manuals for Clarke IBC12/24


Summary of Contents for Clarke IBC12/24
- Page 1 12V/24V INTELLIGENT BATTERY CHARGER/MAINTAINER MODEL NO: IBC12/24 PART NO: 6267016 OPERATION & MAINTENANCE INSTRUCTIONS ORIGINAL INSTRUCTIONS DL1123...
-
Page 2: Safety Symbols
GUARANTEE This CLARKE product is guaranteed against faulty manufacture for a period of 12 months from the date of purchase. Please keep your receipt as proof of purchase.This guarantee is invalid if the product is found to have been abused or tampered with in any way, or not used for the purpose for which it was intended.Faulty goods should be returned to their place of purchase, no... -
Page 3: Safety Precautions
SAFETY PRECAUTIONS WARNING: ALWAYS SWITCH OFF THE CHARGER WHEN CONNECTING OR DISCONNECTING LEADS TO AVOID SPARKING AS HIGHLY INFLAMMABLE HYDROGEN GAS CAN BE RELEASED IN THE PROCESS OF BATTERY CHARGING PLEASE READ BEFORE USING THIS UNIT 1. Batteries can generate explosive gases during normal operation. ALWAYS use in well ventilated area. - Page 4 Have it checked and repaired if damaged. 22. NEVER attempt any repairs yourself. If you have a problem with your charger contact your local CLARKE dealer or contact service@clarkeinternational.com 23. When charging is complete, ensure that the vehicle battery leads are secured to the proper terminals which should be clean, and lightly smeared with petroleum jelly to prevent corrosion.
-
Page 5: Electrical Connections
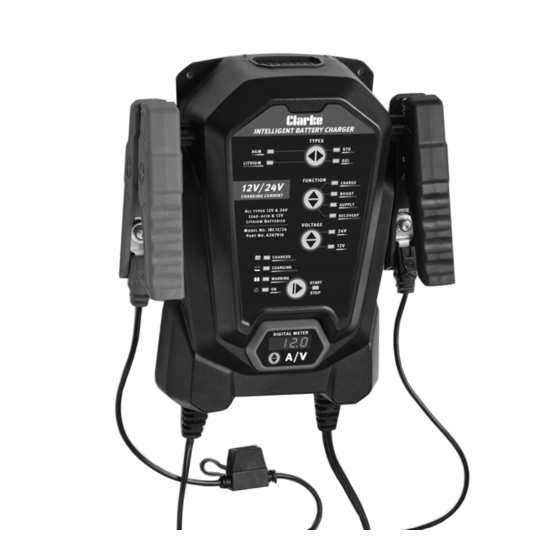
ELECTRICAL CONNECTIONS WARNING! READ THESE ELECTRICAL SAFETY INSTRUCTIONS THOROUGHLY BEFORE CONNECTING THE PRODUCT TO THE MAINS SUPPLY. Before switching the product on, make sure that the voltage of your electricity supply is the same as that indicated on the rating plate. This product is designed to operate on 230V AC 50Hz. - Page 6 OVERVIEW 1 Battery Charger Unit Charging Clamp/Lead Negative (Black) 2 Display/Mode Buttons Charging Clamp/Lead 40A Fuse 3 LCD Display Charging Ring Terminal Positive (Red) 4 Power Cable with 5A Plug 10 Charging Ring Terminal Negative (Black) 5 Charging Cable 11 Wall Mounting Holes 6 Charging Clamp/Lead 12 1 x Spare 40A Fuse (Not Shown) Positive (Red)
-
Page 7: Display Indicators
DISPLAY INDICATORS 1 Battery Type Button: Choose Display Lights: Showing Charged, between AGM, STD, GEL Charging, Warning & Power On. Lithium-ion(BMS) or 4 Cell LiFePO4 2 Function Button: Choose LCD Display Screen between Charge, Boost, Supply or Recovery 3 Voltage Button: Choose between Display Button: Choose between 12V or 24V showing the ampage and voltage... -
Page 8: Charger Location
PREPARATION 1. It may be necessary to remove the battery from a vehicle to charge it. • Always remove the grounded terminal from the battery first. • Ensure all accessories in the vehicle are switched off to prevent sparking. 2. Clean the battery terminals. Be careful to keep any corrosive matter from coming in contact with eyes. - Page 9 ABOUT THE IBC 12/24 1. The IBC12/24 is designed for charging 12V/24V lead-acid and 12V Lithium-ion(BMS) & 4 Cell LiFePO4 batteries. 2. It has a built-in intelligent microprocessor that makes charging faster, easier and safer. 3. This charger has safety features including spark proof, protection for reverse polarity, short circuit, overcurrent, overcharge and overheating.
-
Page 10: Charging Modes
CHARGING CHARGING MODES The IBC12/24 has 11 modes: STANDBY, 12V STD, 12V GEL, 12V AGM, 12V Lithium-ion(BMS)/4 Cell LiFePO4, 24V STD, 24V GEL, 24V AGM, REPAIR, 13.6V SUPPLY and 12V BOOST. For some charge modes, the mode button must be held for three (3) seconds and/or pressed to enter the mode. - Page 11 USING REPAIR (12V ONLY) This mode is for LEAD-ACID batteries only. It is an advanced battery recovery mode for repairing old, idle, stratified or sulfated batteries. Not all batteries can be recovered. For optimal results, take the battery through a full charge cycle, bringing the battery to full charge before using this mode.
- Page 12 3. Identify if you have a negative or positive grounded vehicle. This can be done by identifying which battery terminal (NEG or POS) is connected to the chassis. If unsure, consult the vehicle handbook. 4. For a negative grounded vehicle (most common): connect the RED POSITIVE clamp first to the positive battery terminal, then connect the BLACK NEGATIVE clamp to the negative battery terminal or vehicle chassis.
- Page 13 CHARGING STEPS • STEP 1: Analysing 1 (Checks if battery has connected with the charger). • STEP 2: Desulphation (Pulsing charging to remove sulphates). • STEP 3: Soft Start (Charges with gradually increasing charging current). • STEP 4: Controlled Current Charge (Adjusts the charging current intelligently).
-
Page 14: Care & Maintanence
CARE & MAINTANENCE This battery charger requires minimal maintenance. As with any appliance or tool, a few common sense rules will prolong its working life. WARNING: ALWAYS BE SURE THE CHARGER IS UNPLUGGED BEFORE PERFORMING ANY MAINTENANCE OR CLEANING. ANY REPAIRS MUST BE DONE BY A QUALIFIED SERVICE TECHNICIAN. - Page 15 TROUBLESHOOTING ERROR DISPLAYS LCD Display Cause Solution ERROR + The charger is The charging will automatically pause. OVERHEAT overheating DO NOT cut off the power supply, and the charger will work again when it has cooled down. ERROR + NO Open circuit Connect the red and black clamps to CONNECTION...
-
Page 16: Parts Diagram
PARTS DIAGRAM Parts & Service: 020 8988 7400 / E-mail: Parts@clarkeinternational.com or Service@clarkeinternational.com... -
Page 17: Parts List
Charger Back Cover LCD Display Charger Upper Vent Cover Charging Ring Cable (Not Shown) SPECIFICATIONS Model Number IBC12/24 Input Voltage / Current 230 V, 50Hz, 3.5A Battery Charging Voltages: 12V & 24V Compatible Battery Types Lead Acid, WET, MF, EFB, GEL, AGM... - Page 18 DECLARATION OF CONFORMITY - UKCA Parts & Service: 020 8988 7400 / E-mail: Parts@clarkeinternational.com or Service@clarkeinternational.com...
-
Page 19: Declaration Of Conformity (Ce)
DECLARATION OF CONFORMITY - CE Parts & Service: 020 8988 7400 / E-mail: Parts@clarkeinternational.com or Service@clarkeinternational.com...
Need help?
Do you have a question about the IBC12/24 and is the answer not in the manual?
Questions and answers