Table of Contents
Advertisement
Quick Links
Advertisement
Table of Contents

Related Manuals for MDHearingAid VOLT


Summary of Contents for MDHearingAid VOLT
- Page 1 User Manual...
- Page 2 ® As the owner of the MDHearingAid VOLT Hearing Aid, you may once again enjoy the sounds of your environment and conversations with your family VOLT , please read this User Manual and friends. To get the most out of your in its entirety.
-
Page 3: Table Of Contents
Return Policy ... . 25 3. Turn VOLT On ..8 Warnings ....27 Changing Tubing and Domes 1. -
Page 4: The Mdhearingaid Story
Dr. Cherukuri set out to find a solution that helped with the most common types of hearing loss at a reasonable price. The VOLT is the latest addition to the MDHearingAid line of affordable, FDA-Registered hearing aids. It is our first rechargeable, Mini Behind-the-Ear aid. -
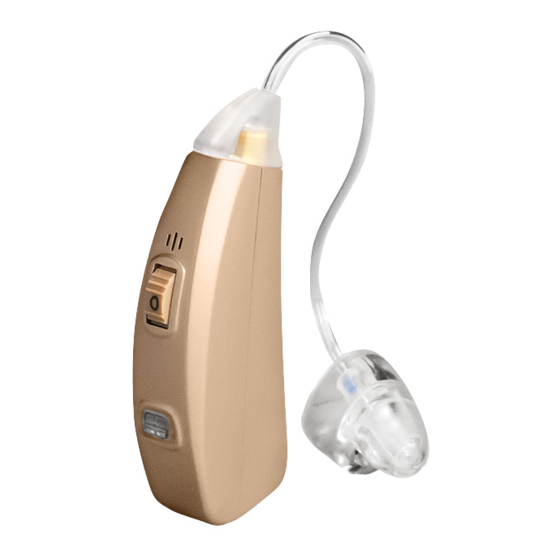
Page 5: Hearing Aid Diagram
MDHearingAid VOLT Diagram Thin Tubing Thin Tubing Base Microphones Volume Dial Hearing Aid (on/off switch) Body Stabilizer Bar Program Button & Charging Light ComfortTIP (Open) -
Page 6: Package Contents
MDHearingAid VOLT Package Contents Hearing Aid (in orange case) with Thin Tubing and Open Open ComfortTIP ; assembled for ComfortTIP your convenience. Allows natural sound and better air flow. Cord and Charger (Packaged Cord and Charger are white.) Cleaning Tool... - Page 7 Additional Accessories (in bag) Earhook 13PLUS Tubing Requires Customization; see page 11. Closed ComfortTIP After Assembly with Earhook, 13PLUS Tube ComfortTIP ComfortTIPs Left Right Ear specific. Closed Open Closed Open Left Right *Contents will vary depending on product ordered.
-
Page 8: Quick Start Guide
Steps 3 Easy Steps to Get Started Step 1: Charge Aid Step 2: Place VOLT on Your Ear Step 3: Turn VOLT On (Packaged Cord and Charger are white.) -
Page 9: Charge Aid
Connect aid to USB cord. charger c) Blue light will turn on. d) When fully charged, the blue light will turn green and VOLT is ready to use. Charger Light Blue Light = Charging faces right Green Light = Fully Charged... -
Page 10: Place Volt On Ear
Step 2 Step 2: Place VOLT On Your Ear a) Hold Thin Tubing at Stabilizer Bar ComfortTIP junction. Insert , with gentle pressure, into the opening of the ear canal. b) Place VOLT Body behind the ear. The curve of the Tubing should rest on top of the ear comfortably (in front of eye wear). -
Page 11: Turn Volt On
• To turn the VOLT ON, turn the Dial Volume Dial upward, past the click. • To turn the VOLT OFF, turn the Volume Dial downward past 0 until you feel a click IMPORTANT: When the VOLT is turned ON, it will take a few seconds to begin amplifying sound. -
Page 12: Changing Tubing And Domes
Changing Tubing and Domes 1: Attach Thin Tubing to VOLT * a) Hold top of Thin Tubing Base and twist VOLT Body clockwise to remove tubing that came on aid. b) Twist VOLT Body counter-clockwise, while gently pushing the new Thin Tubing Base onto threaded end of VOLT Body. -
Page 13: Attach Comforttip
2: Attach ComfortTIP to Thin Tubing* a) Hold Thin Tubing with one hand and ComfortTIP with other hand. Align dome so the vented end is toward the stabilizer bar. ComfortTIP b) Push over ridges on end of Thin Tubing until it is flush þ... -
Page 14: 13Plus Tube
ComfortTIP 13PLUS c) Insert , with Tube attached, into opening of ear canal. Place VOLT behind Mark and Cut Here ear so Earhook rests on top of ear. Mark a line Overlap on Tube ABOVE bottom of Earhook. Cut Tube at marked line. -
Page 15: Tube Cleaning
Tube Cleaning 1) Remove Tubing from VOLT . 2) Run Cleaning Tool's wire end back and forth through Tubing, starting with the triangular shaped Tubing Base. ComfortTIP 3) Debris will be forced out through ComfortTIP Wipe excess earwax off with Cleaning Tool's brush end. -
Page 16: Selecting A Program
• Once turned ON, the VOLT starts on Program 1. This is the default setting. Each time the VOLT is turned OFF it will re-set. • To change Programs, press the Program Button. You will hear a... - Page 17 Program Best For Description Indicator Increases sound in Home, watching TV, 1 Beep ALL frequencies time with family. Social settings: group High frequency 2 Beeps meetings, church, time emphasis with friends. One-on-one Background noise 3 Beeps conversations reduction Larger range of Group conversations focus, background 4 Beeps...
-
Page 18: Getting The Most From
Getting the Most from Your Hearing Aids Your satisfaction with hearing aids depends on the type and degree of your hearing loss and your expectations. No hearing aids will restore the normal hearing of youth. However, you can maximize your return on your investment by understanding the 3 Keys to Hearing Aid Happiness: Fit: The hearing aid must fit properly,... - Page 19 Key #1 — Patience New hearing aids can be a big adjustment. Your brain needs to re-learn how to hear and listen. After many years of not hearing well, it takes time and practice to redevelop these skills. Medical studies show that your brain requires approximately 21 days to adjust to your new Hearing Aids.
- Page 20 Key #2 — Balance We are born with two ears for balance. It is best to maintain balance while treating hearing loss. If you have hearing loss in both ears, medical studies have shown that you will get far greater satisfaction and the BEST results by wearing two Hearing Aids, for the following reasons: •...
- Page 21 ComfortTIP • Should not work for you, please contact customer service. They can provide different domes options. Using Hearing Aids takes practice and patience. Take advantage of our FREE support at any time via email support@mdhearingaid.com or telephone 312-219-8422.
-
Page 22: Care And Cleaning
Care and Cleaning • Use the brush on the Cleaning Tool to gently clean away wax and other debris. • Avoid physical shock to the Hearing Aid, such as dropping it on the floor. • Store your Hearing Aid in a cool dry place when not in use. -
Page 23: Troubleshooting
Troubleshooting 1. Instrument makes a whistling sound. • Whistling (feedback) occurs when • Clean any wax from the amplified sound returns to the Tubing or Ear Dome using microphone and is re-amplified. the Cleaning Tool. ComfortTIP • Try reinserting the into ear canal so it fits better. - Page 24 2. Instrument has a weak or no sound. • Make sure the Hearing Aid is ON. • Rotate the Volume Dial The Volume Dial should be set (on/off switch) back and forth, above the number one (1). in case dust or lint has collected in the controls.
- Page 25 Clean if clogged with wax. distort sounds. • If you are still having difficulty with your Hearing Aids please • Lower the volume. contact MDHearingAid • Turn Hearing Aid OFF completely. Customer Service at Charge for 90 minutes, and turn support@mdhearingaid.com Hearing Aid back ON.
-
Page 26: Protection Plan And
• Coverage must be purchased within your initial warranty period. • This service contract lasts for one (1) year from the date of purchase. Tubing and ComfortTIP Replacement ComfortTIPs For OPTIMAL PERFORMANCE, Tubing and should be replaced every 3 to 6 months. Visit www.mdhearingaid.com/accessories to order replacements. -
Page 27: Warranty And Repair
Warranty and Repair The MDHearingAid VOLT is covered against defects in materials and workmanship for 90 days from the date you receive your order. If our examination determines that the unit failed to work due to parts, materials or workmanship, we will repair or replace it for free. This warranty does not cover... -
Page 28: Return Policy
Return Policy Your satisfaction is guaranteed. If you are not satisfied with your MDHearingAid , you have 45 days from the date of purchase to return it for a full refund. MDHearingAid requires a minimum trial period of 21 days. This minimum trial period is required because medical studies show that your brain requires about three weeks to adjust to new hearing aids. - Page 29 No Refund No Refund We are unable to honor return requests after 45 days from the date of purchase as shown on your invoice. Return Facility address: MDHearingAid , Inc. Please DO NOT mail to this Returns Department address without contacting 18447 W.
-
Page 30: Warnings
Warnings to Hearing Aid Dispensers A hearing aid dispenser should advise a prospective hearing aid user to consult promptly with a licensed physician (preferably an ear specialist) before dispensing a hearing aid. If the hearing aid dispenser determines through inquiry, actual observation, or review of any other available information concerning the prospective user, that the prospective user has any of the following conditions, then consult a physician. - Page 31 Discontinue Use and Consult a Physician if: • Hearing in one or both • Your ear becomes occluded with ears worsens. excessive ear wax. • Hearing does not improve while • You develop an infection of your using a hearing aid. ear or ear canal.
-
Page 32: Important Notice For
Important Notice for Prospective Users Good health practice requires that a person with a hearing loss have a medical evaluation by a licensed physician (preferably a physician who specializes in diseases of the ear) before purchasing a hearing aid. Licensed physicians who specialize in diseases of the ear are often referred to as otolaryngologists, otologist or otorhinolaryngologists. - Page 33 If you have reservations about your ability to adapt to amplification, you should inquire about the availability of a trial/rental or purchase/option program. Many hearing aid dispensers now offer programs that permit you to wear a hearing aid for a period of time for a nominal fee after which you may decide if you want to purchase the hearing aid.
-
Page 34: Notice Of Cancellation
TO CANCEL THIS TRANSACTION, MAIL OR DELIVER A SIGNED AND DATED COPY OF THIS CANCELLATION NOTICE OR ANY OTHER WRITTEN NOTICE, OR SEND A TELEGRAM, TO MDHEARINGAID, 917 W. WASHINGTON BLVD, SUITE 202, CHICAGO, IL 60607 NO LATER THAN MIDNIGHT OF THE 45TH DAY AFTER THE INITIAL TRANSACTION. -
Page 35: Technical Specifications
Technical Specifications MAX OSPL90 ......125 dBSPL HFA Average OSPL90 ....116 dBSPL HFA Full-on-gain. - Page 36 Printed in U.S.A. 02.16.v2...
Need help?
Do you have a question about the VOLT and is the answer not in the manual?
Questions and answers