Table of Contents
Advertisement
Quick Links
Advertisement
Table of Contents

Related Manuals for MDHearingAid VOLT


Summary of Contents for MDHearingAid VOLT
- Page 1 VOLT Series M • User Manual...
- Page 2 “ M y hearing was so bad, I felt left out and didn’t go out much. I hear sounds now that I haven’t heard in years. This has changed my life. — Phyllis G.
- Page 3 Congratulations With the VOLT, you are back in control of the sounds around you, thanks to digital, rechargeable technology, paired with user-adjustable controls. Please read this User Manual in its entirety. Practice and patience are important as your ears relearn how to hear.
- Page 4 We’re here to help. Our dedicated, U.S.-based hearing instrument specialists are the heart and soul of MDHearingAid. They’re happy to guide and assist you with any questions you may have. Take advantage of our free one-on-one phone consultations. 312-366-3899 800-918-3914 (toll-free) Mon.
- Page 5 “ T he customer service has been outstanding. They continue to solve the problem and give solutions. — Joan P.
- Page 6 Table of Contents...
-
Page 7: Table Of Contents
Package Contents... 3 Replacing Tips & Tubing ..17 VOLT Diagram ....4 Using the Telephone ..20 Quick Start Guide . -
Page 8: Package Contents
Package Contents a) VOLT Hearing Aid(s) b) Charger Power Dock Adapter Thin Tubing ComfortTIP ™ Cord c) Cleaning Tool Wire Magnet Brush *Contents will vary depending on quantity ordered. -
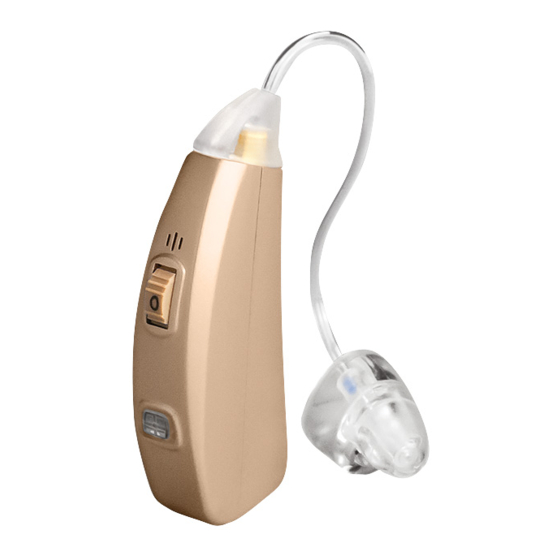
Page 9: Volt Diagram
VOLT Diagram Tubing Base Thin Tubing Microphones ComfortTIP ™ Volume Dial Snap End Stabilizer Bar Program Button VOLT Body & Charging Light (on/off control) Charging Port VOLT comes assembled for your convenience. - Page 10 “ I’m impressed with the quality and clarity of sound. I love that it is rechargeable. — Michael S.
-
Page 11: Quick Start Guide
Step 3: Place VOLT on ear Right VOLT in Left VOLT in right hand. left hand. To identify left/right VOLT: Hold an aid upright in each hand, with controls facing you. The tips/tubing point toward each other when in the correct hand. -
Page 12: Charge
When fully charged, blue light will turn green and VOLT is ready to use. Blue Light = Charging Green Light = Fully Charged Light Off = Not Charging * It takes approximately 3–3.5 hours to fully charge the VOLT. On average, a full charge lasts 18–22 hours. - Page 13 It will turn off automatically and start to charge. A sensor stops the charging process once the battery is full, so there is no risk of battery degeneration if VOLT is left on the charger. Power Cord...
-
Page 14: Turn On
Step 2: Turn On The VOLT’s program button also functions as Flashes green the on/off control. • ON: Press and hold the program button for 2–3 seconds. The light will flash green once when turned on. • OFF: Press and hold the program button for Flashes 2–3 seconds. -
Page 15: Place On Ear
Hold thin tubing at the stabilizer bar junction. Insert ComfortTIP with gentle pressure into ear canal. b) Place VOLT body behind ear. The curve of thin tubing should rest on top of your ear comfortably (next to glasses). c) Tuck stabilizer bar in the outer bowl of ear. -
Page 16: Adjust Volume
Decrease Caution! To avoid a sudden blast of sound, please raise the volume SLOWLY. Please note: Whistling may be heard if the VOLT is turned on but not positioned securely in your ear. Once the ComfortTIP is properly inserted, whistling... -
Page 17: Program Selection
3 beeps or high octave music. Reduce background noise in any loud 4. Restaurant 4 beeps environment and hear directly in front of you. *Program 1 is the default setting. When VOLT is turned off, it will reset to Program 1. -
Page 18: Care And Cleaning
, buttons, and microphones (found on the top and front of VOLT). ™ The VOLT body can be cleaned with a tissue or soft cloth. Do not use water, alcohol, or other liquid agent to clean the VOLT as it may damage it. - Page 19 Use the cleaning tool wire to remove debris from tubing. a) Remove tubing (see page 18). b) Thread wire through tubing base and out of the tip. c) Wipe end of wire clean and repeat as necessary. d) Reattach tubing to VOLT body.
- Page 20 • For maximum battery life, charge VOLT until blue light turns green with each charge. • Do not let your VOLT get wet. • Do not use hair spray or a hair dryer while wearing your VOLT. • Do not expose your VOLT to excess moisture or heat.
-
Page 21: Ordering Parts & Protection
(3) months. Over time, these items wear out and may become stiff, affecting both fit and sound quality. Regular replacement will keep your VOLT sounding and feeling like new. -
Page 22: Replacing Tips & Tubing
Replacing Parts Tips and tubing are left and right ear specific. Thin Tubing: blue label indicates left ear. Left red label indicates right ear. ComfortTIPs ™ Right Left ear tips curve the left. Right ear tips curve to the right. Left Right If you require a different size, you’re not getting... - Page 23 Attach tubing: Gently push new tubing on. c) Make sure tubing base is flush with sides of VOLT body when you are finished. Please note: Thin tubing is left and right ear specific.
- Page 24 IMPORTANT: The end of the tubing should be visible through the opening of the ComfortTIP. Otherwise, tubing may detach from tip when Stabilizer Vented removing VOLT from your ear. Please note: ComfortTIPs are left ™ and right ear specific.
-
Page 25: Using The Telephone
Using the Telephone If whistling occurs while using the phone, try various positions with the phone’s audio output and VOLT microphone until you find what works best for you. Audio Output Microphone... -
Page 26: Troubleshooting
Troubleshooting Issue: Intermittent or Feedback/ Weak or distorted sound whistling no sound Turn VOLT on Adjust volume Charge VOLT Use dehumidifier Clean ear canal Clean tubing/tip Change tubing/tip For more detailed troubleshooting tips, see the following pages. - Page 27 • Trapped moisture may be distorting the sound. Consider using a hearing (see page 18) and rotate volume dial aid dehumidifier overnight. to four (4). If it whistles, your VOLT is working and wax or debris may be • Lower the volume. blocking the sound.
- Page 28 Device makes a whistling sound. • Whistling (feedback) occurs when • If whistling occurs when raising the amplified sound returns to the volume, you might need more gain microphone and is re-amplified. and should try our closed ComfortTIP. Call us at 800-918-3914. •...
- Page 29 (4). If it whistles, your VOLT is working and wax or debris may be • Make sure the VOLT is on (see page 9). blocking the sound. • Make sure VOLT is charged. If unsure, •...
-
Page 30: Warranty And Repair
This warranty does not cover malfunctions due to unusual wear and tear or mistreatment of your VOLT, such as physical shock, damage from moisture or sweat, excessive wax build-up, or tampering with the device, all of which void the warranty. - Page 31 Repair Mailing Guidelines Replacement Facility: • Mail via USPS • Send ONLY the VOLT body • Use a small padded envelope • Write RMA number on the RMA # OUTSIDE of envelope MDHearingAid 650 W Lake St #120 DON’T send: Chicago, IL 60661 •...
-
Page 32: Return Policy
Return Policy Your satisfaction is guaranteed. If you are not satisfied with your MDHearingAid VOLT, you have 45 days to return it for a full refund. ® We are unable to honor return requests after 45 days from the date of delivery as reported by shipment tracking. - Page 33 1-45 100% No Refund No Refund Return Facility: RMA # You must contact customer service MDHearingAid for an RMA number before mailing 650 W Lake St #120 to this address. Please use USPS to Chicago, IL 60661 send your package.
-
Page 34: Warning To Dispensers
Warning to Hearing Aid Dispensers A hearing aid dispenser should advise a prospective hearing aid user to consult promptly with a licensed physician (preferably an ear specialist) before dispensing a hearing aid if the hearing aid dispenser determines through inquiry, actual observation, or review of any other available information concerning the prospective user, that the prospective user has any of the following conditions: •... - Page 35 Stop using the MDHearingAid VOLT and consult a physician if: ® • Hearing in one or both ears worsens. • Your ear becomes occluded with excessive ear wax. • Hearing does not improve. • You develop an infection of your ear or •...
-
Page 36: Important Notice For Users
Important Notice For Users Good health practice requires that a person with hearing loss has a medical evaluation by a licensed physician (preferably a physician who specializes in diseases of the ear) before purchasing a hearing aid. Licensed physicians who specialize in diseases of the ear are often referred to as otolaryngologists, otologists or otorhinolaryngologists. - Page 37 dispensers now offer programs that permit you to wear a hearing aid for a period of time for a fee after which you may decide if you want to purchase the hearing aid. Federal law restricts the sale of hearing aids to those individuals who have obtained a medical evaluation from a licensed physician.
-
Page 38: Notice Of Cancellation
TRANSACTION, MAIL OR DELIVER A SIGNED AND DATED COPY OF THIS CANCELLATION NOTICE OR ANY OTHER WRITTEN NOTICE, OR SEND A TELEGRAM, TO MDHEARINGAID, 650 W LAKE ST #120, CHICAGO, IL 60661 NO LATER THAN MIDNIGHT OF THE 45TH DAY AFTER THE DATE OF DELIVERY AS REPORTED BY SHIPMENT TRACKING. -
Page 39: Technical Specifications
MAX OSPL90 ....120 dBSPL HF Average OSPL90 ... . . 110 dBSPL (You can find your VOLT serial number on the back of the hearing aid) HFA Full-on-gain . - Page 40 v03.21...
Need help?
Do you have a question about the VOLT and is the answer not in the manual?
Questions and answers