Table of Contents
Advertisement
Advertisement
Table of Contents

Subscribe to Our Youtube Channel
Related Manuals for Shining 3D Aoralscan 3


Summary of Contents for Shining 3D Aoralscan 3
- Page 1 Aoralscan 3 Manual V1.0.0.30...
- Page 2 Foreword General The Manual (hereinafter referred to as "the Manual") introduces the functions, installation, usage and maintenance of the Aoralscan 3 (hereinafter referred to as "the Scanner"). Safety Instructions Signal Meaning Additional information for particular situation. Improper actions or conditions that may damage the product or injury, and consequently void your warranty or service contract or lose the patient data or system data.
- Page 3 merchantability or fitness for any particular purpose. Further, Shining3D Corporation reserves the right to revise this publication and to make changes from time to time in the contents hereof without obligation of Shining3D Corporation to notify any person of such revision or changes. ⚫...
-
Page 4: Table Of Contents
Table of Contents Foreword ....................- 1 - Read This First ................- 1 - Basic Information ..............- 1 - Intended Use ............... - 4 - Contraindications ..............- 5 - Warnings ................- 5 - Waste Electrical and Electronic Equipment ......- 6 - Disposal ................ - Page 5 4.2.1. Scan head and scanner body ......... - 24 - 4.2.2. Scanner Pedestal ............- 25 - 4.2.3. Relay box ..............- 25 - 4.2.4. Main Cables ..............- 26 - Software Overview ............. - 27 - 4.3.1. System requirements ............ - 27 - 4.3.2.
- Page 6 Pre-Design ................. - 42 - View Data Storage Path ............- 42 - Upload Order ..............- 42 - Care and Maintenance .............. - 43 - Pre-cleaning, Disinfection, and Sterilization ......- 43 - Scanner Pedestal Care ............- 44 - Scanner Body Care ..............
-
Page 7: Read This First
Name, residence, contact information and after-sales service of the registrant or the filer: Registrant's name: SHINING 3D Tech Co., Ltd. After-sales service provider: SHINING 3D Tech Co., Ltd. Name, residence, contact information and after-sales service of the manufacturer Manufacturer name: SHINING 3D Tech Co., Ltd. - Page 8 as needed by using the relevant buttons on the top, bottom and right side. - Performance Posterior groove teeth scanning and imaging: Under normal operating conditions, the scanner can scan and image human posterior alveolar teeth to form a 3D digital model. Irradiance: Under normal use of the intraoral scanner, the irradiance is not greater than 1mW/cm2.
- Page 9 (3) Try to gently shake the scan head to ensure that it locks into place and is stable. CAUTION The Aoralscan 3 intraoral scanner should not be used in close proximity or stacked with other equipment, and if it must be used in close proximity or stacked, observe to verify proper operation in the configuration in which it is used.
-
Page 10: Intended Use
The use of accessories and cables other than those specified may result in increased emissions or reduced immunity of the Aoralscan 3 intraoral scanner, except for cables sold by the manufacturer of the Aoralscan 3 intra-oral scanner as spare parts for internal components. -
Page 11: Contraindications
Contraindications No known contraindications. Warnings Before using the Aoralscan 3, read these warnings and Safety information on chapter 2. ⚫ Do not attempt to disassemble, repair, or modify the scanner and software. ⚫ There are no user serviceable parts inside the scanner. Necessary modifications must be made only by the manufacturer or its designated agents. -
Page 12: Waste Electrical And Electronic Equipment
⚫ To avoid electrical shock, use only supplied power adapter and connect it only to properly grounded wall outlets. ⚫ The device should not be used adjacent to or stacked with other equipment. If adjacent or stacked use is necessary, the device should be observed to verify normal operation in the configuration in which it will be used. -
Page 13: Warranty
Warranty The warranty is void if unauthorized personnel perform service or maintenance on the set of Aoralscan 3. To ensure correct product performance and to obtain warranty service, contact technical support. Contact Information Manufacturer Shining 3D Tech Co., Ltd No.1398, Xiangbin Road, Wenyan, Xiaoshan, Hangzhou, Zhejiang, China www.shining3d.com... -
Page 14: Safety Information
⚫ To ensure the performance and safety of the scanner, use only the original accessories provided with the scanner (or accessories specified by Shining 3D, consult technical support for details) and software. ⚫ Use only supplied accessories and approved software with the scanner in order to Aoralscan 3_Manual_V1.0.0.30... -
Page 15: Legend Of Labels And Symbols
achieve the designed performance. ⚫ Do not use a power adapter other than the one supplied with the package. ⚫ Connecting the scanner to an unknown power adapter is very dangerous and may lead to fire or explosion. ⚫ Using cables or accessories other than those specified for use with the scanner may result in increased emissions or decreased immunity of the device. -
Page 16: On The Scanner
Serial number AOS3-AH001K13 represents the 001 product manufactured on November 13, 2018. ⚫ AOS3……Stands for scanner model, abbreviation for Aoralscan 3. ⚫ AH……Represents the year of production, A – J in alphabetical order stands for 1: 9 (Since letter I and number 1 are easily confused, ignore I), and 0 is represented by the letter X. -
Page 17: Compliance
Indicates the product serial number information. Indicates CE-related certification information. Class II equipment. Indicates laser information. Indicates Shining 3D’s representative information. Indicates that for more information, see use manual. Compliance Anyone creating or changing a medical electrical system through a combination with other... -
Page 18: Classification
Check the cable housing before use. Do not use the scanner if the housing is damaged or the cable is abraded. ⚫ All devices connected to the Aoralscan 3 shall comply with IEC 60601-1 and IEC 60950. Aoralscan 3_Manual_V1.0.0.30 - 12 -... -
Page 19: Emc Notice
The guidance and manufacturer's statement are shown in the attached table. Warning ⚫ Aoralscan 3 should not be used in proximity or on top of other devices. If it must be, observe to verify that it works properly in the configuration in which it is used. ⚫... - Page 20 Interference immunity The Aoralscan 3 is intended for use in the electromagnetic environment specified below. The customer or user of the Aoralscan 3 should assure that it is used in such an environment. Guidance and Manufacturer's Statement - Electromagnetic emission Aoralscan 3 is intended to be used in the following electromagnetic environment.
- Page 21 If image distortion occurs, it Power frequency may be necessary to position (50/60 Hz) 30 A/m 30 A/m the Aoralscan 3 further from magnetic field sources of power frequency IEC 61000-4-8 magnetic fields or to install magnetic shielding. power frequency magnetic...
- Page 22 Aoralscan 3 is intended to be used in the following electromagnetic environment. The purchaser or user of Aoralscan 3 should ensure that it is used in this electromagnetic environment: Electromagnetic environment – Immunity test IEC 60601 test levels Compliance level...
- Page 23 Guidance and Manufacturer's Statement - Electromagnetic emission Aoralscan 3 is intended to be used in the following electromagnetic environment. The purchaser or user of Aoralscan 3 should ensure that it is used in this electromagnetic environment: Electromagnetic environment – Immunity test...
- Page 24 If the measured field strength in the location in which the Aoralscan 3 is used exceeds the applicable RF compliance level above, the Aoralscan 3 should be observed to verify normal operation. If abnormal performance is observed, additional measures may be necessary, such as reorienting or relocating the Aoralscan 3.
- Page 25 Portable RF communications equipment (including peripherals such as antenna cables and external antennas) should be used no closer than 30 cm (12 inches) to any part of the Aoralscan 3, including cables specified by the manufacturer. Otherwise, degradation of the Aoralscan 3_Manual_V1.0.0.30...
-
Page 26: Biological Safety
performance of this equipment could result. ⚫ If higher IMMUNITY TEST LEVELS than those specified in IEC60601-1-2. ⚫ The minimum separation distance may be lowered. Lower minimum separation distances shall be calculated using the equation specified in IEC60601-1-2 Chapter 8.10. ⚫... - Page 27 Aoralscan 3_Manual_V1.0.0.30 - 21 -...
-
Page 28: Unpack The Package
3. Unpack the Package Check the carry box for the following items. If any item is missing or damaged, contact the distributor or service provider immediately. 1 x Intraoral Scanner with a USB 3.0 cable (length: 2m) 1 x protection cap Scanner heads (4 standard scanner heads and 1 small scanner head) 1 x scanner pedestal 1 x AC/DC power adapter (input: 100-240 V, 50-60 Hz, 1.0 A;... - Page 29 immunity to external EMI/EMC occurrences. Non-specified peripherals, and cables in some cases, can also increase leakage current or compromise the safety of the grounding scheme. ⚫ Using accessories or power supply units other than those specified may cause the warranty to void and result in increased emissions, decreased EMI immunity of the device, or even damages to the device and personal injuries.
-
Page 30: Overview
4. Overview Benefits of the Product The Aoralscan 3 is designed to provide powder-free intraoral color scanning, with higher speeds bringing greater accuracy and less time-lag for image acquisition. It can be used to scan a single tooth, multiple teeth, and whole dental arches. The captured 3D digital images of teeth and soft-tissue areas are designed to be used in conjunction with the supplied software programs. -
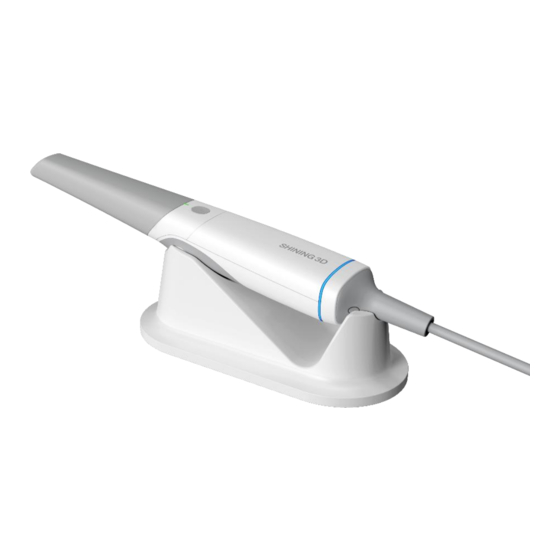
Page 31: Scanner Pedestal
Indicates the status of the scanner. ⚫ Flashing green: The scanner is in the connection or warm-up phase. Indicator light ⚫ Green: The scanner is in scanning or standby mode. ⚫ Blue: The stitching is unsuccessful when the scanner is scanning. ⚫... -
Page 32: Main Cables
Item Description 1. Power socket. 2. Data cable, the other end is connected to the USB3.0 port Relay Box of the computer. 3. Port to which the scanner should be connected. USB cable storage To prevent the USB cable from getting damaged by excessive bending or twisting, you should loosely coil the cable and avoid making kinks or sharp bends. -
Page 33: Software Overview
Scanner connection cable Software Overview The Aoralscan 3 is designed to operate with the software programs, which include four modules: ⚫ Calibration module Calibrate the scanner. ⚫ Dental order system module Designed to manage and store patient data, including cases, prescriptions, and restoration information, realizing functions such as order creation, editing, searching, scanning and deletion, as well as uploading, downloading, previewing and tracking of scanned order and data. -
Page 34: Installing The Software Programs
The computer or notebook you use shall meet the safety requirements of IEC 60601-1 and IEC 60950. 4.3.2. Installing the software programs The USB flash drive contains the IntraoralScan software program. CAUTIONS ⚫ Install the software programs in accordance with the instructions given here. ⚫... -
Page 35: Setting The Scanner
5. Setting the Scanner Connecting the Scanner CAUTIONS ⚫ Ensure the supplied software programs are installed on your computer before the connection. ⚫ If the accuracy of the equipment decreases or if the equipment does not work properly, please consult technical support promptly. ⚫... -
Page 36: Disconnecting The Scanner
(4) Connect the USB 3.0 downstream port on the pedestal and your computer with the supplied USB 3.0 cable. (5) Turn on the power switch on the pedestal. (6) Click the shortcut icon of IntraoralScan on the desktop to launch the software. Disconnecting the Scanner CAUTION Do not attempt to directly disconnect the scanner by removing the power cable and USB... - Page 37 authorized distributor. Follow the steps below to perform the calibration: (1) Insert the power plug of the supplied power adapter into the power connector on the pedestal, and plug the power adapter into a wall outlet. (2) Connect the scanner cable to the USB 3.0 upstream port on the pedestal. (3) Connect the USB 3.0 downstream port on the pedestal and your computer with the supplied USB 3.0 cable.
- Page 38 Otherwise, the Calibrator temperature may get very high. (11) Reattach the scanner head to the scanner for later use or put the protection cap onto the scanner to prevent damage and dust. Aoralscan 3_Manual_V1.0.0.30 - 32 -...
-
Page 39: Scanning Preparations
6. Scanning Preparations Read and follow the guidelines and heads given in this chapter prior to acquire quality images. Warning Concerning hand hygiene and personnel safety when performing a scan, you must wear clean surgical gloves through the whole process. Intraoral Environment ⚫... -
Page 40: Heating The Scanner Head
(2) Gently and carefully attach the scanner head to the scanner body, with the mirror facing downward. (3) Connect the power supply to the Aoralscan 3. See Connecting the scanner in chapter 4. (4) Place the scanner in the pedestal to secure it in place. - Page 41 When the message disappears, the warm-up is done. The scanner is now ready for an acquisition. NOTES ⚫ The heater maintains constant temperature on the scanner head. ⚫ The scanner head is being heated whenever power is supplied, even if the scanner is in standby or sleep mode.
-
Page 42: Clinical Case Quick Guide
7. Clinical Case Quick Guide Note: This chapter takes clinical case as example to show software related operations. For more software related operations, see User Manual. Connect the Scanner See "5.1 Connecting the Scanner." Activate the Scanner When the scanner is first used, it must be connected to the internet and activated successfully. -
Page 43: Scan Upper Jaw
Click Scan. Scanning begins. Scan Upper Jaw Confirm that the image of the camera window in the upper right corner of the software is displayed normally. Click the scan button or press the space bar to start scanning. Before scanning, click in the right side and then it will turn to . -
Page 44: Scan Lower Jaw
When the scanning head leave the object or the scanning is paused, the green area means this area is not scanned. User can re-scan the corresponding area according to the demand. Confirm that the model scan is complete. Click or long press the space bar to process and save the data. - Page 45 Before aligning After aligning After the upper and lower jaws’ data are stitched successfully as well as the whole jaw, click or press the space bar to pause the scanning, check the occlusion and collision results. Aoralscan 3_Manual_V1.0.0.30 - 39 -...
-
Page 46: View Result Data
Click or long press the space bar to post-process the data. View Result Data View result data in IntraoralScan. 7.9.1. View Upper/Lower Jaw Aoralscan 3_Manual_V1.0.0.30 - 40 -... -
Page 47: View Occlusal Effect
7.9.2. View Occlusal Effect Aoralscan 3_Manual_V1.0.0.30 - 41 -... -
Page 48: Pre-Design
Pre-Design View Data Storage Path Click under New Order to return to the order interface and click to open the folder path of the current order storage. Upload Order Click to upload the scanned order. Aoralscan 3_Manual_V1.0.0.30 - 42 -... -
Page 49: Care And Maintenance
8. Care and Maintenance Pre-cleaning, Disinfection, and Sterilization The whole set of Aoralscan 3, including scanner head, scanner body, and scanner pedestal, requires proper care, cleaning, and handling. As individual part may be processed differently, read and follow the information and instructions given to help you effectively and thoroughly reprocess the set. -
Page 50: Scanner Pedestal Care
Follow the steps below to complete the disinfection: (1) Disconnect the power of the Aoralscan 3 (see Disconnecting the scanner on chapter 4). (2) Hold the pedestal firmly with your hand. (3) Use new cotton gauze moistened with 70%-75% solution of ethanol to wipe the surface of pedestal. - Page 51 Follow the steps below to complete the disinfection: (1) Disconnect the power of the Aoralscan 3 (see Disconnecting the scanner on chapter 4). (2) Hold the scanner head firmly with your thumb and forefinger on both sides, and then gently slide the head off from the scanner, as illustrated.
-
Page 52: Scanner Head Care
Follow the steps below to perform cleaning and high-level disinfection: (1) Disconnect the power of the Aoralscan 3 (see Disconnecting the scanner on chapter 4). (2) Hold the scanner head firmly with your thumb and forefinger on both sides, and then gently slide the head off from the scanner body. - Page 53 CAUTION Do not place your finger(s) on the mirror of the head when detaching as this may result in damage to the mirror. (3) Hold the supplied protection cap with the triangle mark facing upward. Then, align the protection cap blocks to the matching slots on the front end of the scanner body. (4) Slide the protection cap onto the scanner to prevent damage and dust.
-
Page 54: Cleaning And Steam Sterilization
Follow the steps below to perform cleaning and steam sterilization: (1) Disconnect the power of the Aoralscan 3 (see Disconnecting the scanner on chapter 4). (2) Hold the scanner head firmly with your thumb and forefinger on both sides, and then gently slide the scanner head off from the scanner, as illustrated. -
Page 55: Attaching The Scanner Head
(5) Pay particular attention to inspect the mirror of the head to ensure that the mirror is not cracked or broken and there is no scratch on it. CAUTION If the mirror of the head has cracks or scratches, stop the cleaning process and contact your local distributor or service provider. -
Page 56: Scanner Storage
In case you need to transport the device, we strongly recommend that you keep the original packaging after unpacking your Aoralscan 3. Shipping the device without its original packaging material may cause possible product damage and result in additional service fees. -
Page 57: Daily And Long-Term Storage
carry box. ⚫ Before closing the lid, make sure no part of the product is protruding from the package. 8.5.2. Daily and Long-term Storage ⚫ Always place the scanner in the pedestal when it is not in use. ⚫ When the scanner head is detached from the scanner body, always protect the subtle units and the inner optical components on the front end of the scanner by putting on the supplied protection cap. -
Page 58: Hardware Specification
9. Hardware Specification Specifications Type name Intraoral Scanner Model name Aoralscan 3 Scanner Standard scanner head: 16 mm × 12 mm × 17 mm Scan field Small scanner head: 12 mm × 9 mm × 17 mm Non-contact scanner with the structured light Scan theory Dimension (L ×...
Need help?
Do you have a question about the Aoralscan 3 and is the answer not in the manual?
Questions and answers