Advertisement
Quick Links
Introduction:
The Odyssey gauge series from Dakota Digital, Inc. incorporates the
reliability and quality of our standard gauges, along with several unique features
and easy mounting. These features include:
• A warning feature that flashes the gauge readout when outside operating
limits.
• A connection for an external warning indicator that is activated when the
gauge flashes.
• User adjustable warning points.
• Microprocessor stabilized readings.
• Quick-Start feature to provide accurate readings quickly after being powered
up.
• Night dimming with lens label lighting.
• High Visibility VFD display for sunlight readability.
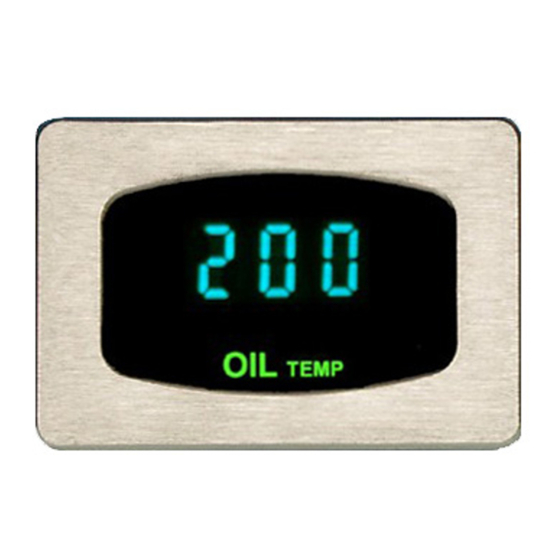
The oil temperature gauge will read the temperature that the engine oil is
currently at. The oil temperature gauge will operate and read correctly between
the temperature range of 0 - 300° F(0 - 150°C). Because of the wide
temperature span, the gauge may not be as accurate below 75° F (24°C). The
gauge has a user adjustable high warning level. This can be set to indicate when
the engine oil is beginning to overheat.
ODY-07-1 or ODY-07-2
OIL TEMPERATURE GAUGE
Advertisement

Related Manuals for Dakota Digital Odyssey ODY-07-1


Summary of Contents for Dakota Digital Odyssey ODY-07-1
- Page 1 ODY-07-1 or ODY-07-2 OIL TEMPERATURE GAUGE Introduction: The Odyssey gauge series from Dakota Digital, Inc. incorporates the reliability and quality of our standard gauges, along with several unique features and easy mounting. These features include: • A warning feature that flashes the gauge readout when outside operating limits.
-
Page 2: Operation
Operation: The gauge needs only the red and black wires connected to light up. The gray wire connects to the sender. The sender must be Dakota Digital part SEN-04-1 or SEN-04-2. Sending units from other manufacturer’s will cause incorrect readings. SEN-04-1 has 1/8” NPT threads and SEN-04-1 has 3/8” NPT threads. - Page 3 For higher current buzzers or lights, a relay will need to be used to switch the indicator on. Dakota Digital’s RLY-1 30A relay may be used for this. One of the coil wires should be connected to 12 volts and the other coil wire connected to the yellow warning wire.
- Page 4 Mounting: The gauge requires a rectangular cut out that is about 2 9/16“ x 1 11/16“. It should be inserted into the opening from the front and the U-clamp will be installed from the back. Tighten the two nuts on the U-clamp so that the gauge is secure.
-
Page 5: Troubleshooting Guide
Troubleshooting guide. Problem Possible cause Solution Gauge will not light up Red wire does not have Connect to a location that has power. power. Black wire is not getting Connect ground to a different location. a good ground. Fuse is blown. Replace in line fuse. -
Page 6: Service And Repair
ODYSSEY SERIES DIGITAL GAUGE LIMITED WARRANTY DAKOTA DIGITAL (the Company) warrants to the ORIGINAL PURCHASER of this product that should it, under normal use and condition, be proven defective in material or workmanship within 24 MONTHS FROM THE DATE OF PURCHASE, such defect(s) will be repaired or replaced (at the Company’s option) without charge for parts or labor...
Need help?
Do you have a question about the Odyssey ODY-07-1 and is the answer not in the manual?
Questions and answers