Table of Contents
Advertisement
Quick Links
Advertisement
Table of Contents

Related Manuals for Belshaw Brothers TG 50


Summary of Contents for Belshaw Brothers TG 50
- Page 1 WAL-MART Thermoglaze Model TG 50 Operator’s Manual Belshaw Bros., Inc. 814 44 Street NW, Suite 103 Auburn, WA 98001 USA Phone: (206) 322-5474 • Fax: (206) 322-5425 Toll Free: 1-800-578-2547 Email: service@belshaw.com • http://www.belshaw.com...
- Page 3 Congratulations on buying a new Thermoglaze from Belshaw Bros., Inc. Please inspect the unit carefully for damage or missing pieces immediately after receiving your system. Belshaw cannot pay for shipping damage, because the freight company has accepted the machine from Belshaw in good condition, and is responsible for its safe delivery.
-
Page 5: Table Of Contents
Contents Unloading and Uncrating Installation Assembly Operation SB-0345 R1 Cleaning Disassembly Cleaning Assembly Maintenance Troubleshooting Appendix SB-0361 Parts List Drawing Insert Page Insert Belshaw Bros., Inc. • www.belshaw.com • Phone 206-322-5474 • Fax 206-322-5425 Thermoglaze MN-1720WM... - Page 6 Preface The operator of the Thermoglaze is expected to behave safely, read this manual before operation, and follow its instructions and warnings. Study the instructions and warnings in this manual carefully before operating the equipment. A thorough understanding of how to install, maintain, and safely operate the Thermoglaze will prevent production delays and injuries.
-
Page 7: Unloading And Uncrating
Unloading and Uncrating Do not connect the Thermoglaze or the DO NOT LIFT EXCESSIVE Thermolizer to electrical power before WEIGHT completing the assembly and placement of the products. Once the crate has been delivered, immediately take the covers off the crate and Figure 1-1 shows the system in the crate ready to inspect for hidden damage. -
Page 8: Installation
Installation Venting: WARNING Local codes prevail. The authorities having jurisdiction are stated in NFPA 96-1994 To avoid electrocuting yourself or damaging regarding requirements for the Thermoglaze. the Thermoglaze, never allow water, steam, cleaning solution, or other liquid to enter the electrical panels or connections Building Layouts: Specification sheets and AutoCAD drawings for... -
Page 9: Assembly
Assembly trough. The Glaze trough slips into the 2 holes on Clean all parts with mild soap and water and let dry before assembly and applying either side of the drain tray with the waterfall electrical power to the equipment. headed toward the oven. - Page 10 Figure 3-2 Right Hand View: Figure 3-3 Control Panel View: Belshaw Bros., Inc. • www.belshaw.com • Phone 206-322-5474 • Fax 206-322-5425 MN-1720WM Thermoglaze...
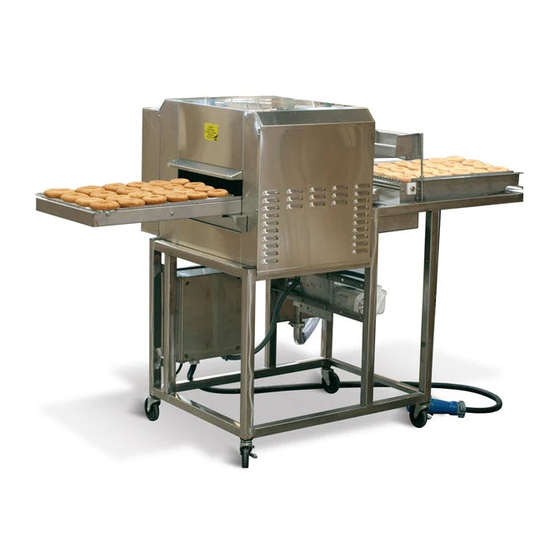
- Page 11 WARNING TURN OFF POWER SOURCE TO THE MACHINE BEFORE REMOVING ANY ACCESS COVER OR GUARDS The Thermoglaze system consists of a Thermoglaze unit and the Thermolizer. They are placed in unison in the area located for the production of donuts. See Figure 4-6 for Thermoglaze system.
-
Page 12: Operation
Operation • Turn on oven power switch and allow to heat • When the screen of donuts is through the to operating temperature. (Note: conveyor glazer and stopped forward travel, place the glazed product on a rack for cooling using will not move until the oven is up to operating temperature and the donut the 2 delrin tray grips provided with the unit. - Page 13 CAUTION! CAUTION! To avoid burning yourself, never touch hot To avoid burning yourself, never touch the screens when the machine is in operation. hot outfeed oven end panel when the machine is in operation. WARNING CAUTION! Lifting the glaze bucket may cause sprains or back injury.
-
Page 14: Sb-0345 R1
SB-0345 Rev 1 AFFECTS: TG-50 PURPOSE: PROGRAMMING THE OGDEN ETR-9000 TEMPERATURE CONTROLLER Operator Interface: The operator interface on the Ogden ETR-9000, Temperature Controller, consists of the following: • A scroll key used to select a parameter to be viewed or adjusted. •... - Page 15 Figure 2 - Menu Flow Chart Belshaw Bros., Inc. • www.belshaw.com • Phone 206-322-5474 • Fax 206-322-5425 Thermoglaze MN-1720WM...
- Page 16 TG-50 Parameter Settings Tables 1, 2 and 3 below list of the temperature controller default settings and the Belshaw Factory settings. When installing a new controller 3 of the default setting must be changed to the Belshaw Factory settings. • Push and hold the scroll key for 3 seconds, this will take you to the “SEt”...
- Page 17 Table 1 - Parameter Descriptions Factory 420ºF set to “uSEr” after setup 450ºF -40ºF 0ºF 0ºF Belshaw Bros., Inc. • www.belshaw.com • Phone 206-322-5474 • Fax 206-322-5425 Thermoglaze MN-1720WM...
- Page 18 Table 2 - Parameter Descriptions Set to “nonE” Belshaw Bros., Inc. • www.belshaw.com • Phone 206-322-5474 • Fax 206-322-5425 MN-1720WM Thermoglaze...
- Page 19 Table 3 - Parameter Descriptions Set to Belshaw Bros., Inc. • www.belshaw.com • Phone 206-322-5474 • Fax 206-322-5425 Thermoglaze MN-1720WM...
-
Page 20: Cleaning
Cleaning Daily TG Cleaning Remove the glazer drain tray. Instructions Disassembly 1. Allow the Thermoglaze to completely cool. (All material must under 130º) 2. Pump the unused glaze back into a bucket. 3. Disconnect the TG from power! 4. Remove the glaze trough. 7. - Page 21 8. Remove the conveyor assembly through the 10. Open the safety cover. outfeed end of the oven. 11. Loosen the lower glaze hose clamp. WARNING Failure to wash the conveyor chain daily may cause damage to the conveyor drive motor. The Thermoglaze will shut down if the chain becomes stiff from glaze buildup.
- Page 22 13. Remove the upper pump clamp. 17. Unscrew and remove the 4 glaze pump cover wing nuts. 14. Lift the glaze reservoir and remove the gasket 18. Remove the glaze pump cover and “O” ring. 15. Remove the glaze reservoir and hose. 19.
- Page 23 20. Insert a flat tip screw driver into the slot to loosen the pump body if it can not be removed by hand. 21. Remove the pump body and impellers. 22. Remove the impellers from the pump body. WARNING Spilled glaze on the floor may cause slipping and falling, resulting in sprains, burns, broken bones or back injury.
-
Page 24: Cleaning
Cleaning 1. Hand wash all parts of the oven and glazer with warm soapy water. 2. Do not use caustic cleaners on oven parts. 3. You may use an approved oven cleaner on the stainless steel finger cover only. 4. Do not use oven cleaner on any other part of the oven or glazer! 5. -
Page 25: Assembly
WARNING Growth of organisms in gaps, crevices, glaze pump, lines, or frame can result from improper cleaning and can cause mild to serious ill health. WARNING Donuts or filling may catch fire due to improper cleaning and can cause serious injury, burns, or death. - Page 26 5. Install the 4 wing nuts finger tight. 8. Install the upper clamp. 6. Set the upper gasket on top of the glaze 9. Install the lower gasket, hose and clamp. pump. 7. Install the glaze reservoir. Belshaw Bros., Inc. • www.belshaw.com • Phone 206-322-5474 • Fax 206-322-5425 MN-1720WM Thermoglaze...
- Page 27 10. Close the safety cover. Make sure the key is 12. Insert the conveyor through the outfeed end in the safety switch. of the oven. 13. Make sure the locating pin is in the matching NOTE hole. The glaze pump will not run with the safety cover open.
- Page 28 14. Pull the drive coupling back and line it up with the conveyor drive shaft. 15. Install the glaze drain tray. 16. Connect the drive belt. 17. Install the rear panel by making sure the key attached to the rear panel is inserted into the safety interlock switch, then screwing in the thumb screw.
-
Page 29: Maintenance
Maintenance The ThermoGlaze is engineered to need little maintenance. By keeping the system clean, the equipment will last for years. The only maintenance that is required is the following: When cleaning the donut system, check all rubber gaskets for wear and replace when necessary. -
Page 30: Troubleshooting
Troubleshooting Call Belshaw Bros. at (206)322-5474, or (800) 578-2547. One of our customer support Following is a troubleshooting chart to help you representatives will be happy to help you. When identify and solve some basic problems. you call, please specify the following: •... - Page 31 CONVEYOR WILL NOT MOVE Possible Causes What To Do Oven not to correct temperature yet. Wait until the oven comes to temp.and the ready light comes on. Conveyor is jammed. Check for obstruction in conveyor and remove. Motor circuit breaker is tripped. Push the black circuit breaker reset at bottom of oven control panel.
- Page 32 THE PUMP MOTOR WILL NOT RUN Possible Causes What To Do The connection of the power cord to the power Make sure the power cord is fully plugged in to a source is faulty. proper power source. The circuit breaker has been tripped. 1.
- Page 33 Calibration Procedure for Temperature and Cook Time on the Thermoglaze Model TG50 Turn off power to the TG50 before removing any adjustment potentiometers. The following is a access covers. This procedure should be photo of the location of the adjustment performed only by qualified service technicians.
- Page 34 Speed control/cook time Note: The back side of the oven has a fan motor extended from it. Adjust the adjustment: temperature by rotating the potentiometer Turn on the oven and allow it to heat for 30 located to the right of the speed control, minutes.
-
Page 35: Appendix
Appendix Service Bulletin SB-0361 WARNING: Special Cleaning Instructions Parts List Drawing Insert Page. Belshaw Bros., Inc. • www.belshaw.com • Phone 206-322-5474 • Fax 206-322-5425 Thermoglaze MN-1720WM... - Page 36 SERVICE BULLETIN SB-0361 This is a maintenance advisory for all owners of Thermoglaze TG-25 and TG-50 machines. Belshaw has recently been informed of conveyor chain binding and/or failures on these machines. We have addressed the problem by inspecting machines during assembly, and by testing and inspecting chains returned to us from the field.
- Page 37 Daily TG Cleaning Instructions Disassembly 1. Allow the Thermoglaze to completely cool. (All material must under 130º) 2. Pump the unused glaze back into a bucket. 3. Disconnect the TG from power! 4. Remove the REAR panel by unscrewing the thumb screws 5.
- Page 38 8. Disconnect the conveyor drive coupling. 9. Remove the conveyor assembly through the outfeed end of the oven. 10. Remove the oven crumb tray. Belshaw Bros., Inc. • www.belshaw.com • Phone 206-322-5474 • Fax 206-322-5425 MN-1720WM Thermoglaze...
- Page 39 11. Remove the safety cover. WARNING Failure to wash the conveyor chain daily may cause damage to the conveyor drive motor. The Thermoglaze will shut down if the chain becomes stiff from glaze buildup. After cleaning, the motor reset button may need to be pressed, located under the control panel. NOTE – THE SERVICE CALL TO FIX THIS PROBLEM WILL NOT BE COVERED UNDER WARRANTY.
Need help?
Do you have a question about the TG 50 and is the answer not in the manual?
Questions and answers